- Как скачать проигрыватель Windows Media
- Windows Media Player для Windows
- Основные возможности программы
- Get Windows Media Player
- Using Windows Media Player Playlist Files in Web Playlists
- Prerequisites
- Saving WPL Playlist Files as ASX Playlist Files in Windows Media Player
- Importing ASX Playlist Files to the Web Playlists Feature
- Enabling your Imported Web Playlist
- Serve the media files from user folders
- Serve the media files from the Web site
- Setting Playback Options
Как скачать проигрыватель Windows Media
Проигрыватель Windows Media доступен для устройств под управлением Windows. Воспользуйтесь этой таблицей, чтобы найти подходящую для вашей системы версию проигрывателя. (Если вы используете компьютер Mac, можно скачать компоненты Windows Media для QuickTime, чтобы воспроизвести файлы Windows Media.)
Операционная система или браузер
Проигрыватель Windows Media 12
Подробнее
Входит в состав Windows 10 (чистая установка и обновление с Windows 8.1 или Windows 7). В некоторых выпусках Windows 10 он входит в качестве дополнительной функции, которую можно включить. Для этого нажмите кнопку Пуск , а затем выберите Параметры > Приложения > Приложения и компоненты > Управление дополнительными компонентами > Добавить компонент > Проигрыватель Windows Media и выберите Установить.
Воспроизведение DVD не поддерживается. Перейдите на страницу Параметры воспроизведения DVD для Windows, чтобы узнать, как добавить функцию воспроизведения DVD в Windows 10.
Проигрыватель Windows Media 12
Подробнее
Входит в состав Windows 8.1 и Windows 8.1 Профессиональная, но воспроизведение DVD-дисков не поддерживается. Перейдите на страницу Параметры воспроизведения DVD для Windows, чтобы узнать, как добавить функцию воспроизведения DVD в Windows 8.1. Для проигрывателя Windows Media 12 для Windows 8,1 N и KN выпусков пакета дополнительных компонентов мультимедиа.
Проигрыватель Windows Media недоступен для Windows RT 8.1.
Проигрыватель Windows Media 12
Подробнее
Входит в состав выпусков Windows 7 Начальная, Домашняя расширенная, Профессиональная, Максимальная и Корпоративная. Для выпусков Windows 7 N и KN Загрузите пакет компонентов мультимедиа.
Компоненты Windows Media для QuickTime
Для переустановки проигрывателя Windows Media выполните следующие действия.
Нажмите кнопку «Пуск» , введите компоненты и выберите Включение или отключение компонентов Windows.
Прокрутите список вниз и разверните Компоненты для работы с мультимедиа, снимите флажок Проигрыватель Windows Media и нажмите кнопку ОК.
Перезапустите устройство. Проигрыватель Windows Media будет удален.
Повторите шаг 1.
Прокрутите список вниз и разверните Компоненты для работы с мультимедиа, установите флажок Проигрыватель Windows Media и нажмите кнопку ОК.
Перезапустите устройство. Проигрыватель Windows Media будет переустановлен.
Примечание: Сведения об устранении проблем с воспроизведением и кодеками см. в разделе «Техническая поддержка» в проигрывателе Windows Media.
Windows Media Player для Windows
 |
| | |
| Версия | Платформа | Язык | Размер | Формат | Загрузка | |
|---|---|---|---|---|---|---|
 Windows Media Player 11 Windows Media Player 11 | Windows | Русский | 25,7MB | .exe | ||
| * скачайте бесплатно Windows Media Player для Windows, файл проверен! | ||||||
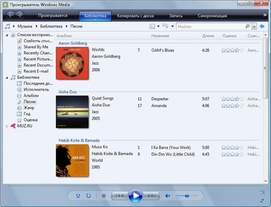
Windows Media Player (Виндовс медиаплеер) – проигрыватель видео и аудио файлов, входящий в состав операционных систем семейства Windows. На сегодняшний день бесплатно распространяется компанией Microsoft. Поддерживает подключение дополнительных плагинов, таких, как:
- AC3filter – обеспечивает поддержку многоканального звука, а также выходы S/PDIF. Кроме того, декодирует в режиме реального времени аудиоформат AC3/DTS;
- Xiph.org – предназначен для работы с форматами FLAC, а также Ogg Vorbis, Speex, Theora;
- WMP Tag Pius – плагин, с помощью которого подключаются библиотеки для интеграции в проигрыватель дополнительных форматов: FLAC, Ogg Vorbis, Monkey’s Audio, MPEG-4, Musepack.
Впервые программа появилась в Windows 98 Second Edition. При первой установке медиапроигрыватель проверяет подлинность лицензионной копии операционной системы Windows.
Основные возможности программы
Кроме воспроизведения медиафайлов, программа умеет приобретать в сети платный контент, производить синхронизацию с другими устройствами, например, MP3-плеером, а также проигрывать аудио и видео из iTunes. Помимо этого, Windows Media Player умеет:
- Воспроизводить мультимедийные файлы локально или в потоковом режиме в большинстве популярных форматов;
- Проигрывать DVD, CD или VCD диски;
- Работать с титрами и текстами песен (опционально);
- Просматривать в сети ТВ-каналы и прослушивать FM-радио;
- Импортировать, экспортировать и создавать плейлисты форматов: .asx, .wax, .m3u, .wmx, Search-MS, .wpl, а также изменять их параметры;
- Выводить подробную информацию о воспроизводимом файле – формат, путь размещения, жанр, альбом, исполнитель или композитор. Может отыскать более детальную информацию, воспользовавшись выходом в интернет;
- Записывать с заданной скоростью DVD и CD диски, а также копировать содержимое с музыкальных компакт-дисков в форматах MP3 или WMA\WAV с выбором качества звучания от 48 до 192 кб. Есть возможность установить защиту от копирования;
- Воспроизводить медиаконтент с локального компьютера на удаленный ПК или мобильное устройство;
- 10-полосный графический эквалайзер с поддержкой предустановленных пресетов, к примеру, «Рок» или «Классика».
Последняя на сегодняшний день версия имеет индекс 12 и была выпущена в 2017 году.
Get Windows Media Player
Windows Media Player is available for Windows-based devices. Use this table to find the right version of the Player for your system. (If you’ve got a Mac, you can download Windows Media Components for QuickTime to play Windows Media files.)
Windows Media Player 12
Learn more
Included in clean installs of Windows 10 as well as upgrades to Windows 10 from Windows 8.1 or Windows 7. In some editions of Windows 10, it’s included as an optional feature that you can enable. To do that, select the Start button, then select Settings > Apps > Apps & features > Manage optional features > Add a feature > Windows Media Player, and select Install.
DVD playback isn’t included. Go to the DVD playback for Windows page to find out how to add DVD playback to Windows 10.
Windows Media Player 12
Learn more
Included in Windows 8.1 and Windows 8.1 Pro, but doesn’t include DVD playback. Go to the DVD playback for Windows page to find out how to add DVD playback to Windows 8.1. For Windows Media Player 12 for Windows 8.1 N and KN editions, get the Media Feature Pack.
Windows Media Player isn’t available for Windows RT 8.1.
Windows Media Player 12
Learn more
Included in Windows 7 Starter, Home Premium, Professional, Ultimate, and Enterprise editions. For Windows 7 N or KN editions, get the Media Feature Pack.
Windows Media Components for QuickTime
If you want to reinstall Windows Media Player, try the following:
Click the Start button, type features, and select Turn Windows features on or off.
Scroll down and expand Media Features, clear the Windows Media Player check box, and click OK.
Restart your device. Windows Media Player should be uninstalled.
Scroll down and expand Media Features, select the Windows Media Player check box, and click OK.
Restart your device. Windows Media player should now be reinstalled.
Note: To troubleshoot issues like playback and codec problems, see the «Get help» section in Windows Media Player.
Using Windows Media Player Playlist Files in Web Playlists
By default, Windows Media Player 11 in Windows Server 2008 creates playlists in WPL format (files with .wpl file name extensions). This article describes how to create copies of the playlist files in ASX format (files with .asx file name extensions) so that you can import them into the Web Playlists extension for Internet Information Services (IIS). When you import the ASX files in Web Playlists, the equivalent Web playlist files (files with .isx file name extension) are created, which you must then edit to enable them in the Web Playlists feature. This article describes how to edit ISX files in two different ways, depending upon whether you want to serve the media files referenced in the playlist media entries either from the original user folder or from a Web site directory.
This article contains the following sections:
Prerequisites
To install the Web Playlists extension for IIS 7.0 and above, see the Installation Notes section in the IIS Media Services Readme.
This article assumes that you have created playlists in Windows Media Player on the local server computer using default Player settings. For more information about installing Windows Media Player 11 and creating Windows Media Player playlists, see the Related Articles section.
Saving WPL Playlist Files as ASX Playlist Files in Windows Media Player
Windows Media Player creates its playlists in WPL format by default. This section shows how to create an ASX-formatted version of a Windows Media Player playlist (.wpl) file to import into the Web Playlists feature.
To create ASX-formatted playlist files
In the Windows Media Player Library, in the Contents pane, select the playlist that you want to add to the Web Playlists feature. Then, in the Details pane, click Edit in List Pane. 
This will add the playlist to the List pane in Windows Media Player. In the following example, we show in the List pane a simple playlist (named playlist1) that contains two tracks (named track1 and track2). 
Click the down arrow next to the playlist name, and then click Save Playlist As. 
This action will open the Save As dialog box with default values. 
In the Save As dialog box, in Save as type, select Any Playlist (*.wpl, *.asx, *.m3u). 
In the Save As dialog box, in File name, change the file name extension from wpl to asx. 
In the Save As dialog box, click Save. 
Importing ASX Playlist Files to the Web Playlists Feature
This section shows how to import the ASX-formatted Windows Media Player playlist file that you created in the previous section.
To import ASX-formatted playlist files
In IIS Manager, select the Web site or virtual directory from which you want to serve your Windows Media Player playlist files (.wpl files), and then in the Contents pane, click the Web Playlists icon. 
In the Actions pane, click Open Feature. 
This action displays the Web Playlists feature page. If you have not previously created Web playlists for the site or virtual directory, the page will be empty as shown below. 
In the Actions pane, click Import ASX Playlist. 
In the Open dialog box, navigate to the location where the playlist file in ASX format is stored, select it, and then click Open. 
The Windows Media Player playlist file (playlist1.asx) in imported to the Web Playlists feature as a Web playlist file (playlist1.isx), as shown below: 
Enabling your Imported Web Playlist
After you import your ASX-formatted Windows Media Player playlist file, there are a couple of approaches to take regarding how you want to serve the media that is referenced in it. You can either leave the media files where they reside in your user folder, or you can copy them to a folder in your Web site root directory or virtual directory. Your choice really depends on whether you want to maintain multiple copies of your media files.
If you choose the first option (leave the media files where they are), then you must do the following:
- In the Web Playlists feature, set impersonation settings so that it can access the files in the user folder.
- In the Web Playists feature, enable Absolute/UNC paths.
- In the ISX file, change relative URIs for the media entries to physical paths.
- In the ISX file, change the srcType from relative URI to physical path.
- In the ISX file, remove the param container with invalid extraparam attributes.
If you choose the second option (copy the media files to your Web site or virtual directory), then you must do the following:
- Copy your media files to a folder in the Web root directory or to the virtual directory.
- In the ISX file, update the relative URIs for the media entries.
- In the ISX file, remove the param container with invalid extraparam attributes.
The following sections provide details on both approaches:
Serve the media files from user folders
In the Web Playlists feature, set impersonation settings so that it can access the files in the user folder. For detailed instructions, see Web Playlists for IIS — Serving Media Content from User Folders.
In the Web Playlists feature, enable Absolute/UNC paths.
a. In the Actions pane, click Edit Feature Settings. 
b. In the Edit Feature Settings dialog box, select Allow absolute/UNC paths. 
In a text editor, such as Notepad, change the relative URI for each media entry in the ISX to a physical path. For example:
You can use the Replace feature in Notepad to make this change to all media entries at once.
In the text editor, change the srcType for each media entry in the ISX to a physical path. For example:
You can use the Replace feature in Notepad to make this change to all media entries at once.
When you import the Windows Media Player ASX playlist file, the Web Playlists feature groups the unsupported playlist attributes as extraParam values in a param container in the ISX playlist file. You must remove (or comment-out) the param container with invalid extraParam attributes for each media entry in the ISX.
In the following example, we comment-out the param (beginning and ending comment marks shown in red). Also, for brevity, we show only the first and last extraParam values (for the track length and number) in the example:
Because extraParam values vary for each track, do the following when using the Replace feature in Notepad:
This will comment-out the param container with the extraParam attributes, as shown in the above example.
Serve the media files from the Web site
Copy the media files referenced in the Windows Media Player playlist (.wpl) file to a folder in the Web site directory or to a virtual directory. For example, if you imported the .asx version of the playlist to the Default Web site, copy the files to: \inetpub\wwwroot\media.
In a text editor, such as Notepad, update the relative URI for each media entry in the ISX. For example:
You can use the Replace feature in Notepad to make this change to all media entries at once.
When you import the Windows Media Player ASX playlist file, the Web Playlists feature groups the unsupported playlist attributes as extraParam values in a param container in the ISX playlist file. You must remove (or comment-out) the param container with invalid extraParam attributes for each media entry in the ISX.
In the following example, we comment-out the param (beginning and ending comment marks shown in red). Also, for brevity, we show only the first and last extraParam values (for the track length and number) in the example:
Because extraParam values vary for each track, do the following when using the Replace feature in Notepad:
This will comment-out the param container with the extraParam attributes, as shown in the above example.
Setting Playback Options
After updating the ISX, clients will be able to play the media items referenced in it. By default, clients will have full control of the playback experience, such as the ability to skip (both forward and backward) to different entries in the playlist and to seek within a currently playing track. You can limit a client’s ability to seek or skip playlist media entries by configuring media entry settings in the Web Playlists feature. For more information, see IIS Media Services Help.
To access this help, press F1 while using the Web Playlists feature in IIS Manager.


