- Как скачать проигрыватель Windows Media
- Get Windows Media Player
- VLC HowTo/Make VLC the default player
- Contents
- Windows
- Vista, 7, 8
- Linux
- Fedora
- GNOME
- How to set or change the default Media Player in Windows 10
- Default Media Player in Windows 10
- How to make VLC the default media player in Windows 10
- Make VLC the default media player in Windows 10
- 1] Using Windows Settings
- 2] Setting as default player while opening a media file
- 3] What if VLC is not listed as a media player
Как скачать проигрыватель Windows Media
Проигрыватель Windows Media доступен для устройств под управлением Windows. Воспользуйтесь этой таблицей, чтобы найти подходящую для вашей системы версию проигрывателя. (Если вы используете компьютер Mac, можно скачать компоненты Windows Media для QuickTime, чтобы воспроизвести файлы Windows Media.)
Операционная система или браузер
Проигрыватель Windows Media 12
Подробнее
Входит в состав Windows 10 (чистая установка и обновление с Windows 8.1 или Windows 7). В некоторых выпусках Windows 10 он входит в качестве дополнительной функции, которую можно включить. Для этого нажмите кнопку Пуск , а затем выберите Параметры > Приложения > Приложения и компоненты > Управление дополнительными компонентами > Добавить компонент > Проигрыватель Windows Media и выберите Установить.
Воспроизведение DVD не поддерживается. Перейдите на страницу Параметры воспроизведения DVD для Windows, чтобы узнать, как добавить функцию воспроизведения DVD в Windows 10.
Проигрыватель Windows Media 12
Подробнее
Входит в состав Windows 8.1 и Windows 8.1 Профессиональная, но воспроизведение DVD-дисков не поддерживается. Перейдите на страницу Параметры воспроизведения DVD для Windows, чтобы узнать, как добавить функцию воспроизведения DVD в Windows 8.1. Для проигрывателя Windows Media 12 для Windows 8,1 N и KN выпусков пакета дополнительных компонентов мультимедиа.
Проигрыватель Windows Media недоступен для Windows RT 8.1.
Проигрыватель Windows Media 12
Подробнее
Входит в состав выпусков Windows 7 Начальная, Домашняя расширенная, Профессиональная, Максимальная и Корпоративная. Для выпусков Windows 7 N и KN Загрузите пакет компонентов мультимедиа.
Компоненты Windows Media для QuickTime
Для переустановки проигрывателя Windows Media выполните следующие действия.
Нажмите кнопку «Пуск» , введите компоненты и выберите Включение или отключение компонентов Windows.
Прокрутите список вниз и разверните Компоненты для работы с мультимедиа, снимите флажок Проигрыватель Windows Media и нажмите кнопку ОК.
Перезапустите устройство. Проигрыватель Windows Media будет удален.
Повторите шаг 1.
Прокрутите список вниз и разверните Компоненты для работы с мультимедиа, установите флажок Проигрыватель Windows Media и нажмите кнопку ОК.
Перезапустите устройство. Проигрыватель Windows Media будет переустановлен.
Примечание: Сведения об устранении проблем с воспроизведением и кодеками см. в разделе «Техническая поддержка» в проигрывателе Windows Media.
Get Windows Media Player
Windows Media Player is available for Windows-based devices. Use this table to find the right version of the Player for your system. (If you’ve got a Mac, you can download Windows Media Components for QuickTime to play Windows Media files.)
Windows Media Player 12
Learn more
Included in clean installs of Windows 10 as well as upgrades to Windows 10 from Windows 8.1 or Windows 7. In some editions of Windows 10, it’s included as an optional feature that you can enable. To do that, select the Start button, then select Settings > Apps > Apps & features > Manage optional features > Add a feature > Windows Media Player, and select Install.
DVD playback isn’t included. Go to the DVD playback for Windows page to find out how to add DVD playback to Windows 10.
Windows Media Player 12
Learn more
Included in Windows 8.1 and Windows 8.1 Pro, but doesn’t include DVD playback. Go to the DVD playback for Windows page to find out how to add DVD playback to Windows 8.1. For Windows Media Player 12 for Windows 8.1 N and KN editions, get the Media Feature Pack.
Windows Media Player isn’t available for Windows RT 8.1.
Windows Media Player 12
Learn more
Included in Windows 7 Starter, Home Premium, Professional, Ultimate, and Enterprise editions. For Windows 7 N or KN editions, get the Media Feature Pack.
Windows Media Components for QuickTime
If you want to reinstall Windows Media Player, try the following:
Click the Start button, type features, and select Turn Windows features on or off.
Scroll down and expand Media Features, clear the Windows Media Player check box, and click OK.
Restart your device. Windows Media Player should be uninstalled.
Scroll down and expand Media Features, select the Windows Media Player check box, and click OK.
Restart your device. Windows Media player should now be reinstalled.
Note: To troubleshoot issues like playback and codec problems, see the «Get help» section in Windows Media Player.
VLC HowTo/Make VLC the default player
| This page describes how to make VLC the default media player. | Other «how to» pages |
Contents
Windows
The simplest way to set VLC as the default media player for Windows is during installation of VLC. During set-up, VLC will ask you if you want to associate certain media file types (such as .mp3, .flv, .wav) with VLC; for each «association» chosen opening that file type will launch it in VLC. By default, all are selected, though you might (or might not) want to un-check file types you’d like to open with another programme.
If you’ve missed this chance at making it the default media player during set-up, perhaps the easiest way is to un-install it and then install it again.
A word of caution regarding re-installation—be sure to un-check the box that deletes your preferences and cache, or all your customisations will be gone!
Vista, 7, 8
Open VLC player, click on Tools in the menu, and from there select Preferences.
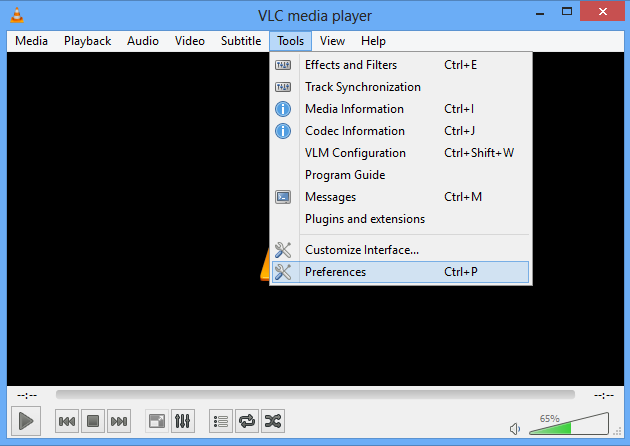
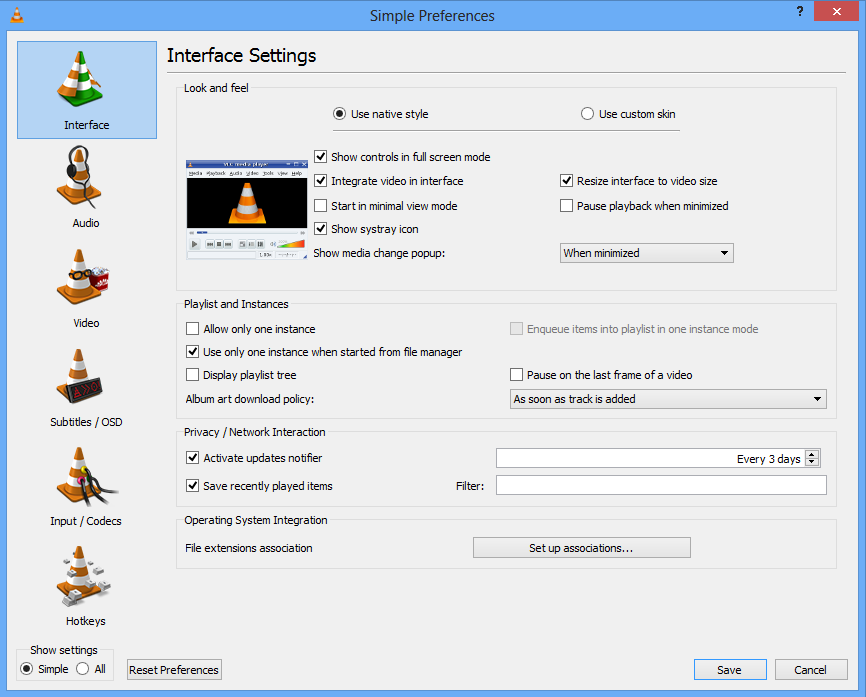
Click on the Interface button on the left panel and then click on Set up associations. (it’s close to the bottom).
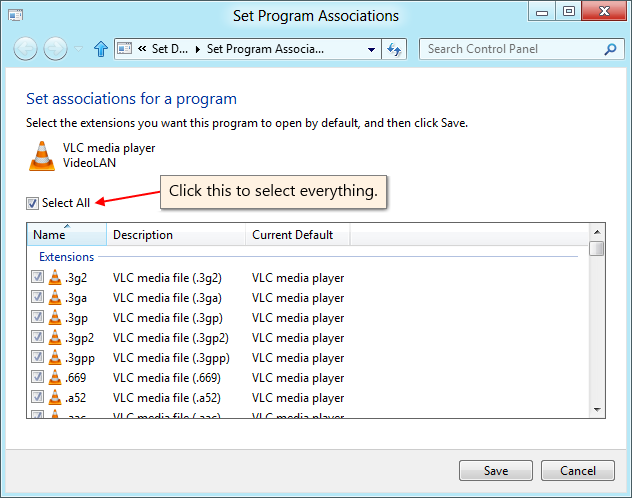
Select types of files from the list that appears. Check any file types for which you want VLC to be the default player, or just check the select all option.
Right-click on the type of file you want to always open with VLC. Click ‘Get Info’. In the ‘Open With’ section, select VLC from the drop-down menu. To apply this change to all files of this type, click the ‘Change All’ button.
For optical media, like CDs or DVDs, go to Apple -> System Preferences and choose «CDs/DVDs» in the Hardware section. Choose «Other Application» from the respective popup menu button. The list is alphabetical, so VLC should be near the bottom of the list.
Linux
Fedora
GNOME
Gnome uses two lists (located at /usr/share/applications/) – mimeinfo.cache and defaults.list – to register applications to file types.
You can either edit these manually or use the tools that GNOME has for this.
Instructions on how to do it in GNOME
Changing the default application for videos using menus (the easy way):
Using Nautilus 2.30.1, from the top menu bar choose «Places», then Home Folder -> Edit menu -> Preferences -> choose Media tab -> and in the drop-down list next to «DVD Video» choose «Open VLC media player».
Voilà.
Alternatively, try: System -> Preferences -> Personal -> Preferred Applications -> Multimedia -> Custom -> Type this: vlc %U
(P.S.: this alternative hasn’t been tested yet).
Changing the default application for videos using menus (the not-so-easy way):
|

- In the tab Open With just choose VLC as your player for that type of file.
Just remember that you will have to do this for each and every type of video/audio file (e.g., mpg, avi, rm, mkv, ogg, mp3, etc.)

- If the VLC icon doesn’t show up on the Open With tab, click on the add button in the lower corner to the right of the window
that has a plus sign, and locate VLC on the window that pops up that is called Add Application.

Changing the default application for videos manually (the hard way):
In Fedora 10 the path /usr/share/applications/ will take you to these 2 files that configure what application opens a type of file.
P.S.: Both files will point to a Desktop Entry file ([name of the file].desktop) that is inside the applications folder, and the 2 important things inside that file are the configurations for what MIME Types the application can handle, and how to launch the application.
A Desktop Entry file is a data file that provides information about an item in a menu. The desktop entry specification describes desktop entries as files describing information about an application such as the name, MIME Types it handles, icon, and description. These files are used for application launchers and for creating menus of applications that can be launched.
If you don’t have the VLC Desktop Entry file, or it disappears for some reason you will have to make one. Look here for some pointers.
You only need to modify mimeinfo.cache, I hope. It works for me. If it doesn’t work for you, please edit this!
So what you have to do is:
- Open mimeinfo.cache as root.
- Search for the MIME Types for video.
- Change all of them to use VLC.
For example:
Registry of MIME Type (video/quicktime) in mimeinfo.cache to use VLC.
The format is:
[MIME Type]=[Name of the Desktop Entry file]
Note: You can put more than one Desktop Entry, but they need to be separated by a semi-colon (;), see the example above.
Those extra entries will appear as options when you right-click on the video file and go to the Open With submenu.
Tip: Nautilus don’t show the real names of the Desktop Entry files. Either drag and drop it on gedit so you see the name on the tab, or use ls to list the files on the command line.
How to set or change the default Media Player in Windows 10
Like its earlier versions, Windows 10 chooses its default players to run your music and video clips. But, what if you do not like the default media player and instead, want a different program to open your music and video files? You can set your desired program as the default Media Player in Windows 10. Let us see how to do it.
Default Media Player in Windows 10
Windows has a set of programs that it will always use to open certain file types. For instance, when you attempt to play a supported file type, such as Windows Media Audio (.wma) or Windows Media Video (.wmv), the Windows Media Player opens up instantly and automatically begins playing the file. Most of the time this is fine, but you might want a different program to do the job, such as VLC Media Player. So here’s a way how to do it.
Recent versions of WMP include the ability to synchronize digital media with a portable media player, like Microsoft’s Zune or Creative’s Zen and purchase or rent content from online media stores so, you may keep it as your default player. However, other media players like VLC Media Player has many of the most popular codecs already built into the program, so you can watch practically any video file without having to download a codec pack.
Open the Settings app and then click on ‘System’. From the ‘System Settings’ section look for Default Apps option in the left side. Scroll down a bit if you do not find the option.
Here you can select the default app for Music files and Movies & TV. Click on Music Player and you will see a list of apps displayed, that can open these files. Select the one you want and click on it.
Follow the same procedure for Video Player.
After you have done this, you will have successfully set the player of your choice as default media player in Windows 10.
If you wish to reset to the Microsoft recommended defaults, you can click on the Reset button towards the end.
Incidentally, Windows Media Center will not be included in Windows 10, you might be looking for some good alternatives. Take a look at this post Windows Media Center alternatives for Windows 10 – it might interest you.
How to make VLC the default media player in Windows 10
VLC is one of the most popular audio-video players for Windows. However, when you install VLC, it does not become the default media player for the computer i.e., when you double click on a media file, Windows plays it in the Windows Media Player. So if you want to make VLC as the default media player in Windows 10, you will have to do it manually. Follow these simple methods to achieve this.
Make VLC the default media player in Windows 10
After installing VLC, the setup wizard usually asks if you want to use it as the default player. If you chose yes, then it should be working. However, if another software prompts to be the default player, then it will replace the VLC.
- Using Windows Settings
- Setting as default player while opening a media file
- What if VLC is not listed as a media player
Make sure to be careful about other players prompting to be the default player. It is similar to how browsers behave. You may have to turn off settings that make media players ask to be the default player.
1] Using Windows Settings
- Open Windows Settings (Win + I)
- Navigate to Apps >Default Apps
- Scroll to find Video Player and Music Player section
- Click on the player name under it and select VLC
Once done, you should see the VLC icon for all your media players.
2] Setting as default player while opening a media file
It is an alternate way of doing what we did above. Select any file, and right-click on it. Look for an option Open with, click on it to further expand. It will list all possible video or audio player. Select VLC, and video files will instantly change icons to VLC.
In case you are not able to find the “Open with” option in the context menu, then follow this guide to add it. It is a registry method, and you will need admin permission to complete it.
3] What if VLC is not listed as a media player
In case VLC is not on the list, you will have to manually select VLC by browsing on the computer by selecting the “Choose another app” option from the menu. This option is available only in the context menu, and not in the Windows settings.
Scroll to find the link “More Apps” and click on it. It will reveal more apps, and at the end of the list, you will get another link which says, “Look for another app on this PC.” Click on it.
It will open the browser button, and you can then go to the Programs Folder and find the VLC.EXE file. Select and click on the Ok button. The programs folder is the location where all programs are installed. It is usually installed at this location-
Once done, double click on the media file, and it will launch in VLC. If the path is different for your computer, you can follow this method to find the VLC program location.
- Click on the Start button, and type VLC to reveal the VLC player on the list.
- Right-click on it, and select open file location
- It will open a folder which will have a set of shortcuts for VLC but not the exact file location.
- In the folder, right-click on the VLC Media Player shortcut and select properties.
- Note the path in the text box next to Target text.
Use this exact path when you need to locate the VLC player path manually.
I hope the post was easy to follow, and you were able to set VLC as the default media player for music and video files.
Date: September 8, 2020 Tags: Media Players


