- Проверка оперативной памяти
- Средство проверки памяти Windows
- 4 Best Free Memory Test Programs
- A list of the best free computer memory (RAM) tester tools
- MemTest86
- Windows Memory Diagnostic
- Memtest86+
- 3 Ways to Test your RAM with Microsoft Windows Memory Diagnostic
- Тест для проверки оперативной памяти на ошибки в Windows 10, 8 или 7
- Суть проблемы
- Как диагностировать проблемы с памятью в Windows 10
- Проверка результатов тестирования
Проверка оперативной памяти

Для проверки оперативной памяти (она же RAM или ОЗУ) существуют различные программы, которые могут работать как из под операционной системы, так и без неё. Необходимость проверки памяти может возникнуть по различным причинам — внезапный отказ работы компьютера во время его загрузки, внезапные перезагрузки или появление «синего окна смерти», проверка стабильности разгона, либо еще какие-либо причины.
Средство проверки памяти Windows
Начиная с Windows 7, в комплекте с операционными системами этого семейства, в комплекте идет собственное средство для проверки оперативной памяти. Запустить его достаточно легко — достаточно в меню Пуск набрать словосочетание «Средство проверки», и найти среди отображенных вариантов «Средство проверки памяти Windows». Так же запустить данное средство можно выполнив команду mdsched в окне «Выполнить» или Командной строке.

По запуску данная программа спросить о том, когда вы хотите выполнить проверку — прямо сейчас, перезагрузив компьютер, или выполнив позже, при следующей загрузке Windows. Разница собственно в том, что при выборе первого пункта компьютер будет перезагружен сейчас же, а если выбрать второй пункт, то перезагрузить компьютер уже надо будет самому.

После перезагрузки начнется сам процесс проверки памяти, время прохождение которого будет прямо пропорционально количеству проверяемой памяти — чем больше, тем дольше.

После завершения теста компьютер будет повторно перезагружен, после чего в системном трее Windows будет показан результат проверки. Например, в случае отсутствия ошибок, выглядеть это будет так:
4 Best Free Memory Test Programs
A list of the best free computer memory (RAM) tester tools
:max_bytes(150000):strip_icc()/tim-fisher-5820c8345f9b581c0b5a63cf.jpg)
:max_bytes(150000):strip_icc()/LisaMildon-5f835103b8724afba8dd2953c83cbde8.jpg)
Memory test software, often called RAM test software, are programs that perform detailed tests of your computer’s memory system.
The memory installed in your computer is very sensitive. It’s always a good idea to perform a memory test on newly purchased RAM to test for errors. Of course, a memory test is always in order if you suspect that you may have a problem with your existing RAM.
:max_bytes(150000):strip_icc()/free-memory-test-programs-2626178-b2f26fc2785a47879cd5259296236a13.png)
For example, if your computer doesn’t boot at all, or if it randomly reboots, you may have some problems with the memory. It’s also a good idea to check the memory if programs are crashing, you hear beep codes during a reboot, you’re seeing error messages like «illegal operation,» or if you’re getting BSODs—some may read «fatal exception» or «memory_management.»
All of the freeware memory testing programs listed function from outside of Windows, meaning each will work no matter if you have Windows (10, 8, 7, Vista, XP, etc.), Linux, or any PC operating system. Also, remember that the term memory here means RAM, not the hard drive—see these hard drive testing tools to test your HDD.
If your memory tests fail, replace the memory immediately. The memory hardware in your computer is not repairable and must be replaced if it fails.
MemTest86
:max_bytes(150000):strip_icc()/memtest86-7-5-5a79b7d91f4e130037a68d4c.PNG)
Runs from a flash drive.
Supports up to 64 GB of RAM.
Used by professionals.
If you’re new to programs like this one, the advanced features can be confusing.
Doesn’t work from a disc.
Memtest86 is a completely free, stand-alone, and extremely easy to use memory test software program. If you only have time to try one memory test tool on this page, try MemTest86.
Simply download the program from MemTest86’s site and put it on a flash drive. After that, just boot from the USB drive and you’re off.
While this RAM test is free, PassMark also sells a Pro version, but unless you’re a hardware developer, the free download and free basic support available from us and on their website should be enough.
We highly recommend MemTest86! It’s our favorite tool for testing RAM, without a doubt.
MemTest86 doesn’t need an operating system to run a memory test. However, it does require an OS to copy the program to a USB device. This can be done using any version of Windows, as well as with Mac or Linux. v9 supports only UEFI boot; the v4 BIOS release (also through the link below) is available, too.
Windows Memory Diagnostic
:max_bytes(150000):strip_icc()/WMD_test-56a6f9a65f9b58b7d0e5caee.jpg)
Runs the memory test completely automatically.
100 percent free to use.
Originally provided by Microsoft.
Downloads quickly because of the small file size.
Hasn’t been updated in a very long time.
Tests only the first 4 GB of RAM.
Windows Memory Diagnostic is a free memory tester provided by Microsoft. Very similar to other RAM test programs, Windows Memory Diagnostic performs a series of extensive tests to determine what, if anything, is wrong with your computer memory.
Just download the installer program and then follow the instructions to create a bootable floppy disk or ISO image for burning to a disc or flash drive.
After booting from whatever it is you made, Windows Memory Diagnostic will automatically begin testing the memory and will repeat the tests until you stop them.
If the first set of tests finds no errors, chances are your RAM is good.
You do not need to have Windows (or any operating system) installed to use Windows Memory Diagnostic. You do, however, need access to one for burning the ISO image to the disc or USB device.
Memtest86+
:max_bytes(150000):strip_icc()/memtest86-4-58ab0b275f9b58a3c9817ba9.PNG)
A free memory test program.
Provides a confirmation to the original Memtest86 software.
Like these other memory test tools, this one is entirely text-based and so might be hard to get used to for some people.
Memtest86+ is a modified, and presumably more up-to-date, version of the original Memtest86 memory test program, profiled in the #1 position above. Memtest86+ is also completely free.
We’d recommend performing a memory test with Memtest86+ if you have any problems running the Memtest86 RAM test or if Memtest86 reports errors with your memory and you’d like a really good second opinion.
Memtest86+ is available in ISO format for burning to disc or USB.
It might seem a bit strange that we rank Memtest86+ as the #3 pick, but since it’s so incredibly similar to Memtest86, your best bet is to try Memtest86 followed by WMD, which operates differently, providing you with a more well-rounded set of memory tests.
Just like with Memtest86, you’ll need a working operating system like Windows, Mac, or Linux to create the bootable disc or flash drive, which can be done on a different computer than the one that needs testing.
3 Ways to Test your RAM with Microsoft Windows Memory Diagnostic
Unfortunately knowing when you have RAM memory inside your PC that has developed problems isn’t as straightforward as you might think. It can manifest itself in many different ways and problems with your computer which don’t seem in the remotest bit connected with RAM, could in fact turn out to be just that.
A computer that fires into life and then sits at a black screen and doesn’t do anything else is a common symptom of a bad module which needs taking out or replacing. A Windows install that keeps failing while unpacking files from the disc could also be due to a memory error. Even problems relating to disk read errors which sound the furthest thing from memory issues as you could imagine, can be caused by errors coming from the memory.
Testing your RAM for errors is something you can easily do because there are a few free tools around that can help you out, and all that’s needed is for you to run the program and let it check all your internal memory. Here’s a few different ways you can test your RAM for errors.

This Microsoft memory testing tool is a bit old coming from 2003 but because the method of testing memory is the same today as it was back then, it still works. While being quick and easy to use, the diagnostic includes a comprehensive set of memory tests and a number of advanced options for the more experienced users.
The tool downloads as an executable, and when you run it, you’re given the choice of creating a bootable floppy or an ISO image that you can then burn to a CD.

Simply boot from the created disc and the tests will begin automatically. This will take several minutes to complete and time depends on the amount and speed of the installed memory. Any errors that might appear mean there are potential problems reading the memory. Letting the tests complete 1 full cycle should be enough to determine if there are any problems.
Pressing “P” to pause the test and then “M” will show the advanced menu where you can change the tests performed, alter the cache settings, and also choose to show errors by memory module which will help identify the RAM module at fault if you have more than 1 installed.
There is one limitation to the Windows Memory Diagnostic utility which is it only scans the 1st 4GB of any installed memory and anything above that will be ignored.
2. Memtest86+

This open source memory diagnostic tool is a branch from the original Memtest86 and is probably the most used free memory testing program around today. There is support for most of the latest hardware and this tool is known to be one of the most accurate and robust at detecting memory errors.
Memtest86+ can be run on your machine three different ways; from a bootable floppy disc, a bootable ISO image which you can burn to a CD, or perhaps the most useful option for today’s PC’s is an executable installer that writes Memetest86+ directly on to a USB stick.

Like the Microsoft memory diagnostic tool, the time Memtest86+ takes to complete the test depends on your hardware specification and usually 1 full pass will be sufficient to detect any issues. Pressing “C” brings up the configuration menu from which you can select specific tests, memory range, and an ECC memory mode,
For those who don’t want to waste a whole CD or use a USB stick just for Memtest86+ because it’s only a few hundred KB in size, you’ll be pleased to know it’s included in the popular Hiren’s BootCD.
3. Windows Vista and 7 Built in Memory Diagnostic
This memory testing tool is not quite as comprehensive as something like Memtest86+, but is useful enough to get a fair idea if you have serious memory errors. It’s readily available in Windows Vista and 7 and users can invoke the tool in 1 of 3 different ways.
#1 If you’re already in Windows, go to Start or press the Win key and type mem into the search box. The Windows Memory Diagnostic Tool should show in the results, and you can then run it by pressing Enter. A window will pop up asking if you want to reboot now and run the tool or run the tool at the next reboot. Simply choose your preferred option and the next time windows boots it will run the diagnostic test.

#2 If you’re not in Windows, the next time you boot press F8 after the BIOS screen to get to the Advanced Boot Options (Safe Mode selection) screen. Press Escape and then the Tab key to select “Windows Memory Diagnostic”, then press Enter to start the test.
#3 The Memory Diagnostic is also present on the Windows DVD and the System Recovery media disc. It’s available from the System recovery Options window and is the same tool accessed from in Windows that asks to reboot now and test, or test at next reboot.

The diagnostic test is pretty quick and defaults to 2 passes, although F1 will take you to the options screen where you can run more basic or more advanced tests, or configure more test passes.
Тест для проверки оперативной памяти на ошибки в Windows 10, 8 или 7
При использовании компьютера вы можете столкнуться с ошибками в работе оперативной памяти. И в этом руководстве, мы рассмотрим, как использовать встроенную в Windows 10, 8 или 7 утилиту для тестирования памяти.

Суть проблемы
Если программы сбоят во время работы или работают очень медленно, или вы замечаете различные глюки в Windows, или система неожиданно перезагружается, зависает, выдает BSOD ошибку синего экрана, то очень сложно определить корень проблемы. Причина сбоев может скрываться как в программном обеспечении, так и в железе.
Оперативная память – это самое легкое что можно быстро проверить. В случае проблемы в работе одного из модулей памяти необходимо срочно провести замену, чтобы вернуть нормальную работоспособность компьютеру и избежать более серьезных проблем, связанных с повреждением системных или пользовательских файлов.
Не смотря на существование сторонних утилит доступных для загрузки в сети Интернет, операционные системы Windows 10, 8 или 7 имеет встроенную программу для проверки оперативной памяти ПК. В этом руководстве мы рассмотрим, как использовать утилиту диагностики памяти Windows, чтобы определить неисправность в планке памяти.
Как диагностировать проблемы с памятью в Windows 10
Для выполнения следующих инструкций необходимо перезагрузить компьютер, поэтому закройте все открытые файлы и завершите работу запущенных приложений. Дале выполните:
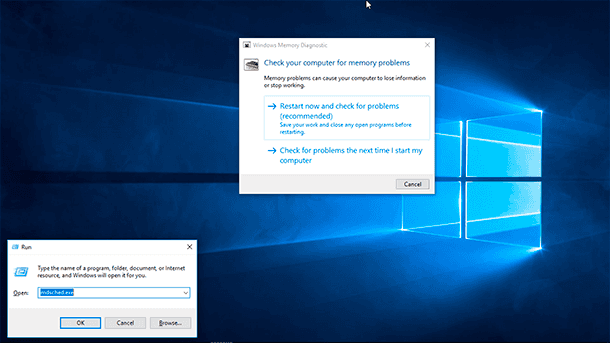
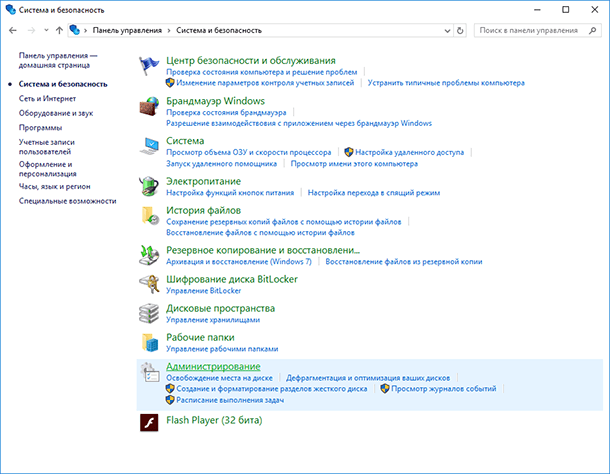
Откройте Панель управления.
Нажмите «Система и безопасность».
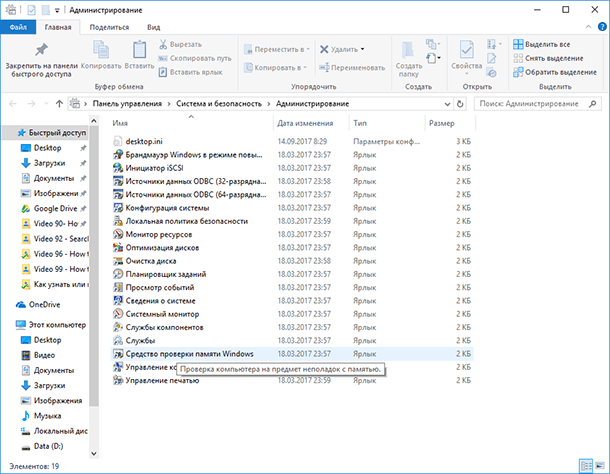
Дважды щелкните ярлык «Диагностика памяти Windows».
Важно: В качестве альтернативы вы можете использовать комбинацию клавиш Windows + R, затем ввести mdsched.exe и нажать «ОК», чтобы запустить инструмент.
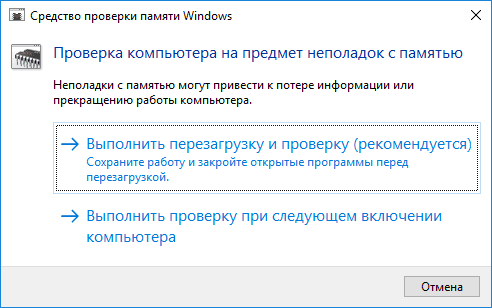
Нажмите кнопку «Выполнить перезагрузку и проверку» для продолжения. (Утилита также предлагает возможность запланировать тест при следующей перезагрузке, если вы не можете позволить себе закрыть свои приложения и перезапуститься в текущий момент.)
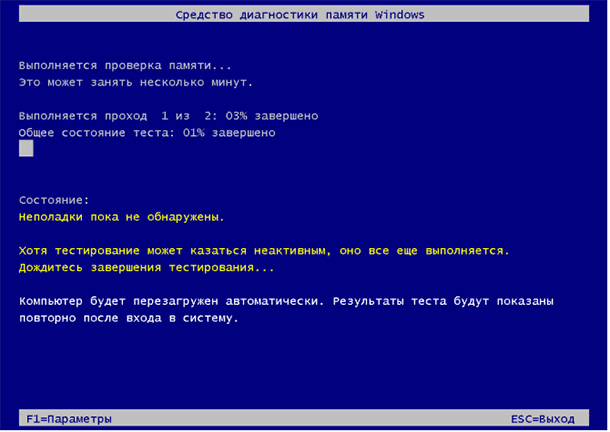
После перезагрузки компьютер автоматически запустится в среде диагностики Windows Memory Diagnostics, и начнется Cтандартное тестирование. Утилита будет запускать все проверки, доступные в Базовом режиме, а также LRAND, Stride6 (с кэшем), CHCKR3, WMATS + и WINVC.
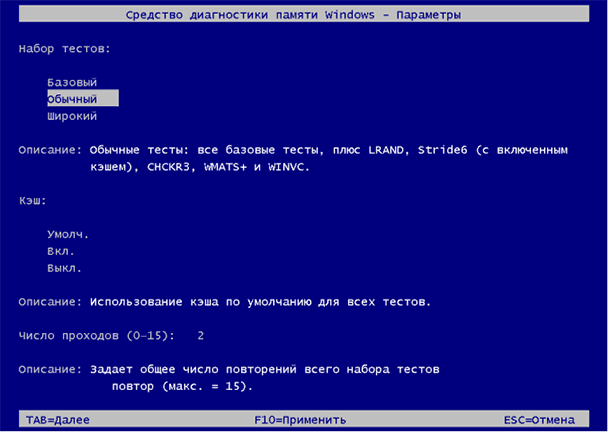
Вы можете дождаться окончания Обычной проверки, или изменить параметры сканирования используя клавишу F1.
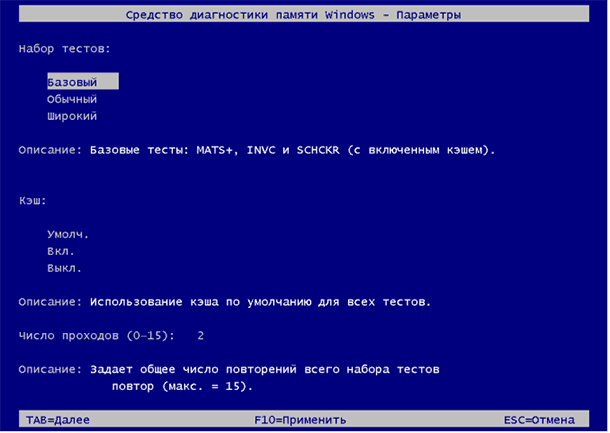
На странице Параметров сканирования можно изменить режим сканирования на Базовый, который запускает тесты MATS +, INVC и SCHCKR (с кэшем).
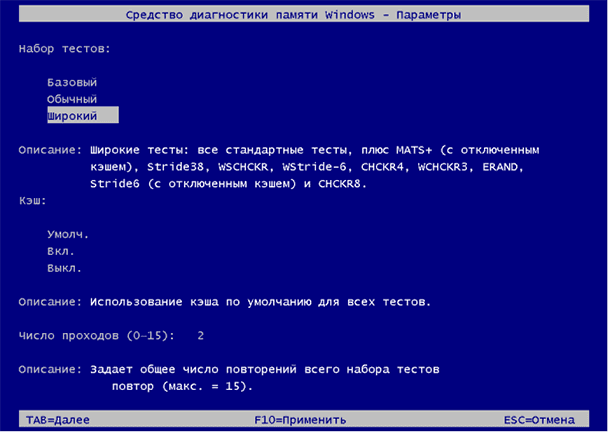
Вы также можете выбрать Расширенный режим, который включает в себя все тесты доступные в Обычном режиме плюс MATS+ (без кеша), Stride38, WSCHCKR, WStride-6, CHCKR4, WCHCKR3, ERAND, Stride6 (без кеша), и CHCKR8.
При необходимости вы можете перемещаться по различным параметрам с помощью клавиши TAB для изменения настроек кеша. Если вы отключите кеш, это позволит инструменту напрямую обращаться к данным в ОЗУ, что обеспечивает полный тест. Кроме того, вы также можете установить количество повторений сканирования, чтобы протестировать модули памяти вашей системы.
Для применения настроек нажмите F10, чтобы вернуться на главную страницу и начала нового сканирования.
Проверка результатов тестирования
Вы видите статус во время процесса сканирования, но как только тест завершиться компьютер автоматически перезагрузится. Вам нужно будет использовать средство просмотра событий, что бы увидеть результаты тестирования и узнать если у вас сбойный RAM модуль.
Введите eventvwr.exe и нажмите Enter, чтобы открыть Просмотр событий.
Перейдите в папку Журналы Windows – Система.
Щелкните правой кнопкой мыши на «Система» и выберите «Найти».
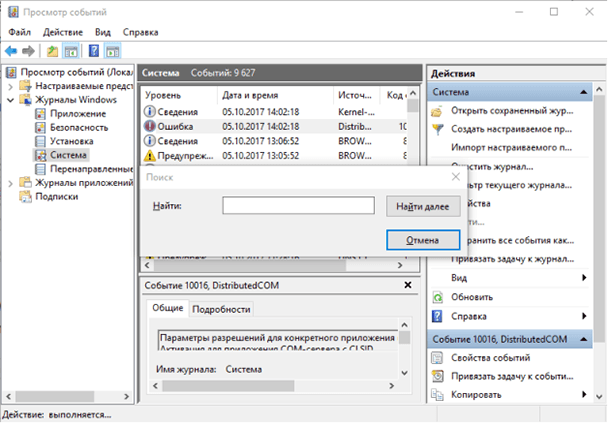
Введите MemoryDiagnostics-Results и нажмите кнопку «Найти далее».
Закройте окно «Поиск».
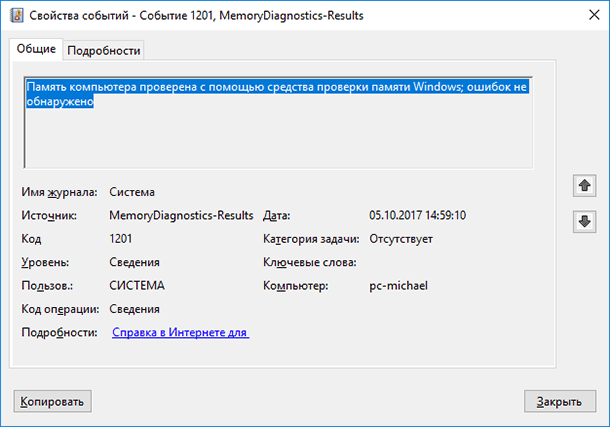
В средстве просмотра событий дважды щелкните источник MemoryDiagnostics-Results и просмотрите сообщение. Если в результате появится сообщение «Память компьютера проверена с помощью средства проверки памяти Windows; ошибок не обнаружено», вы можете отбросить память как корень проблемы.
Если результат показывает одну или несколько ошибок, вы можете попробовать запустить тест расширенной памяти и перепроверить результаты. Если вы по-прежнему видите хотя бы одну ошибку, один из модулей ОЗУ, вероятно, имеет проблемы, и, возможно, его нужно будет заменить.
Иногда, когда тест выходит из строя, инструмент может указать, какой из модулей имеет проблему с результатами. Однако, если он не может предоставить эту информацию, вам может потребоваться удалить и протестировать каждый модуль памяти до тех пор, пока вы не узнаете тот, который неисправен.
Хотя мы ориентируемся на это руководство в Windows 10, средство диагностики памяти Windows доступно в течение многих лет, а это значит, что вы также можете использовать его в предыдущих версиях, включая Windows 8.1 и Windows 7.

Автор: Vladimir Mareev, Технический писатель
Владимир Мареев — автор и переводчик технических текстов в компании Hetman Software. Имеет тринадцатилетний опыт в области разработки программного обеспечения для восстановления данных, который помогает ему создавать понятные статьи для блога компании. Спектр публикаций довольно широк и не ограничивается только лишь темой программирования. Статьи включают также разнообразные обзоры новинок рынка компьютерных устройств, популярных операционных систем, руководства по использованию распространенных и специфических программ, примеры решений возникающих системных или аппаратных проблем и многие другие виды публикаций. Подробнее


