- Certmgr.msc или диспетчер сертификатов в Windows 10/8/7
- Управление сертификатами с помощью диспетчера сертификатов или Certmgr.msc
- Пошаговое руководство. Просмотр сертификатов с помощью оснастки MMC How to: View certificates with the MMC snap-in
- Просмотр сертификатов в оснастке MMC View certificates in the MMC snap-in
- Просмотр сертификатов с помощью средства диспетчера сертификатов View certificates with the Certificate Manager tool
- Просмотр сертификатов для локального устройства To view certificates for the local device
- Просмотр сертификатов для текущего пользователя To view certificates for the current user
- Certmgr.exe (Certificate Manager Tool)
- Syntax
- Parameters
- Remarks
- Examples
Certmgr.msc или диспетчер сертификатов в Windows 10/8/7
Диспетчер сертификатов или Certmgr.msc в Windows позволяет просматривать сведения о ваших сертификатах, экспортировать, импортировать, изменять, удалять или запрашивать новые сертификаты. Корневые сертификаты – это цифровые документы, используемые для управления сетевой аутентификацией и обменом информацией.
Управление сертификатами с помощью диспетчера сертификатов или Certmgr.msc

Консоль диспетчера сертификатов является частью консоли управления Microsoft в Windows 10/8/7. MMC содержит различные инструменты, которые можно использовать для функций управления и обслуживания. Как упоминалось ранее, используя certmgr.msc, вы можете просматривать свои сертификаты, а также изменять, импортировать, экспортировать, удалять или запрашивать новые.
Для управления сертификатами в меню WinX в Windows выберите «Выполнить». Введите certmgr.msc в поле «Выполнить» и нажмите Enter. Помните, что вам нужно будет войти в систему как администратор. Диспетчер сертификатов откроется.
Вы увидите, что все сертификаты хранятся в разных папках в разделе Сертификаты – текущий пользователь . Когда вы откроете любую папку сертификатов, вы увидите, что сертификаты отображаются на правой панели. На правой панели вы увидите такие столбцы, как «Выдан», «Выдан», «Срок действия», «Назначение», «Понятное имя», «Статус» и «Шаблон сертификата». В столбце «Предполагаемые цели» указано, для чего используется каждый сертификат.
Используя диспетчер сертификатов, вы можете запросить новый сертификат с тем же ключом или другим ключом. Вы также можете экспортировать или импортировать сертификат. Чтобы выполнить какое-либо действие, выберите сертификат, щелкните меню «Действие»> «Все задачи», а затем щелкните нужную команду действия. Вы также можете щелкнуть правой кнопкой мыши контекстное меню, чтобы выполнить эти действия.
Если вы хотите экспортировать или импортировать сертификаты , откроется простой в использовании мастер, который выполнит необходимые действия.
Следует отметить, что Certmgr.msc является оснасткой консоли управления Microsoft, тогда как Certmgr.exe является утилитой командной строки. Если вы хотите узнать о параметрах командной строки в certmgr.exe, вы можете посетить MSDN.
Прочтите это, если получите. Проблема с сертификатом безопасности этого веб-сайта в сообщении IE.
Пошаговое руководство. Просмотр сертификатов с помощью оснастки MMC How to: View certificates with the MMC snap-in
При создании защищенного клиента или службы можно использовать сертификат в качестве учетных данных. When you create a secure client or service, you can use a certificate as the credential. Например, общий тип учетных данных — это сертификат X. 509, который создается с помощью X509CertificateInitiatorClientCredential.SetCertificate метода. For example, a common type of credential is the X.509 certificate, which you create with the X509CertificateInitiatorClientCredential.SetCertificate method.
Существует три разных типа хранилищ сертификатов, которые можно проверить с помощью консоли управления (MMC) в системах Windows: There are three different types of certificate stores that you can examine with the Microsoft Management Console (MMC) on Windows systems:
Локальный компьютер. хранилище является локальным для устройства и является глобальным для всех пользователей на устройстве. Local computer: The store is local to the device and global to all users on the device.
Текущий пользователь: хранилище является локальным по отношению к текущей учетной записи пользователя на устройстве. Current user: The store is local to the current user account on the device.
Учетная запись службы. хранилище является локальным для определенной службы на устройстве. Service account: The store is local to a particular service on the device.
Просмотр сертификатов в оснастке MMC View certificates in the MMC snap-in
В следующей процедуре показано, как проверить магазины на локальном устройстве, чтобы найти соответствующий сертификат: The following procedure demonstrates how to examine the stores on your local device to find an appropriate certificate:
В меню Пуск выберите пункт выполнить и введите MMC. Select Run from the Start menu, and then enter mmc.
Откроется консоль MMC. The MMC appears.
В меню файл выберите команду Добавить или удалить оснастку. From the File menu, select Add/Remove Snap In.
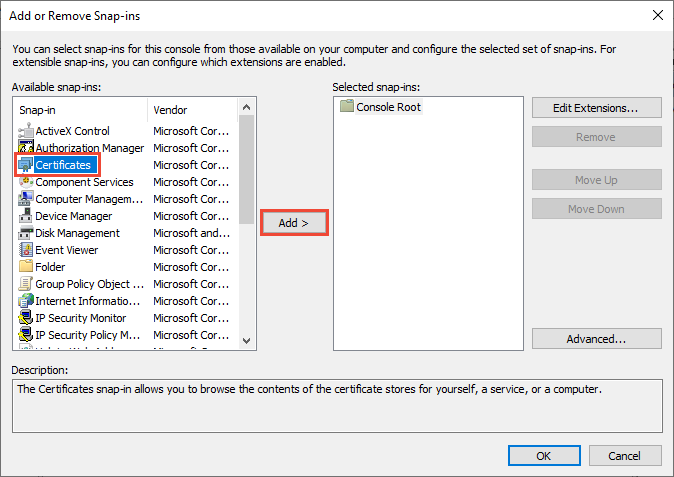
Откроется окно Добавление или удаление оснасток . The Add or Remove Snap-ins window appears.
В списке Доступные оснастки выберите Сертификаты, а затем щелкните добавить. From the Available snap-ins list, choose Certificates, then select Add.
В окне оснастки «сертификаты » выберите учетная запись компьютера, а затем нажмите кнопку Далее. In the Certificates snap-in window, select Computer account, and then select Next.
При необходимости можно выбрать учетную запись пользователя для текущего пользователя или учетной записи службы для конкретной службы. Optionally, you can select My user account for the current user or Service account for a particular service.
Если вы не являетесь администратором устройства, вы можете управлять сертификатами только для учетной записи пользователя. If you’re not an administrator for your device, you can manage certificates only for your user account.
В окне Выбор компьютера оставьте выбранным параметр локальный компьютер и нажмите кнопку Готово. In the Select Computer window, leave Local computer selected, and then select Finish.
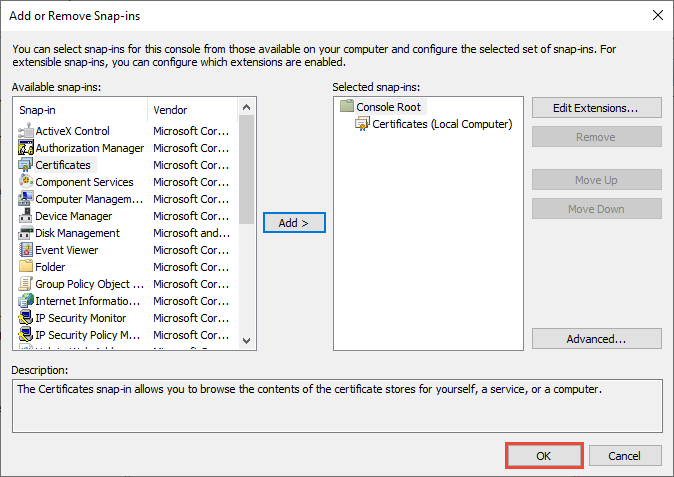
В окне Добавление или удаление оснастки нажмите кнопку ОК. In the Add or Remove Snap-in window, select OK.
Необязательно. в меню файл выберите сохранить или Сохранить как , чтобы сохранить файл консоли MMC для последующего использования. Optional: From the File menu, select Save or Save As to save the MMC console file for later use.
Чтобы просмотреть сертификаты в оснастке MMC, выберите корень консоли в левой области, а затем разверните узел Сертификаты (локальный компьютер). To view your certificates in the MMC snap-in, select Console Root in the left pane, then expand Certificates (Local Computer).
Появится список каталогов для каждого типа сертификатов. A list of directories for each type of certificate appears. Из каждого каталога сертификатов можно просматривать, экспортировать, импортировать и удалять свои сертификаты. From each certificate directory, you can view, export, import, and delete its certificates.
Просмотр сертификатов с помощью средства диспетчера сертификатов View certificates with the Certificate Manager tool
Вы также можете просматривать, экспортировать, импортировать и удалять сертификаты с помощью средства диспетчера сертификатов. You can also view, export, import, and delete certificates by using the Certificate Manager tool.
Просмотр сертификатов для локального устройства To view certificates for the local device
В меню Пуск выберите пункт выполнить , а затем введите certlm. msc. Select Run from the Start menu, and then enter certlm.msc.
Откроется средство диспетчера сертификатов для локального устройства. The Certificate Manager tool for the local device appears.
Для просмотра сертификатов в разделе Сертификаты — локальный компьютер в левой области разверните каталог для типа сертификата, который нужно просмотреть. To view your certificates, under Certificates — Local Computer in the left pane, expand the directory for the type of certificate you want to view.
Просмотр сертификатов для текущего пользователя To view certificates for the current user
В меню Пуск выберите пункт выполнить , а затем введите CertMgr. msc. Select Run from the Start menu, and then enter certmgr.msc.
Появится средство диспетчера сертификатов для текущего пользователя. The Certificate Manager tool for the current user appears.
Чтобы просмотреть сертификаты, в разделе Сертификаты — текущий пользователь в левой области разверните каталог для типа сертификата, который нужно просмотреть. To view your certificates, under Certificates — Current User in the left pane, expand the directory for the type of certificate you want to view.
Certmgr.exe (Certificate Manager Tool)
The Certificate Manager tool (Certmgr.exe) manages certificates, certificate trust lists (CTLs), and certificate revocation lists (CRLs).
The Certificate Manager is automatically installed with Visual Studio. To start the tool, use Visual Studio Developer Command Prompt or Visual Studio Developer PowerShell.
The Certificate Manager tool (Certmgr.exe) is a command-line utility, whereas Certificates (Certmgr.msc) is a Microsoft Management Console (MMC) snap-in. Because Certmgr.msc is usually found in the Windows System directory, entering certmgr at the command line may load the Certificates MMC snap-in even if you have opened the Developer Command Prompt for Visual Studio. This occurs because the path to the snap-in precedes the path to the Certificate Manager tool in the PATH environment variable. If you encounter this problem, you can execute Certmgr.exe commands by specifying the path to the executable.
For an overview of X.509 certificates, see Working with Certificates.
At the command prompt, type the following:
Syntax
Parameters
| Argument | Description |
|---|---|
| sourceStorename | The certificate store that contains the existing certificates, CTLs, or CRLs to add, delete, save, or display. This can be a store file or a systems store. |
| destinationStorename | The output certificate store or file. |
| Option | Description |
|---|---|
| /add | Adds certificates, CTLs, and CRLs to a certificate store. |
| /all | Adds all entries when used with /add. Deletes all entries when used with /del. Displays all entries when used without the /add or /del options. The /all option cannot be used with /put. |
| /c | Adds certificates when used with /add. Deletes certificates when used with /del. Saves certificates when used with /put. Displays certificates when used without the /add, /del, or /put option. |
| /CRL | Adds CRLs when used with /add. Deletes CRLs when used with /del. Saves CRLs when used with /put. Displays CRLs when used without the /add, /del, or /put option. |
| /CTL | Adds CTLs when used with /add. Deletes CTLs when used with /del. Saves CTLs when used with /put. Displays CTLs when used without the /add, /del, or /put option. |
| /del | Deletes certificates, CTLs, and CRLs from a certificate store. |
| /e encodingType | Specifies the certificate encoding type. The default is X509_ASN_ENCODING . |
| /f dwFlags | Specifies the store open flag. This is the dwFlags parameter passed to CertOpenStore. The default value is CERT_SYSTEM_STORE_CURRENT_USER. This option is considered only if the /y option is used. |
| /h[elp] | Displays command syntax and options for the tool. |
| /n nam | Specifies the common name of the certificate to add, delete, or save. This option can only be used with certificates; it cannot be used with CTLs or CRLs. |
| /put | Saves an X.509 certificate, CTL, or CRL from a certificate store to a file. The file is saved in X.509 format. You can use the /7 option with the /put option to save the file in PKCS #7 format. The /put option must be followed by either /c, /CTL, or /CRL. The /all option cannot be used with /put. |
| /r location | Identifies the registry location of the system store. This option is considered only if you specify the /s option. location must be one of the following: — currentUser indicates that the certificate store is under the HKEY_CURRENT_USER key. This is the default. |
| /s | Indicates that the certificate store is a system store. If you do not specify this option, the store is considered to be a StoreFile. |
| /sha1 sha1Hash | Specifies the SHA1 hash of the certificate, CTL, or CRL to add, delete, or save. |
| /v | Specifies verbose mode; displays detailed information about certificates, CTLs, and CRLs. This option cannot be used with the /add, /del, or /put options. |
| /y provider | Specifies the store provider name. |
| /7 | Saves the destination store as a PKCS #7 object. |
| /? | Displays command syntax and options for the tool. |
Remarks
Certmgr.exe performs the following basic functions:
Displays certificates, CTLs, and CRLs to the console.
Adds certificates, CTLs, and CRLs to a certificate store.
Deletes certificates, CTLs, and CRLs from a certificate store.
Saves an X.509 certificate, CTL, or CRL from a certificate store to a file.
Certmgr.exe works with two types of certificate stores: StoreFile and system store. It is not necessary to specify the type of certificate store; Certmgr.exe can identify the store type and perform the appropriate operations.
Running Certmgr.exe without specifying any options launches the certmgr.msc snap-in, which has a GUI that helps with the certificate management tasks that are also available from the command line. The GUI provides an import wizard, which copies certificates, CTLs, and CRLs from your disk to a certificate store.
You can find the names of X509Certificate stores for the sourceStorename and destinationStorename parameters by compiling and running the following code.
For more information about certificates, see Working with Certificates.
Examples
The following command displays a default system store called my with verbose output.
The following command adds all the certificates in a file called myFile.ext to a new file called newFile.ext .
The following command adds the certificate in a file named testcert.cer to the my system store.
The following command adds the certificate in a file named TrustedCert.cer to the root certificate store.
The following command saves a certificate with the common name myCert in the my system store to a file called newCert.cer .
The following command deletes all CTLs in the my system store and saves the resulting store to a file called newStore.str .
The following command saves a certificate in the my system store in the file newFile . You will be prompted to enter the certificate number from my to put in newFile .


