- Как включить Центр мобильности Windows на настольном ПК
- Включить Windows Mobility Center на настольном компьютере
- Как отключить Центр мобильности в Windows 10
- Чтобы отключить Mobility Center в Windows 10, выполните следующие действия.
- Отключение Центр мобильности Windows с помощью редактора локальной групповой политики
- mblctr.exe Центр мобильности Windows
- Как включить и отключить Windows Mobility Center на рабочем столе?
- Как запустить Windows Mobility Center?
- Центр действий как альтернатива Windows Mobility Center
- Windows 10 – How to Access and Utilize Mobility Center Settings
- How to Access Mobility Center in Windows 10
- Start Menu
- Control Panel
- Power User Menu
- How to Set the Brightness in Windows Mobility Center in Windows 10
- How to Set the Volume in Windows Mobility Center in Windows 10
- How to Set Battery Status in Windows Mobility Center in Windows 10
- How to Set External Display in Windows Mobility Center in Windows 10
- How to Use Sync Center in Windows Mobility Center in Windows 10
- How to Set Presentation Settings in Windows Mobility Center in Windows 10
- My Opinion
Как включить Центр мобильности Windows на настольном ПК
Центр мобильности Windows (Windows Mobility Center) — доступен на ноутбуках или планшетах с Windows 10, а не на настольном компьютере. Вы удивитесь, но можно включить «Центр мобильности» на настольном ПК. Это очень полезно, если кто хочет показывать презентации на настольном ПК через «Центр мобильности Windows». Давайте разберем, как это сделать.
Включить Windows Mobility Center на настольном компьютере
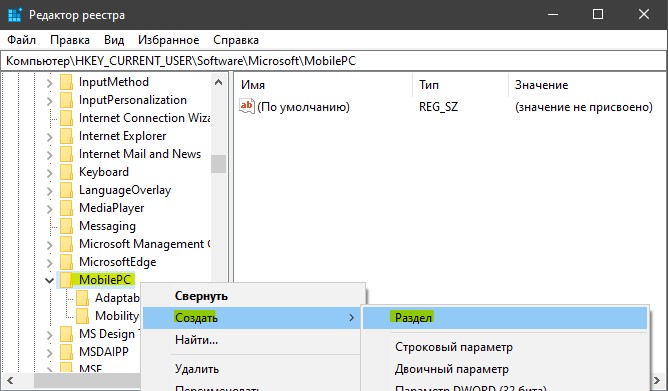
Шаг 1. Нажмите сочетание кнопок Win+R и введите regedit, чтобы открыть редактор реестра. Далее перейдите по пути:
- HKEY_CURRENT_USER\Software\Microsoft\MobilePC
- Нажимаем правой кнопкой мыши на папке MobilePC и «Создать» > «Раздел».
- Создайте два раздела с именем AdaptableSettings и MobilityCenter.
- Если у вас какой-либо уже существует, то его не нужно создавать.
Шаг 2. Нажмите на папку AdaptableSettings и с правой стороны нажмите на пустом поле правой кнопкой мыши «Создать» > «Параметр DWORD (32 бита)«.
- Задайте имя SkipBatteryCheck и значение 1. Чтобы задать значение, щелкните два раза по созданному параметру.

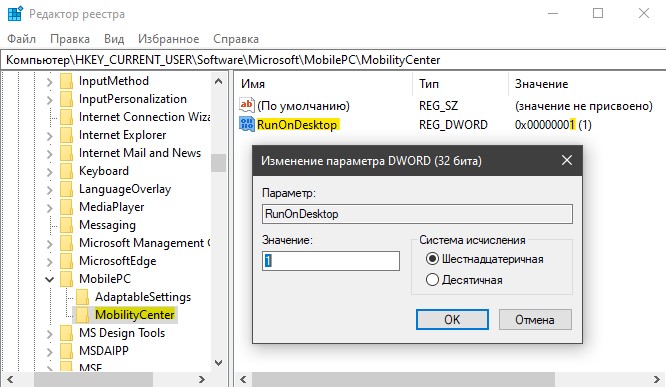
Шаг 3. Нажмите на пупку MobilityCenter и с правой стороны нажмите на пустом поле правой кнопкой мыши «Создать» > «Параметр DWORD (32 бита)«.
- Задайте имя RunOnDesktop и значение 1. Чтобы задать значение, щелкните два раза по созданному параметру.
Шаг 4. Теперь откройте Центр мобильности Windows на настольном компьютере. Для этого нажмите Win+R и введите путь:
- %LocalAppdata%\Microsoft\Windows\WinX\Group3
- Далее запустите «Центр мобильности Windows».
Как отключить Центр мобильности в Windows 10

Центр мобильности Windows (mblctr.EXE) является специальным приложением, которое поставляется в комплекте с Windows 10.
Он присутствует по умолчанию на мобильных устройствах, таких как ноутбуки и планшеты. Это позволяет изменять яркость, громкость, схемы питания, ориентацию дисплея, проекцию дисплея, настройки центра синхронизации и настройки презентации устройства. В некоторых случаях может потребоваться отключить Центр мобильности Windows для всех учетных записей пользователей устройства.
Центр мобильности Windows, был впервые представлен в Windows 7. Windows 8, Windows 8.1 и Windows 10 также включают его, однако он в основном заменен кнопками Центра действий для быстрого переключения этих выше упомянутых настроек. Тем не менее, если вы предпочитаете использовать Mobility Center, вы можете активировать его на настольном компьютере. Это все еще может быть полезно, потому что он может быть расширен OEM с дополнительными плитками для переключения различных системных настроек, таких как Bluetooth или монитора.
Вот как можно отключить эту функцию для всех пользователей. Для продолжения необходимо войти в систему с учетной записью администратора.
Чтобы отключить Mobility Center в Windows 10, выполните следующие действия.
- Откройте редактор реестра. Перейдите к следующему разделу реестра:
- Если у вас нет такого ключа, то просто создайте его. Установите значение 1 в NoMobilityCenter, чтобы отключить Windows мобильности приложения в Windows 10.

Чтобы изменения, внесенные в реестр вступили в силу, необходимо перезапустить ПК.
Позже можно удалить значение NoMobilityCenter, чтобы разрешить пользователю использовать панель управления и параметры.
Отключение Центр мобильности Windows с помощью редактора локальной групповой политики
Если вы работаете под управлением Windows 10 Pro, Enterprise или Education Edition, вы можете использовать локальное приложение редактора групповой политики для настройки параметров, упомянутых выше, с графическим интерфейсом пользователя.
- Нажмите сочетание клавиш Win + R Впишите команду:

Этот параметр политики отключает Центр мобильности Windows. Если этот параметр политики включен, пользователь не сможет вызвать Центр мобильности Windows.
mblctr.exe Центр мобильности Windows
Процесс Mblctr.exe является частью утилиты Windows Mobility Center. Он входит в состав известной операционной системы Microsoft Windows. Это удобное приложение для Windows 10, которое позволяет быстро получить доступ к основным мобильным функциям ноутбука и настроить их. Это могут быть яркость экрана, громкость, схемы управления питанием, ориентация экрана, настройки синхронизации и презентации. Однако эти свойства могут отличаться на разных устройствах.
 mblctr.exe Центр мобильности Windows
Файл Mblctr.exe находится в системной папке и совершенно безвреден.
Как включить и отключить Windows Mobility Center на рабочем столе?
Хотя эта функция доступна только на мобильных устройствах, ее также можно активировать на настольном ПК. Чтобы включить Mobility Center на настольном ПК в Windows 10, выполните следующие действия.
- Запустите приложение «Редактор реестра».
- Найдите этот ключ реестра:
HKEY_CURRENT_USER \ Software \ Microsoft
- Создайте новый подраздел с именем MobilePC.
- В «MobilePC» создайте новый подраздел с именем «MobilityCenter».
- Затем создайте новое 32-битное значение DWORD RunOnDesktop (с правой стороны). Это должно быть 32-битное значение DWORD независимо от типа используемой ОС Windows (32- или 64-битная).
- Введите «1» в качестве значения в поле значения.
Это все, что вам нужно сделать, чтобы включить Mobility Center на настольном ПК.
Чтобы отключить его — просто удалите значение RunOnDesktop. Все, что вы изменили раньше, будет отменено.
Как запустить Windows Mobility Center?
Есть как минимум 5 разных способов открыть Mobility Center в Windows 10.
Способ 1 — из меню опытного пользователя
Есть 2 простых способа сделать это:
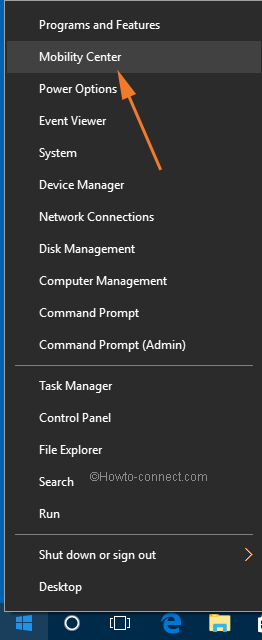
a) Нажмите правую кнопку «Пуск», и Windows 10 покажет меню Win + X. Выберите Mobility Center из списка
б) 1. Используйте Win + X на клавиатуре. Выберите Mobility Center из списка
Способ 2 — из диалога запуска
Вы также можете получить доступ к приложению с помощью диалога запуска.
- Используйте сочетание клавиш Win + R на клавиатуре.
- Введите mblctr.exe в поле «Выполнить»
- Нажмите Enter.
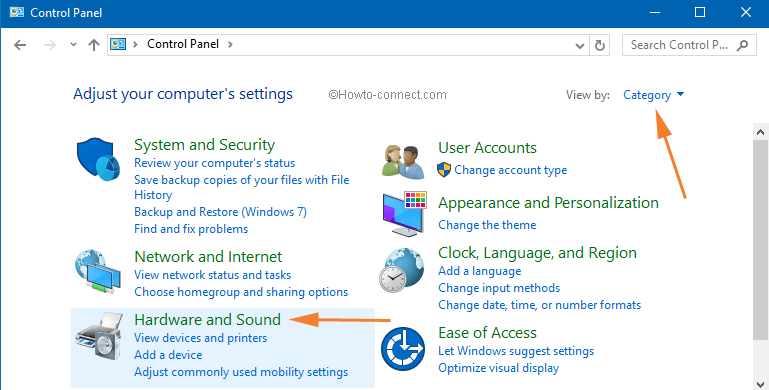
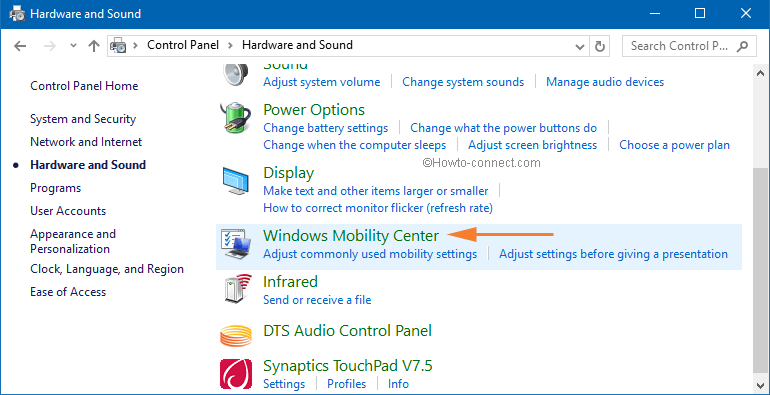
Способ 3 — из панели управления
- Зайдите в панель управления
- Выберите «Оборудование и звук».
- Теперь выберите меню Windows Mobility Center.
Метод 4 — Через поиск Кортана
Просто нажмите на значок поиска Cortana на панели задач, введите Mobility Center и найдите приложение Windows Mobility Center в результатах поиска.
Способ 5 — из контекстного меню батареи
- Найдите значок батареи в левом нижнем углу панели задач
- Щелкните правой кнопкой мыши значок батареи.
- Выберите Windows Mobility Center
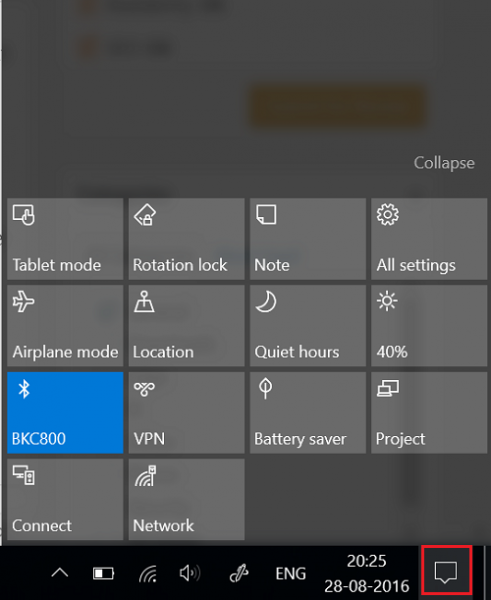
Центр действий как альтернатива Windows Mobility Center
В Windows 10 Mobility Center частично заменен на Action Center, который состоит из часто используемых ярлыков настроек. Вы можете найти его в правом нижнем углу своего ноутбука или планшета и получить к нему доступ, нажав значок сообщения в крайнем правом углу.
 mblctr.exe Центр мобильности Windows (32 бита)
Если вы хотите настроить меню своего Центра поддержки, нажмите кнопку в правом нижнем углу и выберите «Все настройки».
ПРИМЕЧАНИЕ. Вы не можете решить, какие параметры появятся в Центре мобильности Windows.
Пользователь сам выбирает, какое приложение удобнее.
В целом, Windows Mobility Center (mblctr.exe) вызывается для экономии вашего времени и позволяет сразу получить доступ ко всем необходимым настройкам. В первую очередь эта функция была создана для ноутбуков и планшетов, но при необходимости ее можно включить вручную на настольном компьютере. В Windows 10 существует меню с именем Action Center, которое включает в себя аналогичные плитки и может использоваться для тех же целей, что и Windows Mobility Center.
В системе Winx64 mblctr.exe может называться mblctr.exe Центр мобильности Windows (32 бита)
Ошибки что можно встретить:
- null
- Любые параметры яркости экрана, выполненные в «Центре мобильности», являются временными.
Чтобы сделать измененные характеристики яркости экрана постоянными, щелкните значок в области «Яркость экрана», настройте уровень яркости на странице «Изменить параметры плана» и нажмите кнопку «Сохранить изменения».
Примечание. Увеличение яркости экрана сокращает срок работы батареи.
- Адаптер беспроводной сети не обнаружен
- Подключение отсутствует
- Звуковые устройства не обнаружены
- Нет подключенных устройств
- Нет связей для синхронизации
- Некоторые параметры задаются групповой политикой. Если какой-либо параметр недоступен, обратитесь к системному администратору.
- Компьютер не распознал ни одного аудиоустройства.
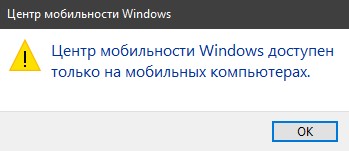
- Центр мобильности Windows доступен только на мобильных компьютерах.
Windows 10 – How to Access and Utilize Mobility Center Settings
If you want to customize the main settings of your Windows 10 laptop, directly launch Windows Mobility Center on your screen. Windows Mobility Center is one of the main constituents of Microsoft Windows which has been found with the introduction of Windows Vista. Before heading more, make a note that Windows Mobility Center will not be accessible in the computers which are not portable. The users who have Windows 10 installed on their laptops, Ultrabook or tablet will be able to take benefit of Windows Mobile Center and utilize it.
Now coming back to its description, it allows the users to control or change the settings of the important components of their system. It has a user-friendly interface with a sequence of some tiles on its window, each representing a portion of information. The items listed by the tiles totally depend on the manufacturers of the device. So don’t get tensed. The general and most used are present in almost all the systems.
In this tutorial of Windows Mobility Center in Windows 10, we will cover its entire details, starting from its accessibility to use its tiles and a lot more. Have patience till the end of this post because you are really going to get some interesting knowledge. Let the learning begin!
How to Access Mobility Center in Windows 10
There are a couple of ways which lead to the launch of Windows Mobility Center on your screen. You can follow any of them as per your comfort.
Start Menu
The first process is via Cortana Search merely underneath the Start Menu. Hit the Cortana icon, type Mobility Center in the search area at the lowermost part.
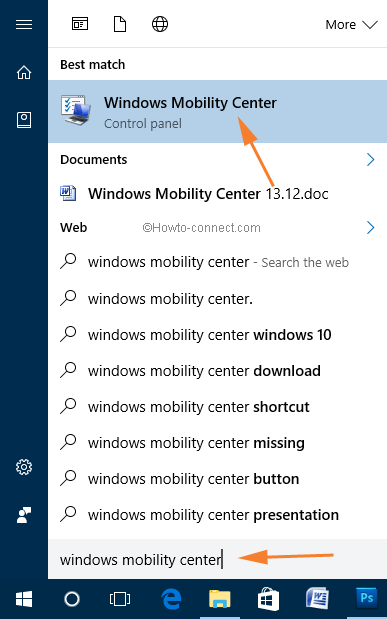
You will notice it in the result. Click on it to open.
Control Panel
Another way to get into Windows Mobility Center is from the Control Panel. First, open the Control Panel. Among the different categories, look for Hardware and Sound.
Under Hardware and Sound window, click the Windows Mobility Center option.
Power User Menu
Right click on the Start icon on the Taskbar. You will notice a list of options. It is called Power User Menu. You can even use the keyboard shortcuts of Windows and X keys to launch this Power User Menu on the screen. Look carefully, the Mobility Center is the second option on the arrived list. Click and open it.
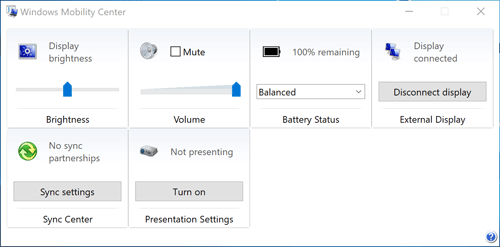
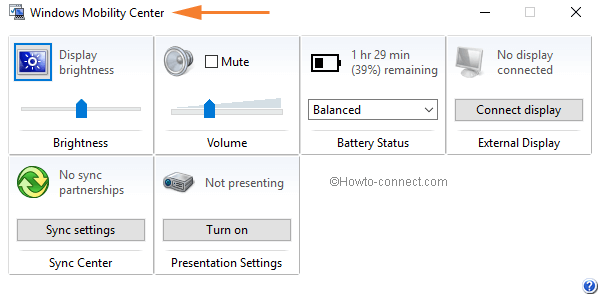
When you open Windows Mobility Center on your Windows 10, it will look something like this, each tile representing each component of your system (See the screenshot below). Rather than navigating the complicated ways to open the components for simple settings, you will get all at one place, which saves your time and energy. Below is the list of tiles that are present in the laptop using Windows 10 –
- Brightness
- Volume
- Battery Status
- External Display
- Sync Center
- Presentation Settings
The settings of each tile will carry out in the next part of this post.
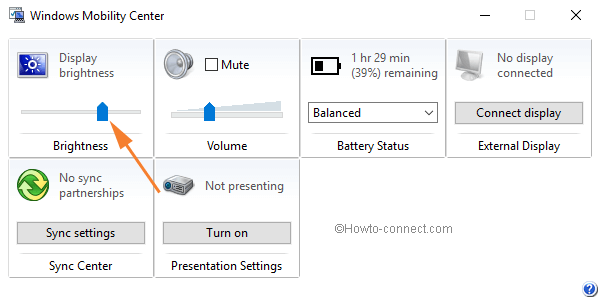
How to Set the Brightness in Windows Mobility Center in Windows 10
The first tile of the Windows Mobility Center is the Brightness. The name and look of the tile itself explain you everything. Use the slider to adjust the display brightness of your Windows 10 laptop screen. Of course, reduce the brightness, the better will be the life of the battery. You might have used this setting in a different way, but here as mentioned before, all at one place.
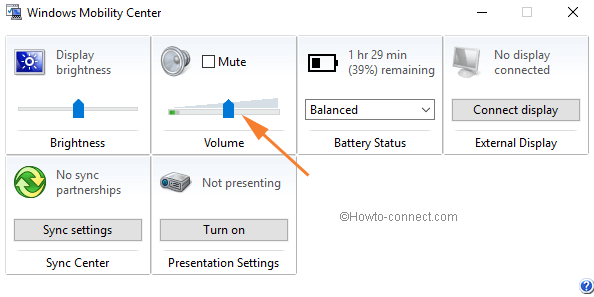
How to Set the Volume in Windows Mobility Center in Windows 10
The method of using the Volume tile is same as the Brightness tile. If you wish to put the sound into a silent mode, check the Mute box. Drag the slider to left or right to increase or decrease the volume. Adjust it to the level you want.
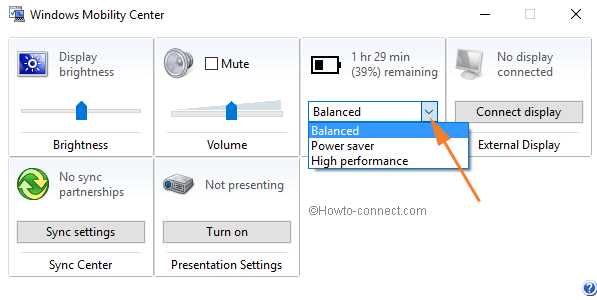
How to Set Battery Status in Windows Mobility Center in Windows 10
The Battery Status tile exhibits you the percentage of remaining power. It also permits you to select the preferred power plans from the drop down menu. When you click on the drop down menu you will notice three power plans are listed. The Balanced power plan is selected by default. Its’ performance is automatic and creates a balance between the performance and its usage. The Power saver option lets the resources provide their maximum performance. You can keep on changing the options and experience yourself which power plan suits best for your laptop.
How to Set External Display in Windows Mobility Center in Windows 10
The option of connecting to the external display will not be obtainable if you are not using a laptop or tablet. This tile will enable your laptop connected to the external display. You will see an option Connect Display in the External Display tile. A click on the Connect Display option will prompt up a charms list on the right edge of your screen exhibiting you different projecting options to choose from. You can view this list through Control Panel also or by simply pressing Windows and P keys on your keyboard.
Below are the four projecting options and their workings –
- PC Screen Only – The external display will be turned off when this option is being selected because it chooses only the computer screen, the one on which you are working.
- Duplicate – When you opt this option, you will see the exact thing on the connected monitor that you are able to see on your PC screen.
- Extend – It is the extension of your PC’s display screen on the connected external screen.
- Second Screen Only – It will switch off the display of your laptop’s screen by making the connected screen as the main screen.
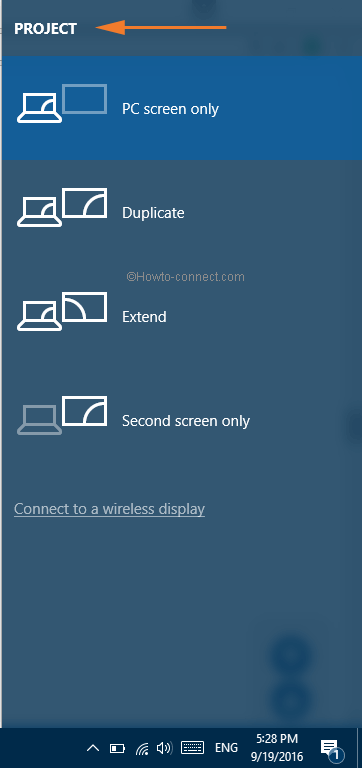
After the completion of your preferred external display, you might require to executing certain modifications of your screen resolution. This facility is not built in Windows Mobility Center. To carry out the modifications, go to your Desktop, right-click on an empty area and select Display settings. Then carry out the needed modifications. In case you think you went wrong with the modifications, the 15 seconds timer of Windows will display the real settings when the new one fails to perform.

How to Use Sync Center in Windows Mobility Center in Windows 10
When you click on the Sync Setting option of Sync Center you will get into the Sync Center window. Dropping down the details of Sync Center here will be a massive thing. We request you to go the below link and get the information related to it.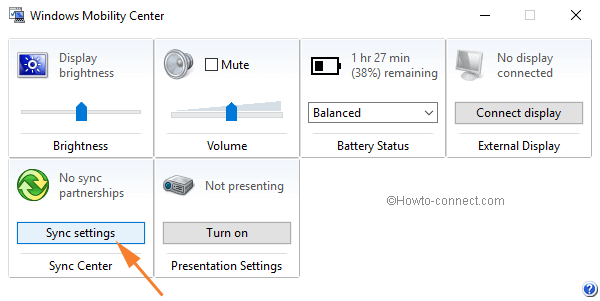
How to Set Presentation Settings in Windows Mobility Center in Windows 10
Last but not the least tile of Windows Mobility Center is of Presentation settings. This option is the simplest of all the settings of the presentation. If you are working first time on this setting from this component, click Turn On button of Presentation Settings tile of Windows Mobility Center.
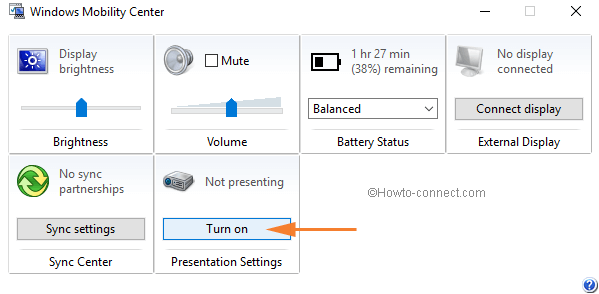
This action will then lead to the pop-up of new Presentation Settings window which will inquire you about performing a presentation. (In case this new window doesn’t pop up automatically, click on the icon of the Presentation Settings and you will get its new settings window on your screen).

In the new Presentation Settings window if you select the first option I am currently giving a presentation, Windows will then deactivate all those power settings which might switch off your screen display and turn all the notifications of the system to the mute mode. You can modify the other options like the turn off the screen saver or the volume settings. You can even change the background of the desktop so that it doesn’t affect your presentation.
Now to connect your laptop to another display, go to the External display tile and click on Connect display. Then abide the steps that have been mentioned in the External display section.
My Opinion
Windows Mobility Center is the best component where you can perform so many settings. If you are using any Windows 10 portable device, this is the most helpful application you will ever experience. Those users who have not experienced it till now are requested to have a look at Windows Mobility Center and experience a new way of settings things. The most interesting thing is the Presentation one. Making a presentation has never been so easy in Windows 10.


