- Подключение диска в папке Mount a drive in a folder
- Подключение диска в пустой папке Mounting a drive in an empty folder
- Подключение диска в пустой папке с помощью интерфейса Windows To mount a drive in an empty folder by using the Windows interface
- Подключение диска в пустой папке с помощью командной строки To mount a drive in an empty folder using a command line
- Удаление точки подключения To remove a mount point
- How to mount network Volume in Docker for Windows (Windows 10)
- 4 Answers 4
- Mount a drive in a folder
- Mounting a drive in an empty folder
- To mount a drive in an empty folder by using the Windows interface
- To mount a drive in an empty folder using a command line
- To remove a mount point
- Монтирование SMB
- How to map or add a Network Location or Map FTP Drive in Windows 10
- Map FTP Drive
- Add Network Location
- Map a Network Drive using Command Line
- Map a Network Drive using PowerShell
Подключение диска в папке Mount a drive in a folder
Относится к: Windows 10, Windows 8.1, Windows Server 2019, Windows Server 2016, Windows Server 2012 R2, Windows Server 2012. Applies To: Windows 10, Windows 8.1, Windows Server 2019, Windows Server 2016, Windows Server 2012 R2, Windows Server 2012
Вы можете использовать оснастку «Управление дисками» для подключения диска (предоставления доступа к нему) в папке, а не путем назначения ему буквы диска. You can use Disk Management to mount (make a drive accessible) in a folder rather than a drive letter if you want. В таком случае диск будет отображаться как обычная папка. This makes the drive appear as just another folder. Диски можно подключать только в пустых папках в базовых или динамических томах NTFS. You can mount drives only in empty folders on basic or dynamic NTFS volumes.
Подключение диска в пустой папке Mounting a drive in an empty folder
Для выполнения следующих шагов необходимо как минимум состоять в группе Операторы архива или Администраторы. You must be a member of the Backup Operators or Administrators group, at minimum, to complete these steps.
Подключение диска в пустой папке с помощью интерфейса Windows To mount a drive in an empty folder by using the Windows interface
- В диспетчере дисков щелкните правой кнопкой мыши раздел или том, который содержит папку для подключения диска. In Disk Manager, right-click the partition or volume that has the folder in which you want to mount the drive.
- Щелкните Изменить букву диска или путь к диску, а затем нажмите Добавить. Click Change Drive Letter and Paths and then click Add.
- Щелкните Подключить к следующей пустой папке NTFS. Click Mount in the following empty NTFS folder.
- Введите путь к пустой папке в томе NTFS или нажмите кнопку Обзор, чтобы найти ее. Type the path to an empty folder on an NTFS volume, or click Browse to locate it.
Подключение диска в пустой папке с помощью командной строки To mount a drive in an empty folder using a command line
Откройте командную строку и введите: diskpart . Open a command prompt and type diskpart .
В командной строке DISKPART введите list volume и запомните номер тома, которому требуется назначить путь. At the DISKPART prompt, type list volume , making note of the volume number you want to assign the path to.
В командной строке DISKPART введите select volume и укажите номер тома, которому требуется назначить путь. At the DISKPART prompt, type select volume , specifying the volume number that you want to assign the path to.
В командной строке DISKPART введите assign [mount=
] . At the DISKPART prompt, type assign [mount=
Удаление точки подключения To remove a mount point
Если вы хотите удалить точку подключения, чтобы доступ к диску нельзя было получить через папку, сделайте следующее: To remove the mount point so that the drive is no longer accessible via a folder:
How to mount network Volume in Docker for Windows (Windows 10)
We’re working to create a standard «data science» image in Docker in order to help our team maintain a consistent environment. In order for this to be useful for us, we need the containers to have read/write access to our company’s network. How can I mount a network drive to a docker container?
Here’s what I’ve tried using the rocker/rstudio image from Docker Hub:
docker run -d -p 8787:8787 -v //c/users/
This does not work (where P is the mapped location of the network drive): docker run -d -p 8787:8787 -v //p:/home/rstudio/foobar rocker/rstudio
This also does not work: docker run -d -p 8787:8787 -v //10.1.11.###/projects:/home/rstudio/foobar rocker/rstudio
I’m relatively new to Docker, so please let me know if I’m not being totally clear.
4 Answers 4
I know this is relatively old — but for the sake of others — here is what usually works for me. for use — we use a windows file-server so we use cifs-utils in order to map the drive. I assume that below instructions can be applied to nfs or anything else as well.
first — need to run the container in privileged mode so that you can mount remote folders inside of the container ( —dns flag might not be required)
docker run —dns -p 8000:80 —privileged -it
now, (assuming centos with cifs and being root in the container) — hop into the container and run:
install cifs-utils if not installed yet
yum -y install cifs-utils
create the local dir to be mapped
mkdir /mnt/my-mounted-folder
prepare a file with username and credentials
echo «username= » >
/.smbcredentials
echo «password=
map the remote folder
mount -t cifs -o iocharset=utf8,credentials=/root/.smbcredentials,file_mode=0777,dir_mode=0777,uid=1000,gid=1000,cache=strict
Mount a drive in a folder
Applies To: Windows 10, Windows 8.1, Windows Server 2019, Windows Server 2016, Windows Server 2012 R2, Windows Server 2012
You can use Disk Management to mount (make a drive accessible) in a folder rather than a drive letter if you want. This makes the drive appear as just another folder. You can mount drives only in empty folders on basic or dynamic NTFS volumes.
Mounting a drive in an empty folder
You must be a member of the Backup Operators or Administrators group, at minimum, to complete these steps.
To mount a drive in an empty folder by using the Windows interface
- In Disk Manager, right-click the partition or volume that has the folder in which you want to mount the drive.
- Click Change Drive Letter and Paths and then click Add.
- Click Mount in the following empty NTFS folder.
- Type the path to an empty folder on an NTFS volume, or click Browse to locate it.
To mount a drive in an empty folder using a command line
Open a command prompt and type diskpart .
At the DISKPART prompt, type list volume , making note of the volume number you want to assign the path to.
At the DISKPART prompt, type select volume , specifying the volume number that you want to assign the path to.
At the DISKPART prompt, type assign [mount=
To remove a mount point
To remove the mount point so that the drive is no longer accessible via a folder:
Монтирование SMB
Монтирование SMB не что иное как подключение сетевой папки WIndows в Linux. SMB (Server Message Block) – сетевой протокол удаленного доступа к сетевым ресурсам (файлы, папки, принтеры и т.п.). В первой версии протокола был известен также как CIFS (Common Internet File System). Протоком SMB повсеместно используется во всех ОС Microsoft Windows.
В современных дистрибутивах Linux уже можно совершенной спокойно путешествовать по сетевым дискам. Но куда удобнее если смонтировать сетевой диск сразу в папку, да еще и на рабочем столе, красота. Я создал папку с общим доступом на сервере Hyper-V, её и буду монтировать. Монтирование SMB буду делать под специально заведенным пользователем, дабы не светить пароль админа.
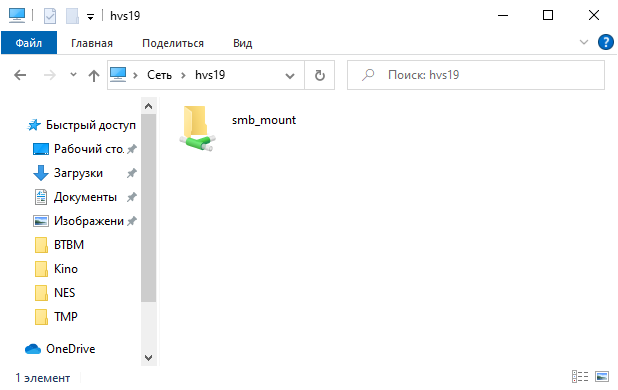
Монтируемая папка
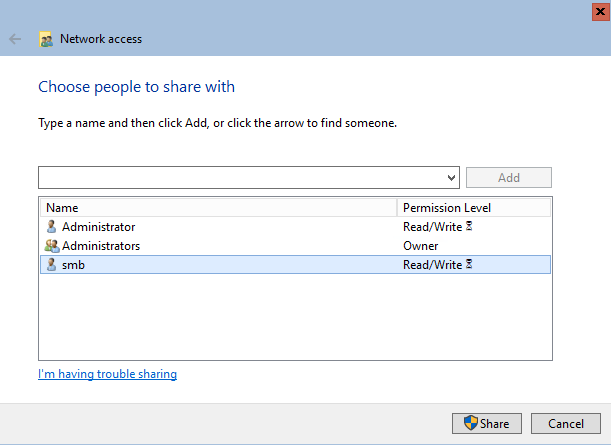
Монтируемая директория доступна только администраторам и пользователю smb (создан специально для монтирования). Сделать общую папку на сервере Windows можно двумя способами: 1 – через свойства папки; 2 – через Powershell. Через свойства папки проще и быстрее как для новичка.
Но в моем случае с сервером HyperV 2019 сработал только второй способ, через Powershell.

Данной командой я сделал общей папку расположенную по пути F:\smb_mount и присвоил ей имя smb_mount. Права на доступ к папке выдал пользователю Administrator и smb.
Общая папка у меня доступна по пути \\hvs19\smb_mount, но монтировать я буду ее по ip адресу. Принципиального вопроса как монтировать нет, просто не всегда есть возможность использовать имя.
С монтируемой папкой закончили, создадим папку куда будем монтировать. Я создал папку в /opt и назвал её F (по имени диска где лежит монтируемая папка) для удобства.
Установим набор утилит для монтирования SMB
Для Ubuntu (и прочих Debian`ов)
Для Centos 8 (и прочих RPM дистрибутивов на YUM)
Монтирование SMB
Все необходимые папки мы создали, теперь приступим к монтированию файловой системы.
Пройдемся по параметрам:
- -t cifs – тип файловой системы cifs (полностью совместим с SMB)
- username – пользователь у которого есть доступ к монтируемой папке (на сетевом диске). Если разрешено, можно использовать гостя, без пароля. В таком случае указываем username=guest
- password – пароль от учетной записи этого пользователя
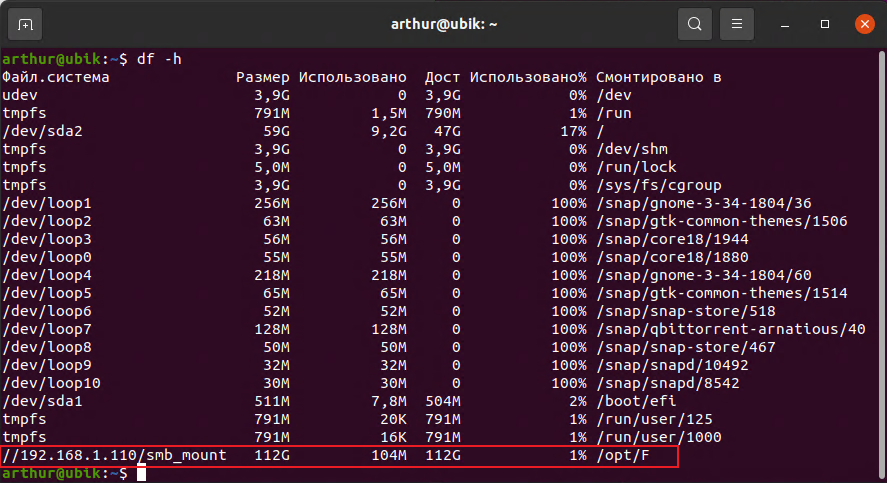
- //192.168.1.110/smb_mount – общая папка на сервере которую монтируем
- /opt/F – папка куда монтируем.
Посмотрим что все получилось, проверим свободное место в сетевой папке
Можно использовать дополнительные возможности при монтировании, используя ключи после параметра -o. Вот некоторые из них
- rw — запись и чтение
- ro — только чтение
- iocharset=utf8 — в данной кодировке будет выводится информация;
- codepage=cp866 — кодировка используемая на сервере с общей папкой. Обычно Windows устанавливает кодировку cp866.
- vers=3.0 – принудительно указать версию подключения SMB протокола. Для безопасного подключения используйте последнюю версию.
Используя команду mount мы монтируем папку в ручном режиме и после перезагрузки монтирования не произойдет. Для автоматического монтирования папки читаем следующий раздел.
Автоматическое монтирование SMB
Для постоянного монтирования папке при старте системы необходимо внести изменения в файл /etc/fstab. При монтировании сетевого диска с SMB используется пароль. Для большей сохранности не будем указывать его в файле fstab, а сохраним в директории root.
Создадим файл с учетными данными
Добавим в файл строки: имя пользователя, пароль, домен (если используется). У меня домена нет, поэтому добавлю только имя и пароль
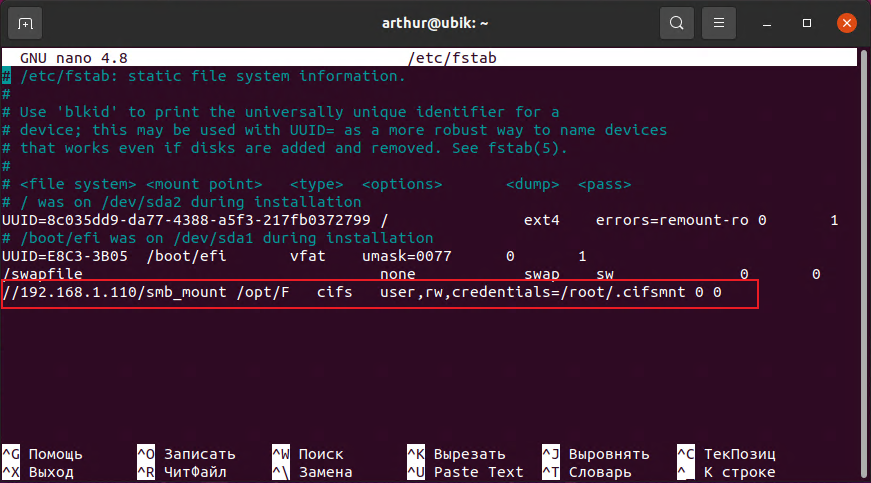
Откроем файл /etc/fstab для редактирования
Добавим новую строку в конец файла
Сохраним файл и перезагрузим компьютер. После этого сетевая папка будет монтироваться автоматически.
Разберем указанные параметры
- //192.168.1.110 – ip адрес сервера где находится сетевая папка
- /smb_mount – сетевая папка на указанном выше сервере
- /opt/F – папка на локальном компьютере куда будем монтировать сетевую папку
- cifs – тип монтируемой файловой системы
- user – разрешение монтировать для любого пользователя
- rw – разрешения на чтение/запись на диск при монтировании
- credentials – путь к файлу с данными учетной записи используемых для подключения по SMB
- 0 – не использовать дамп
- 0 – не проверять файловую систему при старте программой fsck
Права на папки и файлы
Примонтированный диск по умолчанию монтируется от root и разрешает запись на диск только под ним. Рассмотрим опции позволяющие изменить доступ на примонтированные папки и файлы. Также рассмотрим настройки по смене владельца смонтированной папки.
- uid – задает владельца каталога. Узнать uid пользователей можно в файле /etc/passwd
- gid – задает группу владельца каталога. Узнать gid групп можно в файле /etc/passwd
- file_mode=0777 – права на доступ к файлам. 0777 – разрешено запись/чтение всем.
- dir_mode=0777 – права на доступ к папкам. 0777 – разрешено запись/чтение всем.
Пример записи в файле /etc/fstab монтирования от моего пользователя (не root) с полным доступом ко всем файлам и папкам
Размонтирование SMB
Размонтировать сетевую папку SMB можно используя команду umount
В параметрах команды umount указываем директорию куда была смонтирована сетевая папка. В моем случае это /opt/F
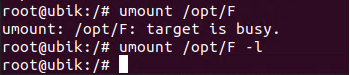
Если смонтированная файловая система сейчас занята, появится сообщение umount: target is busy . В таком случае размонтировать получиться с ключом -l
Решение проблем монтирования
Если по какой либо причине после ваших попыток папка все же не монтируется, необходимо смотреть системный журнал.

В системном журнале будет указана причина ошибки монтирования. Как пример не верный логин/пароль, не установленные утилиты cifs и т.п.
How to map or add a Network Location or Map FTP Drive in Windows 10
If you are looking for a way to add a network location or map an FTP drive and access files & folders on an FTP server, in Windows, natively, then this post may help you. You will be able to have one-click easy access to your files on networked locations via the Windows File Explorer.
Map FTP Drive
You can create or map a drive directly to your FTP site from within Windows. To do so, open File Explorer > Computer (This PC). Right-click and select Map Network Drive.
You can also use the Map network drive button:
It offers options to:
- Map network drive
- Disconnect network drive.
In the box which opens, type the FTP address or the path to your Network drive or browse to it using the Browse button. Your folder Properties must be set to Shared in order to map it as a network drive. You will get the setting under Properties > Sharing tab > Advanced Sharing > Check the Share this folder option.
Check the Reconnect at sign-in option to make the mapping permanent. If you plan to use credentials from the networked computer to access the shared folder, check the Connect using different credentials option and click OK. You will be asked to enter the username and password Next.
You will now have to enter the credentials for the user account, using the following format in the username name field so that your system knows which networked computer it is going to connect to – Computer\Username. Browse to your network folder for mapping and click OK.
Once you have done this, you will be able to see it in Explorer.
To map an FTP site, click on the Connect to a website that you can use to store your documents and pictures link to open the Add Network Location wizard.
Here you have to choose a custom network location and specify the location of your website, specify the login credentials that may be required and name the mapped FTP drive.
Add Network Location
Uncheck Log for anonymously and give the username & password. Click on Next. Give a name to the networked location, when asked. Click Next again. Now select Open this network location when I click Finish.
You will be asked to enter your credentials, and once you do so, you will be connected to your network drive or your FTP drive or your website.
This is quite useful if you need to connect your computers together for sharing files, store files online or run a website.
TIP: See this post if you are Unable to map Network drive.
Map a Network Drive using Command Line
To map Network Drives using the command line, in an elevated command prompt, you have to run the following command:
Here x is the drive letter, and the /persistent:yes parameter makes it permanent.
You can read more about the Net use command, which lets you connect a computer to a shared resource on Technet.
Map a Network Drive using PowerShell
To map Network Drives using Powershell, you have to run the following command:
You can read more about New-PSDrive, which helps you create mapped network drives on MSDN.
NOTES:
- The folders you map should be set to SHARE before you can access them via drive letters
- If you are trying to access a drive from another computer, it should be ON and running; even if the computer is sleeping, you cannot access that drive
- You should know the credentials of the folder, computer, or website you are trying to map or connect as a network drive
- Download FTP Drive tool from KillProg.com. It makes several things including adding a drive letter easier
- You may want also to check out FtpUse, a free tool that helps you map an FTP server as a Local Disk Drive.
- Use Network Drive Control to make Windows automatically map network drives by network name when you log in
- Visual Subst is a free tool that lets you easily create Virtual Drives for your Folders & map Cloud Storage as Virtual Drives.
If you want, you can also download and use one of these free FTP Clients for your Windows PC. How to set up and use SIP Server on Windows may also interest some of you.


