- Overview of Boot Options in Windows
- Boot Loading Architecture
- Boot Configuration Data
- Editing Boot Options
- Создание универсальной мультизагрузочной флешки с Windows 7/8/10, WinPE, Linux и пр. (Legacy + UEFI поддерживается)
- Самый простой способ создания мультизагрузочного носителя
- ШАГ 1
- ШАГ 2
- ШАГ 3
- ШАГ 4: альтернатива
- 🐤 Видео-инструкция
- How to Access Windows 10 Boot Options Menu (6 Ways)
- If you can access Desktop
- And if can’t access Desktop
- Exit Windows 10 boot options
- To summerize
Overview of Boot Options in Windows
The Windows boot loader architecture includes a firmware-independent boot configuration and storage system called Boot Configuration Data (BCD) and a boot option editing tool, BCDEdit (BCDEdit.exe). During development, you can use BCDEdit to configure boot options for debugging, testing, and troubleshooting your driver on computers running Windows 10, Windows 8, Windows Server 2012, Windows 7, and Windows Server 2008.
Administrative privileges are required to use BCDEdit to modify BCD. Changing some boot entry options using BCDEdit could render your computer inoperable. As an alternative, use the System Configuration utility (MSConfig.exe) to change boot settings.
Boot Loading Architecture
Windows includes boot loader components that are designed to load Windows quickly and securely. The previous Windows NT boot loader, ntldr, is replaced by three components:
Windows Boot Manager (Bootmgr.exe)
Windows operating system loader (Winload.exe)
Windows resume loader (Winresume.exe)
In this configuration, the Windows Boot Manager is generic and unaware of the specific requirements for each operating system while the system-specific boot loaders are optimized for the system that they load.
When a computer with multiple boot entries includes at least one entry for Windows, the Windows Boot Manager, which resides in the root directory, starts the system and interacts with the user. It displays the boot menu, loads the selected system-specific boot loader, and passes the boot parameters to the boot loader.
The boot loaders reside in the root directory of each Windows partition. Once selected, the boot loaders take over the boot process and load the operating system in accordance with the selected boot parameters.
Boot Configuration Data
Windows boot options are stored in the Boot Configuration Data (BCD) store on BIOS-based and EFI-based computers.
BCD provides a common, firmware-independent boot option interface for all computers running Windows 10, Windows 8, Windows Server 2012, Windows 7, and Windows Server 2008. It is more secure than previous boot option storage configurations, because it permits secure lockdown of the BCD store and lets Administrators assign rights for managing boot options. BCD is available at run time and during all phases of setup. You can even call BCD during power state transitions and use it to define the boot process for resuming after hibernation.
You can manage BCD remotely and manage BCD when the system boots from media other than the media on which the BCD store resides. This feature is extremely important for debugging and troubleshooting, especially when a BCD store must be restored while running Startup Repair from a DVD, from USB-based storage media, or even remotely.
The BCD store, with its familiar object-and-element architecture, uses GUIDs and names such as «Default» to precisely identify boot-related applications.
BCD includes its own set of boot options. For more information about these boot options, see BCD Boot Options Reference.
Editing Boot Options
To edit boot options in Windows, use BCDEdit (BCDEdit.exe), a tool included in Windows.
To use BCDEdit, you must be a member of the Administrators group on the computer.
You can also use the System Configuration utility (MSConfig.exe) to change boot settings.
To change boot options programmatically in Windows, use the Windows Management Instrument (WMI) interface to boot options. This BCD WMI interface is the best method to programmatically change the boot options. For information about the BCD WMI interface, see Boot Configuration Data WMI Provider in the Windows SDK documentation.
Создание универсальной мультизагрузочной флешки с Windows 7/8/10, WinPE, Linux и пр. (Legacy + UEFI поддерживается)
 Алоха!
Не так давно мне на глаза попалась одна довольно интересная утилита — Ventoy. Предназначена она для создания универсальных загрузочных флешек: Legacy + UEFI (причем, делается это в ней максимально просто, буквально за 2 шага !).
Протестировав ее пару недель, я нашел для себя, что инструмент и в правду заслуживает внимания (именно поэтому и появилась эта заметка).
Отмечу также, что испытал Ventoy я пока лишь на десятке ПК и ноутбуков (выборка не очень большая) — везде всё работало, что называется из «коробки» (кроме ноутбука от HP: у него в BIOS потребовалось отключить защищенную загрузку (Secure Boot), хотя на др. устройствах проблем с этим не возникало. ).

Самый простой способ создания мультизагрузочного носителя
ШАГ 1
Как и для создания любой загрузочной флешки нам понадобятся установочные ISO-образы с ОС Windows. Т.к. мы будем использовать Ventoy — можете сразу же загрузить несколько ISO, например, Windows 10, Windows 8, LiveCD и т.д. 👇 (их количество ограничивается размером вашей флешки 👌)

LiveCD для аварийного восстановления Windows — моя подборка
ШАГ 2
Затем следует загрузить 👉 утилиту Ventoy (ссылка на сайт разработчика) . В установке она не нуждается, достаточно распаковать архив и запустить.
- подключить флешку/диск к USB-порту ( важно : в процессе работы с флешкой — все данные на ней будут удалены!) ;
- запустить Ventoy;
- в разделе «Option» рекомендую включить поддержку «Secure Boot» (на всех новых ПК это есть) ;
- указать флешку и нажать по кнопке «Install» . Через 15-30 сек. флешка будет подготовлена (но еще не готова!).

Ventoy — запись загрузочной флешки
Теперь просто копируем все загрузочные ISO-файлы, которые вам нужны (с Windows/Linux и др.), на подготовленную флешку.
Есть один нюанс : имена файлов должны быть на латинице (без русских символов и пробелов). Вообще, название лучше сделать макс. коротким, без спец. символов. Примеры ниже 👇
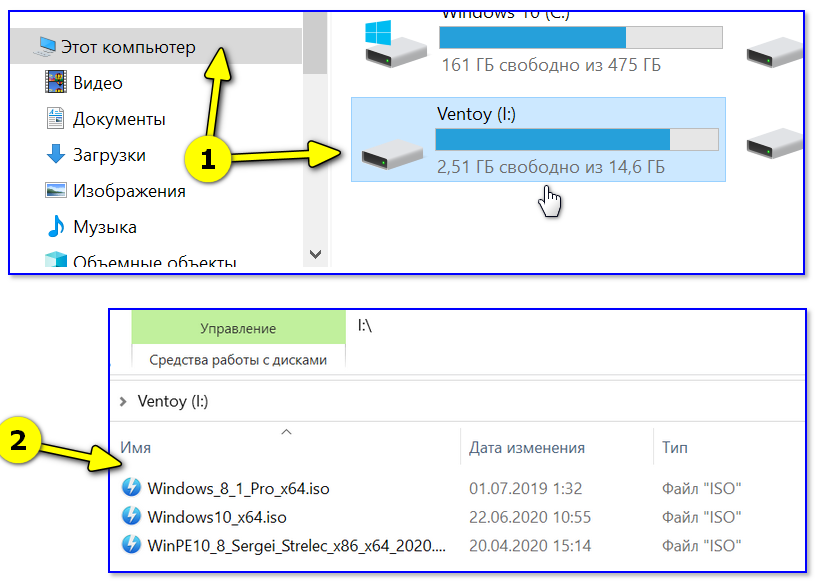
Копируем ISO-файлы с ОС на подготовленную флешку
Отмечу главное преимущество данного способа: вы можете в любое время скопировать на флешку другие ISO и удалить с нее те, что вам стали уже не нужны! И это без какого-либо форматирования и др. сложных пертурбаций (повторно в Ventoy заходить будет не нужно!) .
Правда, ведь удобно?! 👌.
ШАГ 3
Теперь покажу на примере, как всё это выглядит на практике.
Загружаться с флешки, подготовленной в Ventoy, можно, как и с любой другой — достаточно зайти в загрузочное меню (Boot Menu), или изменив соотв. параметры в BIOS. См. пример ниже. 👇
Как загрузиться с USB-флешки или внешнего HDD — для начинающих (всё по шагам)
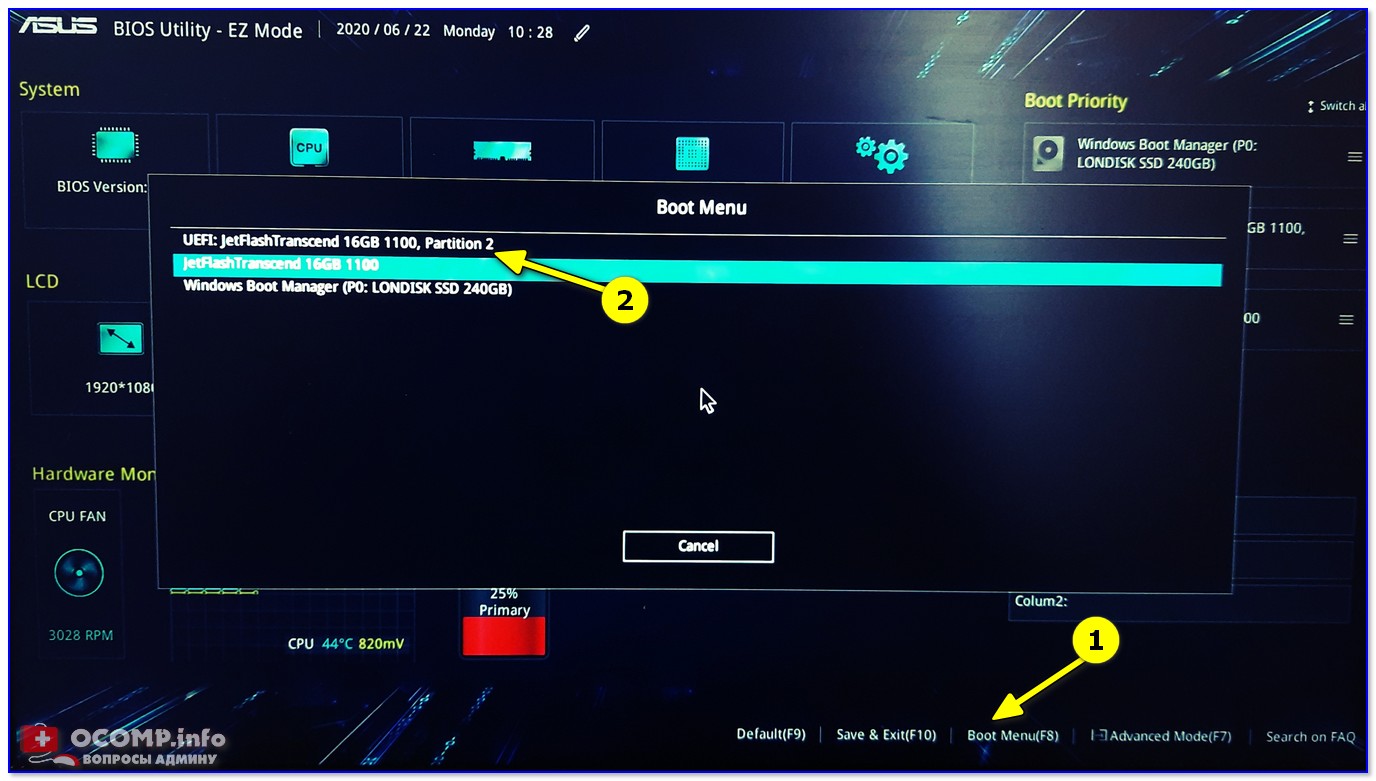
Загрузка с флешки от Ventoy
Далее перед вами покажется универсальное меню со списком всех ISO, которые вы добавили на флешку (в моем случае 3 образа: Windows 8, 10, и LiveCD 👇). Достаточно просто выбрать нужный ISO и нажать Enter.
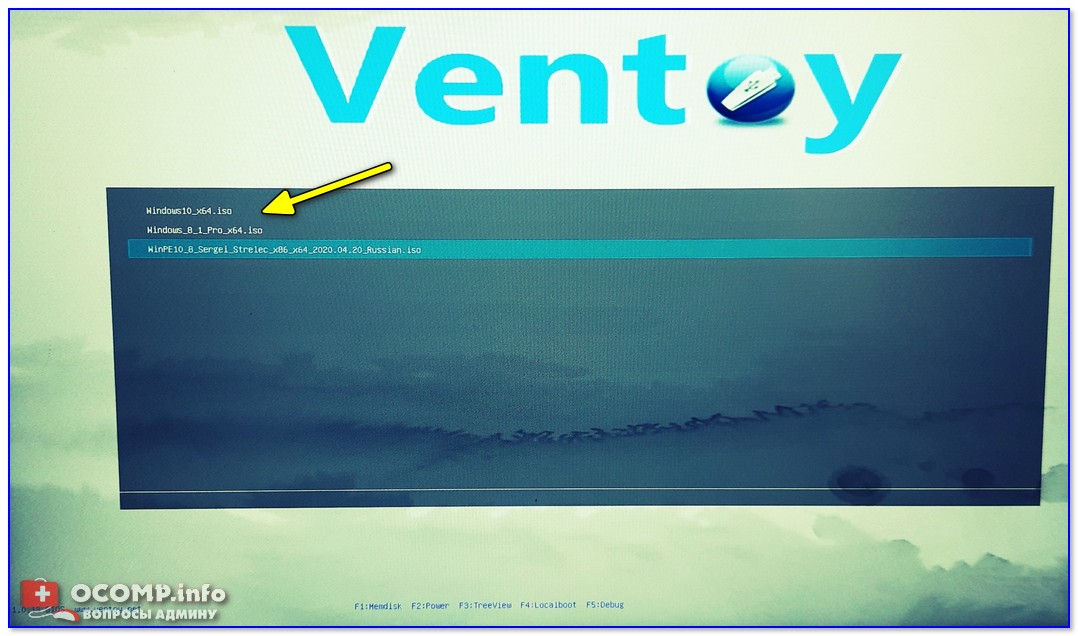
Ventoy — загрузка работает (обратите внимание на название!)
После начнется типовая установка ОС Windows (например). Никаких уникальных доп. действий более не потребуется. Протестировал на нескольких ПК, Windows 7/8/10 — всё ставится достаточно шустро и без проблем (ISO с Windows 7 лучше записать со встроенными драйверами для USB 3.0!) .
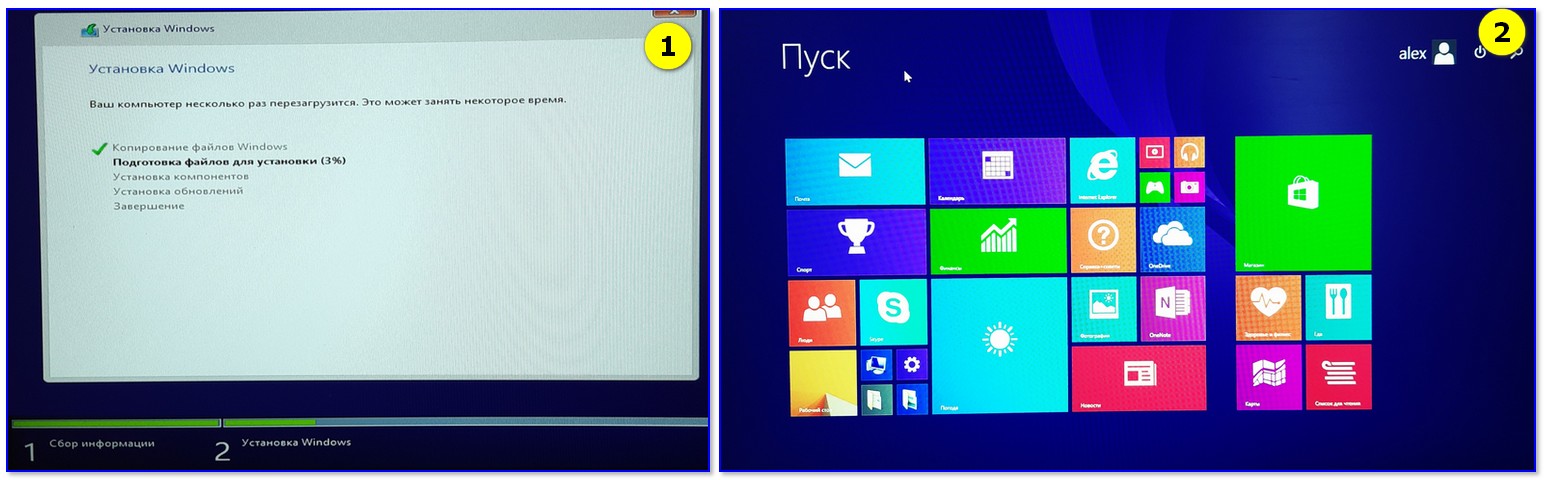
Тест установки Windows 8
ШАГ 4: альтернатива
Так как инструмент Ventoy пока новый, то не исключено, что на каких-то устройствах могут возникнуть «сложности». Поэтому на всякий случай привожу др. альтернативные варианты создания загрузочных носителей. 👇
1) Как создать мультизагрузочную флешку (диск) с несколькими Windows (для компьютеров/ноутбуков, работающих под UEFI)
2) Как создать загрузочную флешку Windows 10 под UEFI или BIOS в Rufus (новая 3.x версия) [инструкция]
🐤 Видео-инструкция
Весь процесс подготовки и тестирования флешки (более детально) вы также можете посмотреть в небольшом видео. Ссылка ниже.
How to Access Windows 10 Boot Options Menu (6 Ways)
Windows 10 offers a lot of interesting features, and the advanced boot options to troubleshoot many of the Windows 10 problems, is one of them. You can reset your PC, restore it to a previous state, boot to a different operating system, use «Startup Repair» to fix startup issues and boot Windows 10 in safe mode to troubleshoot problems.
There are many ways to access Windows 10 boot options with each having its own use case, and in this post, we will show you 5 different ways to access Windows 10 advanced boot options. Let’s take a look at these options.
If you can access Desktop
If Windows is working fine and you can access the desktop, then you can use the below-mentioned methods to access Windows 10 boot options.
I – Hold the Shift key and restart
This is the easiest way to access Windows 10 boot options.
- All you need to do is hold down the Shift key on your keyboard and restart the PC.
- Open up the Start menu and click on «Power» button to open power options.
- Now press and hold the Shift key and click on «Restart».
- Windows will automatically start in advanced boot options after a short delay.
This trick can work from anywhere, whether you click on «Restart» from the start menu, «Shutdown» dialog or the start screen. You just need to make sure you hold the Shift key while doing so. Do keep in mind that this method doesn’t work with the virtual keyboard. If your physical keyboard isn’t working, then this method will not work either.
II – Access Windows 10 boot options from Windows settings
If you can’t use the Shift + Restart option, then don’t worry. You can also boot Windows 10 in advanced startup options from its settings.
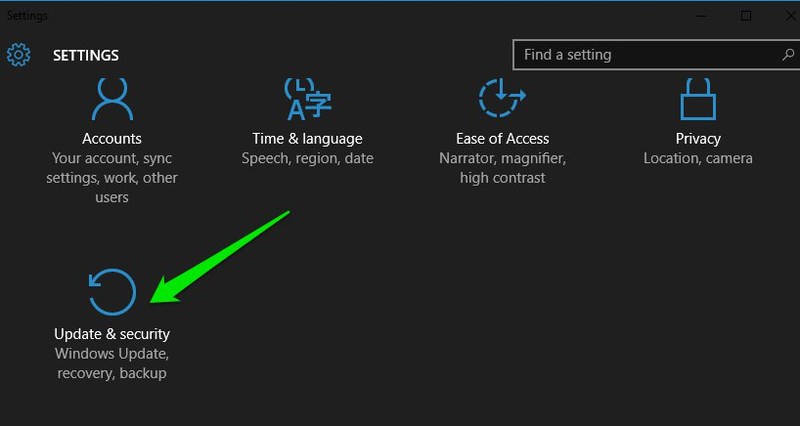
- Launch Windows 10 «Settings» from the Start menu and click on «Update & Security» at the bottom of the window.

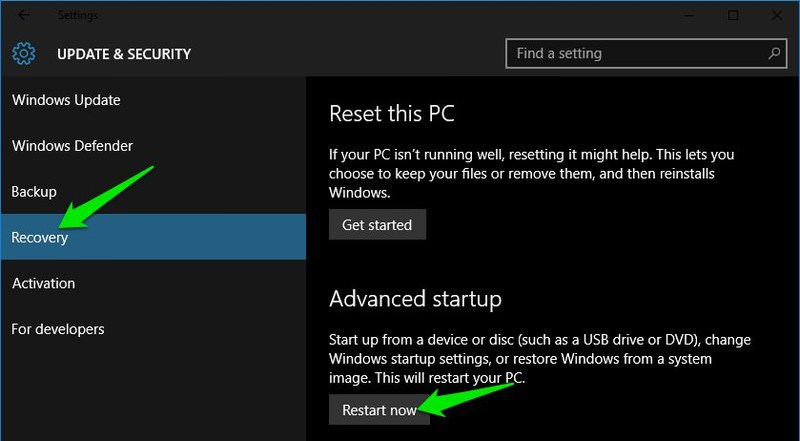
- Here move to the «Recovery» option and click on «Restart now» under «Advanced startup» option. Your PC will now restart into advanced boot options.
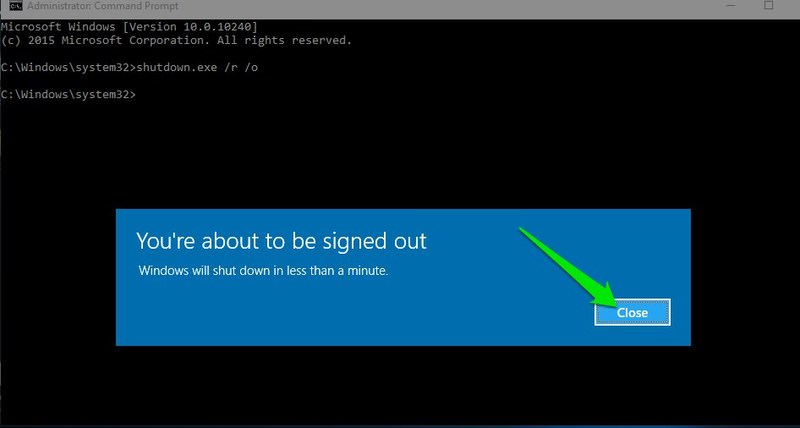
III – Use Command Prompt to access Windows 10 boot options
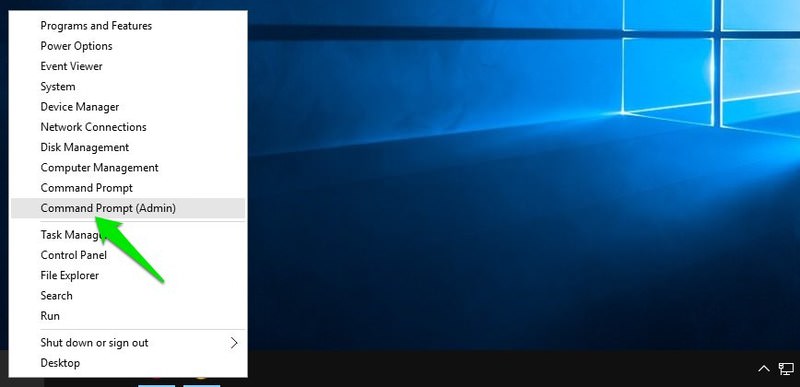
If you are interested, you can also use a quick Command Prompt command to access the advanced boot options.
- Right-click on the Windows 10 Start menu and select «Command Prompt (Admin)» from the menu.
- In the Command Prompt window, type shutdown.exe /r /o and hit «Enter».
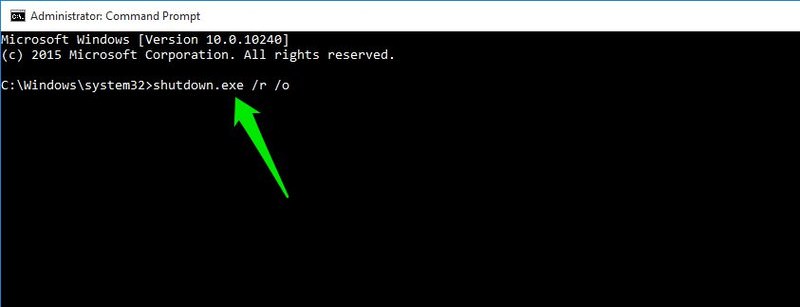
You will see a prompt saying you are being signed out, just close it and Windows 10 will reboot to boot options. However, unlike the above methods where Windows restarts immediately, there will be a tiny delay before the Windows restart.
And if can’t access Desktop
If you are unable to reach the desktop and the Windows keep crashing or restarting, then follow the below methods to access Windows 10 boot options and fix the problem.
I – Force Windows to start in advanced boot options
By default, Windows is set to restart in advanced boot options, if it fails to start up. If any startup error is causing your Windows to crash, then it may automatically launch the boot options for you. However, it is not compulsory and Windows may get stuck in a boot cycle.
In such situation, you can force Windows to crash and open boot options. To do so,
- Start the Windows and as soon as you see Windows logo; press and hold the power button to force shutdown it.
- You can also pull out the power supply (or battery) to force shutdown it.
- Repeat this 2-4 times and Windows will open up boot options for you.
For me, 2 times was enough to open up the boot options, your mileage may vary.
II – Use Windows 10 recovery drive
A Windows recovery drive can troubleshoot many Windows problems in case Windows is not starting. If a force shutdown didn’t help open up boot options, then this will definitely work for you.
If you haven’t created a recovery driver for your PC already, then you can easily create one right now. All you need is a USB drive and a PC running Windows 10.
- Use any Windows 10 PC, whether your own or friend’s; there is no licensing issue.
- Follow the instructions provided by Microsoft to create a recovery drive.
- Now attach the recovery drive to your faulty PC and restart it from this drive.
- You will be asked to choose a keyboard layout. Choose the appropriate one (U.S in most cases) and the boot options will open up.
III – Use Windows 10 installation drive/disc
You can also use a Windows 10 Installation drive/ disc to access boot options. If you installed Windows 10 using a USB drive or disc,
- You can boot from that USB/disc and click on the «Repair» option to access Windows 10 boot options.
- This is also a good option if you don’t have access to another Windows 10 PC to create a recovery drive.
- You can download Windows installerusing any other PC and use it to create an installation drive.
Exit Windows 10 boot options
The aforementioned options should be enough to access Windows 10 boot options and let you troubleshoot whatever the problem is. When you are done, click on the «Continue» button to exit boot options and launch Windows 10.
If you have multiple operating systems, then the default operating system will launch. In that case, select «Launch Another Operating System» option and then select Windows 10 to launch it.
To summerize
Holding Shift key and restarting the PC is definitely the easiest option to access Windows 10 boot options. However, if Windows is acting up and you are unable to boot properly, then a recovery or installation drive will help. If you know any other ways to access Windows 10 advanced boot options, let us know in the comments.


