- Get Started with Windows
- Web Dev — Windows(Native/WSL), Mac-OSX or Linux?
- Context
- How To Decide?
- Ease of Setup
- Ease of Use / Support Issues
- Learning Curve
- Associated Hardware
- Final Conclusion
- Manage windows on Mac
- Move, align and merge windows
- Maximise or minimise windows
- Quickly switch between app windows
- Close windows
Get Started with Windows
This guide will help you get started on setting up your very first React Native for Windows app.
Make sure you have installed all of the development dependencies.
For information around how to set up React Native, see the React Native Getting Started Guide.
Install React Native for Windows
Remember to call react-native init from the place you want your project directory to live.
To create TypeScript template, run npx react-native init
If you’ve installed react native globally in the past, via npm install -g react-native , and are having issues with the new instructions, try adding —ignore-existing to your npx command:
npx —ignore-existing react-native init
—template react-native@^0.64.0 instead.
Navigate into this newly created directory
Once your project has been initialized, React Native will have created a new sub directory where all your generated files live.
Install the Windows extension
Lastly, install the React Native for Windows packages.
The —overwrite flag copies a custom metro.config.js file. If you are starting a new app, this should have no impact. If you are adding Windows to your existing app and you have modified the metro.config.js file, please back up your changes, run the command and copy over to take effect.
Here are the options that react-native-windows-init takes:
| Option | Input Type | Description |
|---|---|---|
| —help | boolean | Show help. |
| —version | string | The version of react-native-windows to use. |
| —namespace | string | The native project namespace. |
| —verbose | boolean | Enables logging. |
| —language | string [» cs «,» cpp «] [default: » cpp «] | Which language the app is written in. |
| —projectType | string [» app «,» lib «] [default: » app «] | The type of project to initialize. |
| —overwrite | boolean | Overwrite any existing files without prompting. |
| —useWinUI3 | boolean | Targets WinUI 3.0 (Preview) instead of UWP XAML. |
| —no-telemetry | boolean | Disables sending telemetry that allows analysis of usage and failures of the react-native-windows CLI |
This sends telemetry to Microsoft by default. You can prevent the telemetry from being sent by using the —no-telemetry command line option. See the react-native-windows-init README for more details.
Running a React Native Windows App
Make sure a browser is launched and running before running a React Native Windows app. Also ensure your system meets all the requirements to build a Windows app as well.
Without Using Visual Studio
In your React Native Windows project directory, run:
A new Command Prompt window will open with the React packager as well as a react-native-windows app. This step may take a while during first run since it involves building the entire project and all dependencies. You can now start developing! :tada:
This sends telemetry to Microsoft by default. You can prevent the telemetry from being sent by using the —no-telemetry command line option. See the @react-native-windows/cli README for more details.
For a description of the options that run-windows offers, see run-windows usage.
Using Visual Studio
- From the root of the project directory, run the following script which will automatically link your app’s dependencies:
- Open the solution file in the application folder in Visual Studio (e.g., AwesomeProject/windows/AwesomeProject.sln if you used AwesomeProject as
)
- Open your applications folder in VS Code.
- Install the React Native Tools plugin for VS Code.
- Create a new file in the applications root directory, .vscode/launch.json and paste the following configuration:
- Press F5 or navigate to the debug menu (alternatively press Ctrl+Shift+D ) and in the Debug drop-down select «Debug Windows» and press the green arrow to run the application.
Authoring Native Modules
Building a standalone React Native Windows App
Follow these steps to build a version of your app that you can install or publish to the store. This version will package your bundle and assets into the APPX package so you don’t need to run Metro.
- Open the solution in Visual Studio
- Select the Release configuration from the Configuration Manager drop-down.
- Build the solution. You can now launch without first launching Metro.
- If you want to build an APPX package to share or publish, use the Project >Publish >Create App Packages. option.
Web Dev — Windows(Native/WSL), Mac-OSX or Linux?

Recently at Auquan, I had to make a choice between Windows, OSX and Linux operating systems. It took me a few weeks to try out all the operating systems and and there were quite a few factors that went into the final decision. In this article, I will break down my experiences, the decision making process and how we finally arrived at Windows(WSL) as the operating system of choice.
Context
Auquan is currently a team of 5 engineers and the number is expected to grow to 10+. We have a MERN(Mongo-Express-React-Node) stack and so far as a seed stage startup we were able to get away with everyone working on their personal laptops. However, it was becoming clear that we need to get our engineers work machines so that the team can have a standard dev environment. Our current state was: 2 of us were on OSX, 1 on Windows(native) and 2 on Linux. So started the long debate of which OS should we go with.
How To Decide?
First things first, I decided to give each one a fair shot. I was actively working in OSX and I had a native windows environment as well that I had used on and off over the past year. For a linux environment I fired up an AWS machine as it would serve well for purposes of evaluating. It was around this time that I remembered something like WSL exists and had enjoyed quite the hype when it first arrived. For the uninitiated, WSL is Windows Subsystem For Linux and it lets you have bash support without having to install linux as a separate partition. I added WSL to the mix of contenders and now we had 4 environments to evaluate. Following are the factors we were considering:
Ease of Setup
Before you can start using an environment you have to set it up so it is important the setup is easy and smooth. For each of the factors I will talk about my experience.
Windows(Native): I did the setup through installers and it was fairly simple to get the environment up and running. I did not install a local version of MongoDB so I cannot speak to simplicity of that.
Mac-OSX/Linux: Absolutely simple once you have xcode/brew setup. Just run a bunch of commands in terminal, clone your repository and you are good to go.
WSL: Getting WSL setup is the added cost here, but you can pick up any guide and you will be set up in
30 mins 25 of which will be the download time, i.e. its super simple to set up WSL. Afterwards installing node is just like linux but setting up mongoDb required a bit more research as WSL is still very new. It took me exponentially more time than either of the other OS’s to set this configuration up but once I figured out the steps the complexity becomes same as the Windows(native) set up. I will make another post with a full rundown of how to set up a web env on WSL.
Ease of Use / Support Issues
This factor was to do with how good is the tooling around our environment. Will we need to repeatedly deal with unsupported libraries or minor issues that make the development process harder.
Windows(Native): The support framework leaves a lot to be desired. Most new things have to be installed separately and the cmd line just feels lacking. Powershell has improved upon that but for our use case it did not seem to deliver. However considering office/excel is also a part of our workflow windows had the clear edge there and the GUI exploration is just better.
Mac-OSX: Great command line and tools around it. iterm has to be the best terminal app and everything you need is a command away. The rest of the OS however did not feel as powerful as windows for our use case of exploring big data sets using GUI or general tooling.
Linux: Once again great command line and tooling. The GUI has improved over the years but compared to other 2 it is still lagging behind.
WSL: This is where WSL shone, we could get the linux command line while keeping the windows GUI. What’s there to lose? Well, possibly quite a bit. WSL is new and does not have extensive support documentation so you may find yourself on wild goose chases every once in a while. However, most of the issues I dealt with had solutions that were applicable for linux and more importantly there always WAS a solution even if it was not officially supported.
Learning Curve
If people have to switch OS’s it always comes with an added cost of learning the new OS/env. It slows you down from getting to the bits that actually matter. I am yet to meet a person who has not used a windows machine ever. Possibly the younger engineers have not but people in their 20’s have all grown up with windows and the OS is very familiar to everyone. So windows was a clear winner here over OSX or Linux.
Associated Hardware
Macs are expensive, the quality of hardware justifies some of that cost but a entry level 15 inch Macbook Pro will still cost you
$2600 with taxes. To top it the current generation Macbook keyboard is just lackluster and the touch bar is one of the worst gimmicks I have ever experienced. You can easily obtain out performing and great looking hardware from HP/Dell for sub $1500 range. And if you want absolutely beautiful looking hardware just look at HP Spectre or Dell Xps but they will run you a little more.
Final Conclusion
After working with WSL for over a month I could not find any reasons to not choose it as my environment of choice. Once I installed cmder I got close to having an iterm like experience and all my everyday commands in WSL just seemed to work. There were a couple gotchas here and there, mostly to do with how the file system operates but a quick google search always gave me answers I needed. My experience, coupled with the linux command line, windows interface and
$1500 saving on every machine we got led us to choose Windows + WSL as our environment. Next, I will be doing a detailed post on how to set up a MERN environment on WSL but in the meantime let me know your thoughts.
Manage windows on Mac
When you open an app or the Finder on your Mac, a window opens on the desktop. Only one app at a time is active; the name of the app (in bold) and the app menus are shown in the menu bar.
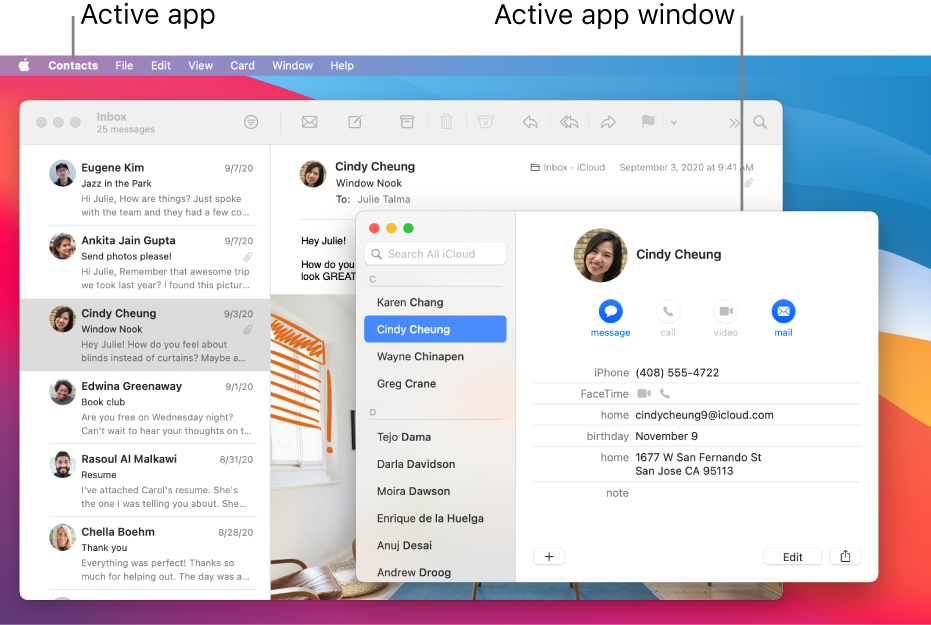
Some apps, such as Safari or Mail, let you open multiple windows or different types of windows at the same time. macOS provides several ways to manage open apps and windows.
Move, align and merge windows
On your Mac, do any of the following:
Move a window: Drag the window by its title bar to where you want it. Some windows can’t be moved.
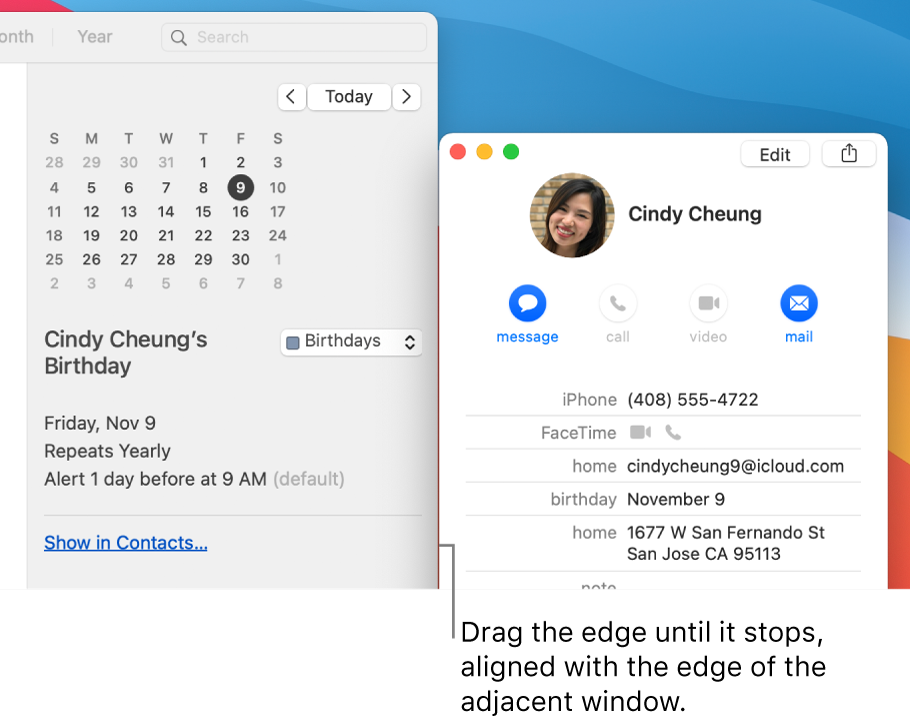
Align windows: Drag a window close to another one — as the window nears the other one, it aligns without overlapping. You can position multiple windows adjacent to each other.
To make adjacent windows the same size, drag the edge you want to resize — as it nears the edge of the adjacent window, it aligns with the edge and stops.
Merge an app’s windows into one tabbed window: In the app, choose Window > Merge All Windows.
To make a tab a separate window again, select the tab, then choose Window > Move Tab to New Window, or just drag the tab out of the window. See Use tabs in windows.
Maximise or minimise windows
On your Mac, do any of the following in a window:
Maximise a window: Press and hold the Option key while you click the green maximise button  in the top-left corner of an app window. To return to the previous window size, Option-click the button again.
You can also double-click an app’s title bar to maximise the window (as long as the option to do so is set to “zoom” in Dock & Menu Bar preferences).
Minimise a window: Click the yellow minimise button  in the top-left corner of the window or press Command-M.
You can set an option in Dock & Menu Bar preferences to have a window minimise when you double-click its title bar.
Most windows can be manually resized. Drag the window’s edge (top, bottom, or sides) or double-click an edge to expand that side of the window.
Quickly switch between app windows
On your Mac, do any of the following:
Switch to the previous app: Press Command-Tab.
Scroll through all open apps: Press and hold the Command key, press the Tab key, then press the Left or Right arrow key until you get to the app you want. Release the Command key.
If you change your mind while scrolling through the apps and don’t want to switch apps, press Esc (Escape) or the Full Stop key, then release the Command key.
Close windows
On your Mac, do any of the following:
Close a single window: In a window, click the red Close button  in the top-left corner of the window, or press Command-W.
Close all open windows for an app: Press Option-Command-W.
Closing one or all windows for an app does not close or quit the app. To do so, press Command-Q, or click the app’s name in the menu bar, then choose Quit [App]. See Quit apps.
You can hide the active app by pressing Command-H.
Use Mission Control to quickly arrange open windows and spaces in a single layer to easily spot the one you need.


