- Download and install drivers in Windows 8.1
- To check that automatic updating is on
- To manually install a driver
- Windows can’t verify the publisher of this driver software
- This driver hasn’t been signed
- Windows requires a digitally signed driver
- Update drivers in Windows 10
- Before you begin
- Update the device driver
- Reinstall the device driver
- More help
- How to Install a Driver Manually in Windows 7, 8, 10 (Basic .inf driver)
- What are Basic Drivers?
- How to Install a Driver Manually using its basic driver
- How to Install Drivers
Download and install drivers in Windows 8.1
Windows comes with drivers for many devices, such as printers, displays, keyboards, and TVs. A driver is software that a device uses to work with your PC. Every device needs a driver to work with your PC. So, in many cases, you can plug in a device, and it’ll work automatically.
Windows can also download device software and info. This might include an app that the device manufacturer created to go with your device or info like the product name, manufacturer, and model number, to help you distinguish between similar devices.
Drivers are updated occasionally. Windows can update them automatically, or you can install the updated drivers yourself. It’s important for you to have confidence in the updated drivers you install. Windows notifies you if it detects a suspicious or unsafe driver you shouldn’t install.
Windows Update checks for updated drivers and software for your devices and install them automatically. Keeping Windows Update on is a good way to make sure your devices continues to work properly and you get the best experience with them.
Note: PCs running Windows RT 8.1 always automatically download and install drivers, apps, and info for your devices.
To check that automatic updating is on
Swipe in from the right edge of the screen, tap Settings, and then tap Change PC settings. (If you’re using a mouse, point to the lower-right corner of the screen, move the mouse pointer up, click Settings, and then click Change PC settings.)
Tap or click Update and recovery, and then tap or click Windows Update.
Tap or click Choose how updates get installed.
Under Important updates, choose Install updates automatically (recommended).
If your device came with a disc, it might contain software that installs a driver. Before you install a driver from a disc, check the info that comes with it to be sure it supports your current version of Windows.
You can also search for new drivers on the manufacturer’s website. Driver updates are often available in the support section of their website. Download the latest driver for your device, and follow the installation instructions on the website. You can usually double-tap or double-click the downloaded file to install the driver on your PC.
If the driver you got from a disc or downloaded from a website doesn’t install itself, you might need to install manually.
To manually install a driver
You must be signed in as an administrator to follow these steps.
Swipe in from the right edge of the screen, and then tap Search. (If you’re using a mouse, point to the lower-right corner of the screen, move the mouse pointer up, and then click Search.)
Enter Device Manager in the search box, and tap or click Device Manager.
In the list of hardware categories, double-tap or double-click the category your device is in and then double-tap or double-click the device you want. For example, to see your video card, tap or click Display adapters, and then double-tap or double-click the video card name.
Tap or click the Driver tab, tap or click Update Driver, and then follow the instructions.  You might be asked for an admin password or to confirm your choice.
Occasionally, you might see a notification that a driver is unsigned, has been changed since it was signed, or can’t be installed by Windows. We recommend that you don’t install unsigned or changed drivers.
A digitally signed driver includes a digital signature, which is an electronic security mark that indicates the publisher of software and whether someone has tampered with it since it was signed. If a driver has been signed by a publisher that has verified its identity with a certification authority, you can be confident that the driver comes from that publisher and hasn’t been changed.
If you see any of the following notifications when you’re installing a driver, you should stop the installation and go to your device manufacturer’s website to get a digitally signed driver for your device.
Windows can’t verify the publisher of this driver software
The driver doesn’t have a digital signature or has been signed with a digital signature that wasn’t verified by a certification authority. You should only install this driver if you got it from the manufacturer’s disc or from your system administrator.
This driver hasn’t been signed
The driver hasn’t been digitally signed by a verified publisher. The driver might have been changed to include malware that could harm your PC or steal info. In rare cases, legitimate publishers do change drivers after they’ve been digitally signed, but you should only install an unsigned driver if you got it from a device manufacturer’s disc.
Unfortunately, there’s no trustworthy source of info that indicates who has published an unsigned driver. Anyone can change the contents of an unsigned driver, and there’s no way to know why it was changed. Most manufacturers now digitally sign the drivers they create before releasing them to the public.
Windows requires a digitally signed driver
A driver that lacks a valid digital signature, or has a signature that was changed after it was signed, can’t be installed on 64-bit versions of Windows. You’ll only see this notification if you have a 64-bit version of Windows and try to install such a driver on it.
Update drivers in Windows 10
Before you begin
Driver updates for Windows 10, along with many devices, such as network adapters, monitors, printers, and video cards, are automatically downloaded and installed through Windows Update. You probably already have the most recent drivers, but if you’d like to manually update or reinstall a driver, here’s how: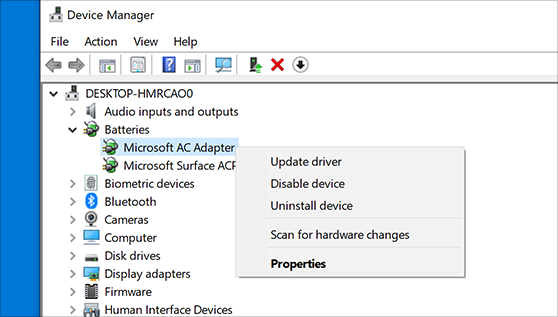
Update the device driver
In the search box on the taskbar, enter device manager, then select Device Manager.
Select a category to see names of devices, then right-click (or press and hold) the one you’d like to update.
Select Search automatically for updated driver software.
Select Update Driver.
If Windows doesn’t find a new driver, you can try looking for one on the device manufacturer’s website and follow their instructions.
Reinstall the device driver
In the search box on the taskbar, enter device manager, then select Device Manager.
Right-click (or press and hold) the name of the device, and select Uninstall.
Restart your PC.
Windows will attempt to reinstall the driver.
More help
If you can’t see the desktop and instead see a blue, black, or blank screen, see Troubleshoot blue screen errors or Troubleshoot black or blank screen errors.
How to Install a Driver Manually in Windows 7, 8, 10 (Basic .inf driver)
Every device needs a driver to communicate with the computer. As you all know, Device driver is a mandatory thing to communicate with any devices like printer, LAN card, Bluetooth, Wi-Fi, audio device etc. Installing a device through its driver setup file is an easy task. But it won’t be easy, if you install a device through its basic driver (inf driver). Here in this article we’ll show you how to install a driver manually using its basic INF driver through device manager.

What are Basic Drivers?
Usually drivers comes as installer. They can be easily installed by running a setup file. But Basic drivers comes without installer. Basic drivers are available in INF format. So to install these type of basic drivers we need to perform some tasks manually. Basic drivers takes very less size, so they are easy to keep as backup. And some times full feature installer is unable to detect the device in this case also we have to install them manually. Sometimes the only basic driver is available for download instead of full feature driver (with installer). So, we only have an option to install the basic driver manually using its basic driver on our computer, but some peoples don’t know how to do it. Here in this article, we will show you how you can install a computer device using its basic “.inf” driver.
How to Install a Driver Manually using its basic driver
We are taking an example of a laptop Wi-Fi driver (Wireless card driver). So let’s get started without any delay.
Before starting you must have the basic driver files available with you. Or first download the drivers from the Internet. Then proceed the following steps
- Step 1: To install basic driver manually, you’ll require to download its basic driver (.sys, .inf driver) which should be in zip format.

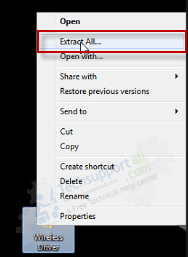
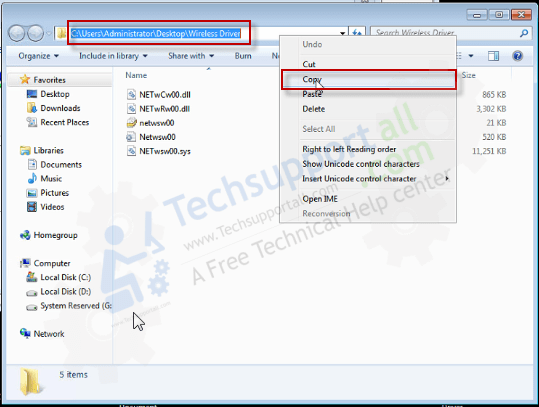
- Step 2: Extract the zipped driver file to a location and copy the location path.
- Step 3: Right-click on “My computer / This PC” → click on Manage → Device Manager→ Other devices.
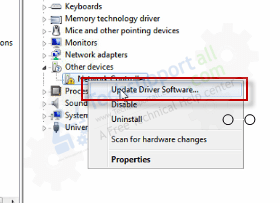
- Step 4: Under other devices you’ll see a device named “Network Controller“. Right-click on Network Device and click on Update driver. You may find the devices with Yellow mark which are without proper device drivers. Select your targeted device from the list.
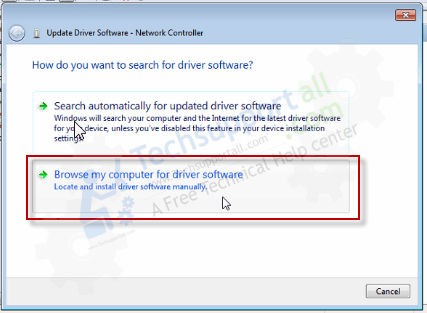
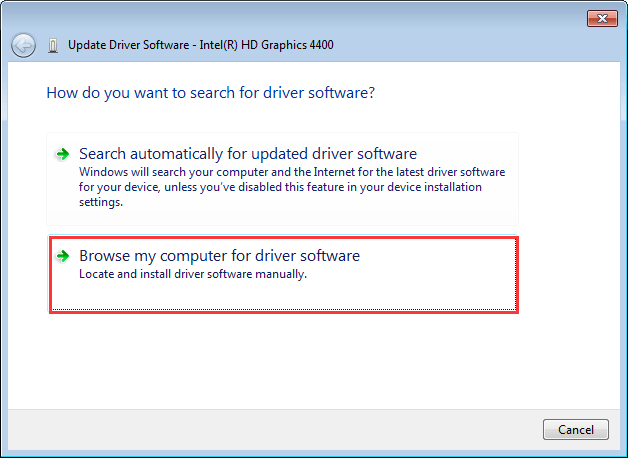
- Step 5: Choose the second option “Browse my computer for driver software“.
- Step 6: Click on second option “Let me pick from a list of available drivers on my computer“.
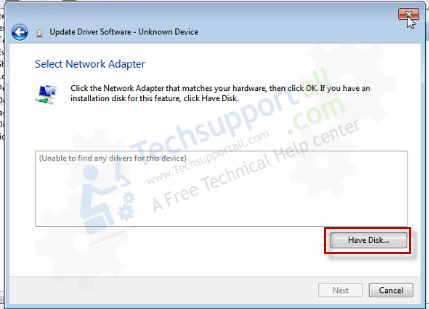
- Step 7: Click on Have Disk.
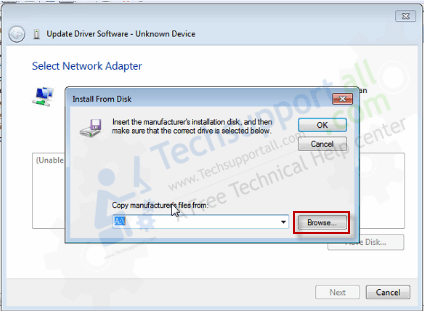
- Step 8: Click on Browse.
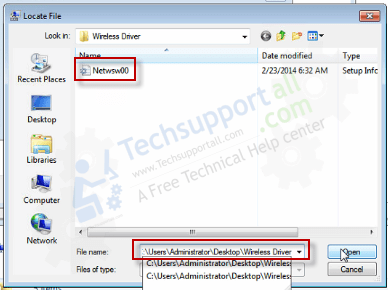
- Step 9: Now, paste the copied path in the “File name” field, and click on open button. Choose the INF file and click on Open. You may extract the full feature driver file and then find the .inf driver file in it.
- Step 10 : It will update the driver’s list, choose the driver “Centrino Advanced-N 6200 AGN” and then click on Next.
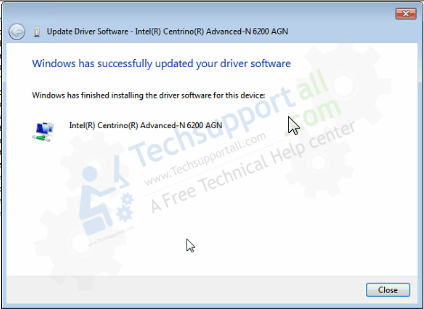
- Step 11: It will start installing the driver automatically and then it will give you the successfully installed message.
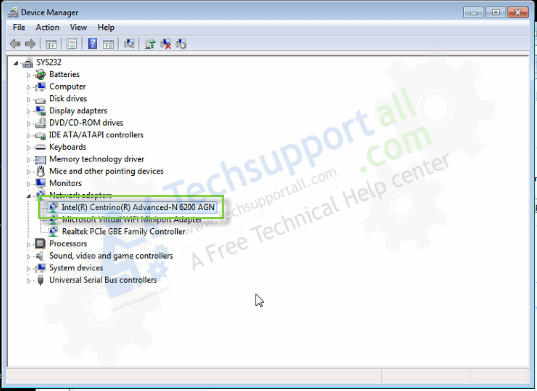
- Step 12: You could go to the device manger and check the basic driver (.inf) has been installed successfully.


If you are unable to find the appropriate drivers you may look for some driver finder utilities or automatic driver installer software. Check out the Best Driver Finder Software.
How to Install Drivers
Last Updated: 4 years ago
As you know, a driver is software that a device uses to work with your PC. When your device isn’t working properly, you can check if the driver is installed correctly. Faulty driver could always be the cause. To fix the problem, you need to update the driver. For some devices, Windows can update the driver automatically. For some devices especially external devices, you need to install the updated drivers yourself, then you need to download the driver manually.
Download the driver manually
To download new drivers, go to PC manufacturer’s website or device manufacturer’s website. Driver updates are often available in the Support section of their website. If you are using a branded computer, it is recommended that you go to the PC manufacturer’s website to check for the latest driver first, as they may customize the driver. You are required to use the PC model and the operating system that you are using to download the correct driver. Usually, the PC model can be found on the machine. See How to Get Operating System. If you need to download the driver from device manufacturer, then you are required to know the device model.
How to install the driver
The downloaded driver file will be an executable file (File name ends in “.exe”.) or a zip file (File name ends in “.zip”.).
For executable file, to install the driver, you just need to double-click on the file and follow the on-screen instructions.
For zip file, you need to unzip it and find the executable file in the archive. If you cannot find an executable file, you need to install the driver step by step using the “.inf” file. Following steps are for your reference how to install the driver in this way.
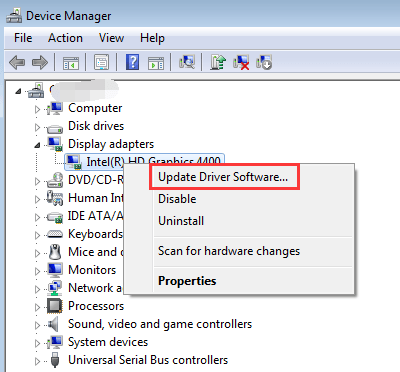
2. Find the device that need to install a driver. (Here let’s take video card for example.)
3. Right-click on the device and select Update Driver Software…
4. Select Browse my computer for driver software.
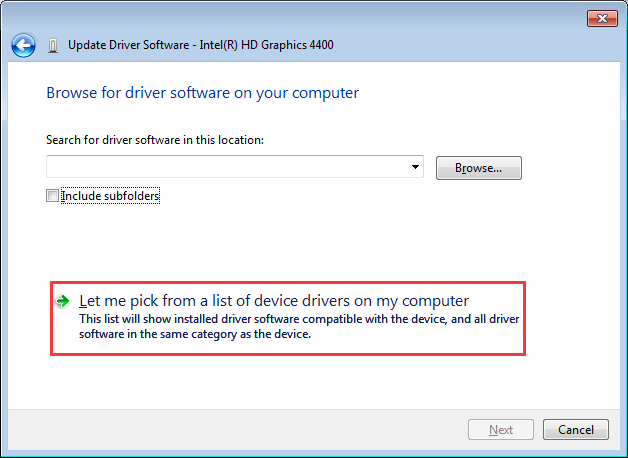
5. Select Let me pick from a list of device drivers on my computer.
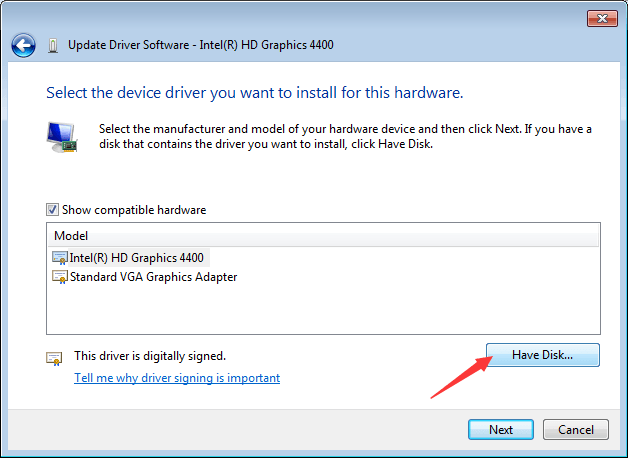
6. Click Have Disk… button.
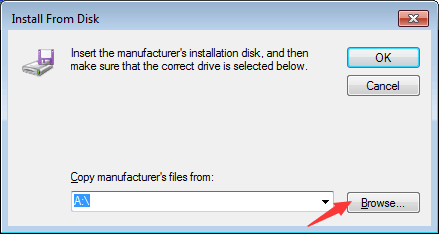
7. Click Browse… button. Navigate to the folder where you saved the downloaded driver file and browse the .inf driver file.
8. Click OK button then Next button to finish the installation. You might be asked for an admin password or to confirm your choice.
If you have difficulty in downloading and installing drivers manually, or if you want to save more time in updating drivers, you can use Driver Easy to help you.
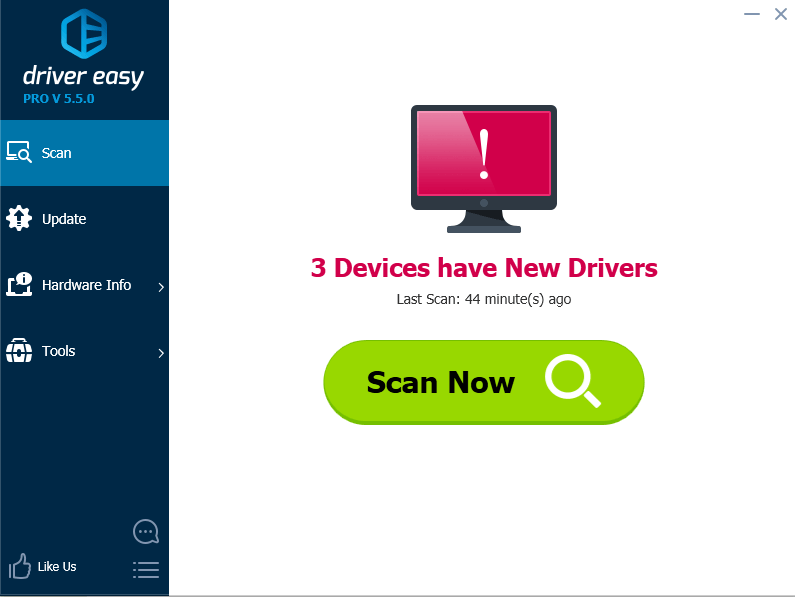
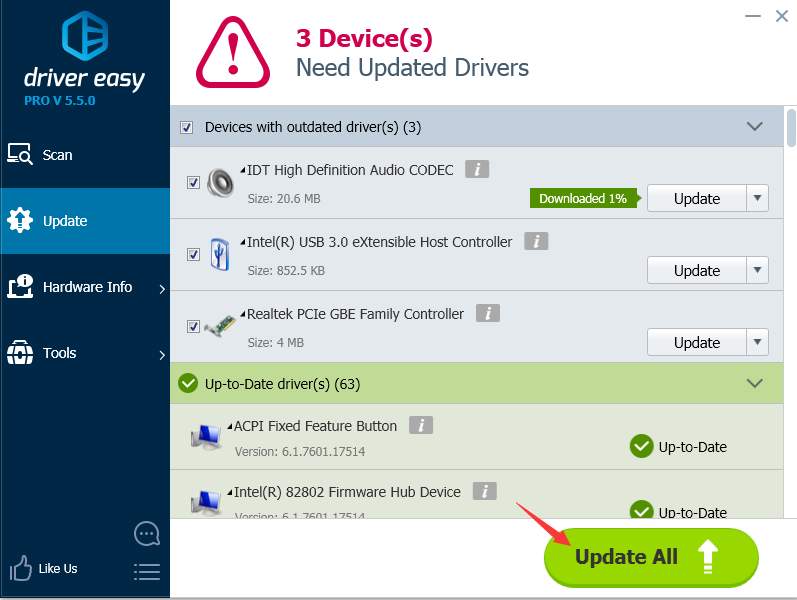
Driver Easy can scan your computer to detect all problem drivers in several seconds, then give you new drivers. It has Free version and Paid version. You can use the Free version to update drivers one at a time. With Paid version, to update drivers, all you need to do is click your mouse 2 times.
1. Click Scan Now button. Then Driver Easy will scan your computer quickly and provide you with new drivers instantly.
2. Click Update All button. Then all drivers will be downloaded and installed automatically.
If you upgrade the program to Paid version, you will enjoy free technical support and 30-day money back guarantee. Just contact our professional support for further assistance regarding any driver problem. And you You can ask for a full refund for any reason.


