- Если появляется синий экран с надписью Your PC/Device needs to be repaired в Windows 10
- Ошибка Your PC/Device needs to be repaired в Windows 10
- 1 Запуск восстановления при загрузке
- 2 Использование командной строки
- 3 Использование восстановления системы
- 4 Переустановка операционной системы
- How to refresh, reset, or restore your PC
- Before you start to refresh or reset your PC
- Refresh, reset, or restore
- To refresh your PC
- To reset your PC
- To restore your PC to an earlier point in time
- You Don’t Need to Regularly Reinstall Windows; Here’s Why
- What Does Slow Windows Down Over Time?
- Stop Installing Junk Applications
- Be Smarter About What You Do Install
Если появляется синий экран с надписью Your PC/Device needs to be repaired в Windows 10
Пользователи расстраиваются и раздражаются, когда находят свой компьютер застрявшим на синем экране с надписью Your PC/Device needs to be repaired. К счастью, эту ошибку довольно просто устранить.
 Ошибка Your PC/Device needs to be repaired в Windows 10
 Ошибка Your PC/Device needs to be repaired в Windows 10
Такая ошибка обычно появляется, когда вы включаете компьютер, и он пытается загрузить операционную систему. Причины этой ошибки варьируются, начиная от отсутствующей/поврежденной системы или загрузочных конфигурационных файлов до других различных проблем загрузки.
Вместе с сообщением об ошибке Your PC/Device needs to be repaired вы увидите коды ошибки, такие как 0xc000000f, 0x000014c, 0x0000098, 0xc0000034, 0xc0000225.

Когда компьютер застрял на экране с таким предупреждением, ошибка сама по себе никуда не денется. Компьютер вернется на тот же самый экран даже, если вы его перезагрузите.
Для того, чтобы исправить эту ошибку, вам нужно перезагрузить компьютер с помощью загрузочного USB-накопителя, используя один из нижеперечисленных методов.
1 Запуск восстановления при загрузке
2 Использование командной строки
3 Использование восстановления системы
4 Переустановка операционной системы
1 Запуск восстановления при загрузке
1 Нажмите кнопку питания для того, чтобы выключить компьютер.
2 Вставьте в USB-порт загрузочный USB-накопитель и включите компьютер, нажав на кнопку включения .
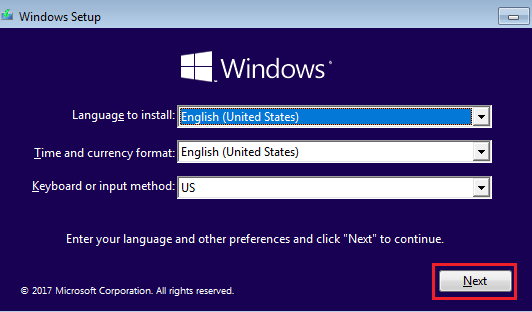
3 Теперь ваш компьютер будет загружаться с загрузочного USB-накопителя, и вы увидите окно установки операционной системы Windows. Выберите свой язык, формат времени и язык клавиатуры и нажмите на кнопку Далее .
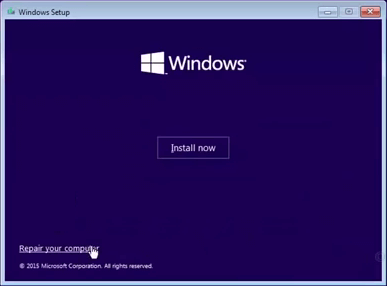
4 На следующем экране нажмите на опцию Восстановление системы .
5 Далее кликните Диагностика .
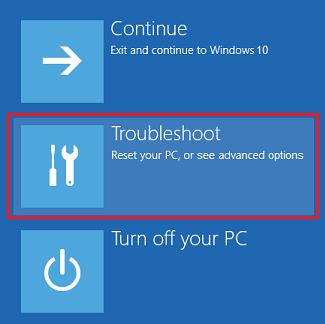
6 Затем, Дополнительные параметры > Восстановление при загрузке .
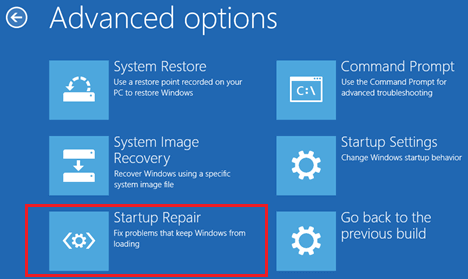
7 Подождите пока Восстановление при загрузке найдет проблемы и устранит их.
Как только процесс восстановления будет закончен, перезагрузите компьютер и проверьте, нормально ли он загружается.
2 Использование командной строки
В случае, если Восстановление при загрузке не смогло исправить проблему на компьютере, тогда вы можете попробовать исправить проблему, используя Командную строку.
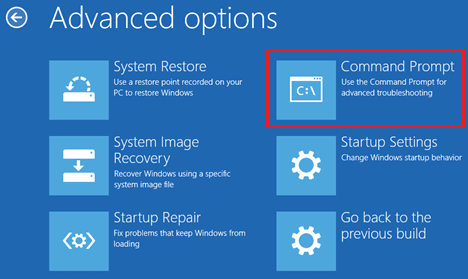
1 Запустите компьютер с использованием загрузочного USB-накопителя > нажмите Далее > Восстановление системы > Диагностика > Дополнительные параметры .
2 На экране Дополнительные параметры нажмите на опцию Командная строка .
3 В окне Командной строки наберите sfc /scannow и нажмите на клавиатуре клавишу Enter.
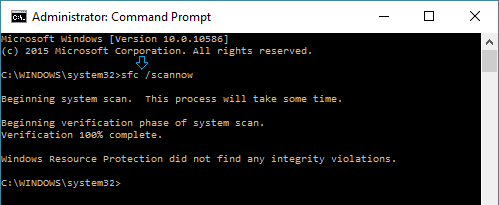
Находясь в окне Командной строки, вы можете исправить файлы загрузочных записей вводя следующие команды – каждый раз после набора команд нажимайте клавишу enter.
1 bootrec /fixmbr
2 bootrec /fixboot
3 bootrec /rebuildbcd
3 Использование восстановления системы
Следующим вариантом является возврат компьютера к той временной точке, когда он работал без проблем. Это может быть выполнено с использованием Восстановления системы в Windows 10.
1 Запустите компьютер с помощью загрузочного USB-накопителя > нажмите Далее > Восстановление системы > Диагностика > Дополнительные параметры .
2 На экране Дополнительные параметры нажмите на опцию Восстановление системы.
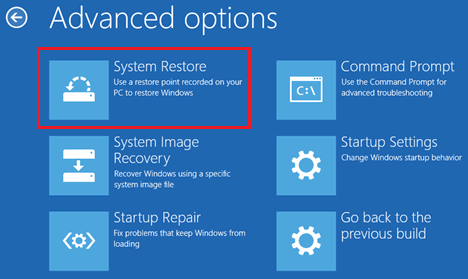
3 Следуйте инструкциям, появляющимся на экране, для восстановления компьютера.
4 Переустановка операционной системы
В случае, если ваш компьютер не был настроен на создание точек восстановления, и ни один из вышеописанных методов не сработал, у вас остался только один вариант – переустановить операционную систему.
Практически, это означает, что вы потеряете все свои файлы, программы и данные, которые находятся на компьютере, за исключением того случая, когда вы сделали бэкап.
1 Запустите компьютер с помощью загрузочного USB-накопителя > Нажмите Далее > Установить .
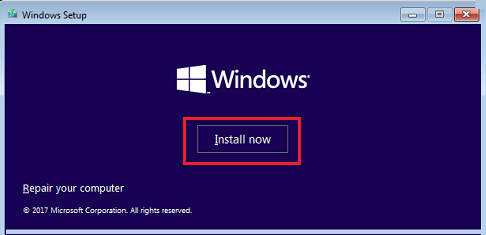
2 Следуйте инструкциям, появляющимся на экране, для того, чтобы выполнить процесс установки и переустановить Windows 10.
How to refresh, reset, or restore your PC
Note: For information about this topic in Windows 10, see Recovery options in Windows 10.
If you’re having problems with your PC, you can:
Refresh your PC to reinstall Windows and keep your personal files and settings. Refresh also keeps the apps that came with your PC and the apps you installed from the Microsoft Store.
Reset your PC to reinstall Windows but delete your files, settings, and apps—except for the apps that came with your PC.
Restore your PC to undo recent system changes you’ve made.
If you’re having trouble starting (booting) your PC, see Windows Startup Settings (including safe mode), and go to the “Get to Windows Startup Settings in the Windows Recovery Environment” section. You can refresh, reset, or restore your PC from the Windows Recovery Environment.
If you want to back up and restore your personal files using File History, see Set up a drive for File History.
Before you start to refresh or reset your PC
In most cases, once you start to refresh or reset your PC, it’ll finish on its own. However, if Windows needs missing files, you’ll be asked to insert recovery media, which is typically on a DVD disc or thumb drive. If that happens, what you’ll need depends on your PC.
If your PC came with Windows 8.1 or Windows RT 8.1, you’ll need the discs or thumb drive that came with your PC. Check the info that came with your PC to see if your PC manufacturer provided these discs or media. In some cases, you might have created them when you first set up your PC.
If you don’t have either of those, you can make them if you have a USB thumb drive of 16 GB or larger. Having a recovery drive can help you troubleshoot and fix problems with your PC, even if it won’t start. For more info, see Create a USB recovery drive.
If you upgraded your PC to Windows 8.1 or Windows RT 8.1 with a DVD, use that disc. If you don’t have Windows 8.1 or Windows RT 8.1 media, contact Microsoft Support.
Refresh, reset, or restore
Select any of the following for more detailed info.
If your PC isn’t performing as well as it once did, and you don’t know why, you can refresh your PC without deleting any of your personal files or changing your settings.
Note: If you upgraded your PC from Windows 8 to Windows 8.1 and your PC has a Windows 8 recovery partition, refreshing your PC will restore Windows 8. You’ll need to upgrade to Windows 8.1 after the refresh has finished.
Warning: Apps you installed from websites and DVDs will be removed. Apps that came with your PC and apps you installed from Microsoft Store will be reinstalled. Windows puts a list of removed apps on your desktop after refreshing your PC.
To refresh your PC
Swipe in from the right edge of the screen, tap Settings, and then tap Change PC settings.
(If you’re using a mouse, point to the upper-right corner of the screen, move the mouse pointer down, click Settings, and then click Change PC settings.)
Tap or click Update and recovery, and then tap or click Recovery.
Under Refresh your PC without affecting your files, tap or click Get started.
Follow the instructions on the screen.
If you want to recycle your PC, give it away, or start over with it, you can reset it completely. This removes everything and reinstalls Windows.
Note: If you upgraded your PC from Windows 8 to Windows 8.1 and your PC has a Windows 8 recovery partition, resetting your PC will restore Windows 8. You’ll need to upgrade to Windows 8.1 after the reset has finished.
Warning: All of your personal files will be deleted and your settings will be reset. All apps that you installed will be removed. Only apps that came with your PC will be reinstalled.
To reset your PC
Swipe in from the right edge of the screen, tap Settings, and then tap Change PC settings.
(If you’re using a mouse, point to the upper-right corner of the screen, move the mouse pointer down, click Settings, and then click Change PC settings.)
Tap or click Update and recovery, and then tap or click Recovery.
Under Remove everything and reinstall Windows, tap or click Get started.
Follow the instructions on the screen.
Note: You’ll be asked to choose whether you want to erase data quickly or thoroughly. If you choose to erase data quickly, some data might be recoverable using special software. If you choose to erase data thoroughly, this will take longer but it makes recovering data less likely.
If you think an app or driver that you recently installed caused problems with your PC, you can restore Windows back to an earlier point in time, called a restore point. System Restore doesn’t change your personal files, but it might remove recently installed apps and drivers.
System Restore isn’t available for Windows RT 8.1.
Windows automatically creates a restore point when you install desktop apps and new Windows updates, if the last restore point is older than 7 days. You can also create a restore point manually at any time.
To restore your PC to an earlier point in time
Swipe in from the right edge of the screen, and then tap Search.
(If you’re using a mouse, point to the upper-right corner of the screen, move the mouse pointer down, and then click Search.)
Enter Control Panel in the search box, and tap or click Control Panel.
Enter Recovery in the Control Panel search box, and then tap or click Recovery.
Tap or click Open System Restore, and then follow the instructions.
If you need additional help refreshing, resetting, or restoring your PC, check out the Repair and Recovery community pages in the Windows forum for solutions that other people have found for problems they’ve experienced.
You Don’t Need to Regularly Reinstall Windows; Here’s Why
One of the most persistent myths about Windows is that you need to reinstall the operating system regularly to keep it running at top performance. Let’s take a look at the real problem and how to fix it.
Today we’re talking about the myth that Windows slows down over time, and how to solve the problem. The reality is that Windows doesn’t slow down if you just take care of your PC a little more. Follow these procedures, and you won’t have to wonder if spending hours backing up data, installing from disc, and re-installing your essential applications is really necessary.
What Does Slow Windows Down Over Time?
I’m not going to sit here and tell you that your Windows PC will never slow down—because for many people, they almost always do. What actually slows your PC down are too many poorly written applications that stay resident in memory and waste CPU cycles, having too many badly written low-level applications that hook into Windows, or running more than one antivirus application at a time. And of course, if you’ve run your PC’s hard drive out of space, you can hardly blame Windows for that.
If you aren’t getting the picture, the problem is usually the person behind the keyboard that installed too many junk applications in the first place. More gently put, it’s often that (very well-meaning) person’s gradual easing of their safeguards and cleaning regimens as time goes by.
Stop Installing Junk Applications
Installing software should be thought of like feeding your PC. If you constantly feed your PC garbage apps, it’s going to get sick and won’t be able to run fast anymore. These poorly written applications clutter your drive with unnecessary DLL files, add always-resident Windows services when they don’t need to, bloat up your registry, and add useless icons to your system tray that waste even more memory and CPU cycles. Usually you can get away with using a few terrible applications, but as you continue to install more and more of them, your PC will slow down to a crawl.
Be Smarter About What You Do Install
We feature and recommend a lot of software applications around here, but you should keep in mind that we aren’t trying to tell you to install every single one of them at the same time-just install the applications that you actually need and you’ll generally prevent the dreaded format and reinstall.
Here’s a few tips to help you know what applications you should be careful with:
- Apps that function as an Explorer plug-in, because they directly hook into the shell and any problem will make your entire PC slow or in the worst case, crash repeatedly.
- Antivirus applications are notorious for slowing your PC down, and you should never, ever, ever use more than one real-time antivirus application at a time. We recommend Microsoft Security Essentials as a free, fast, and awesome antivirus tool .
- Anything that says it will «Speed Up Your PC» or «Optimize Your RAM» will most likely slow it down, or best case, do nothing at all. Avoid these like the plague.
- Make sure to install official system drivers from the manufacturer website. Drivers have a huge impact on performance, and you want to have stable, updated drivers.
- Registry cleaners are a mixed bag, and really aren’t going to speed up your PC in most cases. The biggest problem, however, is that too many of the commercial registry cleaners set themselves to run at startup in the system tray, wasting your memory and CPU cycles.
- You should strongly consider the idea of using portable applications wherever possible, since their self-contained nature means they won’t clutter up the rest of your PC with things you don’t need.


