- Choosing a Network Adapter
- Offload Capabilities
- Receive Side Scaling
- Configuring RSS
- RSS profiles
- Understanding RSS Performance
- How to change the network adapter settings in Windows to automatically obtain an IP address from the router
- Installation Requirements for Network Adapters
- General Requirements
- Additional Requirements for WAN Adapters
Choosing a Network Adapter
Applies to: Windows Server (Semi-Annual Channel), Windows Server 2016
You can use this topic to learn some of the features of network adapters that might affect your purchasing choices.
Network-intensive applications require high-performance network adapters. This section explores some considerations for choosing network adapters, as well as how to configure different network adapter settings to achieve the best network performance.
You can configure network adapter settings by using Windows PowerShell. For more information, see Network Adapter Cmdlets in Windows PowerShell.
Offload Capabilities
Offloading tasks from the central processing unit (CPU) to the network adapter can reduce CPU usage on the server, which improves the overall system performance.
The network stack in Microsoft products can offload one or more tasks to a network adapter if you select a network adapter that has the appropriate offload capabilities. The following table provides a brief overview of different offload capabilities that are available in Windows Server 2016.
| Offload type | Description |
|---|---|
| Checksum calculation for TCP | The network stack can offload the calculation and validation of Transmission Control Protocol (TCP) checksums on send and receive code paths. It can also offload the calculation and validation of IPv4 and IPv6 checksums on send and receive code paths. |
| Checksum calculation for UDP | The network stack can offload the calculation and validation of User Datagram Protocol (UDP) checksums on send and receive code paths. |
| Checksum calculation for IPv4 | The network stack can offload the calculation and validation of IPv4 checksums on send and receive code paths. |
| Checksum calculation for IPv6 | The network stack can offload the calculation and validation of IPv6 checksums on send and receive code paths. |
| Segmentation of large TCP packets | The TCP/IP transport layer supports Large Send Offload v2 (LSOv2). With LSOv2, the TCP/IP transport layer can offload the segmentation of large TCP packets to the network adapter. |
| Receive Side Scaling (RSS) | RSS is a network driver technology that enables the efficient distribution of network receive processing across multiple CPUs in multiprocessor systems. More detail about RSS is provided later in this topic. |
| Receive Segment Coalescing (RSC) | RSC is the ability to group packets together to minimize the header processing that is necessary for the host to perform. A maximum of 64 KB of received payload can be coalesced into a single larger packet for processing. More detail about RSC is provided later in this topic. |
Receive Side Scaling
Windows Server 2016, Windows Server 2012, Windows Server 2012 R2, Windows Server 2008 R2, and Windows Server 2008 support Receive Side Scaling (RSS).
Some servers are configured with multiple logical processors that share hardware resources (such as a physical core) and which are treated as Simultaneous Multi-Threading (SMT) peers. Intel Hyper-Threading Technology is an example. RSS directs network processing to up to one logical processor per core. For example, on a server with Intel Hyper-Threading, 4 cores, and 8 logical processors, RSS uses no more than 4 logical processors for network processing.
RSS distributes incoming network I/O packets among logical processors so that packets which belong to the same TCP connection are processed on the same logical processor, which preserves ordering.
RSS also load balances UDP unicast and multicast traffic, and it routes related flows (which are determined by hashing the source and destination addresses) to the same logical processor, preserving the order of related arrivals. This helps improve scalability and performance for receive-intensive scenarios for servers that have fewer network adapters than they do eligible logical processors.
Configuring RSS
In Windows Server 2016, you can configure RSS by using Windows PowerShell cmdlets and RSS profiles.
You can define RSS profiles by using the –Profile parameter of the Set-NetAdapterRss Windows PowerShell cmdlet.
Windows PowerShell commands for RSS configuration
The following cmdlets allow you to see and modify RSS parameters per network adapter.
For a detailed command reference for each cmdlet, including syntax and parameters, you can click the following links. In addition, you can pass the cmdlet name to Get-Help at the Windows PowerShell prompt for details on each command.
Disable-NetAdapterRss. This command disables RSS on the network adapter that you specify.
Enable-NetAdapterRss. This command enables RSS on the network adapter that you specify.
Get-NetAdapterRss. This command retrieves RSS properties of the network adapter that you specify.
Set-NetAdapterRss. This command sets the RSS properties on the network adapter that you specify.
RSS profiles
You can use the –Profile parameter of the Set-NetAdapterRss cmdlet to specify which logical processors are assigned to which network adapter. Available values for this parameter are:
Closest. Logical processor numbers that are near the network adapter’s base RSS processor are preferred. With this profile, the operating system might rebalance logical processors dynamically based on load.
ClosestStatic. Logical processor numbers near the network adapter’s base RSS processor are preferred. With this profile, the operating system does not rebalance logical processors dynamically based on load.
NUMA. Logical processor numbers are generally selected on different NUMA nodes to distribute the load. With this profile, the operating system might rebalance logical processors dynamically based on load.
NUMAStatic. This is the default profile. Logical processor numbers are generally selected on different NUMA nodes to distribute the load. With this profile, the operating system will not rebalance logical processors dynamically based on load.
Conservative. RSS uses as few processors as possible to sustain the load. This option helps reduce the number of interrupts.
Depending on the scenario and the workload characteristics, you can also use other parameters of the Set-NetAdapterRss Windows PowerShell cmdlet to specify the following:
- On a per-network adapter basis, how many logical processors can be used for RSS.
- The starting offset for the range of logical processors.
- The node from which the network adapter allocates memory.
Following are the additional Set-NetAdapterRss parameters that you can use to configure RSS:
In the example syntax for each parameter below, the network adapter name Ethernet is used as an example value for the –Name parameter of the Set-NetAdapterRss command. When you run the cmdlet, ensure that the network adapter name that you use is appropriate for your environment.
* MaxProcessors: Sets the maximum number of RSS processors to be used. This ensures that application traffic is bound to a maximum number of processors on a given interface. Example syntax:
Set-NetAdapterRss –Name «Ethernet» –MaxProcessors
* BaseProcessorGroup: Sets the base processor group of a NUMA node. This impacts the processor array that is used by RSS. Example syntax:
Set-NetAdapterRss –Name «Ethernet» –BaseProcessorGroup
* MaxProcessorGroup: Sets the Max processor group of a NUMA node. This impacts the processor array that is used by RSS. Setting this would restrict a maximum processor group so that load balancing is aligned within a k-group. Example syntax:
Set-NetAdapterRss –Name «Ethernet» –MaxProcessorGroup
* BaseProcessorNumber: Sets the base processor number of a NUMA node. This impacts the processor array that is used by RSS. This allows partitioning processors across network adapters. This is the first logical processor in the range of RSS processors that is assigned to each adapter. Example syntax:
Set-NetAdapterRss –Name «Ethernet» –BaseProcessorNumber
* NumaNode: The NUMA node that each network adapter can allocate memory from. This can be within a k-group or from different k-groups. Example syntax:
Set-NetAdapterRss –Name «Ethernet» –NumaNodeID
* NumberofReceiveQueues: If your logical processors seem to be underutilized for receive traffic (for example, as viewed in Task Manager), you can try increasing the number of RSS queues from the default of 2 to the maximum that is supported by your network adapter. Your network adapter may have options to change the number of RSS queues as part of the driver. Example syntax:
Set-NetAdapterRss –Name «Ethernet» –NumberOfReceiveQueues
Understanding RSS Performance
Tuning RSS requires understanding the configuration and the load-balancing logic. To verify that the RSS settings have taken effect, you can review the output when you run the Get-NetAdapterRss Windows PowerShell cmdlet. Following is example output of this cmdlet.
In addition to echoing parameters that were set, the key aspect of the output is the indirection table output. The indirection table displays the hash table buckets that are used to distribute incoming traffic. In this example, the n:c notation designates the Numa K-Group:CPU index pair that is used to direct incoming traffic. We see exactly 2 unique entries (0:0 and 0:4), which represent k-group 0/cpu0 and k-group 0/cpu 4, respectively.
There is only one k-group for this system (k-group 0) and a n (where n —>
How to change the network adapter settings in Windows to automatically obtain an IP address from the router
The default setting for network adapters in Windows is automatic IP address obtaining, but if you change this setting, you can restore it as shown below.
In Windows 7, go to Start > Control Panel > Network and Sharing Center and click ‘Local Area Connection’.
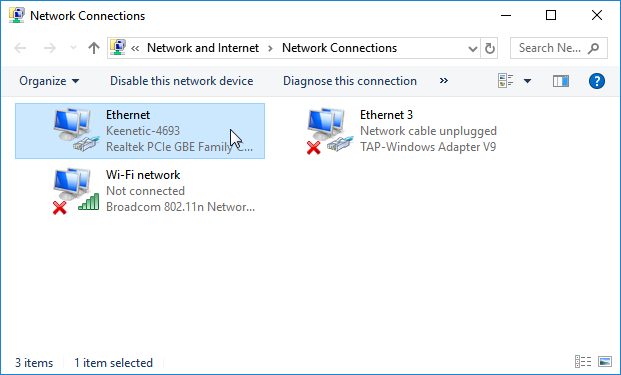
In Windows 10, click Start > Settings > Control Panel > Network and Internet > Network and Sharing Center > Change adapter settings.
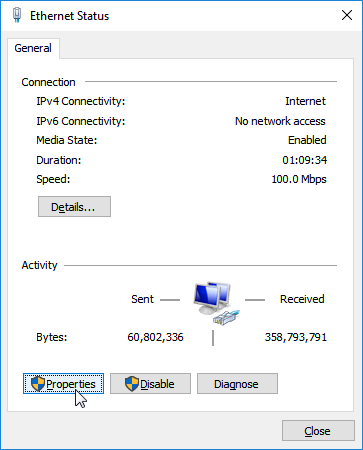
In the list of network connections that opens, select the connection that you are using to connect to your ISP (wireless or LAN). Double-click on the connection.
In the new window, click on the ‘Properties’ button.
Select ‘IP version 4 (TCP/IPv4)’ and click ‘Properties’. In the Protocol Properties window, select ‘Obtain an IP address automatically’ to automatically assign a dynamic IP address from the router (where the DHCP server is turned on) to the computer’s network adapter.
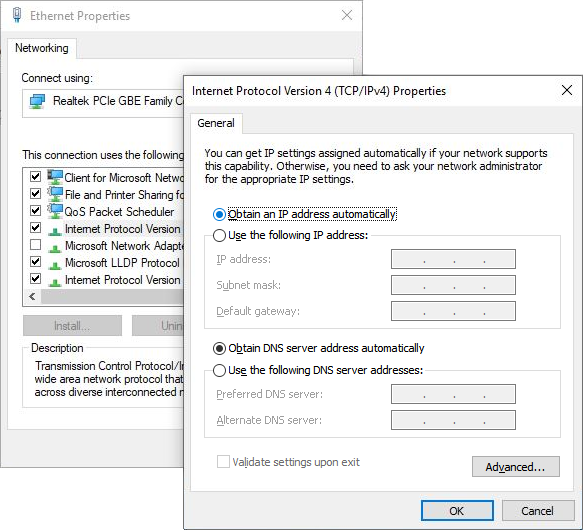
If necessary, you can manually specify a static IP address (select ‘Use the following IP address’ and enter the IP address and mask in the ‘IP address’ and ‘Subnet mask’ fields, respectively).
TIP: Important: The computer’s IP address must belong to the same subnet as the LAN IP address of the router. For example, if your Keenetic has an IP address of 192.168.1.1 (set by default) with a mask of 255.255.255.0, the computer’s IP address must be between 192.168.1.2 and 192.168.1.254 with the same mask.
For information on how to view the network settings (ISP’s IP address, MAC address, and gateway IP address) used on your computer’s network adapter, see ‘How to check the network adapter settings in Windows (IP address, MAC address, and Default gateway)’.
Installation Requirements for Network Adapters
This topic summarizes the installation requirements for network adapters.
NoteВ В NDIS 6.0 and later drivers support a set of standardized INF keywords for network devices.
General Requirements
| INF File Section | Status | Comments |
|---|---|---|


