- How to Rename a Network in Windows 10
- Steps to rename a network in Windows 10
- Method 1 – Use Registry Editor to change network name
- Method 2 – Use Local Security Policy to change network name
- Win32_NetworkConnection class
- Syntax
- Members
- Properties
- Remarks
- Examples
- Network Connection Details in Windows 10 How to
- How to change network names on Windows 10
- Changing the network name on Windows
- Using the Windows Registry
- Using Local Security Policy
- Closing Words
How to Rename a Network in Windows 10


In previous versions of Windows, you could easily change the name of your network, but in Windows 10 it seems that it’s harder to rename the network.
If you wish to change the name of the network in Windows 10, today we’re going to show you how.
In Windows 7 it was easy to rename your network connection, you just had to go to the Network and Sharing center and click your connection to change its name.
In Windows 10 you can’t do that anymore, but luckily there’s a different way to change your network name.
Steps to rename a network in Windows 10
Method 1 – Use Registry Editor to change network name
You can easily change the name of a certain network by performing one registry tweak. Here’s exactly what you need to do:
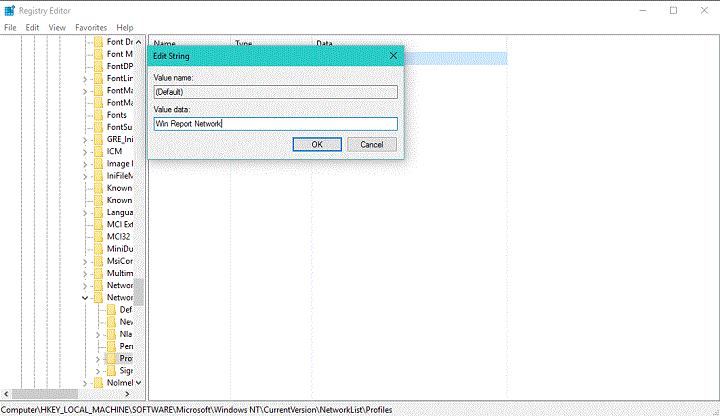
- Open Registry Editor. You can do that by pressing Windows Key + R and typing regedit and clicking OK.
- When Registry Editor opens you need to go to the following key in the left pane:
- HKEY_LOCAL_MACHINE\SOFTWARE\Microsoft\Windows NT\CurrentVersion\NetworkList\Profiles
- Now you need go through all subkeys (they are all labeled with random numbers and letters) under the Profiles key until you find the key with that has ProfileName set as the name of your network.
- In the right pane double click the ProfileName in order to change its value.

- Change the Value data to the desired name of your network connection.
- Close Registry Editor.
- In order to apply changes, you might have to restart your computer, or to sign out and sign in again.
Method 2 – Use Local Security Policy to change network name
If you don’t want to experiment with your Registry, there’s another way to rename a network. So, here’s how to rename a network by using the Local Security Policy:
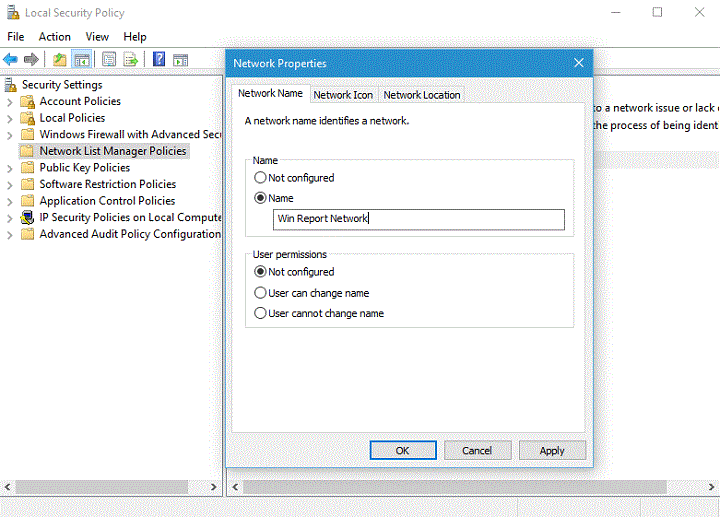
- Press Windows Key + R, type secpol.msc and press Enter to run it.
- In Local Security Policy window, go to the Network List Manager Policies in the left pane.
- Now in the right pane double click on the network name that you want to change.
- In the Properties windows under the Name section make sure that Name is selected.
- Now in the input field enter the name that you wish to use for your connection.
- Click Apply then OK to save the changes.
- You might have to log in again or to restart your computer before the changes are applied.
And that’s how you rename the network in Windows 10. If you have any comments, or questions, just reach for the comments section, below.
Win32_NetworkConnection class
The Win32_NetworkConnection WMI classrepresents an active network connection in a Windows-based environment.
The following syntax is simplified from Managed Object Format (MOF) code and includes all of the inherited properties. Properties and methods are in alphabetic order, not MOF order.
Syntax
Members
The Win32_NetworkConnection class has these types of members:
Properties
The Win32_NetworkConnection class has these properties.
AccessMask
Data type: uint32
Access type: Read-only
List of access rights to the given file or directory held by the user or group on whose behalf the instance is returned. On FAT volumes, the FULL_ACCESS value is returned instead, indicating no security has been set on the object.
FILE_READ_DATA (file) or FILE_LIST_DIRECTORY (directory) (1)
Grants the right to read data from the file. For a directory, this value grants the right to list the contents of the directory.
FILE_WRITE_DATA (file) or FILE_ADD_FILE (directory) (2)
Grants the right to write data to the file. For a directory, this value grants the right to create a file in the directory.
FILE_APPEND_DATA (file) or FILE_ADD_SUBDIRECTORY (4)
Grants the right to append data to the file. For a directory, this value grants the right to create a subdirectory.
FILE_READ_EA (8)
Grants the right to read extended attributes.
FILE_WRITE_EA (16)
Grants the right to write extended attributes.
FILE_EXECUTE (file) or FILE_TRAVERSE (directory) (32)
Grants the right to execute a file. For a directory, the directory can be traversed.
FILE_DELETE_CHILD (directory) (64)
Grants the right to delete a directory and all of the files it contains (its children), even if the files are read-only.
FILE_READ_ATTRIBUTES (128)
Grants the right to read file attributes.
FILE_WRITE_ATTRIBUTES (256)
Grants the right to change file attributes.
DELETE (65536)
Grants delete access.
READ_CONTROL (131072)
Grants read access to the security descriptor and owner.
WRITE_DAC (262144)
Grants write access to the discretionary access control list (DACL).
WRITE_OWNER (524288)
Assigns the write owner.
SYNCHRONIZE (1048576)
Synchronizes access and allows a process to wait for an object to enter the signaled state.
Caption
Data type: string
Access type: Read-only
A short textual description of the object.
Comment
Data type: string
Access type: Read-only
Comment supplied by the network provider.
ConnectionState
Data type: string
Access type: Read-only
Current state of the network connection.
Connected («Connected»)
Error («Error»)
Paused («Paused»)
Disconnected («Disconnected»)
Connecting («Connecting»)
Reconnecting («Reconnecting»)
ConnectionType
Data type: string
Access type: Read-only
Persistence type of the connection used for connecting to the network.
Current Connection («Current Connection»)
Persistent Connection («Persistent Connection»)
Description
Data type: string
Access type: Read-only
A textual description of the object.
DisplayType
Data type: string
Access type: Read-only
Qualifiers: MappingStrings («Win32API|Windows Networking Structures|NETRESOURCE|dwDisplayType«)
Network object should be displayed in a network browsing user interface.
Domain («Domain»)
Generic («Generic»)
Server («Server»)
Share («Share»)
InstallDate
Data type: datetime
Access type: Read-only
Indicates when the object was installed. Lack of a value does not indicate that the object is not installed.
LocalName
Data type: string
Access type: Read-only
Qualifiers: MappingStrings («Win32API|Windows Networking Structures|NETRESOURCE|lpLocalName«)
Local name of the connected network device.
Name
Data type: string
Access type: Read-only
Name of the current network connection. It is the combination of the values in RemoteName and LocalName.
Example: «\\NTRELEASE (c:\public)»
Persistent
Data type: boolean
Access type: Read-only
Connection will be reconnected automatically by the operating system on the next logon.
ProviderName
Data type: string
Access type: Read-only
Qualifiers: MappingStrings («Win32API|Windows Networking Structures|NETRESOURCE|lpProvider«)
Name of the provider that owns the resource. This property can be NULL if the provider name is unknown.
RemoteName
Data type: string
Access type: Read-only
Qualifiers: MappingStrings («Win32API|Windows Networking Structures|NETRESOURCE|lpRemoteName«)
Remote network resource name for a network resource. For a current or persistent connection, RemoteName contains the network name associated with the name of the value in the LocalName property. The name in RemoteName must follow the network provider’s naming conventions.
RemotePath
Data type: string
Access type: Read-only
Qualifiers: MappingStrings («Win32API|Windows Networking Structures|NETRESOURCE|lpRemoteName«)
Full path to the network resource.
ResourceType
Data type: string
Access type: Read-only
Type of resource to enumerate or connect to.
Disk («Disk»)
Print («Print»)
Any («Any»)
Status
Data type: string
Access type: Read-only
String that indicates the current status of the object. Operational and non-operational status can be defined. Operational status can include «OK», «Degraded», and «Pred Fail». «Pred Fail» indicates that an element is functioning properly, but is predicting a failure (for example, a SMART-enabled hard disk drive).
Non-operational status can include «Error», «Starting», «Stopping», and «Service». «Service» can apply during disk mirror-resilvering, reloading a user permissions list, or other administrative work. Not all such work is online, but the managed element is neither «OK» nor in one of the other states.
Values include the following:
OK («OK»)
Error («Error»)
Degraded («Degraded»)
Unknown («Unknown»)
Pred Fail («Pred Fail»)
Starting («Starting»)
Stopping («Stopping»)
Service («Service»)
Stressed («Stressed»)
NonRecover («NonRecover»)
No Contact («No Contact»)
Lost Comm («Lost Comm»)
UserName
Data type: string
Access type: Read-only
User name or the default user name used to establish a network connection.
Remarks
The Win32_NetworkConnection class is derived from CIM_LogicalElement.
Examples
The following VBScript code sample retrieves information on the local network connection.
Network Connection Details in Windows 10 How to
How to find out the network connection details of connected network connection in your Windows 10 computer? It provides you useful network status related information and help you on network connection troubleshooting too.
If your computer is connected to wireless network, then this is the way to find out the network status:
1) Go to lower right corner (taskbar area) in Windows desktop screen to click on the network icon, after that click on Network settings.

2) Scroll down the Network Settings window and click on Change adapter options.
Note:The other way to go to this Change adapter options is via: Start->Settings->Network & Internet->Wi-Fi->Change adapter options

3) Right click the Wi-Fi adapter in Network Connections window and click on Status.
Note: Here you can do the same on Ethernet 2 wired adapter to check the network connection status too.

4) The Wi-Fi status window will appear, it briefly shows you the following connection info: IPv4 connectivity, IPv6 connectivity, media state, SSID, duration, speed, signal quality and also bytes sent and received. Don’t click Disable unless you want to disable this wireless adapter.
Note: If you find out there are only bytes sent but very limited bytes received, most likely it’s not connected properly on network. In this case you could click Diagnose to troubleshoot this network problem.
How to change network names on Windows 10
When you connect to a network for the first time in Windows, Windows saves the network profile and assigns a name to it.
Connections using Ethernet (wired) use a generic name such as Network 7 usually while wireless networks the SSID of the Wi-Fi network the device connected to.
Some users and administrators may dislike the non-descriptive nature of wired network connections on Windows.
Good news is that it is possible to rename network profile names to make them more descriptive on the operating system.
The following guide was written for Microsoft’s Windows 10 operating system but the process should work in previous versions of Windows as well.
Changing the network name on Windows

You can check the current name in the Network and Sharing Center on Windows or in the Settings application on Windows 10.
- Tap on Windows-I to open the Settings application.
- Go to Network & Internet > Ethernet or Wi-Fi depending on the connection type.
The name of the network is displayed at the very top of the page.
To display the name in the Control Panel instead, do this:
- Tap on the Windows-key to activate the Start menu.
- Type Control Panel and select the result.
- Go to Network and Sharing Center
The name is listed under «view your active networks».

Windows administrators and users have two main options to change a network name. The first involves editing the Windows Registry using Local Security Policy. Note that Local Security Policy is only available in professional versions of Windows, e.g. Windows 10 Pro.
Using the Windows Registry

I recommend that you back up the Windows Registry before you make any changes to it. Check out our Windows Registry backup guide to find out how to do that.
- Open the Start Menu.
- Type regedit.exe and select the result to open the Registry Editor.
- Confirm the UAC prompt that is displayed.
- Go to HKEY_LOCAL_MACHINE\SOFTWARE\Microsoft\Windows NT\CurrentVersion\NetworkList\Profiles
- The next step requires some trial and error. Windows lists all network connections with a unique ID and you need to click on each to check the ProfileName variable of it until you find the network name that you want to change.
- Double-click on ProfileName once you have found the right entry and type the new name of the network that you want used on the device. The change is only active on the device.
The change takes affect immediately. You can verify that by opening the Settings app or the Network and Sharing Center to verify that the name change was successful.
Repeat the process for any other network name that you want to change.
Using Local Security Policy

As mentioned earlier, Local Security Policy is only available in professional versions of Windows. A limitation of this method is that you can only change the name of the connected network.
- Open the Start Menu.
- Type secpol.msc and select the result from the list of results. This opens the Local Security Policy on the device. Tip: Check out our list of Windows msc files that you can run here.
- Select Network List Manager Policies on the left.
- Double-click on the name of the network the device is connected to at the time. A new window opens.
- Select «Name» under Name and add a new name for the network that you want used by Windows.
- Click ok.
Closing Words
The Registry option may not be as straightforward but it displays the list of all networks the device was connected to so that you may modify names of network the device is not connected to at the time as well.
Changing network names is just a cosmetic change, though.
Now You: have you changed network names on your devices?


