- Can’t Access/Map Network Shared Folders over SMB from Windows 10
- Can’t Access Shared Folder Because Security Policies Block Unauthenticated Guest Access
- Windows 10 Error: Your system requires SMB2 or higher
- File sharing over a network in Windows 10
- You cannot access shared files and folders or browse computers in the workgroup with Windows XP
- To continue receiving security updates for Windows XP, make sure that you are running Windows XP with Service Pack 3 (SP3). For more information, refer to this Microsoft Web page: Support is ending for some versions of Windows
- Symptoms
- Cause
- Resolution
- Method 1: Enable NetBIOS over TCP/IP and start the Computer Browser service
- Step 1: Enable NetBIOS over TCP/IP
- Step 2: Start the Computer Browser service
- Method 2: Install File and Print Sharing and make sure that it is not blocked by Windows Firewall
- Step 1: Install File and Print Sharing for Microsoft Networks
- Step 2: Make sure that File and Printer Sharing is not blocked by Windows Firewall
- Did this fix the problem?
- More Information
Can’t Access/Map Network Shared Folders over SMB from Windows 10
If you cannot open/map network shared folders on your NAS, Samba Linux server, computers with old Windows versions (Windows 7/XP/Server 2003) from Windows 10, most likely the problem is that legacy and insecure versions of the SMB protocol are disabled in the latest Windows 10 builds (SMB protocol is used in Windows to access shared network folders and files).
Starting with Windows 10 1709 and Windows Server 2019 (both in Datacenter and Standard editions), the unsafe SMBv1 protocol is disabled by default SMBv1 because of CVE-2017-0144 (remember the WannaCry ransomware attack, which was implemented through the SMBv1 vulnerability), as well as anonymous (guest) access to network shared folders.
The specific actions that you need to take depend on the error that appears in Windows 10 when you trying to access the shared folder, and on the settings of the remote SMB server that hosts the network shares.
Can’t Access Shared Folder Because Security Policies Block Unauthenticated Guest Access
Starting with the Windows 10 build 1709 Fall Creators Update (Enterprise and Education editions), users began to complain that when they tried opening a network shared folder on a nearby computer, an error appeared:
Microsoft Windows Network: You can’t access this shared folder because your organization’s security policies block unauthenticated guest access. These policies help protect your PC from unsafe or malicious devices on the network.

Moreover, on other computers with Windows 8.1, Windows 7, or on Windows 10 with a build of up to 1709, the same shared network folders open normally. The point is that in modern versions of Windows 10 (starting from 1709 build), the guest access to the shared folders using the SMBv2 protocol is disabled by default. Guest (anonymous) means access to a shared network folder without authentication. When accessing a network folder under a guest account over the SMBv1/v2 protocol, such methods of traffic protection as SMB signing and encryption are not used, which makes your session vulnerable to the MiTM (man-in-the-middle) attacks.
If you try to access a network shared folder using the SMB v2 protocol under the guest account, the following error appears in the SMB client log (Microsoft-Windows-SMBClient):
In most cases you can face this problem when accessing old NAS devices (usually guest access is enabled on them for ease of setup) or when opening network folders on Windows 7/2008 R2/Windows XP/2003 with the anonymous (guest) access configured (see the table of supported SMB protocol versions in different Windows editions).
In this case, Microsoft recommends changing the settings on a remote computer or NAS device that hosts the network folders. It is advisable to switch the network share to the SMBv3 mode. Or configure access with authentication if only the SMBv2 protocol is supported by the device. This is the most correct and safest way to fix the problem.
Depending on the device on which network folders are stored, you must disable guest access on them:
- NAS devices – disable guest access in the settings of your NAS device (depending on model);
- Samba server on Linux — if you are sharing network folder using Samba on Linux, add the following string to the smb.conf configuration file under the section [global]: map to guest = never
And restrict anonymous access in the section with a description of the shared folder: guest ok = no - In Windows, you can enable sharing of network folders and printers with password protection via the Control Panel -> Network and Sharing Center -> Advanced sharing settings. For All Networks in the “Password Protected Sharing” section, change the value to the “Turn on password protected sharing”. In this case, anonymous (guest) access to the network share folders will be disabled and you will have to create local users, grant them access permissions to the shared folders and printers and use these accounts to connect to the shared folders on a remote computer.


There is another way – you can change the settings on your Windows 10 computer to allow access to shared network folders under the guest account. This method should be used only as a temporary workaround (. ), because access to folders without authentication significantly reduces the level of security of your computer and data.
To enable access under the guest account from your computer, you need to use the Group Policy Editor (gpedit.msc). Go to the section: Computer Configuration -> Administrative templates -> Network -> Lanman Workstation. Find and enable the policy Enable insecure guest logons. These policy settings determine whether the SMB client will allow unsafe guest logon to the SMB server.
In Windows 10 Home, which does not have a local GPO editor, you can make a similar change through the registry editor with the command:
reg add HKLM\SYSTEM\CurrentControlSet\Services\LanmanWorkstation\Parameters /v AllowInsecureGuestAuth /t reg_dword /d 00000001 /f
Windows 10 Error: Your system requires SMB2 or higher
Another possible problem when accessing a network folder from Windows 10 is server-side support of the SMBv1 protocol only. Since the SMBv1 client is disabled by default in Windows 10 1709 and newer, when you try to open the shared folder, you may get an error:
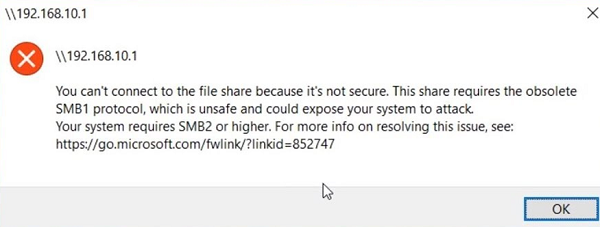
The error message clearly shows that the network shared folder supports access over the SMBv1 protocol only. In this case, you should try to reconfigure the remote SMB device to use at least SMBv2 (the correct and safe way).
If you use Samba server on Linux to share network folders, you can specify the minimum supported version of SMB protocol in the smb.conf file like this:
On Windows 7/Windows Server 2008 R2, you can disable the SMB 1 protocol and enable SMBv2 with the following PowerShell commands:
Set-ItemProperty -Path «HKLM:\SYSTEM\CurrentControlSet\Services\LanmanServer\Parameters» SMB1 -Type DWORD -Value 0 –Force
Set-ItemProperty -Path «HKLM:\SYSTEM\CurrentControlSet\Services\LanmanServer\Parameters» SMB2 -Type DWORD -Value 1 –Force
On Windows 8.1/Windows Server 2012 R2, you can disable SMBv1, enable SMBv2 and SMBv3, with the following command (verify that a private or domain profile is used for your network connection):
Disable-WindowsOptionalFeature -Online -FeatureName «SMB1Protocol»
Set-SmbServerConfiguration –EnableSMB2Protocol $true
If your network device (NAS, Windows XP, Windows Server 2003) supports only the SMB1 protocol, you can enable a separate SMB1Protocol-Client feature on Windows 10. But this is not recommended.
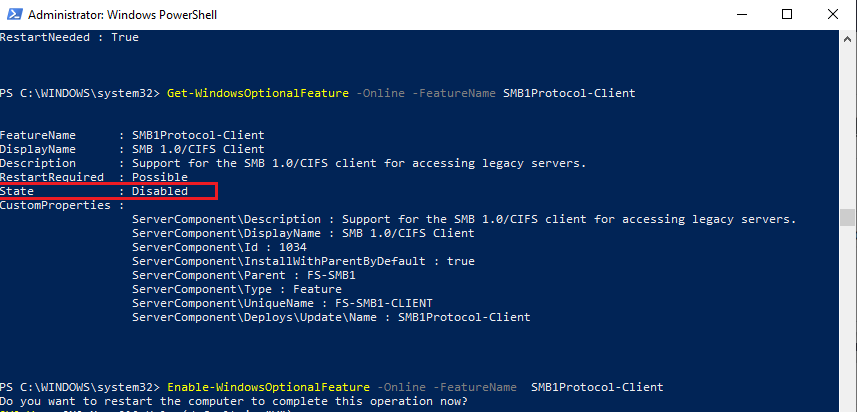
Run the PowerShell prompt and verify that the SMB1Protocol-Client is disabled (State: Disabled):
Get-WindowsOptionalFeature -Online -FeatureName SMB1Protocol-Client
Enable the SMBv1 client protocol (a reboot is required):
Enable-WindowsOptionalFeature -Online -FeatureName SMB1Protocol-Client
You can also enable/disable additional features of Windows 10 (including SMBv1 components) from the dialog optionalfeatures.exe -> SMB 1.0/CIFS File Sharing Support.
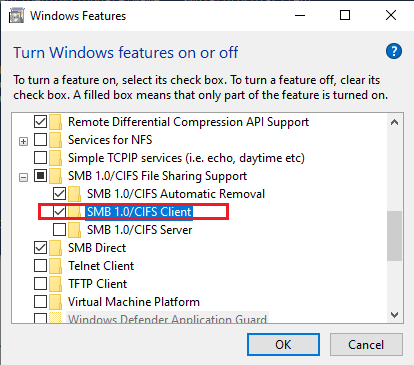
In this example, I enabled only the SMBv1 client. Do not enable the SMB1Protocol-Server feature if your computer is not used by legacy clients as a shared folder SMB server.
After installing the SMBv1 client, you should be able to connect to a shared folder or printer without any problems. However, you should understand that using this workaround is not recommended, because this reduces the level of protection for your system.
File sharing over a network in Windows 10
In Windows 10, some features of file and folder sharing over a network have changed, including the removal of HomeGroup. Read on for answers to common questions about other changes to file and folder sharing in Windows 10.
To share a file or folder in File Explorer, do one of the following:
Right-click or press a file, select Give access to > Specific people.

Select a file, select the Share tab at the top of File Explorer, and then in the Share with section select Specific people.

If you select multiple files at once, you can share them all in the same way. It works for folders, too—share a folder, and all files in it will be shared.
To stop sharing in File Explorer, do one of the following:
Right-click or press a file or folder, then select Give access to > Remove access.

Select a file or folder, select the Share tab at the top of File Explorer, and then in the Share with section select Remove access.

File Explorer shows the «Remove access» option («Stop sharing» in older versions of Windows 10) for all files, even those that aren’t being shared over a network.
Open File Explorer, then type \\localhost into the address bar.
Note: When you’ve shared a file from a folder in your user profile and you go to \\localhost, you’ll see your user profile and all its files there. This doesn’t mean that all of your files are shared—just that you have access to all your own files.
If you open File Explorer, go to Network, and see an error message («Network discovery is turned off….»), you’ll need to turn on Network discovery to see devices on the network that are sharing files. To turn it on, select the Network discovery is turned off banner, then select Turn on network discovery and file sharing.

To troubleshoot problems with sharing files or folders, follow the steps below on all computers from which you’re trying to share.
Make sure the computers are on the same network. For example, if your computers connect to the internet through a wireless router, make sure they all connect through the same wireless router.
If you’re on a Wi-Fi network, set it to Private. To find out how, read Make a Wi-Fi network public or private in Windows 10.
Turn on network discovery and file and printer sharing, and turn off password protected sharing.
Select the Start button, then select Settings > Network & Internet , and on the right side, select Sharing options.
Under Private, select Turn on Network discovery and Turn on file and printer sharing.
Under All Networks, select Turn off password protected sharing.
Make sharing services start automatically.
Press the Windows logo key + R.
In the Run dialog box, type services.msc, and then select OK.
Right-click each of the following services, select Properties, if they’re not running, select Start, and next to Startup type, select Automatic:
You cannot access shared files and folders or browse computers in the workgroup with Windows XP
To continue receiving security updates for Windows XP, make sure that you are running Windows XP with Service Pack 3 (SP3). For more information, refer to this Microsoft Web page: Support is ending for some versions of Windows
Symptoms
On Windows XP-based computers that are configured as members of a workgroup in a peer-to-peer network environment, you may experience one or more of the following symptoms:
You cannot access shared folders or files.
You cannot locate other computers in the workgroup.
You receive the following error message when you double-click the workgroup in My Network Places:
Workgroup Name is not accessible. You may not have permission to use this network resource.
Note In a peer-to-peer network, each computer is equal and can initiate communications. In this manner, it differs from a client/server network.
Cause
This behavior may occur if all the following conditions are true:
NetBIOS over TCP/IP is not turned on (enabled) on one or more computers in the workgroup.
The Computer Browser service is not started or is turned off on one or more computers in the workgroup.
This behavior may also occur if File and Print Sharing for Microsoft Networks is not installed or is blocked by Windows Firewall.
Resolution
Method 1: Enable NetBIOS over TCP/IP and start the Computer Browser service
To resolve this issue, make sure that NetBIOS over TCP/IP is turned on and that the Computer Browser service is running on each computer in the workgroup. To do this, follow these steps.
Step 1: Enable NetBIOS over TCP/IP
Click Start, click Control Panel, and then click Network and Internet Connections.
Click Network Connections.
Right-click Local Area Connection, and then click Properties.
Click Internet Protocol (TCP/IP), and then click Properties.
Click the General tab, and then click Advanced.
Click the WINS tab.
Under NetBIOS setting, click Enable NetBIOS over TCP/IP, and then click OK two times.
Click Close to close the Local Area Connection Properties dialog box.
Close the Network Connections window.
Step 2: Start the Computer Browser service
Click Start, right-click My Computer, and then click Manage.
Double-click Services and Applications.
On the right side, right-click Computer Browser, and then click Start.
Close the Computer Management window.
Method 2: Install File and Print Sharing and make sure that it is not blocked by Windows Firewall
Step 1: Install File and Print Sharing for Microsoft Networks
Click Start, click Run, type ncpa.cpl, and then click OK.
Right-click Local Area Connection, and then click Properties.
Click the General tab, and then click Install.
Click Service, and then click Add.
In the Network Service list, click File and Print Sharing for Microsoft Networks, and then click OK.
Step 2: Make sure that File and Printer Sharing is not blocked by Windows Firewall
Click Start, click Run, type firewall.cpl, and then click OK.
On the General tab, make sure that the Don’t allow exceptions check box is not selected.
Click the Exceptions tab.
On the Exceptions tab, make sure that the File and Printer Sharing check box is selected, and then click OK.
Did this fix the problem?
Check whether the problem is fixed. If the problem is fixed, you are finished with this section. If the problem is not fixed, you can contact support .
More Information
The Computer Browser service maintains an updated list of computers on the network, and it supplies this list to computers that are designated as browsers. If this service is stopped, the list is neither updated nor maintained. If this service is turned off, any services that explicitly depend on it do not start.
For more information about the Network Setup Wizard in Windows XP, click the following article number to view the article in the Microsoft Knowledge Base:
308522 Description of the Network Setup Wizard in Windows XP
For more information about file sharing in Windows XP, click the following article number to view the article in the Microsoft Knowledge Base:
304040 How to configure file sharing in Windows XP
For more information about how to set up workgroups in Windows XP Home Edition, click the following article number to view the article in the Microsoft Knowledge Base:
813936 How to set up a small network with Windows XP Home Edition (PART 1)


