- Изменяем сетевые параметры Windows с помощью netsh+batch
- Netsh
- Batch-файлы
- Итого
- Настройка порядка сетевых интерфейсов Configure the Order of Network Interfaces
- Настройка сетевого адаптера в Windows
- Шаг 1
- Шаг 2
- Шаг 3
- Шаг 4
- Network interfaces
- Overview
- Network interface identifiers and properties
- Visibility to developers
- Related topics
Изменяем сетевые параметры Windows с помощью netsh+batch
Года полтора назад была у меня такая рутинная работа: приходя на работу – вводить IP-адрес, маску, шлюз, DNS для Ethernet-порта ноутбука, а приходя домой – менять все эти параметры на другие. Первое время я мирился, но длилось это недолго – ну как можно каждый день делать одно и то же!? Тогда и вышел я на след Windows-утилиты netsh, которая, вкупе с batch-файлом дала возможность делать то же самое, но гораздо (!) быстрее и удобнее (используя стандартные средства Windows и всего один текстовый файл).
Здесь утилита netsh уже была немного описана, но я предлагаю другую реализацию, возможности которой будут более гибкими.
Netsh
Итак, поигравшись с netsh на Windows 7 (для Windows XP синтаксис немного меняется) я обнаружил, что можно присвоить интерфейсу (в приведенном ниже примере — интерфейсу под названием «LAN») IP-адрес, маску и шлюз с помощью команды:
Команды, понятное дело, вводятся в командной строке Windows. Если параметры отказываются изменяться — запускаем cmd от имени администратора.
Если понадобится добавить еще один IP-адрес, то используем:
Две следующие команды очищают список DNS-серверов и выставляют IP-адрес 212.154.163.162 первым в списке DNS-серверов:
Чтобы предоставить возможность назначения сетевых параметров DHCP-серверу используем:
Ну и для отображения текущих параметров можно использовать:
Batch-файлы
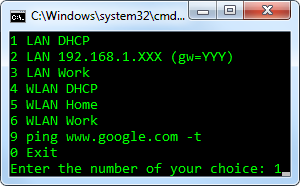
На этом закончим наше знакомство с netsh и перейдем к batch-файлами Windows (текстовый файл с расширением «bat»), который позволяет не только автоматизировать ввод длинных команд (в том числе и netsh-комманд), но также поможет сделать этот процесс более интересным, интерактивным и не заставит нас использовать для каждого варианта настроек отдельный файл.
Для вывода на экран используется команда «ECHO» (она будет использоваться для вывода своеобразного меню):
Для вывода сообщения и запроса ввода от пользователя используем «SET»:
Для условного перехода к метке воспользуемся связкой «IF» и «GOTO» (если кто знает, можно ли использовать Case — буду рад упростить итоговый скрипт):
Для обозначения метки (в нашем случае метки «one») используется двоеточие:
Итого
На этом можно закончить и торжественно сообщить, что Вы знаете все, что нужно для того, чтобы полностью разобраться в итоговом batch-файле (есть комментарии на русском языке) и переделать его под себя. Вот ссылка на страничку гугл-проекта QNet (сделал по аналогии с Yet Another Net Switcher — спасибо автору, раньше этим не пользовался). Ах да, комментарии в batch-файлах начинаются с «rem».
P.S. Теперь ни на работе, ни дома этим скриптом почти не пользуюсь (есть DHCP), но в командировках — по-прежнему очень удобная вещь.
P.P.S. С русскоязычным названием «Подключение по локальной сети» скрипт может и не сработать, но я давно привык именовать сетевые карты как «LAN» и «WLAN».
Данная статья не подлежит комментированию, поскольку её автор ещё не является полноправным участником сообщества. Вы сможете связаться с автором только после того, как он получит приглашение от кого-либо из участников сообщества. До этого момента его username будет скрыт псевдонимом.
Настройка порядка сетевых интерфейсов Configure the Order of Network Interfaces
Применяется к: Windows Server (Semi-Annual Channel), Windows Server 2016 Applies to: Windows Server (Semi-Annual Channel), Windows Server 2016
В Windows Server 2016 и Windows 10 можно использовать метрику интерфейса для настройки порядка сетевых интерфейсов. In Windows Server 2016 and Windows 10, you can use the interface metric to configure the order of network interfaces.
Это отличается от предыдущих версий Windows и Windows Server, которые позволяли настраивать порядок привязки сетевых адаптеров с помощью пользовательского интерфейса или команд инеткфгкомпонентбиндингс:: мовебефоре и Инеткфгкомпонентбиндингс:: мовеафтер. This is different than in previous versions of Windows and Windows Server, which allowed you to configure the binding order of network adapters by using either the user interface or the commands INetCfgComponentBindings::MoveBefore and INetCfgComponentBindings::MoveAfter. Эти два метода упорядочения сетевых интерфейсов недоступны в Windows Server 2016 и Windows 10. These two methods for ordering network interfaces are not available in Windows Server 2016 and Windows 10.
Вместо этого можно использовать новый метод для задания перечисленного порядка сетевых адаптеров, настроив метрику интерфейса для каждого адаптера. Instead, you can use the new method for setting the enumerated order of network adapters by configuring the interface metric of each adapter. Метрику интерфейса можно настроить с помощью команды Windows PowerShell Set-нетипинтерфаце . You can configure the interface metric by using the Set-NetIPInterface Windows PowerShell command.
При выборе маршрутов сетевого трафика и настройке параметра интерфацеметрик команды Set-нетипинтерфаце общая метрика, используемая для определения предпочтения интерфейса, является суммой метрики маршрута и метрики интерфейса. When network traffic routes are chosen and you have configured the InterfaceMetric parameter of the Set-NetIPInterface command, the overall metric that is used to determine the interface preference is the sum of the route metric and the interface metric. Как правило, метрика интерфейса дает предпочтение конкретному интерфейсу, например использование проводной сети, если доступны как проводные, так и беспроводные сети. Typically, the interface metric gives preference to a particular interface, such as using wired if both wired and wireless are available.
В следующем примере команды Windows PowerShell показано использование этого параметра. The following Windows PowerShell command example shows use of this parameter.
Порядок, в котором адаптеры отображаются в списке, определяется метрикой интерфейса IPv4 или IPv6. The order in which adapters appear in a list is determined by the IPv4 or IPv6 interface metric. Дополнительные сведения см. в разделе функция жетадаптерсаддрессес. For more information, see GetAdaptersAddresses function.
Ссылки на все разделы данного руководства см. в разделе Настройка производительности сетевой подсистемы. For links to all topics in this guide, see Network Subsystem Performance Tuning.
Настройка сетевого адаптера в Windows
Инструкция по настройке сетевого интерфейса Windows после подключения сервера к сети.
Шаг 1
Подключитесь к виртуальному серверу по RDP и откройте Network and Sharing Center, для этого на рабочем столе Windows в правом нижнем углу правой кнопкой мыши кликните Настройки сетевых подключений.

В открывшемся окне выбирете нужный интерфейс, у которого нет доступа к сети.

Откроется окно состояния интерфейса. Чтобы убедиться, что выбран нужный интерфейс откройте его детали с помощью кнопки Details.

Сравните значение поля Physical Address со значением поля MAC в панели управления.


Шаг 2
Если при создании сети в панели вы активировали опцию DHСP, то настройка сетевого адаптера Windows будет выполнена автоматически. Проверить включена или выключена опция можно в свойствах сети в панели управления.

Шаг 3
Если при создании сети в панели управления вы НЕ активировали опцию DHСP, то настройку необходимо выполнить вручную. Откройте свойства адаптера с помощью клавиши Properties.

Выбирете соединение IPv4 и нажмите Properties.

В открывшемся окне в поле IP-address введите выданный адрес, в поле Subnet mask введите маску подсети. Все значения можно посмотреть в панели в настройках сервера (раздел Сети) или в меню Сеть.


Шаг 4
Чтобы проверить настройку сетевого адаптера выполните команду ping на адрес шлюза по умолчанию, например:
Примечание: для проверки на Windows Server 2016 необходимо выполнить пинг на другой локальный сервер.
Network interfaces
This topic describes high-level network interface concepts on Windows, including the ways they can be identified in code and their properties.
This topic is intended for a developer audience, both for Windows desktop networking apps and kernel mode networking drivers. Nevertheless, some of the information presented here can also be useful for system administrators managing network interfaces through PowerShell cmdlets.
Overview
A network interface is the point where two pieces of network equipment or protocol layers connect. Typically, this is represented by a physical Network Interface Card (NIC) for connection between a computer and a private or public network. However, it can also take the form of a software-only component such as the loopback interface ( 127.0.0.1 for IPv4 or ::1 for IPv6).
Network interfaces are defined by the Internet Engineering Task Force (IETF) in RFC 2863 and are not meant to be defined by Windows. For detailed questions about the meaning of network interface identifiers such as ifIndex, see the IETF’s definitions of them. The rest of this topic discusses Windows-specific implementation details.
Network interface identifiers and properties
On Windows, a network interface can be identified in different ways. Some of these identifiers are used to distinguish network interfaces from each other, but not all identifiers are equally suited to that task because of their differing properties. Generally, network interfaces are identified by a network address to external components. For example, this may be a node ID and a port number, or simply a unique node ID.
In code, a network interface can be identified in many ways. The following table details the ways a network interface can be identified along with associated properties. We recommend using the interface GUID (ifGuid) for programming unless a specific API requires a different network interface identifier.
In the following table, bolded cells represent a property that is desirable for networking programmers.
| Identifier | Size | Is unique on the system | Is unique in the world | Is predictable | Will be recycled if the NIC is removed | Persists across reboots | End users can modify at any time | Drivers can modify at any time | General familiarity with end users | Is always present |
|---|---|---|---|---|---|---|---|---|---|---|
| ifIndex | 4 bytes | Yes | No | No | Yes | No 1 | No | No | Some 2 | Yes |
| NetLuid | 8 bytes | Yes | No | No | Yes | Yes | No | No | No | Yes |
| ifGuid | 16 bytes | Yes | Usually 3 | No | No | Yes | No | No | No | Yes |
| ifAlias | 514 bytes | Yes for NICs 4 | No | Sometimes 5 | Yes | Yes | Yes | No | Yes | Usually 4 |
| ifDescr | 514 bytes | Usually 6 | No | No | Yes | Yes | No | Yes | Yes | Usually |
| ifPhysAddress (MAC ADDRESS) | 0 to 32 bytes | Usually, for NICs | Usually, for NICs | Yes | Tied to hardware | Yes | No | No | Yes | Usually 7 |
| PnP instance ID | Up to 400 bytes | Yes | No | No | Yes | Yes | No | No | No | Usually, for NICs 8 |
| PnP location (PCI slot number) | Up to 400 bytes | Yes | No | Yes | Yes | Yes | No | No | Sometimes | Sometimes 8,9 |
Notes for the preceding table:
- IfIndexes are not guaranteed to be stable across reboots, even though they often receive the same value as the previous boot. Therefore, it is not recommended that drivers use ifIndex except where required by an API.
- Some netsh commands take ifIndex , or index , as an input. Therefore, some administrative users are familiar with the ifIndex property if they use the netsh command frequently.
- If a machine is cloned or imaged, then some of the GUIDs might be the same. Also, certain special network interfaces such as the built-in Teredo interface might have the same GUID on all machines.
- NetCfg enforces that an ifAlias is a non-empty string and is unique among all NICs. However, the NDIS interface provider does not. Thererfore, it is possible to find special network interfaces with duplicate or empty names. This is most commonly seen with LBFO teams.
- Only if the firmware supports Consistent Device Naming. Typcically, servers have this feature.
- NetCfg assigns unique ifDescrs to all network interfaces. However, drivers can call an API to change the ifDescr to anything, including something that is not unique. Some 3rd party software packages do this.
- Not all media types have a «MAC address.» For example, some tunnels do not have this concept and simply advertise a zero-length byte array as their network address.
- Only present on network interfaces that are backed by a PnP device. For example, loopback interfaces, light weight filter interfaces, interfaces provided by an NDIS interface provider, and certain special built-in NICs don’t have PnP devices backing them.
- Only some PnP buses support a PnP location ID. The built-in PCI and USB buses do, while root-enumerated devices do not.
Visibility to developers
In the preceding table, all properties except for the Plug and Play (PnP) properties are visible to user mode desktop apps and kernel mode drivers via a shared header (Netioapi.h). The PnP properties are visible via the Devpkey.h header and are used by both user mode desktop apps and kernel mode drivers. For example, see the DEVPKEY documentation.
The IP Helper API is also available for both user mode desktop apps and kernel mode drivers.
The UWP API surface only exposes the ifGuid property directly. However, it is possible for a UWP app developers to import the GetIfTable2 function using P/Invoke if they are required to access other network interface properties.
Related topics
For management information base (MIB) definitions for network interfaces, see RFC 2863.
For NDIS network interfaces in network drivers, see NDIS Network Interfaces.
For Netioapi.h API reference, see netioapi.h header.


