- Включаем Jumbo Frames в Windows Server 2012 R2 Hyper-V
- Настройка Jumbo Frames в Hyper-V Windows Server 2012 / R2
- Jumbo Frames на физических сетевых картах сервера
- Поддержка Jumbo Frames на сетевом оборудовании
- Включаем поддержку Jumbo Frames на виртуальном коммутаторе Hyper-V
- Активация Jumbo Frames в гостевой ОС (Windows Server 2012)
- Тестируем работу Jumbo Frames в Windows
- Настройка Jumbo Frames из Powershell
- Windows network jumbo frames
- Working Hard In IT
- My view on IT from the trenches
- Configuring Jumbo Frames with PowerShell in Windows Server 2012
- Windows network jumbo frames
- Answered by:
- Question
- Answers
Включаем Jumbo Frames в Windows Server 2012 R2 Hyper-V
В этой статье мы рассмотрим методику активации пакетов увеличенной длины, Jumbo Frames, на виртуальной машине с Windows, запущенной в Hyper-V на базе Windows Server 2012 R2. Но для начала немного вкратце напомним что такое Jumbo Frames и зачем они нужны.
Jumbo Frames – это особые, сверхдлинные кадры Ethernet, размер которых превышает стандартный размер MTU (Maximum Transmission Unit) для Ethernet в 1518 байт. Размер Jumbo-кадров обычно варьируется в диапазоне от 1518 до 16000 байт. Как правило, размер Jumbo Frame-а не превышает 9000 байт, это ограничение накладывается 32 битной CRC в сетях Ethernet, теряющей свою эффективность при объеме передаваемых данных больше 12000 байт.
Зачем же нужны такие увеличенные пакеты?
Благодаря использованию пакетов увеличенной длины можно существенно повысить КПД сети, т.к. при сохранении размера Ethernet заголовка, количество полезной информации, содержащейся в пакете увеличивается (почти в 6 раз). Кроме того за счет уменьшения количества пакетов, заголовки которых нужно разбирать, снижается нагрузка на CPU сервера. Пакеты Jumbo Frames рекомендуется использовать в высокопроизводительных сетях с интенсивной пересылкой больших объемов данных
Настройка Jumbo Frames в Hyper-V Windows Server 2012 / R2
По умолчанию jumbo frames в Windows — системах отключен. Чтобы активировать передачу больших пакетов Jumbo Frames для гостевой ОС, запущенной в виртуальной машине на базе Hyper –V 2012 нужно:
- Включить Jumbo Frames на физических сетевых картах (NIC) гипервизора (хостовой ОС), подключенных к сети LAN
- Включить поддержку Jumbo Frames на сетевом оборудовании LAN
- Включить Jumbo Frames на виртуальном коммутаторе Hyper-V
- Активировать Jumbo Frames в гостевой ОС
Jumbo Frames на физических сетевых картах сервера
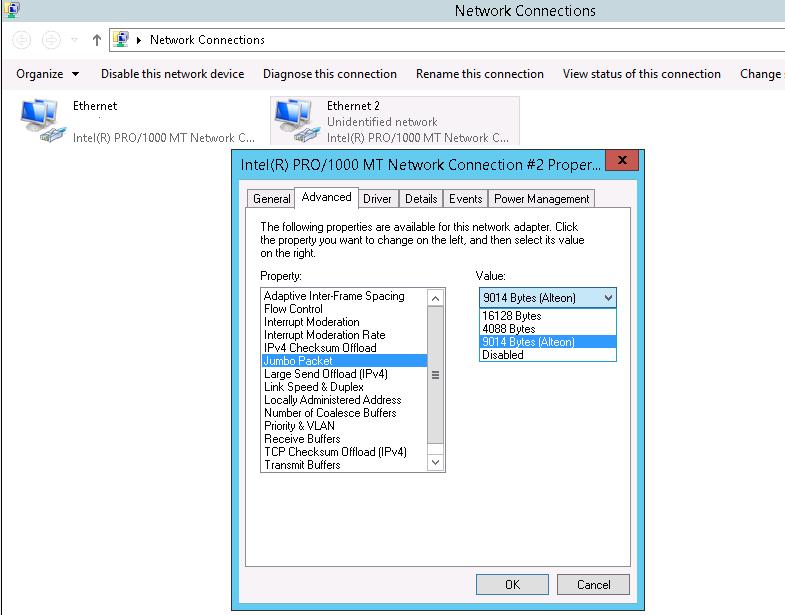
Для каждой из сетевых карточек (NIC), используемых для подключений сервера (хостовой ОС) к сети LAN необходимо в свойствах сетевых адаптеров перейти в режим настройки драйвера (кнопка Configure). Затем на вкладке Advanced найти параметр с названием Jumbo Frames (в зависимости от производителя NIC, он также может называться Packet Size, Jumbo Packets или что-то похоже) и установить его значение в 9014.
Поддержка Jumbo Frames на сетевом оборудовании
Далее необходимо включить поддержку Jumbo Frames на коммутаторах, которые в дальнейшем будут задействована в цепочке передачи данных между серверами с включенным Jumbo Frames (это задача для администраторов сети).
Включаем поддержку Jumbo Frames на виртуальном коммутаторе Hyper-V
В том случае, если на хостовой ОС (гипервизор) установлена Windows Server 2012, чтобы активировать Jumbo Frames для виртуального коммутатора Hyper-V нужно
- Открыть редактор реестра и развернуть ветку HKLM\SYSTEM\CurrentControlSet\Control\Class\
- Внутри данной ветки содержатся несколько «подкустов». Нужно пробежаться по ним и найти ветку, в которой значение параметра «driverdesc» равно «Hyper-V Virtual Ethernet Adapter», а «Characteristics»= 0x00000029 (41)
- В найденной ветке задать параметру *JumboPacket значение 9014

- Перезагрузите сервер для вступления изменений в силу

Активация Jumbo Frames в гостевой ОС (Windows Server 2012)
На уровне гостевой ОС (в нашем примере это Windows Server 2012) включается аналогично гипервизору: в расширенных настройках драйвера укажите, что Jumbo Packet=9014 Bytes. 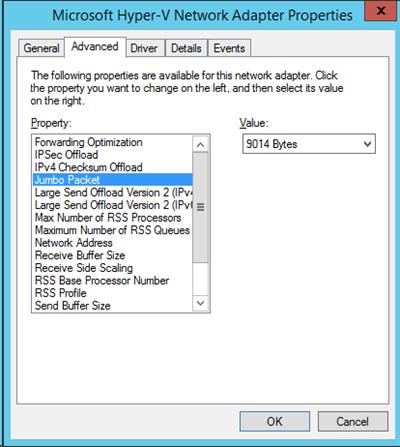
Тестируем работу Jumbo Frames в Windows
В большинстве случаев после выполнения указанных настроек перезагрузка ни гостевой, ни хостовой машины не требуется. Однако если что-то не работает, в первую очередь рекомендуется перезагрузить систему.
Протестировать работу Jumbo Frames можно с помощью простой команды ping, позволяющей определить что пакет большого размера может быть передан без дефрагментации:
где, флаг f — запрещает фрагментацию пакета, флаг –l задает размер пакета (8972 — на нашем стенде это максимальный размер пакета, передающийся без дефрагментации), second_jumbo_frame_server – имя/ip_адрес второго сервера с включенным Jumbo Frames.
Если ping отработал успешно – поздравляю, вы только что настроили Jumbo Frames для виртуальной машины на Hyper-V!
Настройка Jumbo Frames из Powershell
Указанные выше операции можно выполнить и с помощью всемогущего Powershell:
Следующая команда позволяет узнать включен ли Jumbo Frames для сетевого адаптера с именем Ethernet:
Если команда возвращает Disables (RegistryValue 1514), этоозначает, что Jumbo Frames в настоящий момент не включен, и используется стандартный размер MTU – 1514 байт.
Задаем увеличенный размер пакета для данного интерфейса:
Windows network jumbo frames
Jumbo frames are Ethernet frames with a payload greater than the standard mtu of 1500. Increasing the mtu size on a 1 GB network usually improves network performance and efficiency.The following PowerShell cmdlets will help display and check current jumbo frame values and edit them.The maximum value of a Jumbo frame on an Ethernet adapter varies depending on the network adapter brand.
I have a Windows Server 2012R2 with four NICs in a team. After setting the Jumbo frame values at the individual NICs, they should be inherited by the NIC team adapter.The Advanced Properties of the NICs are displayed below:

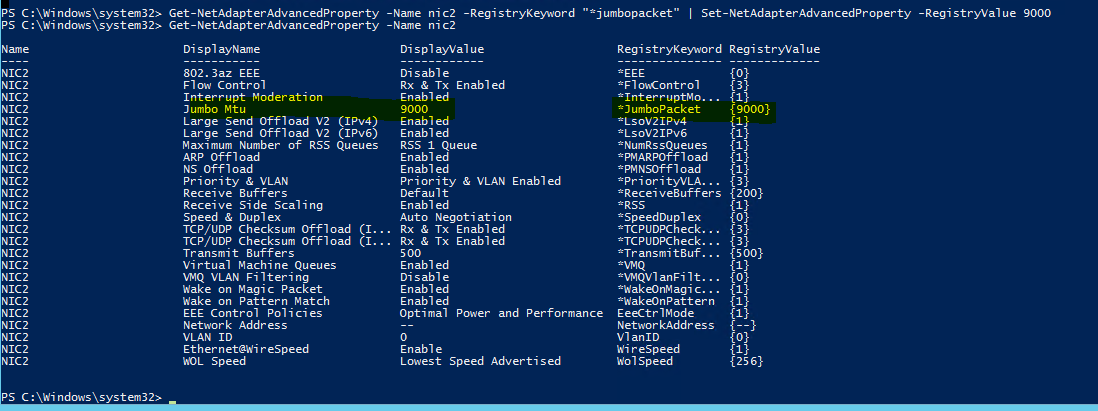
The Get-NetAdapterAdvancedProperty -Name nic2 cmdlet displays the current Jumbo frame value of NIC2 in the team:

My attempt to set the Jumbo frame value on this NIC to 9014 failed, with the following error message “the value must be within the range 1500-9000” as indicated :

Set the new value to 9000:
Get-NetAdapterAdvancedProperty -Name nic2 -RegistryKeyword «*jumbopacket» | Set-NetAdapterAdvancedProperty -RegistryValue 9000
The new value is shown in the following screen shot:
I completed the same configuration on the remaining team NICs.To optimize performance on the network and take full advantage of this configuration, the next logical step in the process is to configure the corresponding Cisco switch port for Jumbo frames.
By default, the switch and it’s gigabit ports/interfaces are set to the standard 1500 mtu. As indicated in the following command :
L3Switch#sh system mtu
System MTU size is 1500 bytes
System Jumbo MTU size is 1500 bytes
Routing MTU size is 1500 bytes
This could also be verified by using the sh run command as shown below:
L3Switch#sh running-config
Building configuration.
Current configuration : 3666 bytes
!
version 12.2
no service pad
service timestamps debug datetime msec
service timestamps log datetime msec
service password-encryption
!
hostname L3Switch
!
boot-start-marker
boot-end-marker
!
enable secret 5 $1$w7It$7sxFdFRIbKR7zfDZeYJq2/
!
no aaa new-model
clock timezone CST -5
system mtu routing 1500
And the sh interfaces gigabitEthernet0/21 command for a specific interface:
L3Switch#sh interfaces gigabitEthernet0/21
GigabitEthernet0/21 is down, line protocol is down (notconnect)
Hardware is Gigabit Ethernet, address is 64d8.148e.8015 (bia 64d8.148e.8015)
MTU 1500 bytes, BW 10000 Kbit, DLY 1000 usec,
reliability 255/255, txload 1/255, rxload 1/255
Configure Jumbo Frame values on the Cisco Gigabit switch globally:
L3Switch#config t
Enter configuration commands, one per line. End with CNTL/Z.
L3Switch(config)#system mtu jum
L3Switch(config)#system mtu jumbo ?
Jumbo MTU size in bytes
L3Switch(config)#system mtu jumbo 9000 ?
L3Switch(config)#system mtu jumbo 9000
Changes to the system jumbo MTU will not take effect until the next reload is done
L3Switch(config)#^Z
L3Switch#
*Mar 1 00:23:12.967: %SYS-5-CONFIG_I: Configured from console by console
L3Switch#reload
System configuration has been modified. Save? [yes/no]: y
Building configuration.
[OK]
Proceed with reload? [confirm]
After reload, verify Jumbo Frame settings have taken effect:
L3Switch#sh system mtu
System MTU size is 1500 bytes
System Jumbo MTU size is 9000 bytes
Routing MTU size is 1500 bytes
Verify the settings for a specific interface:
L3Switch#sh interfaces gigabitEthernet0/21
GigabitEthernet0/21 is down, line protocol is down (notconnect)
Hardware is Gigabit Ethernet, address is 64d8.148e.8015 (bia 64d8.148e.8015)
MTU 9000 bytes, BW 10000 Kbit, DLY 1000 usec,
reliability 255/255, txload 1/255, rxload 1/255
Working Hard In IT
My view on IT from the trenches

Configuring Jumbo Frames with PowerShell in Windows Server 2012
During lab and test time with Windows Server 2012 Hyper-V some experimenting with PowerShell is needed to try and automate actions and settings. One of the thing we have been playing around with was how to enable and configure jumbo frames.
Many advanced features like Large Send Offload have commandlets of their own (Enable-NetAdapterLso etc.), but not all them and jumbo frames is one of the latter. For those advanced features you can use the NetAdapterAdvancedProperty commandlets (Network Adapter Cmdlets in Windows PowerShell). You can than set/enable those features via the registry keywords & values. Let’s say we want to enable jumbo frames on a virtual adapter named “ISCSI” in a VM.

To know what values to use you can run:
Get-NetAdapterAdvancedProperty -Name ISCSI

As you can see Jumbo Packet has a RegistryValue of 1514 and a DisplayValue of “Disabled”. You can also see that the RegistryKeyword to use to enable and configure jumbo frames is “*JumboPacket”. So to enable jumbo frames you run the following command:
Set-NetAdapterAdvancedProperty -Name “ISCSI” -RegistryKeyword “*JumboPacket” -Registryvalue 9014

The RegistryValue is set to 9014 and the DisplayValue is set to “9014 Bytes”, i.e. it’s enabled.
If you type in an disallowed value it will list the accepted values. Please note also that these can differ from NIC to NIC depending on what is supported. Some will only show 1514, 4088, some will show 1514, 4088, 9014.

Now to disable jumbo frames you just need to reset the RegistryValue back to 1514
Set-NetAdapterAdvancedProperty -Name “ISCSI” -RegistryKeyword “*JumboPacket” -Registryvalue 1514
The result of this command can be seen in the picture below. DisplayName Jumbo Packet has a DisplayValue of “Disabled” again.

Let’s say you want to enable jumbo frames on all network adapters in a host you can run this:
Get-NetAdapterAdvancedProperty -DisplayName “Jumbo Packet” | Set-NetAdapterAdvancedProperty –RegistryValue “9014 ”
Set-NetAdapterAdvancedProperty -Name * -RegistryKeyword “*JumboPacket” -Registryvalue 9014
I didn’t notice much difference in speed testing this with measure-command.
If you mess things up to much and you want to return all DisplayName settings to a well known status, i.e. the defaults you can run:
Reset-NetAdapterAdvancedProperty –Name SCSCI –DisplayName *
If you’ve just messed around with the jumbo frame settings run
Reset-NetAdapterAdvancedProperty -Name ISCSI –DisplayName “Jumbo Packet”
Or you can do the same for all network adapters:
Reset-NetAdapterAdvancedProperty –Name * –DisplayName “Jumbo Packet”
There you go, you’re well on your way doing the more advanced configurations of your network setup. Enjoy!
Windows network jumbo frames
This forum has migrated to Microsoft Q&A. Visit Microsoft Q&A to post new questions.
Answered by:
![]()
Question
![]()
![]()
Hello, I have a brand new HP server with 2 NICs.
I enabled jumbo frames on both NICs, and then added them into a NIC team.
I cant find whether the teamed NIC needs to also have jumbo frames enabled as well. I cant seem to find a way to enable them either.
Does this teamed nic in server 2012 R2 need to have jumbo frames enabled? How do I do this? How do I verify that jumbo frames is working.
Answers
![]()
![]()
>>I cant find whether the teamed NIC needs to also have jumbo frames enabled as well. I cant seem to find a way to enable them either.
As far as I know, teamed NIC inherits the MTU set from the NICs of the team.
Configuring on the physical NICs and you would get a team available of jumbo frames.
>>How do I verify that jumbo frames is working.
Run the command ping with -l Size flag.


