Команда NET SHARE — общие ресурсы компьютера
Команда NET SHARE разрешает использовать ресурсы компьютера другим пользователям в сети. Kогда используется без параметров, выводит информацию обо всех ресурсах данного компьютера, которые могут быть совместно использованы. Для каждого ресурса Windows NT выводит имя устройства или путь и соответствующий комментарий.
А для простого просмотра общих ресурсов компьютера используется команда NET VIEW.
Синтаксис команды NET SHARE
NET SHARE имя_ресурса=диск:путь [/USERS:чиcло | /UNLIMITED]
[/REMARK:»текст»]
[/CACHE:Manual |Automatic | No]
[/CACHE:Manual | Documents| Programs | None]
NET SHARE имя_ресурса | имя_устройства | диск:путь /DELETE, где
- имя_ресурса — Задает сетевое имя данного совместно используемого ресурса. Если ввести в качестве параметра только имя ресурса, то выводится информация об этом ресурсе.
- диск:путь — Указывает абсолютный путь к совместно используемому каталогу.
- /USERS:число — Устанавливает максимальное число пользователей, которые могут одновременно получить доступ к совместно используемому ресурсу.
- /UNLIMITED — Определяет, что ограничения на число пользователей, которые могут получить доступ к совместно используемому ресурсу, отсутствует.
- /REMARK:»текст» — Задает краткое примечание, описывающее ресурс. Текст должен быть заключен в кавычки.
- имя_устройства — Задает один или несколько принтеров (от LPT1: до LPT9:) совместно используемых под данным именем ресурса.
- /CACHE:Manual — Задает ручное кэширование программ и документов на этом общем ресурсе.
- /CACHE:Documents — Задает автоматическое кэширование документов на этом общем ресурсе.
- /CACHE:Programs — Задает автоматическое кэширование документов и программ на этом общем ресурсе.
- /CACHE:None — Отключает кэширование на этом общем ресурсе.
- /DELETE — Прекращает совместное использование данного ресурса.
Примеры команды NET SHARE
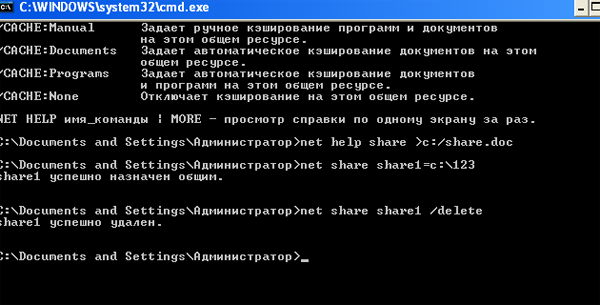
- Чтобы вывести справку о команде введите — NET HELP SHARE
- Чтобы вывести сведения об общих ресурсах компьютера, введите — NET SHARE
- Чтобы сделать папку «C:\Docs» общим ресурсом Sharedocs и включить примечание к нему, введите — NET SHARE Sharedocs=c:\Docs /remark:»Для отдела 123″
- Чтобы отменить общий доступ к ресурсу Sharedocs, созданному в предыдущем примере, введите — NET SHARE Sharedocs /delete
- Чтобы сделать папку «C:\123» общим ресурсом Share1, введите — NET SHARE Share1=c:\123
Видео — Работа с утилитой NET SHARE
File sharing over a network in Windows 10
In Windows 10, some features of file and folder sharing over a network have changed, including the removal of HomeGroup. Read on for answers to common questions about other changes to file and folder sharing in Windows 10.
To share a file or folder in File Explorer, do one of the following:
Right-click or press a file, select Give access to > Specific people.

Select a file, select the Share tab at the top of File Explorer, and then in the Share with section select Specific people.

If you select multiple files at once, you can share them all in the same way. It works for folders, too—share a folder, and all files in it will be shared.
To stop sharing in File Explorer, do one of the following:
Right-click or press a file or folder, then select Give access to > Remove access.

Select a file or folder, select the Share tab at the top of File Explorer, and then in the Share with section select Remove access.

File Explorer shows the «Remove access» option («Stop sharing» in older versions of Windows 10) for all files, even those that aren’t being shared over a network.
Open File Explorer, then type \\localhost into the address bar.
Note: When you’ve shared a file from a folder in your user profile and you go to \\localhost, you’ll see your user profile and all its files there. This doesn’t mean that all of your files are shared—just that you have access to all your own files.
If you open File Explorer, go to Network, and see an error message («Network discovery is turned off….»), you’ll need to turn on Network discovery to see devices on the network that are sharing files. To turn it on, select the Network discovery is turned off banner, then select Turn on network discovery and file sharing.

To troubleshoot problems with sharing files or folders, follow the steps below on all computers from which you’re trying to share.
Make sure the computers are on the same network. For example, if your computers connect to the internet through a wireless router, make sure they all connect through the same wireless router.
If you’re on a Wi-Fi network, set it to Private. To find out how, read Make a Wi-Fi network public or private in Windows 10.
Turn on network discovery and file and printer sharing, and turn off password protected sharing.
Select the Start button, then select Settings > Network & Internet , and on the right side, select Sharing options.
Under Private, select Turn on Network discovery and Turn on file and printer sharing.
Under All Networks, select Turn off password protected sharing.
Make sharing services start automatically.
Press the Windows logo key + R.
In the Run dialog box, type services.msc, and then select OK.
Right-click each of the following services, select Properties, if they’re not running, select Start, and next to Startup type, select Automatic:
Internet Connection Sharing in Windows 10
How am i can share my internet to another computer or laptop
i had connected from wifi first device
second device how am i share internet
***Subject edited for clarity by the moderator.***
Replies (53)
* Please try a lower page number.
* Please enter only numbers.
* Please try a lower page number.
* Please enter only numbers.
![]()
To enable Internet Connection Sharing in Windows 10, please follow the steps below:
- Press Windows key + X to open the Power User menu and select Network Connections.
- Right-click the network adapter with an Internet connection (Ethernet or wireless network adapter), then select Properties.
- Click Sharing.
- Put a check mark on Allow other network users to connect through this computer’s Internet connection.
- From the Home networking connection drop-down menu, select the Microsoft Hosted Virtual Adapter.
- Click OK to finish.
Let us know how it goes.
264 people found this reply helpful
Was this reply helpful?
Sorry this didn’t help.
Great! Thanks for your feedback.
How satisfied are you with this reply?
Thanks for your feedback, it helps us improve the site.
How satisfied are you with this reply?
Thanks for your feedback.
- Put a check mark on Allow other network users to connect through this computer’s Internet connection.
- From the Home networking connection drop-down menu, select the Microsoft Hosted Virtual Adapter.
- Click OK to finish.
I got to step 4, then couldn’t find anything like «Home Networking» in step 5. See step 1 and 2 above I am running Win10 Pro. The crazy thing is, it was working for a while without doing this or enabling the ICS Service.
As I remember, you had to assign the second adapter a static IP address? (Win95 & XP)
Any help would be appreciated.
55 people found this reply helpful
Was this reply helpful?
Sorry this didn’t help.
Great! Thanks for your feedback.
How satisfied are you with this reply?
Thanks for your feedback, it helps us improve the site.
How satisfied are you with this reply?
Thanks for your feedback.
![]()
For more details about enabling Internet Connection Sharing on Windows 10, we recommend checking out this page. It contains threads about the same issue, including solutions from other Windows experts.
Let us know if you have additional questions.
19 people found this reply helpful
Was this reply helpful?
Sorry this didn’t help.
Great! Thanks for your feedback.
How satisfied are you with this reply?
Thanks for your feedback, it helps us improve the site.
How satisfied are you with this reply?
Thanks for your feedback.
For more details about enabling Internet Connection Sharing on Windows 10, we recommend checking out this page. It contains threads about the same issue, including solutions from other Windows experts.
Let us know if you have additional questions.
175 people found this reply helpful
Was this reply helpful?
Sorry this didn’t help.
Great! Thanks for your feedback.
How satisfied are you with this reply?
Thanks for your feedback, it helps us improve the site.
How satisfied are you with this reply?
Thanks for your feedback.
To enable Internet Connection Sharing in Windows 10, please follow the steps below:
- Press Windows key + X to open the Power User menu and select Network Connections.
- Right-click the network adapter with an Internet connection (Ethernet or wireless network adapter), then select Properties.
- Click Sharing.
- Put a check mark on Allow other network users to connect through this computer’s Internet connection.
- From the Home networking connection drop-down menu, select the Microsoft Hosted Virtual Adapter.
- Click OK to finish.
Let us kno how it goes.
this X where i get
18 people found this reply helpful
Was this reply helpful?
Sorry this didn’t help.
Great! Thanks for your feedback.
How satisfied are you with this reply?
Thanks for your feedback, it helps us improve the site.
How satisfied are you with this reply?
Thanks for your feedback.
116 people found this reply helpful
Was this reply helpful?
Sorry this didn’t help.
Great! Thanks for your feedback.
How satisfied are you with this reply?
Thanks for your feedback, it helps us improve the site.
How satisfied are you with this reply?
Thanks for your feedback.
Just came up on this thread to connect a another PC to a laptop and share the internet via ethernet port the Wifi and Ethernet networks must be bridged.
Internet sharing will not work if you are connected to wifi because the hotspot needs the antenna and you can’t use it at the same time.
From the network connection page right-click Ethernet adapter while holding CTRL key and then right-click WiFi adapter.
Once they are both highlighted left-click on an adapter and select Bridge Connection.
Now you can use your device internet.
Note: Laptop wifi antenna is located on the display so leave it open for higher network speed.
100 people found this reply helpful
Was this reply helpful?
Sorry this didn’t help.
Great! Thanks for your feedback.
How satisfied are you with this reply?
Thanks for your feedback, it helps us improve the site.
How satisfied are you with this reply?
Thanks for your feedback.
To enable Internet Connection Sharing in Windows 10, please follow the steps below:
- Press Windows key + X to open the Power User menu and select Network Connections.
- Right-click the network adapter with an Internet connection (Ethernet or wireless network adapter), then select Properties.
- Click Sharing.
- Put a check mark on Allow other network users to connect through this computer’s Internet connection.
- From the Home networking connection drop-down menu, select the Microsoft Hosted Virtual Adapter.
- Click OK to finish.
Let us kno how it goes.
this X where i get
Also, connect a router or switch to the network interface card in your computer. Otherwise, internet connection sharing will not resume, following a reboot of your computer. Finally, my internet sharing works, after rebooting the computer which is sharing internet. When you are asked, select to have your network interface card connected network be private.
7 people found this reply helpful
Was this reply helpful?
Sorry this didn’t help.
Great! Thanks for your feedback.
How satisfied are you with this reply?
Thanks for your feedback, it helps us improve the site.
How satisfied are you with this reply?
Thanks for your feedback.
Just came up on this thread to connect a another PC to a laptop and share the internet via ethernet port the Wifi and Ethernet networks must be bridged.
Internet sharing will not work if you are connected to wifi because the hotspot needs the antenna and you can’t use it at the same time.
From the network connection page right-click Ethernet adapter while holding CTRL key and then right-click WiFi adapter.
Once they are both highlighted left-click on an adapter and select Bridge Connection.
Now you can use your device internet.
Note: Laptop wifi antenna is located on the display so leave it open for higher network speed.
Thanks a bunch, JG(?) both those solutions are going to be useful. (FYI, I have an older but still kickin’ HP laptop. lid closed of course! It would be in the way of the external monitor. . .
Anyhoo, , much appreciated, especially since i worked for nearly 20 years an IT tech, Help desk then Server engineering I was an MCSE on Windows 2000 in early 2001. I got a congratulatory note in the mail signed Bill Gates .So I knew how to bridge devices, but didn’t think of that.
Muchas gracias, again, and you can share this reply with anyone.
Frank, aka kkicker
5 people found this reply helpful
Was this reply helpful?
Sorry this didn’t help.
Great! Thanks for your feedback.
How satisfied are you with this reply?
Thanks for your feedback, it helps us improve the site.
How satisfied are you with this reply?
Thanks for your feedback.
4. Put a check mark on Allow other network users to connect through this computer’s Internet connection.
5. From the Home networking connection drop-down menu, select the Microsoft Hosted Virtual Adapter.
6. Click OK to finish.
I got to step 4, then couldn’t find anything like «Home Networking» in step 5. See step 1 and 2 above I am running Win10 Pro.
I had this too, eventually found I had to enable it via the command prompt. If anyone has this issue, first uncheck the sharing you enabled in the first three steps and restart your pc (otherwise this option still won’t appear).
— Run a command prompt with admin privileges (if unfamiliar with this just search for CMD on the desktop toolbar search, then right click the «Command Prompt» app it finds and run as admin)
— Type: NETSH WLAN set hostednetwork mode=allow ssid=Your_SSID key=Your_Passphrase
— (In the above replace ‘Your SSID’ with desired network name and ‘Your Passphrase’ with a security code of at least 8 letters/digits)
— Type: NETSH WLAN start hostednetwork
— Now do steps 1 to 4 as described in the OP above.
— You should now have options in the home networking drop-down menu
— For step 5, it might not be called ‘Microsoft Hosted Virtual Adapter’, mine was called ‘Local Area Connection 3’, but it was identified as an MS virtual adapter in its properties. I also had an entry just called ‘wifi’ — don’t use this one, didn’t work for me.
— If you want to disable this virtual adapter in the future use the following commands:
NETSH WLAN stop hostednetwork
NETSH WLAN set hostednetwork mode= disallow
It’s actually pretty quick and easy once you’ve done it once. You may have to reenable if you reboot your pc.
NOTE: I was setting up a pc which had an Ethernet internet access connection, then using its wifi for the new shared connection. Not all wifi cards are suitable for the above, apparently.


