- What Are Network Credentials in Windows 10
- What Are Network Credentials in Windows 10?
- Extra Tips: How to Fix “Enter Network Credentials Username and Password Incorrect” Error in Windows 10?
- The network folder specified is currently mapped using a different user name and password error
- Symptoms
- Status
- Workaround 1
- Workaround 2
- Enter network credentials on Windows 10 [Best solutions]
- How do I fix network credentials problems on Windows 10
- 1. Check that your IP addresses are properly assigned
- 2. Enter your Microsoft credentials
- 3. Enter computer name in the username field
- 4. Use username and password to log in to Windows 10
- 5. Add other PC’s network credentials to Credentials Manager
- 6. Change Advanced sharing settings
- 7. Change your security policies
- 8. Change your services
- 9. Set your connection to Private
- 10. Create a new user account
- 11. Change your user account options
What Are Network Credentials in Windows 10
“What is the ‘enter network credentials’ pop up while sharing files between two Windows 10 PCs via Wi-Fi network? I have a laptop and desktop both connected to my Wi-Fi router. Now when I try to access my laptop from my desktop and vice versa in the Network option I’m asked for some username and password. What’s that username and password and where will I get those?”
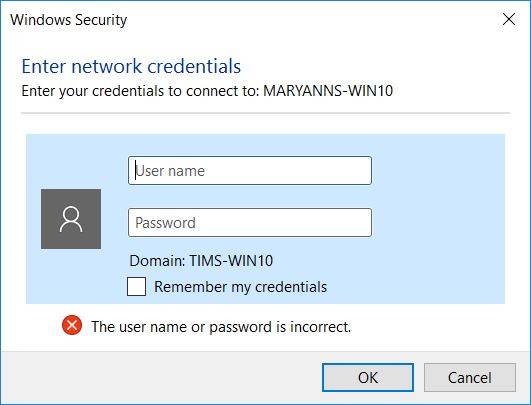
From the above quote description, the asker raises a subject, which is what network credentials are in Windows 10. On the Network Credentials screen, you need to type the user name, password, and sometimes, even the user domain of the user account you would like to use for this operation. Some Windows users may be lack of knowledge about Network Credentials in Windows 10 computer. Consequently, we will tell you what they are in the following content.
What Are Network Credentials in Windows 10?
In Windows 10, it is impossible to access shared resources on the network without entering a valid username and password. Suppose that everyone can access other person’s computer and visit data with a blank password, then it will cause severe issues, nobody could protect their personal privacy. To prevent things getting worse, the “password protected sharing” is enabled by default when a user attempts to share data. The other person who would like to visit them will need to type the username and password in the “Enter Network Credentials” screen.
Network Credentials are the account and password that stored in local host in order to visit network resource. This is to validate that the correct person and service are sending data to the right receiver’s device. And usually, you can’t remove this password from Windows 10.
It should be the login credentials of the machine on which you are accessing the folder/data. If the sender is prepared to share some folders or driver and set the appropriate permissions by using username and password, then the receiver should use the same username and password to login into that particular computer.
If you have a local network in Windows 10, it is likely that you are willing to share files between different PCs. For the sake of protecting your computer from unauthorized access, there are network credentials, which is a satisfactory protection.
Extra Tips: How to Fix “Enter Network Credentials Username and Password Incorrect” Error in Windows 10?
Sometimes you have no idea about the username and password; sometimes you know the password but Windows 10 prompts it is incorrect. Here are the possible scenarios to fix “Username and password is incorrect” error in the “Enter Network Credentials” of Windows 10.
- Way 1. Type Microsoft Account and Password
If you use Microsoft account to login Windows 10, try to use it to access other network devices in your local network, instead of local account username and password.
Way 2. Type Computer Name in the Username Field
Another attempt is to press your computer name follow by the username in the username input filed. For example, if the computer name is A and the username is B, you may enter both of them. Here your username is A\B. Take note that there is no slashed before A.
Way 3. Stop PIN Code in Windows 10
If you have no way to login other network computers because there is no username and password, such as login Windows 10 with PIN code, try to stop using PIN code provisionally and then try again to access the network credentials.
Way 4. Check if your IP address are properly assigned
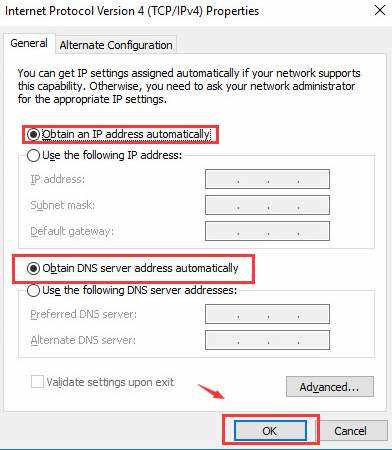
If your IP address is set to automatic, try to change it to static because the former may cause to issues with network credentials. Just to right-click network icon in the right side of your computer, then choose “Open Network and Sharing Center”. Navigate to: Ethernet -> Properties -> Internet Protocol Version 4(TCP/IPv4) -> Properties -> Obtain an IP address automatically -> Obtain DNS server address automatically -> OK.
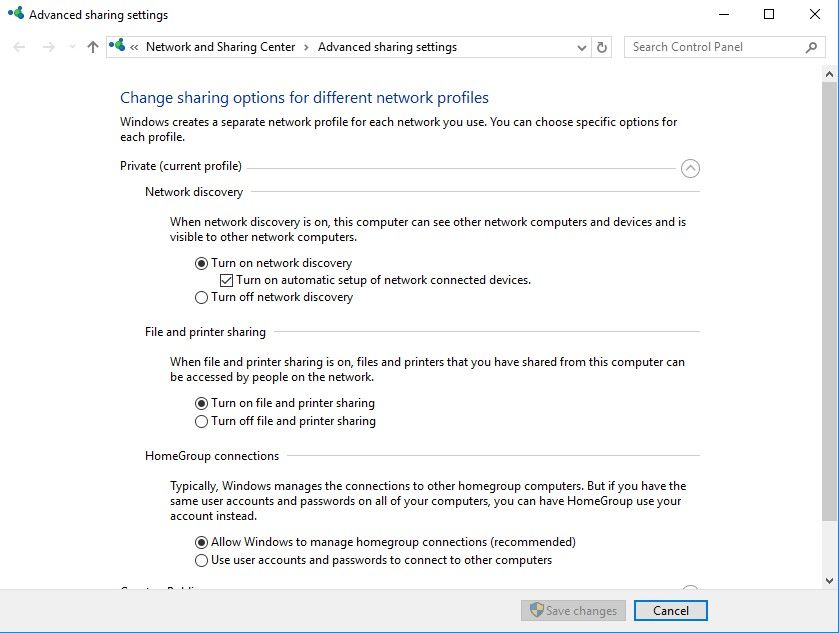
Way 5. Change Advanced Sharing Settings
Search “advanced sharing setting” in the search option on Windows 10 desktop, which is close to Start button. Then you will be navigated to “Advanced sharing settings” window, just click “Allow Windows to manage homegroup connections(recommended)” in the HomeGroup connections option and then click “Save changes” button.
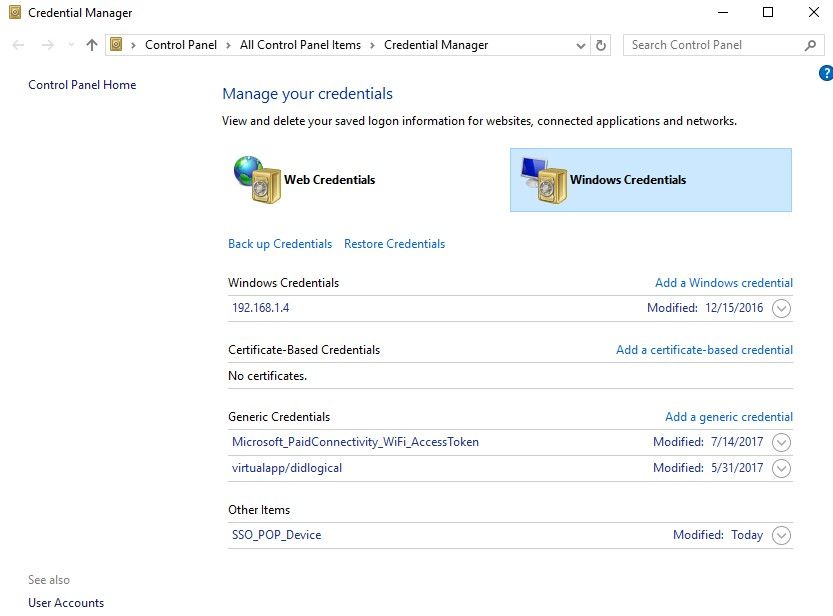
Way 6. Increase New Network Credential to Credential Manager
You can also increase other computer’s credential to Credential Manager. In this way, you have to get the computer’s name, the username and password united with that account. Then you can begin the change. To get started, search “credentials” and then type “Credential Manger” to access the window. Tap on “Windows Credentials” and then hit “Add a Windows credential”. In the new window, type the computer name, user name and password and finally click “OK” button.
That’s all about network credential in Windows 10 and how to fix network credential incorrect user name and password error! It won’t ask you to enter network credentials in Windows 10 then after. I hope these help someone one day so they can avoid the frustration issue with wrong username and password. By the way, if you lose login account password in Windows 10, Windows Password Key is the best tool to remove/reset/unlock it.
The network folder specified is currently mapped using a different user name and password error
This article provides workarounds to solve the error messages that occur when you try to use different user credentials to connect to the other network share.
Original product version: В Windows Server 2012 R2, Windows Server 2008 R2 Service Pack 1, Windows 7 Service Pack 1
Original KB number: В 938120
Symptoms
Consider the following scenario:
- You have a Windows-based computer.
- There are two network shares on a remote server.
- You use user credentials to connect to one of the network shares. Then, you try to use different user credentials to connect to the other network share.
In this scenario, you receive this error message:
The network folder specified is currently mapped using a different user name and password. To connect using a different user name and password, first disconnect any existing mappings to this network share.
If you select OK in response to the error message, you receive the following error message:
Multiple connections to a server or shared resource by the same user, using more than one user name, are not allowed. Disconnect all previous connections to the server or shared resource and try again.
Status
This behavior is by design.
Workaround 1
Use the IP address of the remote server when you try to connect to the network share.
Workaround 2
Create a different Domain Name System (DNS) alias for the remote server, and then use this alias to connect to the network share.
After you use one of these methods, you can use different user credentials to connect to the network share. In this situation, the computer behaves as if it is connecting to a different server.
Enter network credentials on Windows 10 [Best solutions]

- Working with your team over a local network is a very fast method of collaborative work.
- Issues might arise when Windows asks for your network credentials but won’t recognize them.
- We have a great System Errors Hub with information available to help you out in tricky situations.
- The Teamwork section offers ideas about using collaboration software in your best interest.

If you have a local network, you’re probably sharing files between computers. In order to protect your PC from unauthorized access Windows 10 uses network credentials.
This is a decent protection, but several users reported certain issues when asked to enter network credentials on Windows 10.
Enter network credentials message can appear while trying to access shared drives or directories and prevent you from accessing your files.
Similar issues that users reported are the following:
- Enter network credentials the username or password is incorrect
- Enter network credentials Windows 8, 7
- Windows 10 network credentials incorrect
- To fix this issue, you might have to change your security policies.
- Enter network credentials/ Access is denied
- To fix this problem, try disabling certain services and check if that helps.
- Network credentials asking for password
- If you keep getting asked for your network credentials, the issue might be your user account; simply create a new user account and check if that solves your problem.
How do I fix network credentials problems on Windows 10
1. Check that your IP addresses are properly assigned

In a local network, you probably assign all computers static IP addresses in order to access them easier.
According to users, your IP address might be set to automatic, and that can sometimes cause issues with network credentials, therefore be sure to check if IP addresses of your network devices are set to static.
To set your IP addresses to static you can always use your router’s built-in software.
If you’re facing trouble with the static IP address, this guide should help out.
2. Enter your Microsoft credentials

Windows 10 relies heavily on your Microsoft account, and since you can use your Microsoft account to sign in to Windows 10, you can also use it to access other network devices in your local network.
Users reported that you can fix problems with network credentials simply by entering your Microsoft account username and password instead of your local account’s username and password.
It is important to mention that many network issues are caused by malware, various scripts, and bots. You can secure yourself by installing Cyberghost, a leader in the VPN market. It protects your PC from attacks while browsing, masks and manages your IP address, and blocks all unwanted access.
3. Enter computer name in the username field

According to users, you can fix problems with network credentials by entering the name of the computer that you’re trying to access followed by the username.
For example, if the computer you’re trying to access is named Computer1 and you have a user named Mike, you need to enter both computer name and the user name in the user input field.
In our example the user name field would be Computer1Mike. Bear in mind not to enter any slashes before the computer name.
4. Use username and password to log in to Windows 10

Users reported that you can’t connect to other network computers if you don’t use a username and password to log in.
This limitation mostly affects users that log in to Windows 10 by using a PIN, therefore if you need to access and share files with others, you might want to temporarily stop using PIN code for login.
If your PIN is not working properly, you can get to the bottom of the problem with the help of this article.
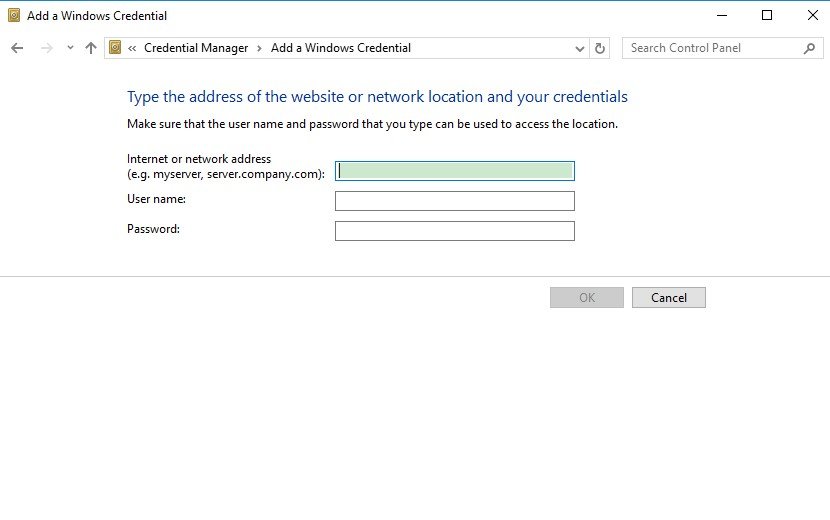
5. Add other PC’s network credentials to Credentials Manager
- Press Windows Key + S and enter credentials. Choose Credential Manager from the menu.

- Make sure that Windows Credentials is selected. Click Add a Windows credential.
- E nter the name of the computer you want to access, the user name, and the password related to that user name.
- Once you’re done click OK.
After adding the other computer’s information to the Credentials Manager you should be able to access it without any problems.
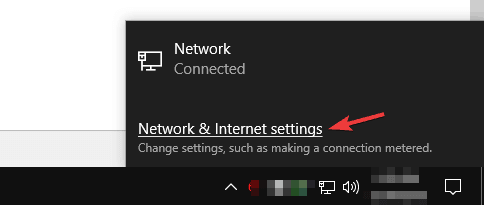
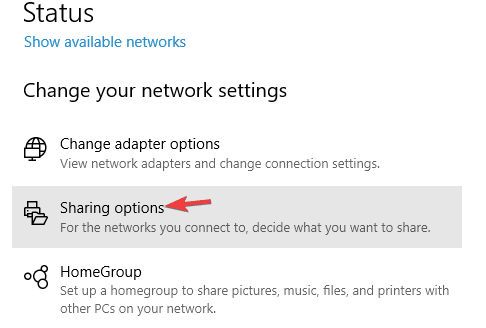
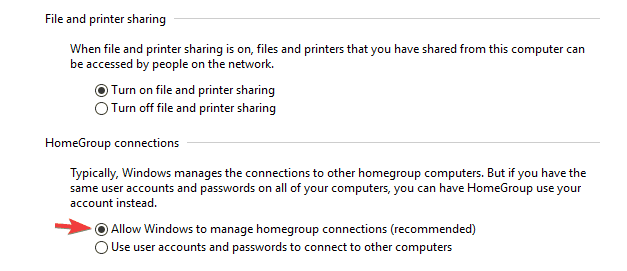
6. Change Advanced sharing settings
- Click the network icon in the Taskbar and choose Network & Internet settings.
- Click on Sharing options.
- Find your network profile and go to the HomeGroup connections section. Make sure that Allow Windows to manage homegroup connections (recommended) is selected.
- Click Save changes.
If your taskbar isn’t working, take a look here.
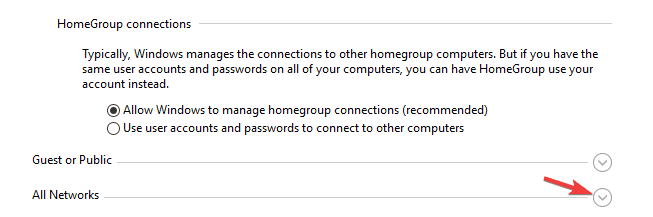
Several users reported that you can fix this problem simply by changing the following Advanced sharing settings:
- Open Advanced sharing settings window.
- Now expand All Networks section.
- In the Password protected sharing section, select Turn off password protected sharing. Click Save changes button.
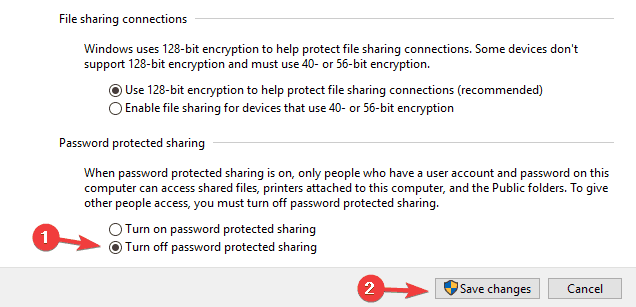
After making these changes, the problem should be completely resolved.
7. Change your security policies
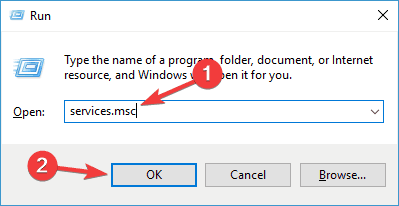
- Press Windows Key + R and enter secpol.msc . Now press Enter or click OK .
- When the Local Security Policy window opens, in the left pane navigate to Local Policies > Security Options . In the right pane, double-click Accounts: Limit local account use of blank passwords to console logon only .
- Now select Disabled from the menu and click on Apply and OK .
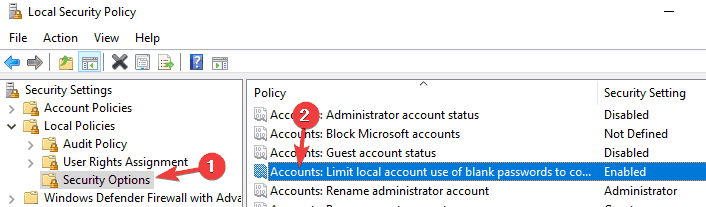
After making these changes, the problem with this message should be completely resolved and everything will start working again.
8. Change your services
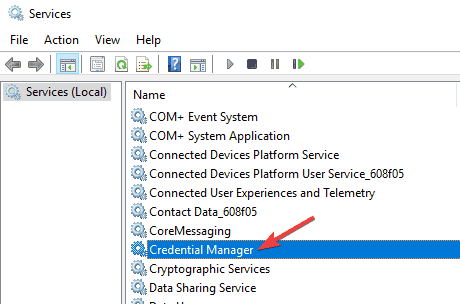
- Press Windows Key + R and enter services.msc. Now press Enter or click OK.
- When Services window opens, locate Credential Manager on the list and double-click it.
- The properties window will now appear. Set Startup type to Disabled and click the Stop button to stop the service. Now click Apply and OK.
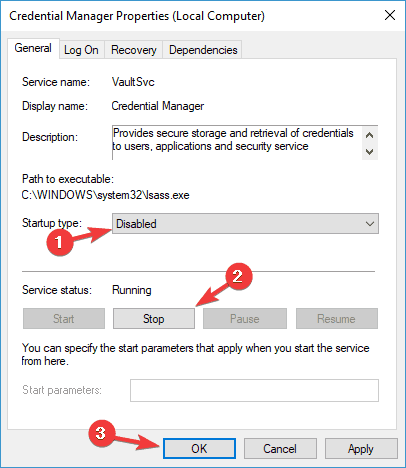
Once you stop the service, check if the problem is resolved.
9. Set your connection to Private
- In the Taskbar, click the network icon and choose Network & Internet settings.
- Now select Change connection properties.
- Now set Network profile to Private.
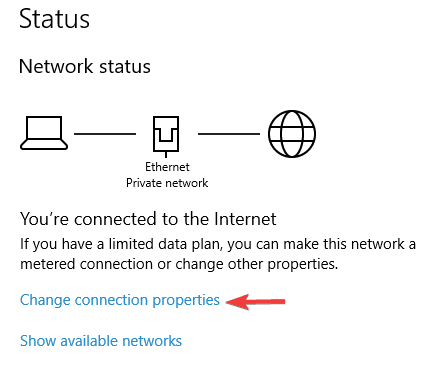
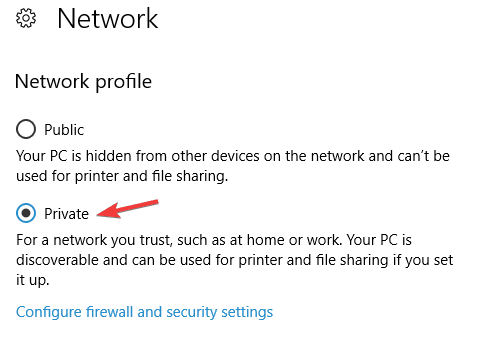
After doing that, the issue should be completely resolved. Keep in mind that you should use this step only on a secure networks. If you’re on a public network, changing these settings might reduce your security, so keep that in mind.
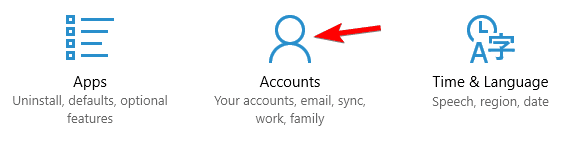
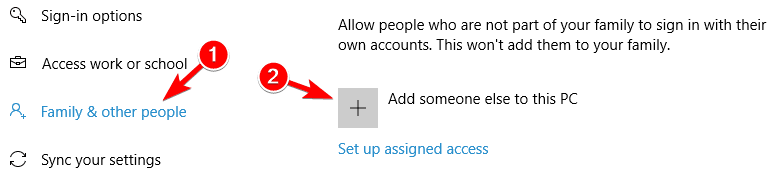
10. Create a new user account
- Open the Settings app. You can do that quickly by using Windows Key + I shortcut.
- When Settings app opens, navigate to Accounts section.
- Select Family & other people from the left pane. Now click Add someone else to this PC.
- Select I don’t have this person’s sign-in information.
- Choose Add a user without a Microsoft account.
- Enter the desired user name and click the Next button to proceed.
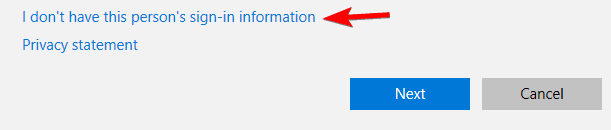

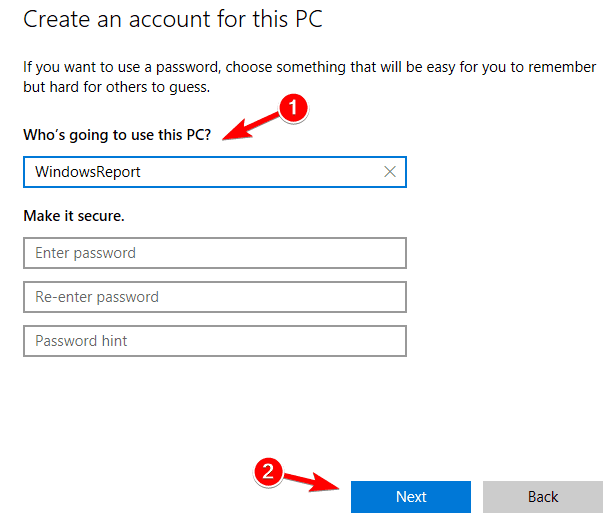
After doing that, you’ll have a new user account on your PC. Switch to a new user account and check if the problem still persists. If the issue doesn’t appear on a new account, you might want to consider using your new account instead of your main one.
If you’re having trouble accessing the Settings app, you may want to take a closer look here. If your user account has expired, follow these steps to get things rolling again.
11. Change your user account options
- Press Windows Key + R and enter netplwiz. Now press Enter or click OK.
- Uncheck Users must enter a user name and password to use this computer. Now click OK and Apply to save changes.
- Restart your PC to apply the changes.
- Once you log back in, repeat the same steps, but this time enable the Users must enter a user name and password option and save changes.


After doing that, the problem should be completely resolved and the password protection setting will work as it should.
Problems with network credentials can sometimes be hard to fix, but we hope that you managed to fix them after using one of our solutions.
If you have any more questions, don’t hesitate to leave them in the comments section below.


