- Customize the default local user profile when you prepare an image of Windows
- Summary
- Customize a default user profile
- Step 1: Configure the default user profile
- Step 2: Create an Unattend.xml file that contains the Copy Profile parameter
- Step 3: Customize the default user profile in the Unattend.xml file
- What to consider if you use automated image build and deployment systems
- Turn the default user profile into a network default user profile
- Turn the default user profile into a mandatory user profile
- Step 1: Prepare the mandatory profile location
- Step 2: Copy the default user profile to the mandatory profile location
- Step3: Prepare a user account
- Still need help
- Resources
- Create mandatory user profiles
- Profile extension for each Windows version
- Mandatory user profile
- How to create a default user profile
- How to make the user profile mandatory
- Apply a mandatory user profile to users
- How to apply a mandatory user profile to users
- Apply policies to improve sign-in time
Customize the default local user profile when you prepare an image of Windows
This article describes how to customize the default local user profile settings when you create an image in Windows 7.
Original product version: В Windows 7 Service Pack 1, Windows Server 2012 R2
Original KB number: В 973289
Summary
After you deploy the image, the default local user profile settings are applied to all new users who log on to the computer.
To customize a default user profile or a mandatory user profile, you must first customize the default user profile. Then, the default user profile can be copied to the appropriate shared folder to make that user profile either the default user profile or a mandatory user profile.
When the default user profile is customized as described in this article, it reconstructs the source profile in a format that is appropriate for use by multiple users. This is the only supported method of customizing the default user profile for the Windows operating system. If you try to use other methods to customize the default user profile, it may result in extraneous information being included in this new default user profile. Such extraneous information could lead to serious problems with applications and system stability.
This article supersedes all previously published procedures about how to customize default local user profiles when you prepare images.
Customize a default user profile
The only supported method for customizing the default user profile is by using the Microsoft-Windows-Shell-Setup\CopyProfile parameter in the Unattend.xml answer file. The Unattend.xml answer file is passed to the System Preparation Tool (Sysprep.exe).
Step 1: Configure the default user profile
Log on to Windows by using the built-in local Administrator account.
You cannot use a domain account for this process.
Open the User Accounts control panel, and remove all added user accounts except for the one Administrator-level user account that you used to log on to Windows.
Configure the settings that you want to copy to the default user profile. This includes desktop settings, favorites, and Start menu options.
Customizing the Start menu and the Taskbar is limited in Windows 7.
Step 2: Create an Unattend.xml file that contains the Copy Profile parameter
Create an Unattend.xml file that contains the Copy Profile parameter ( Microsoft-Windows-Shell-Setup\CopyProfile ). By using this Copy Profile parameter, the settings of the user who is currently logged on are copied to the default user profile. This parameter must be set to true in the specialize pass.
Windows System Image Manager (Windows SIM) creates and manages unattended Windows Setup answer files in a graphical user interface (GUI).
Answer files are XML-based files that are used during Windows Setup to configure and to customize the default Windows installation.
Use the Windows System Image Manager tool to create the Unattend.xml file. The Windows System Image Manager tool is included as part of the Windows Automated Installation Kit (Windows AIK). Obtain the AIK for your operating system from one of the following websites:
For more information about Windows AIK, see Windows Automated Installation Kit (AIK). Directions about how to create an answer file can be found in the Help information that is included with Windows AIK. For more information about how to create an answer file, see Work with Answer Files in Windows SIM.
Step 3: Customize the default user profile in the Unattend.xml file
Open an elevated command prompt. To do this, click Start, type cmd in the Search box, right-click cmd in the Programs list, and then click Run as administrator.
If you are prompted for an administrator password or for confirmation, type the password or provide confirmation.
At the command prompt, type the following command, and then press ENTER:
Sysprep.exe is located in the %systemdrive%\Windows\System32\sysprep directory.
To confirm that the CopyProfile command successfully completed, open the %systemroot%\panther\unattendgc\setupact.log file.
Search for lines that resemble the following (in the specialize pass):
[shell unattend] CopyProfileDirectory from c:\Users\Administrator succeeded.
[shell unattend] CopyProfile succeeded.
This line confirms whether the CopyProfile command succeeded and which user profile was copied to the default user profile.
Capture the image.
Deploy the image. For more information about how to use Sysprep to capture and deploy an image, see Sysprep Technical Reference.
- You must use the /generalize switch with sysprep.exe so that the Copy Profile parameter can be used. The /unattend option is used to point to the desired Unattend.xml file. Therefore, in this example, the Unattend.xml file is located in the c:\answerfile folder.
- The built-in administrator account profile is deleted when you perform a clean Windows installation or when you run the Sysprep tool. The CopyProfile setting is processed before the built-in administrator account is deleted. Therefore, any customizations that you make will appear in the new user account profile. This includes the built-in administrator account profile settings.
- If there are multiple user profiles, Windows sysprep may select an unexpected profile to copy to the default user profile.
- Not all customizations will propagate to new profiles. Some settings are reset by the new user logon process. To configure those settings, use Group Policy settings or scripting.
What to consider if you use automated image build and deployment systems
When you use tools such as the Microsoft Deployment Toolkit or System Center Configuration Manager, the CopyProfile setting is not required when you run the Sysprep command. These tools usually replace or change the Unattend.xml file after the image is deployed to the disk but before the operating system has started for the first time after you run the Sysprep command. Therefore, the Unattend.xml file that is used in the Microsoft Deployment Toolkit or System Center Configuration Manager deployment process must contain the CopyProfile setting.
If you set the CopyProfile setting to true when you run Setup from the Windows 7 installation media during the image build process, the administrator profile settings may be unintentionally copied into the default user profile. The administrator profile settings are typically present in the Install.wim file on the installation media.
Turn the default user profile into a network default user profile
To turn the default user profile into a network default user profile, follow these steps:
Use an account that has administrative credentials to log on to the computer that has the customized default user profile.
Use the Run command to connect to the NETLOGON shared folder of a domain controller. For example, the path resembles the following:
\\ \NETLOGON
Create a new folder in the NETLOGON shared folder, and name it Default User.v2.
Click Start, right-click Computer, click Properties, and then click Advanced system settings.
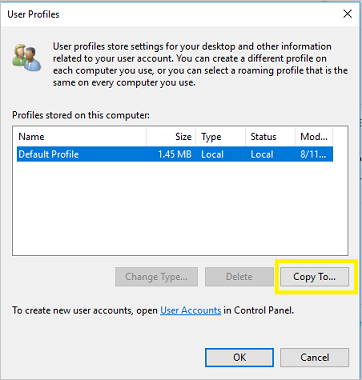
Under User Profiles, click Settings. The User Profiles dialog box shows a list of profiles that are stored on the computer.
Select Default Profile, and then click Copy To.
In the Copy profile to text box, type the network path of the Windows default user profile folder that you created in step 3. For example, type the path \\ \NETLOGON\Default User.v2 .
Under Permitted to use, click Change, type the name Everyone, and then click OK.
Click OK to start to copy the profile.
Log off from the computer when the copying process is completed.
Turn the default user profile into a mandatory user profile
You can configure the default local user profile to become a mandatory profile. By doing this, you can have one central profile that is used by all users. To do this, you have to prepare the mandatory profile location, copy the local default user profile to the mandatory profile location, and then configure a user’s profile location to point to the mandatory profile.
Step 1: Prepare the mandatory profile location
On a central file server, create a new folder or use an existing folder that you use for roaming user profiles. For example, you can use the folder name Profiles:
\Profiles
If you are creating a new folder, share the folder by using a name that is suitable for your organization.
The share permissions for shared folders that contain roaming user profiles must enable Full Control permissions for the Authenticated Users group. The share permissions for folders that are dedicated to storing mandatory user profiles should enable Read permissions for the Authenticated Users group and enable Full Control permissions for the Administrators group.
Create a new folder in the folder that is created or identified in step 1. The name of this new folder should start with the logon name of the user account if the mandatory user profile is for a specific user. If the mandatory user profile is for more than one user, name it accordingly. For example, the following domain has a mandatory profile, and the folder name begins with the word mandatory:
\Profiles\mandatory
Finish naming the folder by adding .v2 after the name. The example that is used in step 3 has the folder name mandatory. Therefore, the final name of the following folder for this user is mandatory.v2:
\Profiles\mandatory.v2
Step 2: Copy the default user profile to the mandatory profile location
Log on to the computer that has the customized local default user profile by using an account that has administrative credentials.
Click Start, right-click Computer, click Properties, and then click Advanced System Settings.
Under User Profiles, click Settings. The User Profiles dialog box shows a list of profiles that are stored on the computer.
Select Default Profile, and then click Copy To.
In the Copy profile to text box, type the network path of the Windows default user folder that you created in the Step 1: Prepare the mandatory profile location section. For example, type the following path:
\\ \Profiles\mandatory.v2
Under Permitted to use, click Change, type the name Everyone, and then click OK.
Click OK to start to copy the profile.
Log off from the computer when the copying process is completed.
On the central file server, locate the folder that you created in the Step 1: Prepare the mandatory profile location section.
Click Organize, and then click Folder options.
Click the View tab, click to select the Show hidden files and folders check box, click to clear the Hide extensions for known file types check box, click to clear the Hide protected operating system files check box, click Yes to dismiss the warning, and then click OK to apply the changes and close the dialog box.
Locate and right-click the NTUSER.DAT file, click Rename, change the name of the file to NTUSER.MAN, and then press ENTER.
Previously it was possible to copy profiles by using the System Control Panel item. This copy to default profile option is now disabled as it could add data that made the profile unusable.
Step3: Prepare a user account
As a domain administrator, open the Active Directory Users and Computers management console from a Windows Server 2008 R2 or Windows Server 2008 computer.
Right-click the user account to which you want to apply the mandatory user profile, and then click Properties.
Click the Profile tab, type the network path that you created in the Step 1: Prepare the mandatory profile location section in the profile path text box. However, don’t add .v2 at the end. In our example, the path would be as follows:
\\ \Profiles\mandatory
Click OK, and then close the Active Directory Users and Computers management console. The user will now use the customized mandatory user profile.
Still need help
If this article does not answer your question, ask a question and pose it to other community members at Microsoft Community.
Resources
If you are having issues logging on to a user profile, see the website:
Create mandatory user profiles
Applies to
A mandatory user profile is a roaming user profile that has been pre-configured by an administrator to specify settings for users. Settings commonly defined in a mandatory profile include (but are not limited to): icons that appear on the desktop, desktop backgrounds, user preferences in Control Panel, printer selections, and more. Configuration changes made during a user’s session that are normally saved to a roaming user profile are not saved when a mandatory user profile is assigned.
Mandatory user profiles are useful when standardization is important, such as on a kiosk device or in educational settings. Only system administrators can make changes to mandatory user profiles.
When the server that stores the mandatory profile is unavailable, such as when the user is not connected to the corporate network, users with mandatory profiles can sign in with the locally cached copy of the mandatory profile, if one exists. Otherwise, the user will be signed in with a temporary profile.
User profiles become mandatory profiles when the administrator renames the NTuser.dat file (the registry hive) of each user’s profile in the file system of the profile server from NTuser.dat to NTuser.man . The .man extension causes the user profile to be a read-only profile.
Profile extension for each Windows version
The name of the folder in which you store the mandatory profile must use the correct extension for the operating system it will be applied to. The following table lists the correct extension for each operating system version.
| Client operating system version | Server operating system version | Profile extension |
|---|---|---|
| Windows XP | Windows Server 2003 Windows Server 2003 R2 | none |
| Windows Vista Windows 7 | Windows Server 2008 Windows Server 2008 R2 | v2 |
| Windows 8 | Windows Server 2012 | v3 |
| Windows 8.1 | Windows Server 2012 R2 | v4 |
| Windows 10, versions 1507 and 1511 | N/A | v5 |
| Windows 10, versions 1607, 1703, 1709, 1803, 1809, 1903 and 1909 | Windows Server 2016 and Windows Server 2019 | v6 |
Mandatory user profile
First, you create a default user profile with the customizations that you want, run Sysprep with CopyProfile set to True in the answer file, copy the customized default user profile to a network share, and then you rename the profile to make it mandatory.
How to create a default user profile
Sign in to a computer running Windows 10 as a member of the local Administrator group. Do not use a domain account.
Use a lab or extra computer running a clean installation of Windows 10 to create a default user profile. Do not use a computer that is required for business (that is, a production computer). This process removes all domain accounts from the computer, including user profile folders.
Configure the computer settings that you want to include in the user profile. For example, you can configure settings for the desktop background, uninstall default apps, install line-of-business apps, and so on.
Unlike previous versions of Windows, you cannot apply a Start and taskbar layout using a mandatory profile. For alternative methods for customizing the Start menu and taskbar, see Related topics.
Create an answer file (Unattend.xml) that sets the CopyProfile parameter to True. The CopyProfile parameter causes Sysprep to copy the currently signed-on user’s profile folder to the default user profile. You can use Windows System Image Manager, which is part of the Windows Assessment and Deployment Kit (ADK) to create the Unattend.xml file.
Uninstall any application you do not need or want from the PC. For examples on how to uninstall Windows 10 Application see Remove-AppxProvisionedPackage. For a list of uninstallable applications, see Understand the different apps included in Windows 10.
It is highly recommended to uninstall unwanted or unneeded apps as it will speed up user sign-in times.
At a command prompt, type the following command and press ENTER.
(Sysprep.exe is located at: C:\Windows\System32\sysprep. By default, Sysprep looks for unattend.xml in this same folder.)
If you receive an error message that says «Sysprep was not able to validate your Windows installation», open %WINDIR%\System32\Sysprep\Panther\setupact.log and look for an entry like the following:

Use the Remove-AppxProvisionedPackage and Remove-AppxPackage -AllUsers cmdlet in Windows PowerShell to uninstall the app that is listed in the log.
The sysprep process reboots the PC and starts at the first-run experience screen. Complete the set up, and then sign in to the computer using an account that has local administrator privileges.
Right-click Start, go to Control Panel (view by large or small icons) > System > Advanced system settings, and click Settings in the User Profiles section.
In User Profiles, click Default Profile, and then click Copy To.
In Copy To, under Permitted to use, click Change.

In Select User or Group, in the Enter the object name to select field, type everyone , click Check Names, and then click OK.
In Copy To, in the Copy profile to field, enter the path and folder name where you want to store the mandatory profile. The folder name must use the correct extension for the operating system version. For example, the folder name must end with «.v6» to identify it as a user profile folder for Windows 10, version 1607.
- If the device is joined to the domain and you are signed in with an account that has permissions to write to a shared folder on the network, you can enter the shared folder path.

- If the device is not joined to the domain, you can save the profile locally and then copy it to the shared folder location.
Click OK to copy the default user profile.
How to make the user profile mandatory
In File Explorer, open the folder where you stored the copy of the profile.
If the folder is not displayed, click View > Options > Change folder and search options. On the View tab, select Show hidden files and folders, clear Hide protected operating system files, click Yes to confirm that you want to show operating system files, and then click OK to save your changes.
Rename Ntuser.dat to Ntuser.man .
Apply a mandatory user profile to users
In a domain, you modify properties for the user account to point to the mandatory profile in a shared folder residing on the server.
How to apply a mandatory user profile to users
Open Active Directory Users and Computers (dsa.msc).
Navigate to the user account that you will assign the mandatory profile to.
Right-click the user name and open Properties.
On the Profile tab, in the Profile path field, enter the path to the shared folder without the extension. For example, if the folder name is \\server\profile.v6, you would enter \\server\profile.
Click OK.
It may take some time for this change to replicate to all domain controllers.
Apply policies to improve sign-in time
When a user is configured with a mandatory profile, Windows 10 starts as though it was the first sign-in each time the user signs in. To improve sign-in performance for users with mandatory user profiles, apply the Group Policy settings shown in the following table. (The table shows which operating system versions each policy setting can apply to.)
| Group Policy setting | Windows 10 | Windows Server 2016 | Windows 8.1 | Windows Server 2012 |
|---|---|---|---|---|
| Computer Configuration > Administrative Templates > System > Logon > Show first sign-in animation = Disabled |  | | | |
| Computer Configuration > Administrative Templates > Windows Components > Search > Allow Cortana = Disabled | | |  | |
| Computer Configuration > Administrative Templates > Windows Components > Cloud Content > Turn off Microsoft consumer experience = Enabled | | | | |
The Group Policy settings above can be applied in Windows 10 Professional edition.


