- The network folder specified is currently mapped using a different user name and password error
- Symptoms
- Status
- Workaround 1
- Workaround 2
- 7 solutions to fix Windows 10 Can’t Connect to This Network (WiFi)
- Windows 10 Can’t Connect To This Network
- Fix Temporary glitch with Restarting Network Devices
- Forget the wireless connection
- Run Network Adapter Troubleshooter
- Uninstall and Re-install Network Adapter
- Disable IPv6
- Change channel width
- Network Reset (Windows 10 Users only)
- Windows 10 can’t connect to this network [Comprehensive Fix]
- How can I fix Windows 10 network connection errors?
- 1. Windows 10 can’t connect to a wireless network
- Driverfix
- 2. Windows 10 can’t connect to this network after upgrade
- 3. Windows 10 can’t connect to this network, enter an APN and try again
- 4. Windows 10 can’t connect to this network and WEP problems
- 5. Windows 10 can’t connect to this network after waking from Sleep Mode
- Windows 10 can’t connect to this network after a password change
The network folder specified is currently mapped using a different user name and password error
This article provides workarounds to solve the error messages that occur when you try to use different user credentials to connect to the other network share.
Original product version: В Windows Server 2012 R2, Windows Server 2008 R2 Service Pack 1, Windows 7 Service Pack 1
Original KB number: В 938120
Symptoms
Consider the following scenario:
- You have a Windows-based computer.
- There are two network shares on a remote server.
- You use user credentials to connect to one of the network shares. Then, you try to use different user credentials to connect to the other network share.
In this scenario, you receive this error message:
The network folder specified is currently mapped using a different user name and password. To connect using a different user name and password, first disconnect any existing mappings to this network share.
If you select OK in response to the error message, you receive the following error message:
Multiple connections to a server or shared resource by the same user, using more than one user name, are not allowed. Disconnect all previous connections to the server or shared resource and try again.
Status
This behavior is by design.
Workaround 1
Use the IP address of the remote server when you try to connect to the network share.
Workaround 2
Create a different Domain Name System (DNS) alias for the remote server, and then use this alias to connect to the network share.
After you use one of these methods, you can use different user credentials to connect to the network share. In this situation, the computer behaves as if it is connecting to a different server.
7 solutions to fix Windows 10 Can’t Connect to This Network (WiFi)
Having trouble connecting to the WiFi network? Suddenly after a recent windows update, WiFi gets disconnected and try to reconnect results “can’t connect to this network” Or sometimes after Change WiFi password Windows fails to connect to the WiFi network with the error message Can’t Connect To This Network. A number of users report the same issue “unable to connect to wifi” on the Microsoft forum:
After upgrading to Windows 10 20H2 can’t connect to my Wifi network. At same time i can connect to others, but when I try to connect to my network the message: Can’t connect to this network. After that the network disappears from the list, I tried to add manually but nothing.

Windows 10 Can’t Connect To This Network
Internet & Network connection problems are most commonly caused by disconnected cables or by routers and modems that aren’t working correctly. Again incorrect network configuration, Outdated network adapter driver, Security software etc cause frequent disconnect or Can’t connect to this network error. Whatever the reason, here 5 solutions that help to fix Internet & Network connection problems.
Fix Temporary glitch with Restarting Network Devices
First of all Power cycle modem-router-computer that most of the time fix Internet and network connections if any temporary glitch causing the problem.
- Simply power off Router, Switch and modem (if installed) at same also restart your Windows 10 PC/Laptop
- Wair a few minutes and then Turn on all network devices include the router, switch and modem and wait for all its lights to turn up.
- Once Done try to connect the WiFi network this helps.
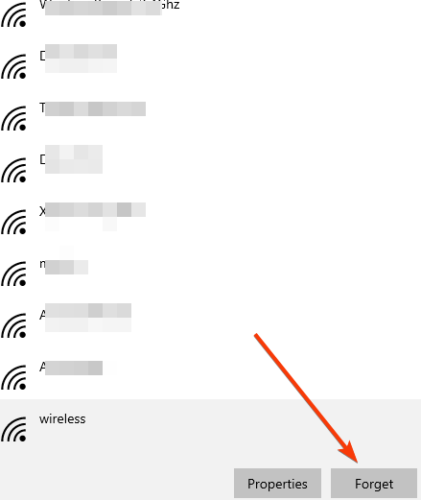
Forget the wireless connection
- Open Settings App and go to Network & Internet.
- Go to the Wi-Fi section and click Manage Wi-Fi settings.
- Scroll down to the Manage known networks, select your Wireless network and click Forget.
- After you’ve done that, connect to the same wireless network again.

Run Network Adapter Troubleshooter
Windows has a built-in Network adapter troubleshooter that helps with checking problems prevent To Connect WiFi network. Run the troubleshooter and let windows detect and fix it for you.
- Open Control panel
- Change the view by (small icon) and Click on Troubleshooting
- Select Hardware and Sound, then click on Network adapters
- This will open the network adapter troubleshooter
- From Advanced and checkmark on “Apply repairs automatically”
- Click next and follow on-screen instructions to let windows check and fix the problem with Wireless and Other network adapters.
- Restart windows after complete the troubleshooting process, and check there is no more error while connecting to the WiFi network.

Uninstall and Re-install Network Adapter
Mostly this error “Can’t connect to this network” occurs when there’s something wrong with your network adapter driver, it’s corrupted or not compatible with the current windows version. If the network adapter troubleshooter fails to fix the problem, you must try to update or reinstall the driver for the network adapter that probably fixes the problem for you.
Before move forward: On a different PC Visit your Device manufacturer site. look for the latest available Driver version for the network adapter, Download and save it to your local drive.
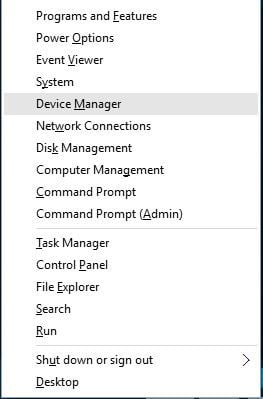
- Press Windows Key + X to access the Power user menu, and select Device Manager from the list.
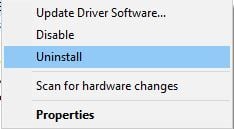
- This will display all installed driver list. Find your network adapter, right-click on it and select Uninstall from the context menu.
- Make sure you check the “Delete the driver software for this device” box and click OK.
- After uninstalling, restart your computer.
- Wait till windows automatically detect and re-install the Network adapter. Check if it solved the problem.
- If windows didn’t detect the network driver, simply Install the driver that previously downloaded from the device manufacturer’s website.
- Restart windows to take effect the changes, Now connect to Wireless network, check it works.

Disable IPv6
- Press Windows + R, type ncpa.cpl and ok
- Right, click on the wireless adapter and select properties.
- Under Wireless Adapter properties locate the Internet Protocol Version 6 (TCP /IPv6) box and uncheck it.
- Click on Ok and save the changes that you made. Restart your computer to apply them. Check if you can connect to the network now.

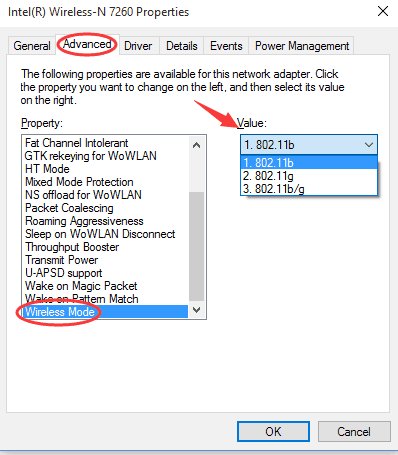
Change channel width
Again some of the users mention Changing channel width for the wireless network adapter helps them to fix the Windows 10 can’t connect to this network issue.
- Again open the Network adapters window using ncpa.cpl command.
- locate your wireless adapter, right-click on it and select Properties from the context menu.
- When the Properties window opens, click the Configure button and switch to the Advanced tab.

- Under property, list select Wireless mode and select value change the value of Wireless mode so it matches the value of Wireless mode on your router.
- In most cases, 802.11b (or 802.11g) should work, but if it doesn’t, try experimenting with different options.

- Click on Ok and save the changes that you made. Check if the network connection is working fine again.
Network Reset (Windows 10 Users only)
If none above not working, try the network reset option would probably help. Personally, for me, this option worked and help to reconnect to my wireless network again.
- Open Settings and click on “Network & Internet”
- Then, click “Status” on the left. Scroll Down, You’ll find an option on the right called “Network reset.” Click on it.
- Your pc will be Restarted itself, so make sure you have everything saved and ready to shut down. Click the “Reset now” button when you’re ready.

- Network Reset Confirmation popup will appear, Click Yes to confirm the same and Reset the Network Settings to the default setup.

- This Will Take Flew minute to Perform the Reset process after that windows automatically restart.
- Now connect to your wireless network, hope this time you get connected.
Did these solutions help to fix Windows Network and internet connection problem “can’t connect to this network”? Let us know on the comments below, also read
Windows 10 can’t connect to this network [Comprehensive Fix]

- Windows 10 sometimes won’t connect to the Internet, and there can be a multitude of reasons for that.
- Depending on the exact error, there are various solutions, as you’ll see below.
- Network problems are common, and we’ve got a whole collection of useful guides in the Network Hub.
- Having trouble with certain apps too? See our tutorials in the Troubleshooting section.

Internet access is crucial for many users, and there have been reports that users are getting Windows 10 can’t connect to this network message while trying to establish an Internet connection.
This can be a big problem, but there there are few ways to fix these issues.
How can I fix Windows 10 network connection errors?
1. Windows 10 can’t connect to a wireless network
1.1. Uninstall your network adapter
- Press Windows Key + X and choose Device Manager from the list.

- Locate your network adapter and right-click it.
- Choose Uninstall. (If asked, check to Delete the driver software for this device and click OK.)
- After the driver has been uninstalled, restart your computer and Windows 10″ href=’https://windowsreport.com/windows-10-windows-7-user-base/’ data-id=»http://data.windowsreport.com/windowsreport/post/windows_10_hits_35_user_base__windows_7_takes_the_crown_with_43;http://data.windowsreport.com/windowsreport/entity/windows_10_2″>Windows 10 will automatically install the new driver.
1.2. Update your network adapter drivers
Sometimes issues with the wireless network are caused by an outdated driver, and in order to fix connection errors, you’ll have to download the latest drivers for your network adapter.
To do this you’ll need a computer or any other device with a working Internet connection.
Visit the website of your network adapter manufacturer and download the latest drivers for your network adapter on a USB or other external source.
After installing the latest drivers, this issue should be resolved.
Users can certainly update device drivers on their PC manually by going to each device manufacturer’s website and searching there or on the web for the right driver to match their device type and model.
However, besides being time-consuming, this process carries the risk of getting the wrong driver installed, which may lead to serious malfunctions.
The safer and easier way to update drivers on a Windows computer is by using an automatic tool such as DriverFix.
- Download DriverFix.
- Launch the program.
- DriverFix will proceed to scan your PC for missing broken or outdated drivers
- Choose which drivers to update or repair
- Wait while DriverFix deals with your drivers.
- Restart your PC.
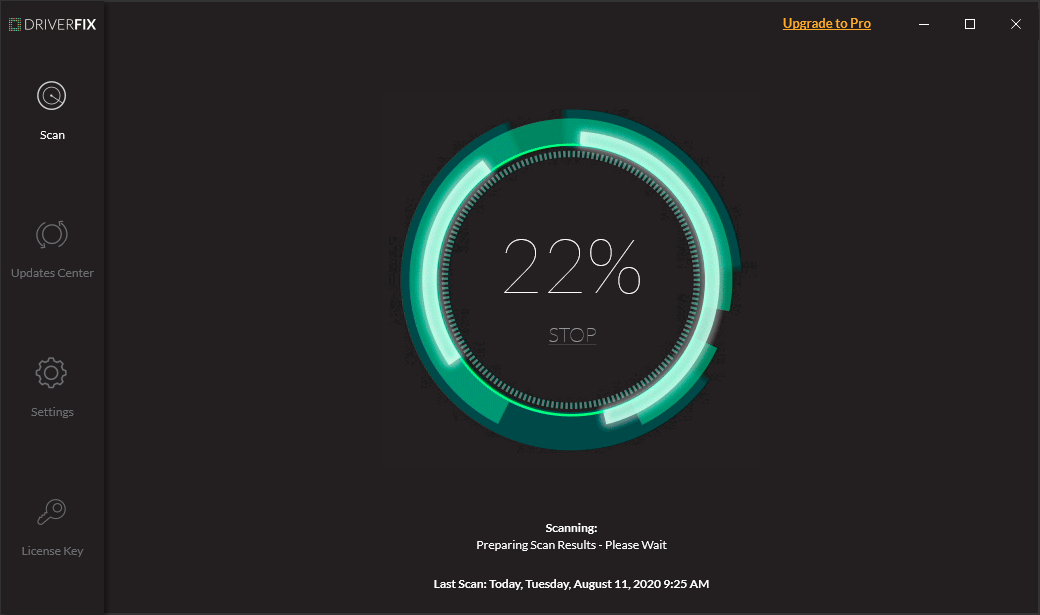


Driverfix
1.3. Change channel width for your network adapter
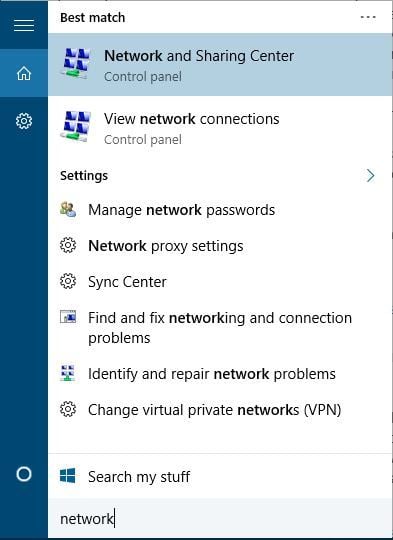
- Press Windows Key + S and enter type network.
- Chose Network and Sharing Center from the list of results.
- Click the Change adapter settings.
- Locate your wireless adapter and right-click it. Choose Properties from the menu.
- Navigate to Advanced tab.
- Select the 802.11 channel width and change the value. (Some users have reported that changing the value to 20 MHz has fixed the issue for them, but you might have to use a different value.)
- Click OK to save the changes.
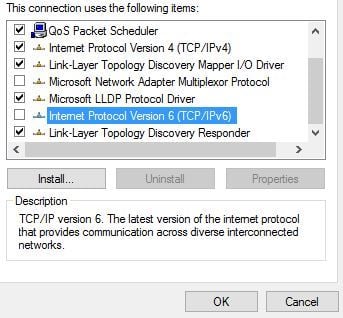
1.4. Disable IPv6 on your computer and router
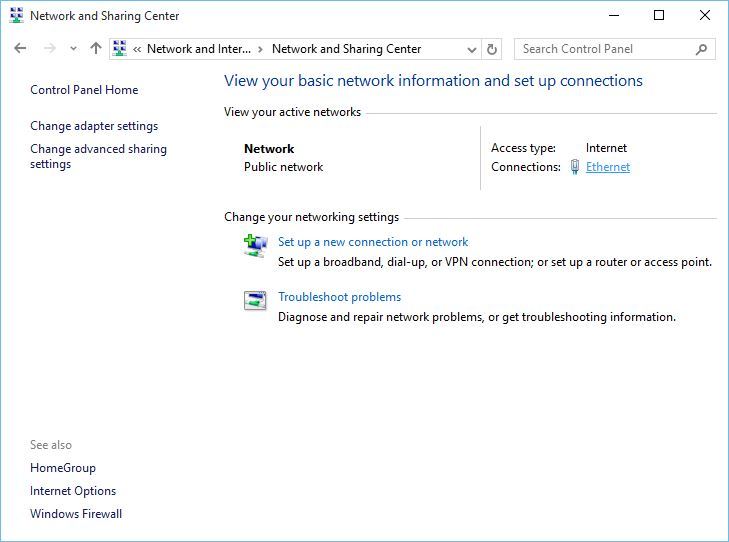
- Open Network and Sharing Center.
- Find the Connections section and click your current connection.
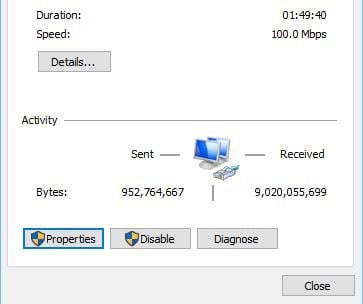
- In the Connection status window, click the Properties button.
- Find Internet Protocol Version 6 (TCP /IPv6) and uncheck it.
- Click OK button to save the changes.
- Restart your computer in order to apply the changes.
If the problem still persists, you might have to disable IPv6 on your router.
Disabling IPv6 on your router is a complicated process, and it’s different for every type of router, so before you do that, check your router’s instruction manual.
If you encounter any issues or if your network protocol is missing, be sure to check out this guide that will help you get back on track.
1.5. Make sure that your adapter and router are using the same security type
In order to protect your data, wireless connections come with certain security types such as WPA2-PSK (AES) or WPA-PSK (AES).
For your network connection to work properly, your router and computer need to use the same security type.
You can set the security type for your router by following the instructions from your router’s instruction manual.
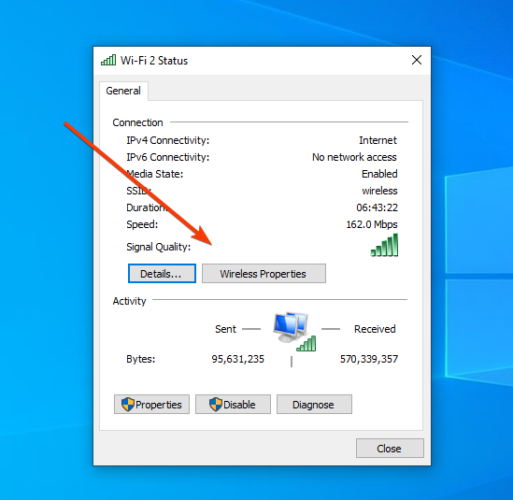
After you’ve set a specific security type on your router, you need to check if the same security type is being used on your computer as well. To do that, you need to follow these steps:
- Open Network and Sharing Center.
- Click on your connection, then on Wireless Properties.
- In the Security tab, you should see your connection security type.
- The Security type section should show the same security type that your router is using. ( You might have to try several different security types before you pick the right one.)
- Click OK to save changes.
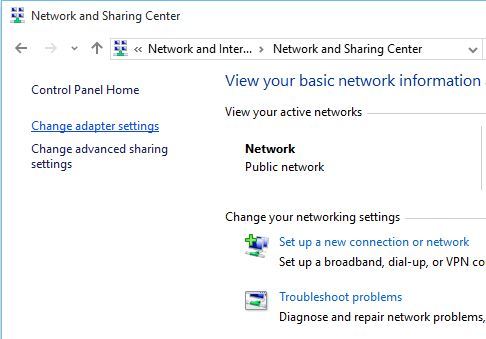
1.6. Add the connection manually
- Open Network and Sharing Center.
- Click Set up a new connection or network.
- Choose Manually connect to a wireless network and click Next.
- Enter the requested information such as network name, security key and security type.
- Click Next to finish the process.
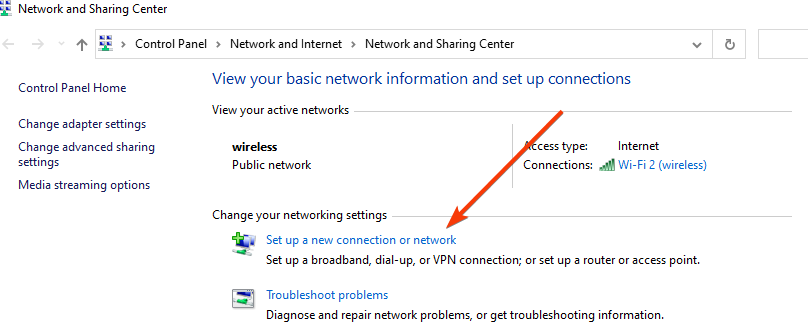
After you’ve created a new network connection, everything should be working without any problems. If the issue persists, try changing the security type of your new network.
1.7. Change the wireless network mode
- Open Network and Sharing Center.
- Click Change adapter settings, locate your wireless network adapter, right-click it and choose Properties from the menu.
- When the Properties window opens, click the Configure button.
- Go to the Advanced tab and from the list select Wireless mode.
- Now change the value of Wireless mode so it matches the value of Wireless mode on your router. (In most cases 802.11b (or 802.11g) should work, but if it doesn’t, try experimenting with different options.)
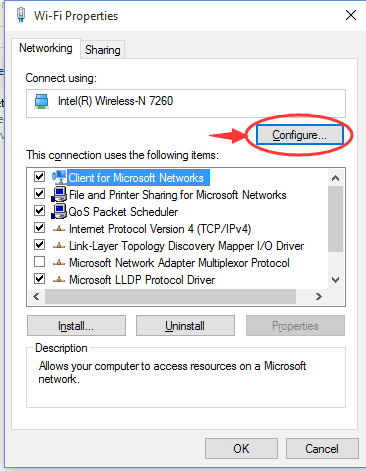
You can change the wireless network mode for your router and your wireless adapter. In order for your network to work, your router and network adapter need to use the same or similar network mode.
If you want to change the network mode of your router, you’ll need to check the instruction manual, but in most cases, it won’t be necessary to change wireless network mode on your router.
1.8. Forget the wireless connection
- Open Settings App and go to Network & Internet.
- Go to Wi-Fi section and on Manage known networks.
- Select your Wireless network and click Forget.
- After you’ve done that, connect to the same wireless network again.
Can’t access the Settings app? Take a look on this step-by-step guide to get to the bottom of the problem.
Many network issues are caused by malware, various scripts, and bots. You can secure yourself by installing PIA (Private Internet Access), a leader in the VPN market. It protects your PC from attacks while browsing, masks your IP address, and blocks all unwanted access.
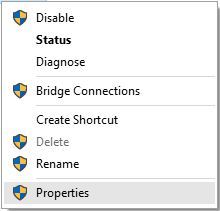
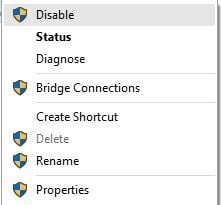
1.9. Disable and enable your wireless connection
- Open Network and Sharing Center.
- Click Change adapter settings.
- Locate your wireless connection, right-click it and choose Disable.
- Right-click the same connection again and choose Enable.
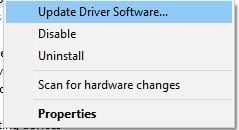
1.10. Install the driver manually
- Open Device Manager and find your network adapter.
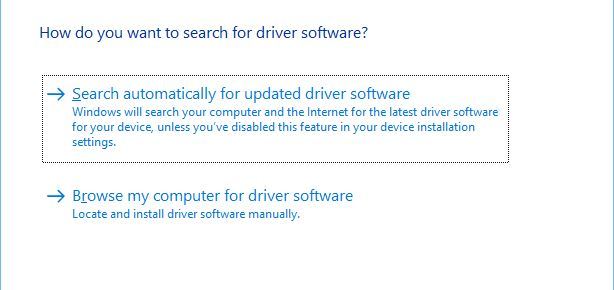
- Right-click it and choose Update Driver Software.
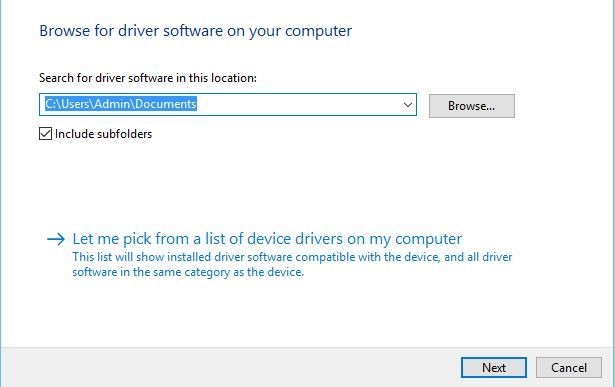
- Click Browse my computer for driver software.
- Now click on Let me pick from a list of device drivers on my computer.
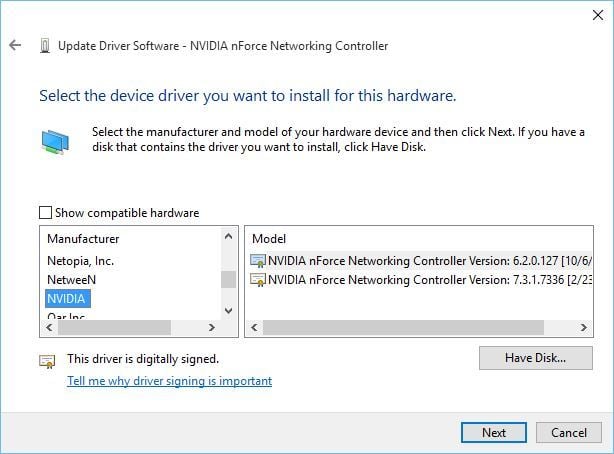
- Make sure that Show compatible hardware is not checked.
- Find your network adapter manufacturer and select the driver you wish to install.
- After you’ve installed the driver, restart your computer.
1.11. Use ipconfig /release command
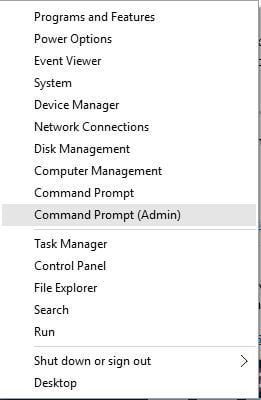
- Press Windows Key + X and from the list choose Command Prompt (Admin).
- When Command Prompt starts, enter the following lines and after each line press Enter to run it:
- ipconfig /release
- ipconfig /renew
- Close Command Prompt and try to connect to the network again.
If you can’t run the commands because Command Prompt won’t work with admin rights, you may want to take a look here to solve the problem.
1.12 Change your network adapter

If nothing else works, maybe you should change your network adapter.
Certain USB WiFi adapters aren’t compatible with Windows 10, and if that’s the case, you might have to replace your current adapter with a newer model.
2. Windows 10 can’t connect to this network after upgrade
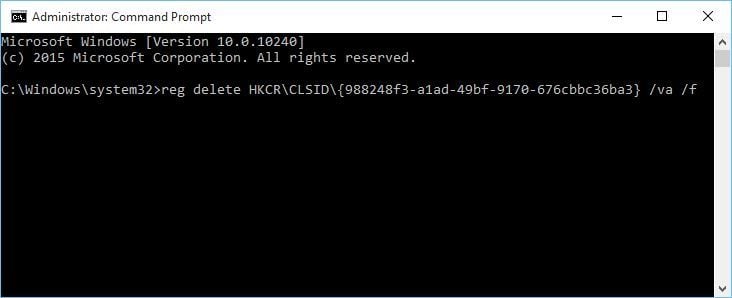
2.1. Use Command Prompt
- Open Command Prompt as administrator.
- When Command Prompt starts, type the following and press Enter to run it:
- reg delete HKCRCLSID <988248f3-a1ad-49bf-9170-676cbbc36ba3>/va /f
- reg delete HKCRCLSID <988248f3-a1ad-49bf-9170-676cbbc36ba3>/va /f
- Now enter the following line and press Enter to run it:
- netcfg -v -u dni_dne
- netcfg -v -u dni_dne
- Close Command Prompt and restart your computer.

2.2. Uninstall ESET Smart Security/antivirus software
- Open Settings and choose System.
- Go to Apps & features section.
- Locate your ESET Smart Security software and click Uninstall.
- Restart your computer.
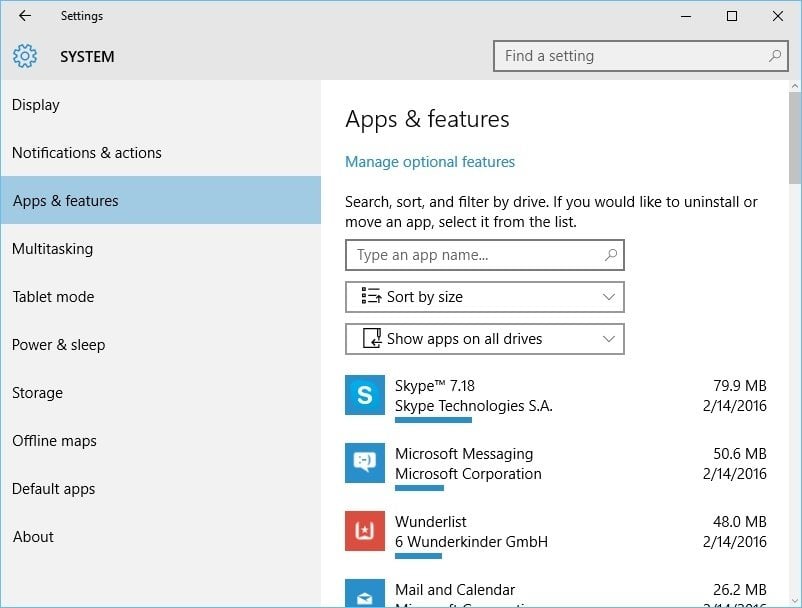
If you don’t use ESET Smart Security, you might want to uninstall the antivirus software that you’re currently using.
If your network connection starts working, you can install your antivirus software again.
We have to mention that some users suggest that you need to uninstall your Ethernet driver as well in order to fix this issue.
2.3. Check if IPv4 and IPv6 protocols are enabled

- Open Network and Sharing Center.
- Click Change adapter options.
- Find your adapter, right-click it and choose Properties.
- Make sure that IPv4 and IPv6 protocols are enabled.
- Click OK and check if the issue has been resolved.
- If the issue still persists, repeat all the steps but this time enable all items in the Properties window.
If you cant access the IPv4 proprieties, don’t worry. This guide will help you fix the issue.
3. Windows 10 can’t connect to this network, enter an APN and try again
Enter new Internet APN
- Tap on Mobile network + SIM settings.
- Choose SIM settings > Add Internet APN.
- Now you’ll need to enter APN information.
- After you’re done, tap Save.
As we said, you might have to contact your mobile provider in order to get your APN information, or you can search for it online from a different device.
4. Windows 10 can’t connect to this network and WEP problems

We have already covered how to create a wireless connection manually in this article, but in order to connect to the network that uses WEP security, you have to set Security type to WEP for your new connection.
We should also mention that WEP security type isn’t the safest, and it’s advised that you switch to WPA2 security type.
To do that, you’ll have to change the Security type in your router and on your computer.
5. Windows 10 can’t connect to this network after waking from Sleep Mode
5.1. Disable IPv6 / Change Power Management settings
We have already explained how to disable IPv6 in this article, but if you’re getting Windows 10 can’t connect to this network message after your computer wakes up from Sleep Mode, you need to do check Power Management settings for your adapter.
To do that, follow these steps:
- Open Device Manager and navigate to the Network Adapters section.
- Locate your wireless adapter and right-click it. Choose Properties from the menu.
- Navigate to the Power Management tab.
- Uncheck Allow the computer to turn off this device to save power and save the changes.

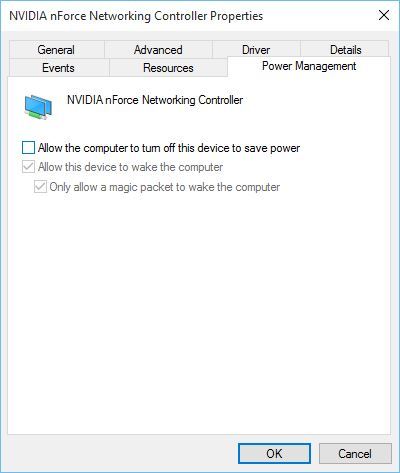
If you use a USB network adapter, you’ll have to repeat this step for all USB devices in Device Manager.
After doing this, if your PC won’t recognize the USB devices, you can take a look here to see some great solutions.
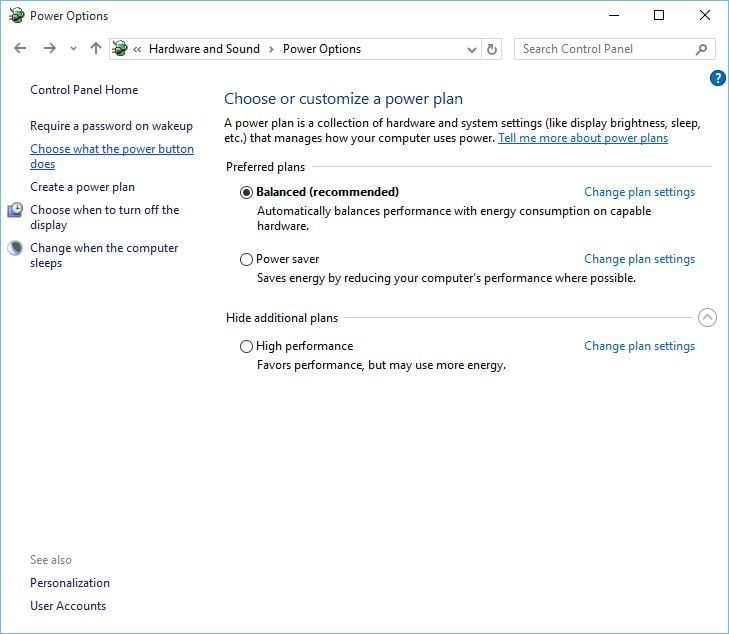
5.2. Change Power Options
- Press Windows Key + S and type Power Options. Choose Power Options from the list.
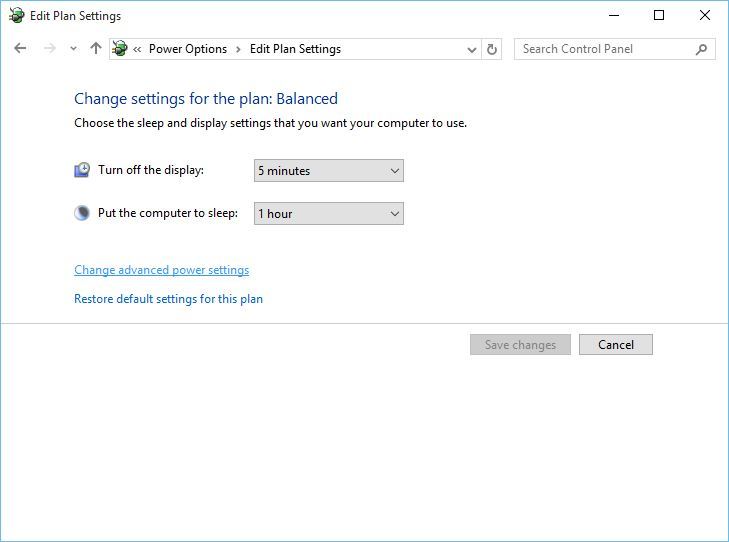
- Find your selected power plan and click the Change plan settings.
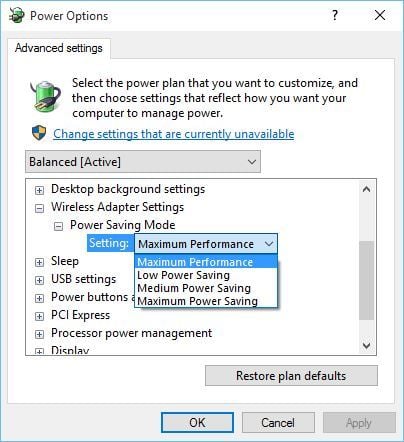
- Now click Change advanced power settings.
- Navigate through the list and go to Wireless Adapter Settings > Power Saving Mode.
- Change its Setting to Maximum Performance and save the changes.

If this solution doesn’t work, you can also try changing your power plan to High Performance. To do that, follow these steps:
- Open Power Options.
- Select the High performance power plan.

5.3. Turn off Connect to WiFi hotspots
- Open Settings and go to Network & Internet.
- Go to Wi-Fi and click on Manage Wi-Fi settings.
- Make sure that Connect to Wi-Fi hotspots and Send information about Wi-Fi connections to help discover nearby Wi-Fi are turned off.
Few users have reported that this solution has worked for them, so you might give it a try.
If Windows doesn’t find your Wi-Fi adapter, check out this article to fix the issue.
5.4. Disable and enable your network connection / turn on and off Airplane mode
In order to fix Windows 10 can’t connect to this network error, you can disable and enable your network connection to fix this problem.
In addition, you can try turning Airplane mode on and off in order to fix this problem.
For any Airplane mode errors, you may encounter there’s this awesome guide that can be of help.
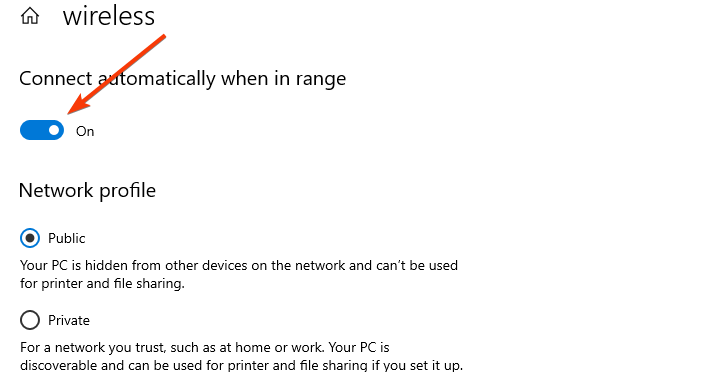
Windows 10 can’t connect to this network after a password change
If you’ve recently changed your password for the wireless network and now can’t connect to your network, you might want to forget the connection, as shown in a previous solution.
In addition, you need to check if your security type on your computer matches the security type on your router (also described above).
Additionally, toggle the option to connect automatically to your network to Off. This will allow you to input your new password.
As seen, there can be many causes why your device can’t connect to the Internet. We truly hope that our solutions have been helpful and that you’ve managed to resolve this issue.
If you have any questions, feel free to reach for the comments section below.


