Change the email address or phone number for your Microsoft account
Your Microsoft account lets you manage Microsoft services and subscriptions, like Xbox Live, Outlook.com, OneDrive, Skype, and Windows 10, from a single account.
You can add up to 10 email addresses or phone numbers to your Microsoft account. Email addresses and phone numbers that are associated with your Microsoft account are called aliases and they use the same contacts, online storage, subscriptions, and account settings. Each alias lets you sign in to all your Windows 10 devices and services that use the Microsoft account.
Your aliases share a single password, and you can send and receive email with each. Your primary alias will be the username you use to sign in to your account, the username that appears on your Windows 10 devices, and how you show up to recipients in email.
You can make changes to the email addresses or phone numbers (aliases) that are associated with your Microsoft account. Here are some reasons you might want to make changes:
You want to add or remove an email address or phone number.
You want to use a different email address or phone number to sign in.
You want a different username to appear on your Windows 10 devices.
You want an email address you can give to other companies or other people that can’t be used to sign in to your account or access your info.
You received the “Which account do you want to use” message at sign-in.
If you’re trying to change your Outlook email account or change your email password, see Add or remove an email alias in Outlook.com or Change or update your email password.
To learn how to change which account sends email in Outlook.com, see Add your other email accounts to Outlook.com.
If you have questions about your email account, see Get help with Outlook.com.
The following sections provide the steps that you need to change the email address or phone number for your Microsoft account. Select the one that best fits your scenario.
To add a new email address or phone number as an alias:
Sign in to Manage how you sign in to Microsoft with your Microsoft account. If you’re having issues signing in to your Microsoft account, go to Microsoft account help.
Note: You may be prompted to enter your Microsoft account password, or to enter a code sent to the email address or phone number listed in your account’s security information. By providing this info to us, we know the request is coming from you.
Under the Account aliases section, select either Add email or Add phone number.
If you selected Add a phone number, go to step 5. If you selected Add email, choose whether to add:
A new email address. Select Create a new email address and add it as an alias, and then follow the instructions.
A non-Microsoft email address (such as an @gmail.com or @yahoo.com email address). Select Add an existing email address as a Microsoft account alias, and then select Add alias.
After you’ve added the email address, you’ll be asked to verify that you’re the account owner:
Select Verify next to the new alias. A message is sent to the account for verification.
After you receive the message, select the included link to confirm that you own the account.
If you selected Add a phone number, follow these steps:
Select your country from the list.
Enter the phone number you want to use, and then select Next.
When you add a new phone number, we’ll send a text message to that number to verify it. Enter the code from the text message, and then select Next.
You can use any email address or phone number you’ve listed as a username to sign in to your Microsoft account. If you want to sign in with a specific one or change the one you’re signing in with, here’s how:
Sign in to Manage how you sign in to Microsoft with your Microsoft account. If you’re having issues signing in to your Microsoft account, go to Microsoft account help.
Note: You may be prompted to enter your Microsoft account password, or to enter a code sent to the email address or phone number listed in your account’s security information. By providing this info to us, we know the request is coming from you.
If you want to use an existing email address or phone number, go to step 6. If you’re adding a new email address or phone number, go to step 3.
If you selected Add a phone number, go to step 5. If you selected Add email, choose whether to add:
A new email address. Select Create a new email address and add it as an alias, and then follow the instructions.
A non-Microsoft email address (such as an @gmail.com or @yahoo.com email address). Select Add an existing email address as a Microsoft account alias, and then select Add alias.
After you’ve added the email address, you’ll be asked to verify that you’re the account owner:
Select Verify next to the new alias. A message is sent to the account for verification.
After you receive the message, select the included link to confirm that you own the account.
If you selected Add a phone number, follow these steps:
Select your country from the list.
Enter the phone number you want to use, and then select Next.
When you add a new phone number, we’ll send a text message to that number to verify it. Enter the code in the text message, and then select Next.
Under Sign-in preferences, select Change sign-in preferences.
Either select the check boxes next to the aliases you want to use to sign in, or clear the check boxes for the aliases that you don’t want to use to sign in, and then select Save.
To change the username that appears on your Windows 10 devices, like your Xbox or Surface, change your primary alias.
Note: If you want to change how your name appears for your Microsoft account, use the steps on the How to change your Microsoft account display name page.
Sign in to Manage how you sign in to Microsoft with your Microsoft account. If you’re having issues signing in to your Microsoft account, go to Microsoft account help.
Note: You may be prompted to enter your Microsoft account password, or to enter a code sent to the email address or phone number listed in your account’s security information. By providing this info to us, we know the request is coming from you.
Select Your info, and then select Manage how you sign in to Microsoft.
Under the Account aliases section, select Make primary next to the alias you want to appear on your Windows 10 devices.
Just because you aren’t using an email account or phone number anymore doesn’t mean you have to remove it from your list of aliases. However, if you want to remove it, here’s how.
If you remove an alias that’s an email address from a Microsoft domain (like @hotmail.com, @live.com, @outlook.com, or @msn.com), the email is permanently deleted from our systems and can no longer be used to send or receive emails, nor can it be transferred to a different account. Microsoft also doesn’t recycle email addresses, which means the alias can’t be reclaimed later.
BEFORE YOU DELETE—Make sure you review the following before you delete an alias:
If you want to remove an email address from a non-Microsoft domain (like @gmail.com), then it usually becomes immediately available and can be added as an alias on another Microsoft account. NOTE: This removal doesn’t trigger a deletion of the email across our systems. You can learn more about how to control your personal data in the Microsoft Privacy Statement.
Save any info that you want from this alias before you remove it.
If you’re removing a primary alias, you’ll need to choose another primary alias before it can be removed. Nothing associated with a deleted alias will transfer to your new primary alias. So if you use the primary account to sign in to any other Microsoft services, you won’t be able to sign in to any of them after deleting the account.
Sign in to Manage how you sign in to Microsoft with your Microsoft account. If you’re having issues signing in to your Microsoft account, go to Microsoft account help.
Note: You may be prompted to enter your Microsoft account password, or to enter a code sent to the email address or phone number listed in your account’s security information. By providing this info to us, we know the request is coming from you.
Select Your info, and then select Manage how you sign in to Microsoft.
Make sure you have one verified option that you can continue to use. If you only have one option and you plan to remove it, add a new phone or email.
Under the Account aliases section, select Remove next to the email address or phone number you want to remove.
If you received the «Which account do you want to use?» message when you sign in, it means you have two accounts with Microsoft that use the same email address:
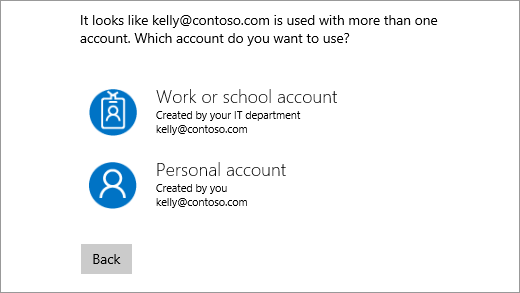
To stop receiving this message, use the steps in the “I want to use a different email address or phone number to sign in” section on this page to change the email address that you use to sign in to your Microsoft account. Doing this changes the way you sign in to your account, but it won’t affect any of the data associated with it.
Aliases can’t be moved from one Microsoft account to another.
If you remove your alias from the account it’s on today, it will be deleted from our systems and isn’t recoverable, so you’ll no longer be able to use it to send or receive emails.
Microsoft doesn’t recycle aliases once they are deleted. This means it won’t be available again as an alias or new account to you or anyone else at a later time.
Set up email in the Mail app for Windows 10
Stay connected and on schedule
You can be organized, on time, and buttoned up with Outlook — your life organizer.
If you log on to Windows 10 using a Microsoft account with an Outlook.com, Live, Hotmail, or MSN address, that account is added to the Mail and Calendar apps. You can add that and many other email accounts to the Mail and Calendar apps to start sending and receiving email and creating and managing events.
Seeing a message that your account is out of date? You probably need to update your account settings. See Fixing an out-of-date account for more information.
Did you set up your email, but you don’t see your messages? Change your mailbox sync settings.
Add a new email account
Open the Mail app by clicking the Windows Start menu and choosing Mail.

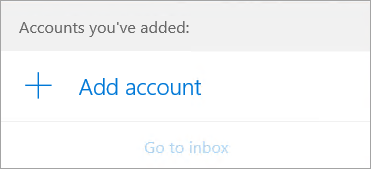
If this is the first time you’ve opened the Mail app, you’ll see a Welcome page. Select Add account to get started.
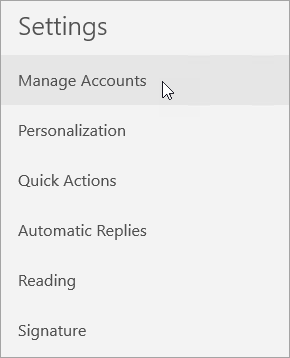
If you’ve used the Mail app before, at the bottom of the left navigation pane, select Settings  , and then choose Manage Accounts.
Note: On a phone or tablet, tap the three dots at the bottom of the page to access Settings.
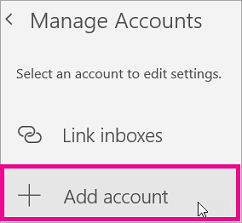
Select Add account.
Choose the type of the account you want to add.
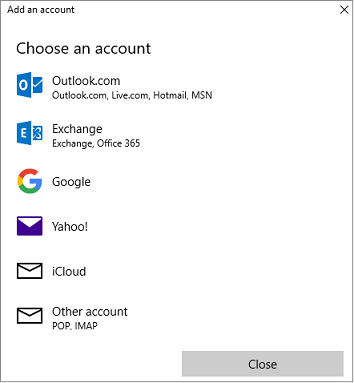
You may need to scroll down the Add an account dialog box to view all options.
If you choose Google, you’ll need to sign in to your Google account, enter your 2-step verification code if you’ve enabled that security feature, and give Windows permission to access your information. Click Allow and your account will be created.
If you choose another email account, you’ll need to follow the special instructions under Special instructions for other accounts below.
Enter the required information and click Sign in. For most accounts, this is your email address, password, and the account name. The account name is what you’ll see in both the left pane of Mail for Windows 10 as well as the Manage Accounts pane.
Note: If you receive the message “We couldn’t find info for that account. Make sure that the email address is correct and then try again,” you’ll need to click Try again three times before the button changes to Advanced. Click Advanced and follow the steps in the next section to add your account.
Click Done. Your data will start syncing as soon as your account is set up.
Note: It may take a few minutes for your account to synchronize. During this time, you may see «Not synced yet» in the message pane. If this message persists, see Resolve sync issues in Mail and Calendar apps in Windows 10.
Add an account using advanced setup
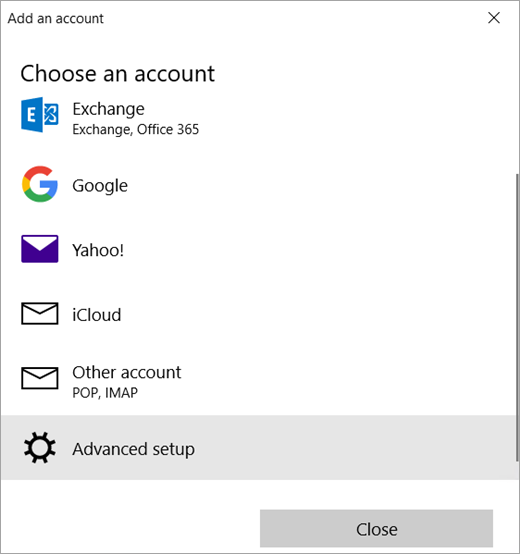
There are two ways you can access the Advanced setup options for your email account.
Click Advanced setup if your automatic email setup fails in Step 3 above.
Click Advanced setup from the Choose an account window in Step 2 above. The Advanced setup option is the last option on the list, and you may have to scroll to see it.
You can choose an Exchange ActiveSync account or an Internet email account. Unless your administrator has instructed you to use Exchange ActiveSync, click Internet email.
Enter the following information in the Advanced setup window.
Email address This is the name you’ll see in the left pane of the Mail app.
User name This is your full email address.
Password Enter your email account password.
Account name This is the name that you’ll see in the left pane of Mail for Windows 10, as well as in the Manage Accounts pane. You can choose any name you want.
Send your messages using this name Enter the name you want recipients to see when they receive your message.
Incoming email server You can get this information from your ISP or administrator. Usually, an incoming mail server address is in the format of mail.contoso.com or imap.google.com . For many email accounts, you can find this information in our POP and IMAP server name reference.
Account type Choose POP3 or IMAP4. Most email accounts use IMAP4. If you don’t know which one to choose, contact your ISP.
Outgoing (SMTP) email server You can get this information from your ISP or administrator. Usually, an outgoing email server address is in the format of mail.contoso.com or smtp.contoso.com .
By default, all four checkboxes at the bottom of the window will be selected. Most email accounts don’t require any changes to these options.
Your email provider can give you the settings you need to fill in the Advanced setup but you can also go to the POP and IMAP server name reference we’ve provided for the most popular email providers.
After you’ve entered the required information, click Sign in > Done.
Note: If you’re adding an account other than Gmail, see Special instructions for other accounts.
Troubleshooting
If you’re having problems setting up your account, try the following.
If you upgraded to Windows 10, you will need to re-add your accounts to Mail for Windows 10.
Make sure your email address and password are correct. Passwords are case-sensitive.
If you see your most recent messages but no older messages, you probably need to change your email sync duration.
If you see a message that your account is out-of-date, you probably need to either update your password, your incoming or outgoing servers, or your SSL settings. See Fixing an out-of-date account for more information.
Special instructions for other accounts
If you’ve enabled two-factor authentication on your iCloud account, you’ll need to generate an app-specific password to add your iCloud account to the Mail app.
Select Generate Password below App-Specific Passwords.
Follow the instructions on your screen.
Microsoft has added OAuth support for Yahoo! accounts in the Windows 10 Creators update. To install the Creators Update now, go to the software download site, and select Update now. For more information about the update, see Windows 10 Creators Update is here.
If you have a Japanese Yahoo! email account you will need to do the following:
You’ll need to add your Yahoo! account as an IMAP account. To do this, follow the steps in Add an account using advanced setup using imap.mail.yahoo.co.jp for your incoming mail server and smtp.mail.yahoo.co.jp for your outgoing mail server.
To sync your QQ mailbox with the Mail and Calendar apps, you need to enable IMAP on QQ.
Sign in to your QQ account.
Select Settings > Account > POP3/IMAP/SMTP/Exchange/CardDAV/CalDAV Service > Find IMAP/SMTP Service > Open.
You might need to send a text message to enable this service. After you select Open in step 2, a dialog might appear prompting you to use your phone to send a message to the displayed phone number.
After the text message is sent, QQ will open a new dialog with an authorization code. Copy the authorization code as you’ll need this to add your QQ mail account in the Mail and Calendar apps.
In the Mail and Calendar apps, remove your QQ account and add it again using the authorization code.
Your QQ account should now sync automatically.
When you try to connect your GMX.de or WEB.de account to the Mail and Calendar apps, you’ll receive an email in your GMX.de or WEB.de mailbox with instructions about how to enable access.
In a web browser, sign in to your GMX.de or WEB.de account.
Find the email message with instructions about how to connect your account to the Mail and Calendar apps, and follow the instructions.
Your account should now sync with the Mail and Calendar apps automatically.


