- Missing or No Security Tab Found in Windows XP Professional
- How to Set Security in Windows XP Professional That Is Installed in a Workgroup
- Registry Key and Values
- Enable and Display Security Tab in Windows XP Home Edition
- security tab missing windows 10
- Windows Folder Security Tab Missing | Windows 10 Pro
- STEP #1:
- STEP #2:
- STEP #3:
- STEP #4:
- STEP #5:
- STEP #6:
- Update Group Policy
- FIX: Windows update & security tab not loading
- How do I fix Windows Update and Security tab not working?
- 1. Run the System File Checker tool
- 2. Use a dedicated software – Restoro
- Run a System Scan to discover potential errors
- Restoro
- 3. Scan and fix errors using DISM commands
- 4. Change the Windows 10 account
- 5. Perform a system restore
Missing or No Security Tab Found in Windows XP Professional
Security tab for the properties of files or folders in Windows XP Professional is the important functionality that enable administrators and users to define security permissions and rights for particular user or group to the computer resources. By default, Windows XP Professional follows recommended setting to enable the use of simple file sharing that hide the Security tab, leaving you with only General, Sharing, Web Sharing & Customize tabs as in the Simple File Sharing UI.
So to see and unhide the Security tab, just use the following steps:
- Launch Windows Explorer or My Computer.
- Click on the Tools at the menu bar, then click on Folder Options.
- Click on View tab.
- In the Advanced Settings section at the bottom of the list, uncheck and unselect (clear the tick) on the “Use simple file sharing (Recommended)” check box.
- Click OK.
Security tab is available only to Administrator or users with administrative rights. So make sure you login as one. And security can only be set in an NTFS partition. If you’re still having problem to reveal or display the Security tab on files or folder properties, check out the following registry hack and set the value to 0 or simply delete the key:
Hive: HKEY_CURRENT_USER
Key: Software\Microsoft\windows\CurrentVersion\Policies\Explorer
Name: Nosecuritytab
Type: REG_DWORD
Value: 1
If you’re using a Windows XP Professional system that is installed in a Workgroup, the Security tab is also hidden by default because in Windows XP Home Edition and Windows XP Professional, guests are forced to log on to a workgroup. Follow the instruction and information on Microsoft Knowledge Base where you need to set the value for ForceGuest registry key.
How to Set Security in Windows XP Professional That Is Installed in a Workgroup
In Windows XP Home Edition and Windows XP Professional, if working in a workgroup, the Security tab is hidden by default. This behavior occurs because in Windows XP Home Edition and Windows XP Professional, guests are forced to log on to a workgroup.
NOTE: Security can only be set in an NTFS partition. If you remove the Everyone group from the NTFS permissions, the file or folder is inaccessible over the network.
When Simple file sharing is enabled, the user is presented with the Simple File Sharing UI rather than the classic «Security» and «Sharing» tabs. This new UI is implemented by default in Windows XP, Windows XP Home Edition, and Windows XP Professional when working in a workgroup. However, the computer is started in Safe mode, the ACL editor is displayed.
The simplified Sharing UI is different for My Documents and the folders that are located in My Documents. When the My Documents folder is opened, the following options are displayed:
- Only I have access to this folder
- This folder is shared on the network
Share name: - Allow other users to change my files
However, when the other folders is opened, the following options are displayed:
- Share name:
- Allow other users to change my files
In addition, when a user password is created in Control Panel, the Protect The My Documents Folder option is displayed. On a Windows XP Professional-based computer, only you can make a registry change to show the classic security UI.
Registry Key and Values
| Operating system and mode | ForceGuest | Sharing UI | ACL editor |
|---|---|---|---|
| Personal | 1 (no choice) | Simple | Not available |
| Personal in Safe mode | 1 (no choice) | Classic | Available |
| Professional | 0* | Classic | Available |
| Professional | 1 | Simple | Not available |
| Professional in Safe mode | 0 | Classic | Available |
| Professional in Safe mode | 1 | Classic | Available |
Windows XP Professional defaults to normal authentication but supports the Log on as Guest option. For example, if the computer is upgraded from Windows XP Home Edition, Microsoft Windows 95, Microsoft Windows 98, and Microsoft Windows 98 Second Edition, Windows XP Professional uses the Guest if in a workgroup option by default.
NOTE: You cannot share a folder that is located in My Documents after you configure the simple Sharing and Security setting to Only I have access to this folder. When security is set for the parent folder, security is set on all child folders; security settings cannot be changed from the child folders.
Enable and Display Security Tab in Windows XP Home Edition
Unlike Microsoft Windows XP Professional where the security tabs for the folders and drives have been hidden and needs to be enable with certain tricks, Windows XP Home edition by default doesn’t have the security tabs that allows users to configure and change the permissions and rights for Windows folders and drives.
To unhide, view and display the Security Tab in Windows XP Home edition operating system, Security Configuration Manager Tool needs to be used. Security Configuration Manager Tool is a tool set to configure security for a Windows NT-based or Windows 2000-based computer. SCM has other features too such as perform periodic analysis of the computer to ensure that the configuration remains intact or to make necessary changes over time.
- Download Security Configuration Manager Tool (x86 (Intel version) is SCESP4I.EXE) from Microsoft.
- Double click the SCESP4I.EXE and extract the contents to a folder on your hard disk.
- Go to the folder where the SCESP4I.exe contents are extracted, locate the Setup.inf (Setup Information) file.
- Right click on Setup.inf and select Install.
- Reboot computer after installation finished.
You can now see the security tab when you view the properties for the drive, file or folder. Warning though, misconfigured permissions will make your drives, files and folders inaccessible to everybody, including Administrator account will also be locked out from the resources. Beside, some advice on permissions setting is that Deny Permissions take precedence over Allow Permissions, regardless of your group membership, and Administrators are members of the User’s group, by default. So if you deny access to the User’s group, Administrators won’t be able to access too. So, try to Uncheck Allow, rather than using Deny.
security tab missing windows 10
This post was most recently updated on July 2nd, 2017
If you’re new here, you may want to subscribe to my RSS feed. Thanks for visiting!
Windows Folder Security Tab Missing | Windows 10 Pro
Security Tab Missing and Present:

Security Tab Present

Security Tab Missing
Security Tab Missing issue has been bugging us for a long time. When you want to change the security settings of a Windows folder, You Right-click the respective folder and then click on properties.
However, to your dismay, you find the security tab missing from folder properties. This has nothing to do with Windows file permissions or Windows folder permissions. But, you will need the Windows security tab to modify Windows permissions. What do you do if you are in such a situation?
This might probably help:
a. Open Local Group Policy Editor by typing gpedit.msc in the Cortana search bar and press enter.
b. In the left pane, click on User Configuration => Administrative Templates => Windows Components => and click on File Explorer.
c. In the right pane, right click on “Remove Security tab” and click on Edit.
d. Ensure Disabled is selected.
The above steps will fix the issue in most cases, but what will you do if you are unable to find Windows Components or File Explorer in the group policy editor?
Follow the below steps to bail you out of the frustration. The given method can be used to fix most of the issues related to group policy editor ‘Administrative Templates’ corruption. It can fix missing Windows Components related to Sharing, Previous versions, and Customize tab in Folder Properties, including no security tab issue.
STEP #1:
Go to => C:\Windows\PolicyDefinitions and rename the ‘PolicyDefinitions folder’ to PolicyDefinitions.OLD
STEP #2:
Download the Administrative Templates (.admx) MSI file for Windows 10 from https://www.microsoft.com/en-us/download/confirmation.aspx?id=53430
Save it to the Desktop.
You can alternatively download the admx MSI file from here
STEP #3:
Run the saved ADMX.msi File. (select option: for all users)
By default, it is installed in C:\Program Files (x86)\Microsoft Group Policy\Windows 10 and Windows Server 2016
STEP #4:
Go to => C:\Program Files (x86)\Microsoft Group Policy\Windows 10 and Windows Server 2016 =>PolicyDefinitions
STEP #5:
Finally, Copy the PolicyDefinitions folder and paste it into C:\Windows
After Step 5, gpedit.msc will show the missing file explorer etc., under Administrative Templates => Windows Components. Now you can make the required changes.
STEP #6:
a. Open Local Group Policy Editor by typing gpedit.msc in the Cortana search bar and press enter.
b. In the left pane, click on User Configuration => Administrative Templates => Windows Components => and click on File Explorer.
c. In the right pane, right click on “Remove Security tab” and click on Edit.
d. Ensure Disabled is selected.
Voila! The Security tab is back in Windows Folder Properties. In the file folder tabs.
Update Group Policy
In some situations, you might need to update the Group Policy settings for it to work.
Open Command Prompt in Admin mode.
Right-click Windows Start Menu, Select Command Prompt(Admin)
Copy and Paste the below command in the CMD window.
Hit Enter, Type Exit to close the command prompt window.
windowsexplorer.admx is the file associated with the security tab in Windows folder. If only that particular file is missing from C:\Windows\PolicyDefinitions folder you can try to copy and paste only that file from the C:\Program Files (x86)\Microsoft Group Policy\Windows 10 and Windows Server 2016 =>PolicyDefinitions folder.
For the enterprising, The .admx files can be opened and edited with notepad or notepad++. These are actually XML files.
In case you need a bit more information, The Reference Guide for Group Policy Settings lists in an Excel spreadsheet.
It includes all the information about the Group Policy settings available in Windows 10. You can download it from here.
FIX: Windows update & security tab not loading

- The Windows security won’t open and that means you won’t have access to processes and operations related to updating and restoration features
- If W indows Security is not showing anything, start by running the System File Checker tool.
- You can also try to scan and fix errors using DISM commands and change the Windows 10 account.
- Another idea is to perform a system restore if you have any restore points activated for your system.

- Download Restoro PC Repair Tool that comes with Patented Technologies (patent available here).
- Click Start Scan to find Windows issues that could be causing PC problems.
- Click Repair All to fix issues affecting your computer’s security and performance
- Restoro has been downloaded by 0 readers this month.
Update & Security is a special field integrated by default into the Windows 10 core system. This built-in menu offers access to processes and operations related to updating and restoration features.
Here you can check for your update history or schedule your restart for a specific time and the process is automated so you don’t have to do anything manually.
Shortly, by accessing the Update & Security window you can scan for new updates, apply certain updates, remove recently installed patches, initiate a system recovery operation and perform similar other processes.
However, sometimes you might notice that the Windows Security won’t open. This is quite a common Windows 10 error caused by corrupted system files or by other Windows 10 malfunctions.
Fortunately, there are a few solutions that you can use to fix the Update & Security tab.
How do I fix Windows Update and Security tab not working?
- Run the System File Checker tool
- Scan and fix errors using DISM commands
- Change the Windows 10 account
- Perform a system restore
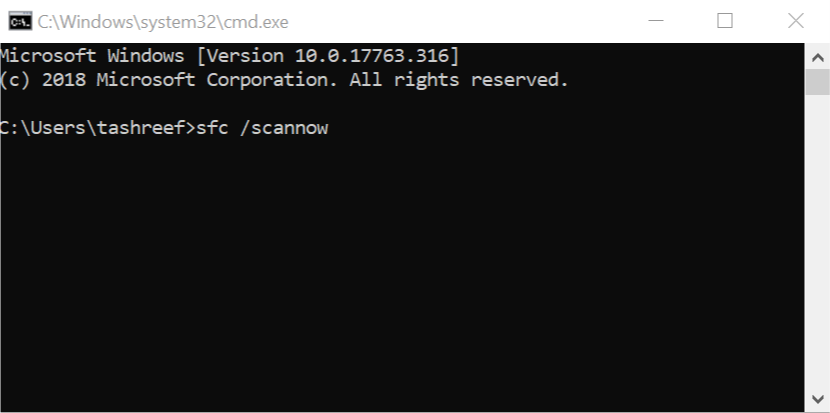
1. Run the System File Checker tool
- Type cmd in the Seach box and click on Run as administrator under the Command Prompt app.
- Type sfc /scannow and press Enter.

- Wait until the scan is completed (it might take a while depending on how many files are stored on your computer).
- If problems are found the troubleshooter should fix them automatically.
- Don’t forget to restart your PC in the end.
If you need to know more about System File Checker, we have an excellent guide on how to use it.
2. Use a dedicated software – Restoro
As this problem can be produced by corrupted files or registry, we recommend using specialized software like Restoro to fix the problem.
This amazing tool not only that will fix your file and system issues but after that, it will continue to monitor your OS and will make sure that it’s always in tip-top shape and running smoothly.
Run a System Scan to discover potential errors


After using Restoro, don’t be surprised if your PC will become faster and more responsive because this solution will provide the much-needed performance boost that you’ve never experienced.

Restoro
3. Scan and fix errors using DISM commands

- Start a Command Prompt window as explained above.
- Enter the following commands (press Enter after each entry):
- Dism /Online /Cleanup-Image /CheckHealth
- Dism /Online /Cleanup-Image /ScanHealth
- Dism /Online /Cleanup-Image /RestoreHealth
- Close the command prompt window and restart the Windows 10 system.
If you want to learn everything there is to know about using DISM commands check our handy guide.
4. Change the Windows 10 account
- Click on the Cortana icon, located near the Start button.
- In the Search box enter settings and pick Settings from the resulted entries.
- Then, click on Account and go to Other user accounts.
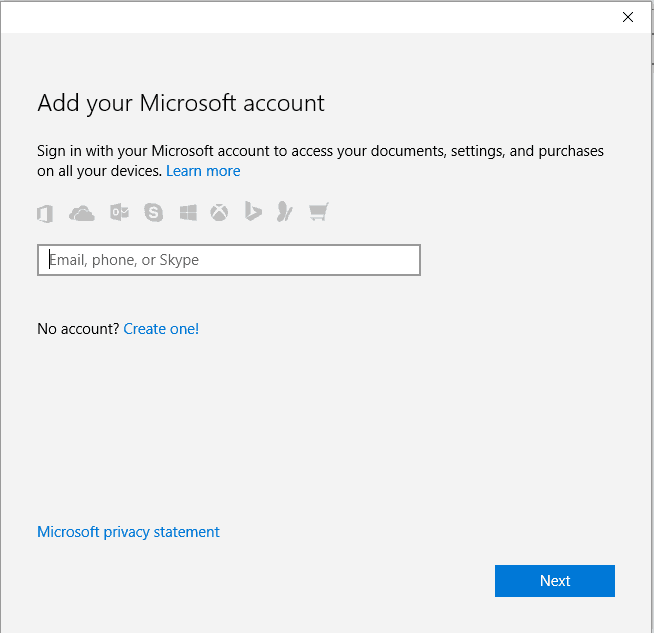
- Select Add an account from Manage other accounts.
- You will have to pick Sign in without a Microsoft account and Local account.
- Fill out the forms and save your changes.
- Switch to the newly created account and verify if you can access the Update & Security tab.
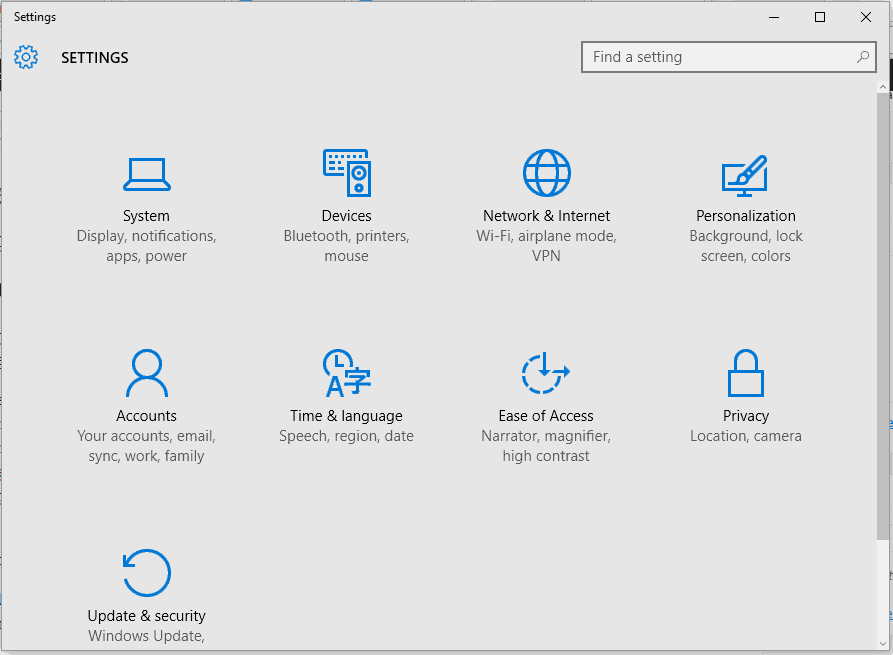
The problem might be associated with one particular account. So, it’s recommended to create a new account as from afterward you might be able to access the Windows 10 Update & Security tab again.
5. Perform a system restore
If our steps above look too complicated, we also have a complete guide on how to create and use a System Restore Point in Windows 10.
Hopefully, you managed to solve the Windows 10 Update & Security tab not working issue.
Usually, one of the troubleshooting solutions from above is fixing this Windows 10 problem without having to initiate a clean install of the system itself.
However, depending on each situation and how you use your Windows 10 device, the solutions might differ.
That’s why, if the issue persists, use the comment section below to describe your situation in detail. Based on the details that you offer, we can try to find the more solutions for you.


