- Windows on raspberry pi discord server
- Re: Installing Discord On Raspberry Pi
- Re: Installing Discord On Raspberry Pi
- Re: Installing Discord On Raspberry Pi
- Re: Installing Discord On Raspberry Pi
- Re: Installing Discord On Raspberry Pi
- Re: Installing Discord On Raspberry Pi
- Re: Installing Discord On Raspberry Pi
- Re: Installing Discord On Raspberry Pi
- How to Install Windows 10 on a Raspberry Pi 4
- What you will need to install Windows 10 on a Raspberry Pi 4
- How to Install Windows 10 on the Raspberry Pi 4
- Setting up a Raspberry Pi
- Overview
- Using the Dashboard
- Instructions
- Connect to a network
- Wired connection
- Wireless connection
- Connect to Windows Device Portal
- What raspberry pi should I get to host a Discord Bot?
- 1 Answer 1
- Music commands
- Less than 500 guilds
- More than 500 guilds
- Just Discord API interaction
- Not using slow endpoints, for example, getting a large list of messages in a channel
- Less than 5000 guilds
- More than 5000 guilds
- Having a loop that searches through 1,000,000s of messages or a command that does an action with a large amount of users
Windows on raspberry pi discord server
A very popular chatting app, called Discord has been lauched for over two years now. They also have a linux file. I’ve tried several times to install it on my pi. Has anyone been able to successfully install it? If so can you please provide the steps. Thank you!
Re: Installing Discord On Raspberry Pi
Donni H wrote: Hello,
A very popular chatting app, called Discord has been lauched for over two years now. They also have a linux file. I’ve tried several times to install it on my pi. Has anyone been able to successfully install it? If so can you please provide the steps. Thank you!
On the downloads page it states 64bit Linux, which is x86-64 CPU
The Raspberry Pi has an ARM CPU, so not surprising incompatible.
The information is out there. you just have to let it in.
My other Linux machines: ChromeBox
https://www.aliexpress.com/item/32966393971.html
& Stone Desktop Intel CoreDuo circa 2010
Re: Installing Discord On Raspberry Pi
Re: Installing Discord On Raspberry Pi
why though? I thought its all written in java script ?
guessing its the modules for audio that needed to be executed on X86..
Re: Installing Discord On Raspberry Pi
Re: Installing Discord On Raspberry Pi
Re: Installing Discord On Raspberry Pi
Sorry, you said «JavaScript», I read «Java».
From your link: https://www.reddit.com/r/discordapp/com . f_discord/ we can read that it is indeed written in Javascript.
We also read that it uses Electron as it run time engine. https://electron.atom.io/
Electron is the Google browser HTML and JavaScript engine being used for display and user input coupled with node.js for interaction with the operating system. Basically a way to create desktop applications using web technologies.
So, before Discord will run there needs to be an Electron that runs on the Pi.
So far the only nice way to do that I have found is via the services of resin.io.
I’m pretty sure whatever downloads Discord have include Electron built for x86.
Re: Installing Discord On Raspberry Pi
Actually, it is possible. Twister OS which is based on Raspberry Pi OS, actually has it pre-installed! so there MUST be a way. I also don’t know. It does not use stuff such as Box86. If you want to install it right now, post this into terminal : curl -sSL https://git.io/JfAPE | bash it will install pi-kiss. then open it. navigate to the internet section and you will find discord click enter on discord. it will install discord and then it will show pres any key to exit. then open discord. always first it opens terminal and starts to emulate it. then after 10-20 sec it will open discord and ask you to sign in.
It worked for me and should work on any pi. Hope it helped you. If not, just use the web version. type discord.com, click on Login and login.. It wil open discord.

Re: Installing Discord On Raspberry Pi
Well since this thread was necro’d, I might as well help any future viewers out.
The Pi-Apps Raspberry Pi app store has Discord in it. And unlike PiKISS, this Discord is a much newer version, with fixed bugs and more features.
Install Pi-Apps with:
How to Install Windows 10 on a Raspberry Pi 4
By Les Pounder 19 July 2020
Yes, you can get a working Windows 10 desktop running on a Raspberry Pi 4
The Raspberry Pi is commonly associated with Linux operating systems such as Raspberry PI OS. But what about running Windows 10 on your Raspberry Pi? Officially, Microsoft’s only operating system for the Pi is an old version of Windows 10 IoT Core, which just lets you execute Visual Studio code on the computer but doesn’t work as a standalone OS with a GUI (in other words, no “windows”). However, the lack of support from Microsoft hasn’t stopped some ambitious developers from finding a way to run a full desktop version of Windows 10 on Raspberry Pi.
In 2019, we tried installing a hacked version of Windows 10 on a Raspberry Pi 3 and it ran, but it was extremely painful to use. Recent developments have now made it possible to run Windows 10 somewhat-competently on a Raspberry Pi 4, at least as a proof-of-concept We’ll show you how to install Windows 10 on your Raspberry Pi below.
However, before you begin, please note that this is not an official Microsoft product and the source of the images and software used is from a passionate and vibrant community working together to create this project. Amir Dahan is the creator of Windows 10 Lite, Marcin is responsible for UEFI and Pete Batard responsible for the 3GB RAM fix. The Windows 10 image file and RAM fix you’ll need to make this work are constantly changing as are their download locations so you’ll need to find them via the Windows on Raspberry Pi Discord Group, which is where all the developers hang out and share updates. We can’t vouch for the safety or legitimacy of any of the custom files the community has created for this project so proceed at your own risk.
At the time of writing this project runs surprisingly well (see below for more details) but has a lot of caveats. . The Raspberry Pi’s onboard Ethernet, Bluetooth and GPIO do not work so you’ll need a USB Ethernet or USB Wi-Fi dongle to get online (there’s no list of supported dongles so we can’t guarantee yours will work). Audio via HDMI is also not available but Bluetooth audio via a USB Bluetooth dongle is possible.
What you will need to install Windows 10 on a Raspberry Pi 4
- Raspberry Pi 4 4GB or 8GB
- 16GB or larger microSD card, (see best microSD cards for Raspberry Pi)
- Windows 10 PC
- USB to Ethernet or WiFi dongle
- Bluetooth dongle (if you want Bluetooth)
- Keyboard, mouse, HDMI and power for your Raspberry Pi
How to Install Windows 10 on the Raspberry Pi 4
1. Download the latest pre-release version of WoR tool https://www.worproject.ml/downloads and extract the files.
2. Visit the Windows on Raspberry Pi Discord server and go to the Downloads channel to Download the latest stable image, currently 0.2.1.
3. Open the WoR Alpha tool and select your language.

4. Insert microSD card and select the drive. The Raspberry Pi 4 mode is currently experimental, but has worked reliably in our tests.
5. Select your Windows on ARM image.
6. Select the latest package of drivers from the server.
7. Use the latest UEFI firmware available.
8. Check the configuration and when happy click Next.
9. Double check everything before clicking Install.
The installation process can take as long as two hours to complete, depending on the speed of the microSD card.
10. Download the RAM fix for Rpi 4 file from the Windows On Raspberry Pi Discord server. Extract the contents.
11. Copy winpatch.exe to the root of C: drive.
12. Locate the drive containing the Windows 10 on ARM installation, make a note of the drive letter.
13. Open a Command Prompt as Administrator and go to the root of C: drive.
14. Patch the USB driver to enable USB ports on the Raspberry Pi 4. Change the drive letter to match your installation.
15. Overclock the Raspberry Pi. This step is optional but highly recommended (though you’ll want a cooling fan). Edit the config.txt file found in BOOT drive. Add these two lines at the end of the file. Overclocking will require cooling for your Raspberry Pi.
16. Eject the microSD card and insert it into the Raspberry Pi 4. Connect your keyboard, mouse etc and power on the Pi.
17. Follow the standard Windows 10 install process and after a short while you are ready to use Windows 10 on your Raspberry Pi 4.
18. As an administrator open a Command Prompt and run this command to enable 3GB of RAM. Press Enter to run the command.
19. Reboot the Raspberry Pi for the update to take effect.
20. For network access, use a USB to Ethernet or a compatible WiFi dongle.
21. Install Microsoft Edge by double clicking on the Microsoft Edge desktop icon.
22. Installing software works in the same manner as a typical Windows 10 install. We tested GIMP Photo Editor and the Arduino IDE and both installed, albeit slowly and were usable for basic tasks.
Setting up a Raspberry Pi
Overview
Dashboard cannot be used used to setup the Raspberry Pi 3B+. If you have a 3B+ device, you must use the 3B+ technical preview. Please view the known limitations of the technical preview to determine if this is suitable for your development.
When the «format this disk» pop up comes up, do not format the disk. We are working on a fix for this issue.
When setting up a Raspberry Pi for prototyping, we recommend using the Windows 10 IoT Core Dashboard. However, if you’re looking to manufacture with a Raspberry Pi, please refer to the IoT Core Manufacturing Guide. You cannot use maker images for manufacturing.
Using the Dashboard
To flash, or download, IoT Core onto your Raspberry Pi, you’ll need:
- A computer running Windows 10
- Windows 10 IoT Core Dashboard
- A high-performance SD card, such as a SanDisk SD card
- An external display
- Any other peripherals (e.g. mouse, keyboard, etc.)
Instructions
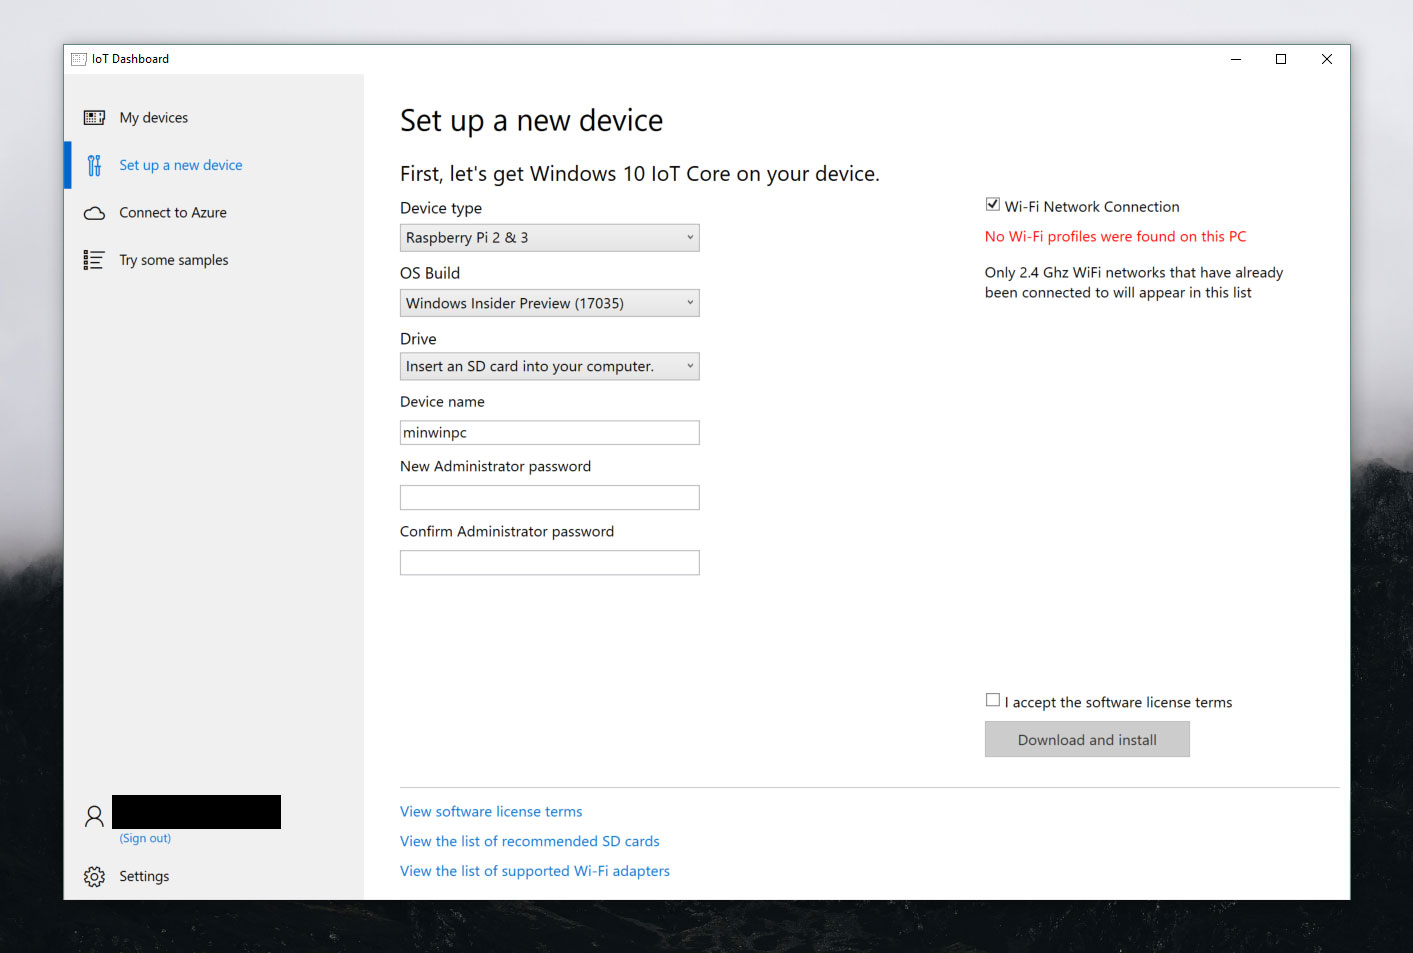
- Run the Windows 10 IoT Core Dashboard and click on Set up a new device and insert an SD card into your computer.
- Hook up your Raspberry Pi to an external display.
- Fill out the fields. Select «Broadcomm [Raspberry Pi 2 & 3]» as the device type. Make sure to give your device a new name and password. Otherwise the default credentials will remain as:
- Accept the software license terms and click Download and Install. If all goes well, you’ll see that Windows 10 IoT Core is now flashing your SD card.
Connect to a network
Wired connection
If your device comes with an Ethernet port or USB Ethernet adapter support to enable a wired connection, attach an Ethernet cable to connect it to your network.
Wireless connection
If your device supports Wi-Fi connectivity and you’ve connected a display to it, you’ll need to:
- Go into your default application and click the settings button next to the clock.
- On the settings page, select Network and Wi-Fi.
- Your device will begin scanning for wireless networks.
- Once your network appears in this list, select it and click Connect.
If you haven’t connected a display and would like to connect via Wi-Fi, you’ll need to:
- Go to the IoT Dashboard and click on My Devices.
- Find your unconfigured board from the list. Its name will begin with «AJ_». (e.g. AJ_58EA6C68). If you don’t see your board appear after a few minutes, try rebooting your board.
- Click on Configure Device and enter your network credentials. This will connect your board to the network.
Wifi on your computer will need to be turned on in order to find other networks.
Connect to Windows Device Portal
Use the Windows Device Portal to connect your device through a web browser. The device portal makes valuable configuration and device management capabilities available.
What raspberry pi should I get to host a Discord Bot?
As you can see by the question, Im new to the Raspberry Pi and im looking to get one ideal to host a Discord bot from my home network at the lowest cst possible.
Before i look into what model i should be buying, I first of all need to know, Can you run a Luvit environment on a Raspberry Pi? I need to know this because it is needed for the Discordia lib that i have made my bot in
Any help would be appreciated, Thanks!

1 Answer 1
It very much depends on what your bot is. If your bot is not used very frequently and is not on too many guilds, then practically anything can run it. With discord.py, I ran 7 bots on the same server (2 cores, 2 GB RAM) and I could have done much more. If your bot has music functionality, the usage can go up dramatically. With just messages and basic commands interacting with just the Discord API, you should be fine on anything.
Music commands
Less than 500 guilds
You can run on any of the raspberry pis as long as your code is optimised.
More than 500 guilds
This can vary a lot on activity. If you are on 1000s of guilds but there is never more than one guild using the music command at a time, then you should still be fine with any of them. To be safe and to allow for growth, I would recommend going for a Pi 3 B+.
Just Discord API interaction
Not using slow endpoints, for example, getting a large list of messages in a channel
Less than 5000 guilds
You should be able to run on any of the Pis
More than 5000 guilds
If you have a large number of active users, then you should go for a 3 B+ to be safe. If your bot is unstable and crashes, load up times on this amount of guilds is extremely slow. One of my bots has 1,000,000+ users and has a load up time of a couple of minutes with a large number of commands. The main variable on initial loading time is users.
Having a loop that searches through 1,000,000s of messages or a command that does an action with a large amount of users
You’re going to need to be able to run well while running slow commands, so go for the 3 B+. If your bot has cooldowns for these kinds of commands, then you can probably run on a 2.


