- Restarting Hudson on Windows
- 3 Answers 3
- Installing Hudson as a Windows Service
- Hudson-ci/Installing Hudson Windows Service
- Contents
- Install Hudson as a Windows service
- Install Slave as a Windows service (requires .Net 2 framework)
- Changing the configuration of services
- 7 Installing and Configuring Hudson for Continuous Integration
- 7.1 Prerequisites for Installing and Configuring Hudson
- 7.2 Downloading Hudson
- 7.3 Installing Hudson
- 7.3.1 Installing Hudson on Linux
- 7.3.2 Installing Hudson on Windows
- 7.4 Configuring the HTTP Port
- 7.5 Starting Hudson
- 7.6 Configuring Maven After Startup
- 7.6.1 First Time Startup
- 7.6.2 Configuring the JDK
- 7.6.3 Specifying the Maven Home
- 7.6.4 Setting Up Maven for Use by Hudson
- 7.6.5 Installing Hudson Plug-Ins
- 7.6.6 Integrating the Repository
- 7.6.7 Monitoring Subversion
- 7.7 More Information About Hudson
Restarting Hudson on Windows
I’ve been having an issue with Hudson on windows.
Whenever I update Hudson or a plugin I get the option to restart when no jobs are running.
If I click this button Hudson hangs and doesn’t restart. I’ve tried restarting the Hudson service but this doesn’t help, so end up having to reboot the box to bring Hudson back online.
I’ve just updated to the most recent version, but didn’t click the restart button and it’s now vanished.
Is there a correct way to restart Hudson on windows?
3 Answers 3
I have a this problem once in a while too. For some reason the Hudson server does not shut down completely and the server that starts up, can not use the port. To fix that problem, I run `netstat -n -o’. This way I can find out the process ID that holds the port and kill that app through taskmanager. Now I can restart the service and Hudson comes up fine.
For the last few weeks I had a similar problem. The description says, that it restarts the app, when no processes are running. I missed out on one job that was hold in the build queue and because of a faulty configuration never actually build, therefore preventing Hudson from restarting.
After all of your jobs are finished and your server does not restart. Just visit the restart page again http://server:port/restart and try to restart again. If that doesn’t work stop the service and start it again.
UPDATE:
Since I grew tired of physically logging into the Hudson/Jenkins server, I now use following commands to run the kill remotely. These commands assume that you run the service with a dedicated user (e.g. JenkinsUser). If another process running with the same credentials than the service does and might start java.exe, you need to run the netstat which needs to be executed locally on the Jenkins server or by using rexec (this was not an option for me).
If I have to much time, I might create a script out of it.
Installing Hudson as a Windows Service
Join the DZone community and get the full member experience.
I don’t usually recommend using Windows for your build server, but sometimes you may not have a choice. You may be running Microsoft tools as an integral part of your build lifecycle, for example, or be constrained to use the local company standards.
Hudson has a very convenient feature designed to make it easy to install Hudson as a Windows servers. There is currently no graphical installer that does this for you, but you get the next best thing — a web-based graphical installer.
First, you need to start the Hudson server on your target machine. The simplest approach is to run Hudson using Java Web Start (see http://wiki.hudson-ci.org/display/HUDSON/Meet+Hudson#MeetHudson-TestDrive). Alternatively, you can do this by downloading Hudson and running it from the command line, as you would normally do:
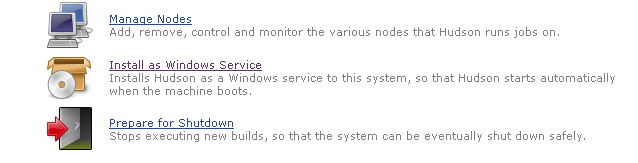
This second option is useful if the default Hudson port (8080) is already being used by another application. It doesn’t actually matter too much which port you use — you can change this later. Next, connect to this server and go to the Manage Hudson screen. Here you will find an «Install as Windows Service» button. This will create a Hudson service on the server that will automatically start and stop Hudson in an orderly manner.
Hudson will prompt you for an installation directory. This will be the Hudson home directory (HUDSON_HOME). The default value is the default HUDSON_HOME value: a directory called «.hudson» in the current user’s home directory. This is often not a good choice for a Windows installation. When running Hudson on Windows, you should avoid installing your Hudson home directory anywhere near your «C:\Documents And Settings» directory — not only is it a ridiculously long name, the spaces can wreak havoc with your Ant and Maven builds and any tests using classpath-based resources. It is much better to use a short and sensible name such as «C:\hudson».
Hudson-ci/Installing Hudson Windows Service
| Hudson Continuous Integration Server |
| Website |
| Download |
| Community |
| Mailing List • Forums • IRC • mattermost |
| Issues |
| Open • Help Wanted • Bug Day |
| Contribute |
| Browse Source |
 | Installing Hudson as a Windows Service |
|---|
Contents
Install Hudson as a Windows service
First, you need to start Hudson before installing it. This can be done by running java -jar hudson.war . Now connect to hudson by going to the following URL http://localhost:8080/
Once Hudson is started, click the manage Hudson link and look for the «Install as Windows Service» link on the management page.
Clicking this link shows you the installation screen:

Choose the directory where Hudson shall be installed (the directory must already exist). This will become HUDSON_HOME and will be used to store data files and programs.
Upon successful completion of the installation, you should see a page asking you to restart Hudson. Note that you will need administrator privileges to complete this operation.
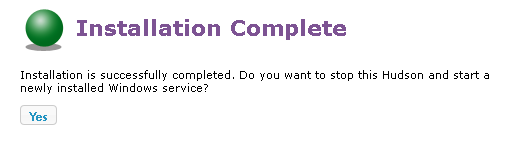
Hudson will then be relaunched as a Windows service.

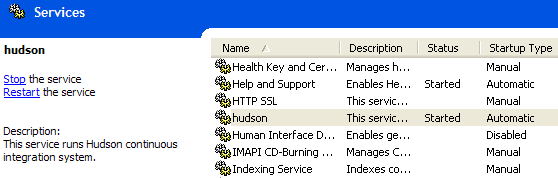
At this point you can use the service manager to confirm that Hudson is running as a service.
Install Slave as a Windows service (requires .Net 2 framework)
Hudson also allows you to install a slave agent as a Windows service. (See Distributed Builds for more about how to do distributed builds in general.)
First, you configure your slave to run as a JNLP slave agent. This should create a JNLP launch icon in the corresponding page, as shown below: 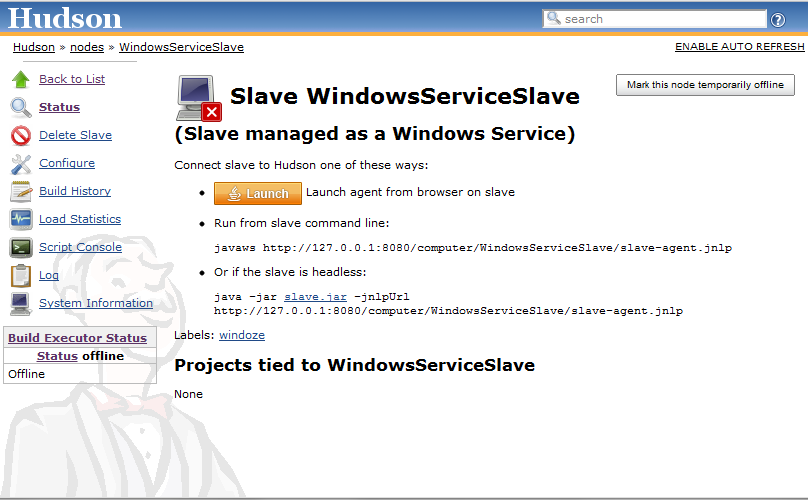
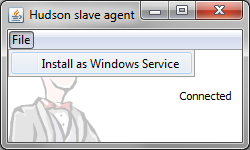
From the slave machine, launch a slave agent. You should see a window like this:

Choose «File» > «Install as Windows Service» from the menu:
Confirm your intention to install as a service. The installation will place the program files to the directory designated as the slave root directory (from the «configure executors» screen.)
Once the installation succeeds, you’ll be asked if you’d like to stop the current slave agent and immediately start a slave agent. When you click «OK», the slave agent window will terminate. The new slave agent runs as a service without showing a window, so head over to the service manager from the control panel and confirm that the slave agent is indeed running as a service.
Changing the configuration of services
The JVM launch parameters of these Windows services are controlled by an XML file hudson.xml and hudson-slave.xml respectively. These files can be found in $HUDSON_HOME and in the slave root directory respectively, after you’ve install them as Windows services.
The file format should be self-explanatory. Tweak the arguments for example to give JVM a bigger memory.
Stdout and stderr from the service processes go to log files in the same directory.
7 Installing and Configuring Hudson for Continuous Integration
Hudson is a popular continuous integration server product. It enables you to define build jobs and manages the execution of those jobs for you. If necessary, it has the ability to scale up to a farm of build servers.
This chapter describes how to install and configure Hudson to automate the build process and how to integrate Hudson with Maven.
This chapter contains the following sections:
7.1 Prerequisites for Installing and Configuring Hudson
Ensure that you have the following components of the continuous integration system configured before you begin installing:
Subversion server configured and running, as directed in Chapter 3.
Archiva configured and running as directed in Chapter 4, which implies that you have an Oracle Fusion Middleware product installed in an Oracle home and have run the Oracle Maven synchronization plug-in to populate Archiva.
JDK 1.6 or higher installed on the Hudson host.
Maven 3 installed on the Hudson host.
7.2 Downloading Hudson
The latest production version of Hudson can be downloaded directly from the following location:
Hudson is distributed in two distinct versions:
WAR file, which can either run as standalone or can be added to an existing application server installation.
Linux RPMs compiled for specific operating systems. Package management support in the form of appropriate repositories are available to install the RPM and necessary dependencies.
This document focuses on Oracle Linux and Windows installation. Details for the other operating systems may vary from these. For instructions on various types of installations, see http://wiki.eclipse.org/Hudson-ci/Installing_Hudson .
7.3 Installing Hudson
This section contains the following topics:
7.3.1 Installing Hudson on Linux
On a Linux computer supporting YUM, run the following commands:
This installs Hudson as a daemon and creates a Hudson user. This user is used by the server to perform build job-related activities.
7.3.2 Installing Hudson on Windows
You must download the Hudson WAR distribution and start it in standalone mode by running the following command:
When Hudson starts:
Open the following URL in a web browser:
Navigate to Manage Hudson , then Install as Windows Service . This enables you to configure Hudson as a standard Windows service.
For instructions, see
7.4 Configuring the HTTP Port
If you are using a single host for your artifact repository and continuous integration server, you must change the HTTP port used by Hudson.
This value is located in the /etc/sysconfig/hudson directory with HUDSON_PORT .
This value is located in the c:\ciroot\hudson\etc\sysconfig\hudson directory.
7.5 Starting Hudson
To start Hudson:
If you have installed Hudson as a service, you can start the application by running the following command:
Start up can be monitored on Linux by checking the logs in the following directory:
Run the following command to monitor logs:
Start Hudson on Windows as a normal service:
Go to Control Panel.
Navigate to Administrative Tools , then Services .
Select the Hudson service and click Start.
Hudson logs are available in the following location:
7.6 Configuring Maven After Startup
This section contains the following topics:
7.6.1 First Time Startup
The first time you start Hudson, go to the home page to complete the installation:
Open a browser and go to http://localhost:8080 (change the port if you modified it during installation).
In the list of plug-ins that is presented, scroll down to find the Subversion , Maven 3 and Maven 3 SNAPSHOT Monitor options and select these options.
Scroll down to the bottom and click Install .
Click Finish to move to the Hudson home page.
The rest of the configuration in this section is continued from the Hudson home page.
7.6.2 Configuring the JDK
You must configure the JDK you intend to use for direct Java build configurations. To configure:
Log in to Hudson:
Navigate to Manage Hudson , then Configure System .
In the Configure System screen, scroll down to the JDK section and click Add JDK , deselect the option Install automatically and then enter a name, for example, jdk1.7.0 and add the complete path of your installed JDK.
For example: /ciroot/product_binaries/jdk1.7.0 .
Scroll down to the bottom of the page and click Save .
7.6.3 Specifying the Maven Home
You must specify the Maven 3 location so that Hudson knows where Maven is located. To do so:
Log in to Hudson:
Navigate to Manage Hudson , then Configure System .
On the Configure System screen, scroll down to the section Maven 3 .
Click Add Maven , then deselect the option Install automatically and enter a name and the path to the Maven installation, as shown in the following image:
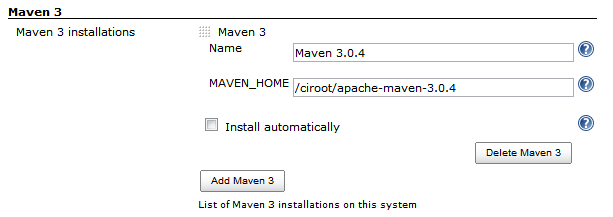
Description of the illustration maven3.png
Scroll down to the bottom of the page and click Save .
7.6.4 Setting Up Maven for Use by Hudson
To utilize Maven settings from Hudson, embed the settings.xml content into a settings object in Hudson’s global Maven configuration:
Log in to Hudson:
Go to Manage Hudson , then Maven 3 Configuration .
For Type, select SETTINGS .
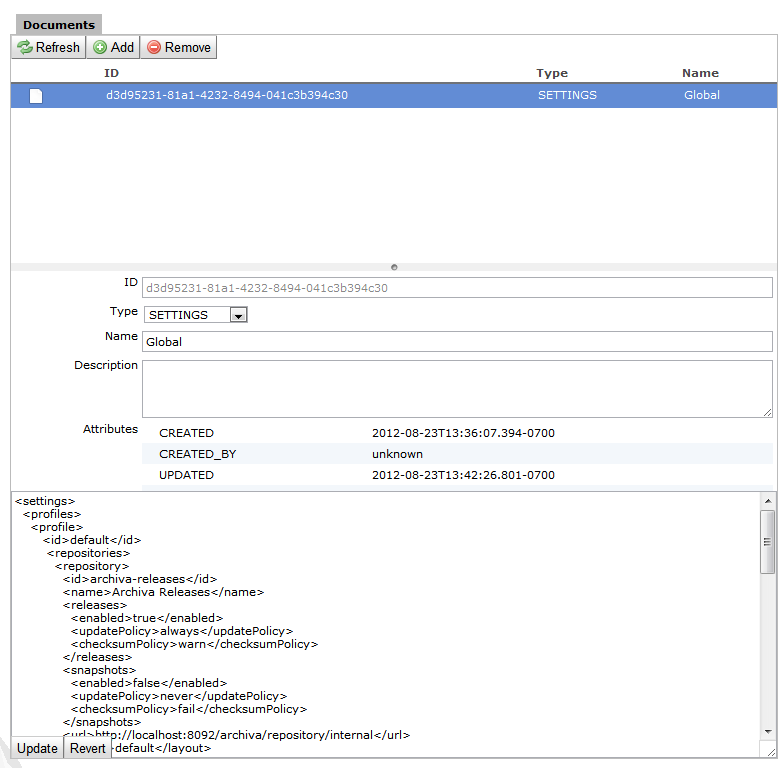
Description of the illustration maven-settings.png
Provide a name and optional description.
Find the settings.xml on your file system (that you have configured in Chapter 5) and copy the contents into the large text field at the bottom of the page. It is located at /$HOME/.m2/settings.xml .
Oracle recommends that you replace any localhost URL references in the settings.xml with fully qualified domain names or IP addresses because Hudson builds can eventually occur on non-local build hosts.
7.6.5 Installing Hudson Plug-Ins
Hudson jobs may require job-specific customizations of environment variables. Because Hudson does not support this by default, you must install an additional plug-in. To install the plug-in:
Log in to Hudson:
Go to Manage Hudson , then Manage Plugins .
Select Hudson Setenv Plugin .
After the installation completes, use the restart option in Hudson to enable the plug-in.
7.6.6 Integrating the Repository
To configure automatic builds when changes are checked in, you must configure Hudson to monitor the artifact repository for SNAPSHOT deployment changes. Such changes trigger builds of affected components that have dependencies on the changed artifacts. To configure Hudson to monitor the artifact repository:
Log in to Hudson using the following URL:
Navigate to Manage Hudson , then System Configuration .
In the main system configuration panel under System Configuration, select Maven 3 SNAPSHOT Monitor . In the Archiva configuration instructions, you must have created a continuous integration specific user for continuous integration server access to the repository. Enter the path to Maven repository.

Description of the illustration maven3-monitor.png
Set the User and Password for the continuous integration user.
7.6.7 Monitoring Subversion
In addition to monitoring the artifact repository for updated dependencies, the continuous integration server must constantly check the source control system for updates and trigger project builds accordingly. Unlike repository monitoring, software configuration management monitoring must be uniquely configured per build configuration. As you create new build configurations, you must set the Subversion location information for the related project. For more information, see Section 16.3.
Subversion support comes with the base Hudson distribution. Other source control systems may require separate Hudson plug-in installation.
7.7 More Information About Hudson
You can find the primary source of the official documentation on Hudson in the following location:
For new users, you can find introductory guides to Hudson in the following location:
The Hudson book is located in the following location:


