- 3 Ways to Keep a Window Always on Top on Windows 10
- 1. Use a Keyboard Shortcut with an Always on Top AutoHotkey Script
- 2. Use Your Mouse with DeskPins
- 3. Use a System Tray Menu with TurboTop
- Bring the Always-on-Top Feature to All Windows
- Window On Top: бесплатная программа для исправления окон на переднем плане
- Легко исправляйте окна с помощью Window On Top
- Перетащите, чтобы удерживать окно
- Выводы.
- Окно загрузки сверху
- Альтернативные варианты для Window On Top
- Окно TopMost Control
- Инструмент Pip
- PinWin
- WindowTop
- Set window on top, make it dark, transparent and more
- WindowTop
- Set Window On Top
- Click Through
- Set Transparency
- Shrink Windows
- Dark/Reading Mode
- Nice Looking
- Good for coding
3 Ways to Keep a Window Always on Top on Windows 10


When you are working in Windows with limited screen space, it’s useful to have certain windows stay on top of others. Some programs in Windows automatically incorporate this “always on top” feature, but most programs don’t, and Windows doesn’t include this feature either.
Today we’ll cover three ways to easily add the “always on top” feature to every single program in Windows.
1. Use a Keyboard Shortcut with an Always on Top AutoHotkey Script
AutoHotkey is a free program that allows you to create scripts to perform multiple actions with a single keyboard shortcut. It runs in the background and sits in the system tray.
We’re going to use AutoHotkey to create a script that will keep a selected window on top of all others when you press Ctrl + Spacebar when that window is active. We’ll show you the script and explain how it works. But we’ll also provide a downloadable AutoHotkey script file you can use.
Download and install AutoHotkey and then run it.
Download the AlwaysOnTop.ahk script file, extract the .zip file, and put the script in a folder on your hard drive that won’t be moved or deleted.
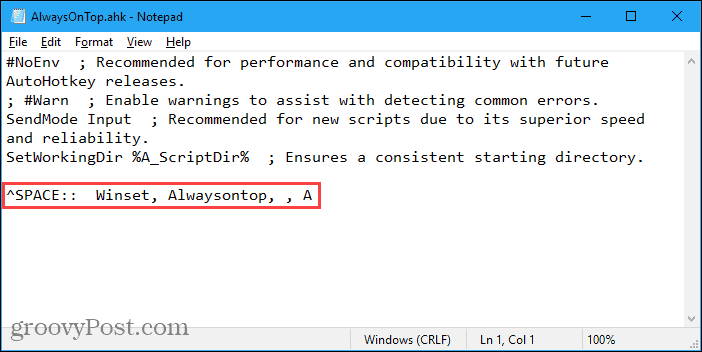
The script contains some comments and then the following command:
This command sets the currently active window to always be on top when you press Ctrl + Spacebar. If you’d rather use a different key combination, you can change the first part of the command, “^SPACE“. The “^” character represents the Ctrl key. You’ll find the symbols to use for other hotkeys in the Hotkey Modifier Symbols section on this AutoHotkey help page.
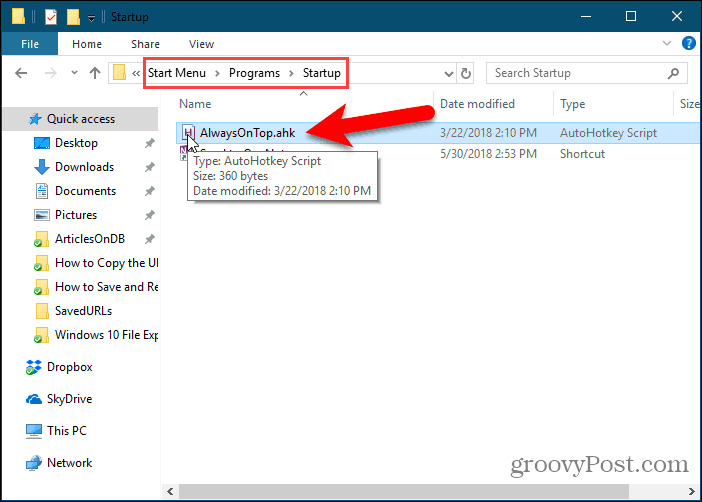
You can put the script in the Windows startup folder (%AppData%\Microsoft\Windows\Start Menu\Programs\Startup), so it starts automatically when Windows starts.
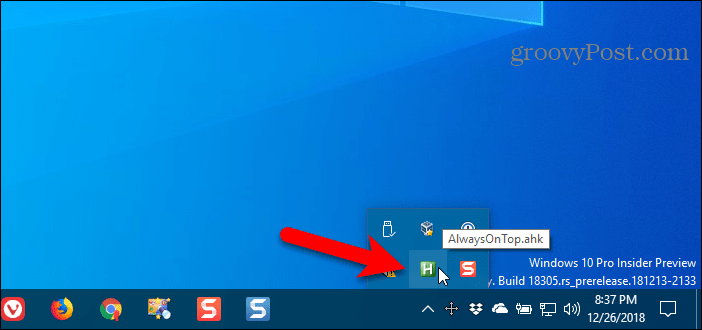
The AutoHotkey script stays in the system tray.
To make the active window always on top, press Ctrl + Spacebar (or the keyboard shortcut you assigned). Press the keyboard shortcut again to disable “always on top” for the active window.
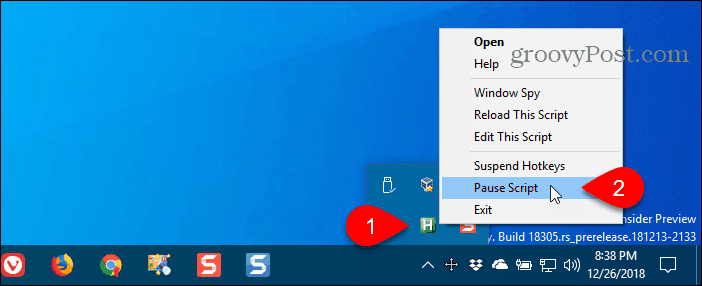
For script options, right-click on the AutoHotkey icon in the system tray.
2. Use Your Mouse with DeskPins
DeskPins provides pins you can grab and use to keep any window on top of all other windows. The program sits in the system tray and uses minimal resources.
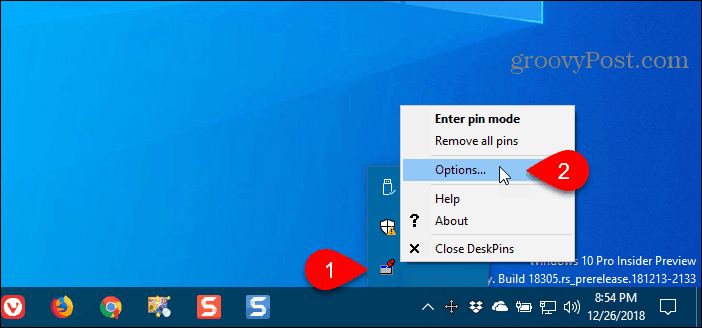
Download and install DeskPins. Run the program, right-click the icon in the system tray, and select Options to change the Pins, Autopin, and Hotkeys settings.
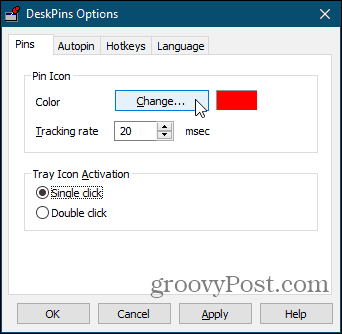
On the Pins tab, you can change the color of the pins. The Tracking rate controls how often each pin checks the pinned window’s position and state. Lower values make the pins more responsive. You can enter any number from 10 to 1000 msec (milliseonds).
If you have an older computer, you may want to increase the Tracking rate number to avoid slowing down your computer.
You can also choose Single click or Double click under Tray Icon Activation to indicate how you get pins from the DeskPins system tray icon. The default is Single click.
You can have DeskPins automatically pin certain types of windows using rules on the Autopin tab.
Check the Enable box and then click Add to add a new rule. Use the check boxes next to the rules to enable and disable individual rules.
Click Help to access the DeskPins help file for more information about automatically pinning windows.

DeskPins provides default shortcuts for entering pin mode and toggling the active window pin. You can change these shortcuts on the Hotkeys tab.

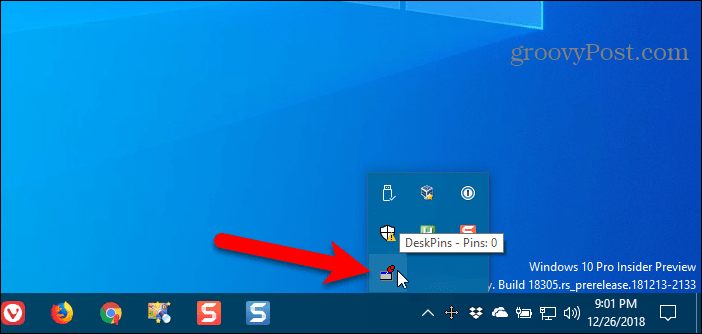
To pin a window on top, click (or double-click, depending on the setting) the DeskPins icon in the system tray.
Then, click the title bar on the window you want to keep always on top.
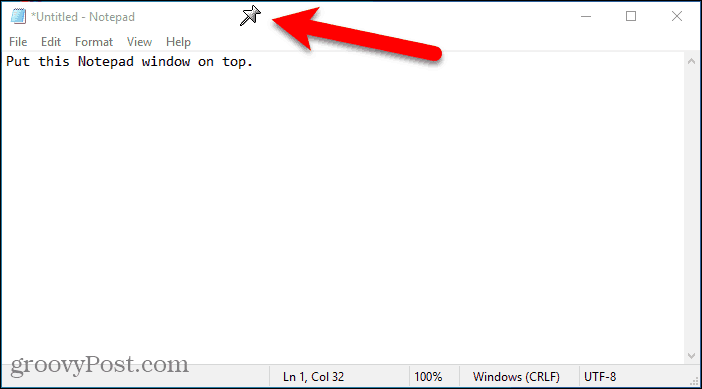
A pin displays on the title bar of the chosen window in the color you specified, or in the default color red.
Click the pin again to disable always on top for the window.
3. Use a System Tray Menu with TurboTop
TurboTop also sits in your system tray like DeskPins. But it operates differently.
Download and install TurboTop. Then, run the program.
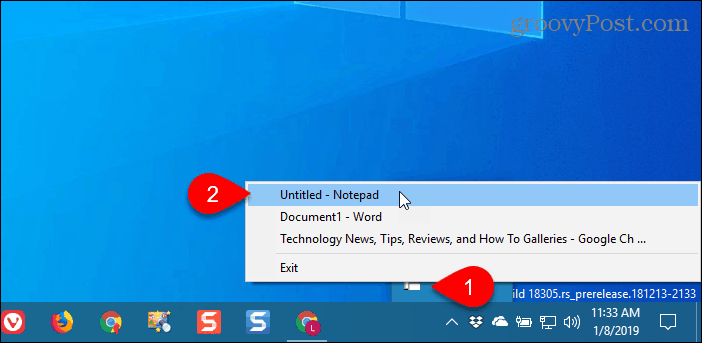
To keep a window always on top, click the TurboTop icon in the system tray. A list of all open windows displays. Select the title of the window you want.
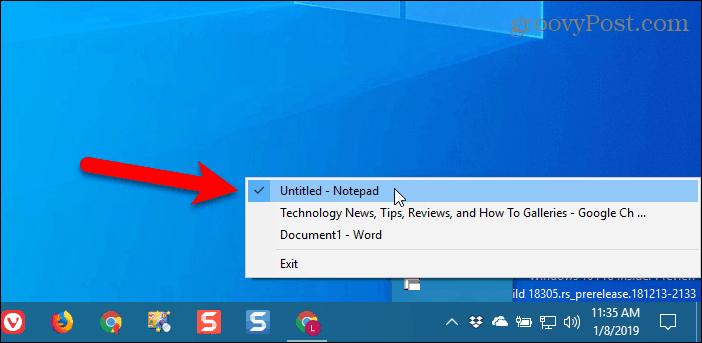
Any windows you choose to be always on top are indicated with a check mark on the TurboTop menu.
To stop keeping a window always on top, click the TurboTop icon in the system tray and select that window again, so there’s no check mark next to the window name on the menu.
Bring the Always-on-Top Feature to All Windows
Whether you like using keyboard shortcuts or prefer using the mouse, there’s an easy solution for keeping windows always on top. If you’ve found other options for keeping windows always on top, let us know in the comments.
Window On Top: бесплатная программа для исправления окон на переднем плане
При одновременной работе с нашим компьютером с несколькими окнами это может вызвать хаос и беспорядок, которые могут закончиться беспорядком. Постоянно и постоянно держать окно открытым над остальными — это то, что может ускорить нашу работу, поскольку позволяет нам держать в поле зрения то, что действительно важно. Это то, что мы не можем сделать изначально с Windows, поэтому мы можем использовать сторонние приложения, такие как Окно сверху о котором мы поговорим.
Несмотря на то, что Windows является наиболее часто используемой операционной системой в мире, это не означает, что она идеальна, и это то, что Microsoft Операционная система имеет достаточно ограничений, которые не позволяют нам выполнять ряд действий, какими бы простыми они ни казались нам. . Доказательством этого является то, что он не включает в себя никакой функции, которая позволяет установить любое окно на переднем плане, чтобы оно было фиксированным и всегда было видимым на переднем плане.
При организации работы с компьютером может быть жизненно важно иметь возможность фиксировать окно, чтобы оно не было скрыто за другими приложениями. Это означает, что нам нужно будет максимизировать и минимизировать несколько окон, чтобы иметь возможность найти необходимую информацию, что в конечном итоге приведет к беспорядку на нашем рабочем столе.
Window On Top — это небольшое приложение, которое было разработано, чтобы мы могли пометить любое окно или папку, которые мы открыли на нашем рабочем столе, чтобы они оставались фиксированными и всегда виден на переднем плане на нашем экране. Таким образом, это гарантирует, что у нас есть вся необходимая информация на экране без необходимости постоянно минимизировать и максимизировать окно, поскольку не будет другого элемента, который его скрывает.
Легко исправляйте окна с помощью Window On Top
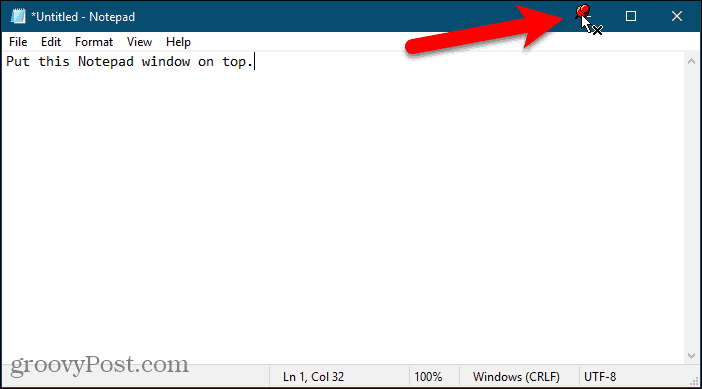
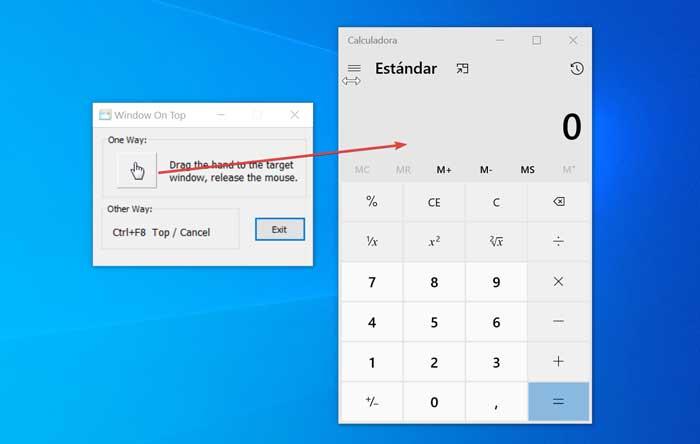
Как только мы запускаем приложение, появляется маленькое окно, интерфейс которого совершенно прост, хотя он на английском языке и чрезвычайно интуитивный поскольку у нас почти нет функций, кроме настройки окна. В интерфейсе наличие значок в форме руки выделяется.
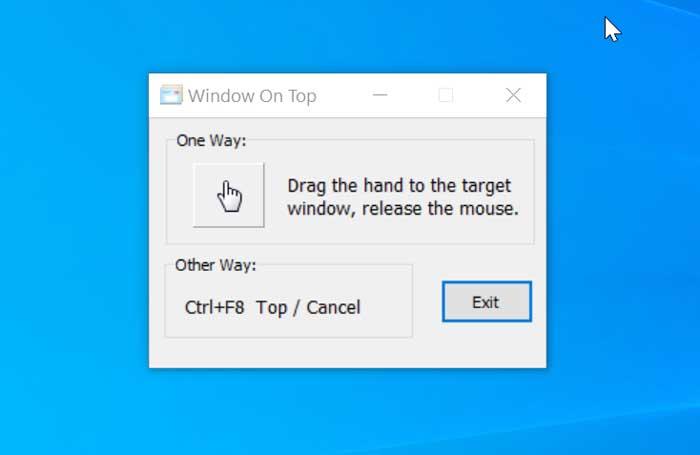
Этот значок поможет нам перетащить его в окно, которое мы хотим оставить на переднем плане. У нас также есть другой способ сохранить фиксированное окно, и это с помощью сочетания клавиш Ctrl + F8 . Следовательно, если мы нажмем его во время просмотра окна, мы можем установить его на передний план или деактивировать функцию.
Перетащите, чтобы удерживать окно
Если у нас есть Microsoft край браузер и приложение «Калькулятор» открываются, по умолчанию одно всегда будет над другим, в зависимости от того, какой из них мы используем. Поэтому, если мы хотим, чтобы калькулятор всегда был на переднем плане, пока мы печатаем или перемещаемся по Edge, мы будем использовать Window On Top. Для этого нам нужно будет только перетащить значок руки калькулятора. Таким простым способом приложение всегда будет оставаться фиксированным на экране . Когда нам больше не нужно, чтобы приложение было на переднем плане, достаточно будет снова перетащить к нему значок руки. Как мы уже упоминали, эту функцию также можно выполнить с помощью сочетания клавиш. Нам просто нужно оставить приложение калькулятора активным и нажать Control + F8, чтобы исправить это. Если мы снова нажмем эту комбинацию клавиш, мы отключим функцию.
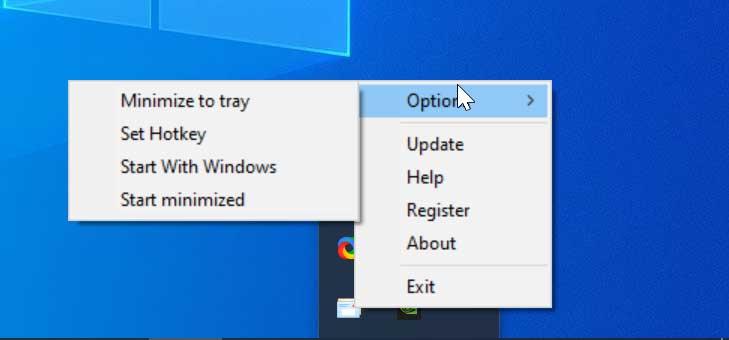
Window On Top остается на панели задач. Если щелкнуть по его значку правой кнопкой мыши, появится небольшой список открывается там, где выделяется раздел «Параметры». Здесь мы найдем четыре настройки, которые мы можем активировать или деактивировать по своему усмотрению. Мы всегда можем свести лоток к минимуму (Свернуть в лоток), настроить клавиши прямого доступа (Установить горячую клавишу), активировать так, чтобы приложение запускалось одновременно с Windows (Запуск с Windows) и всегда запускалось в свернутом виде (Начать Свернуть). Остальные действия, которые мы можем выполнить из этого меню, — это зарегистрировать продукт, получить доступ к файлу справки или выполнить поиск обновлений.
Выводы.
Как мы видим, Window On Top — чрезвычайно простое приложение с четкой и уникальной целью: сохранить любое приложение на переднем плане. Он не включает дополнительных дополнительных функций или чего-либо, что заставляет нас отвлекать внимание от его основной миссии, которую он выполняет эффективно и просто, поэтому его могут использовать все типы пользователей без каких-либо осложнений.
Окно загрузки сверху
Если мы хотим попробовать Window On Top, мы можем скачать бесплатная пробная версия для дней 7 с веб-сайта . После тестирования, если он убедит нас и окажется полезным, мы можем купить его лицензию, чтобы иметь возможность использовать его постоянно, заплатив $ 9.95 . В настоящее время у него есть новая версия 3.8, которая имеет размер всего 632 КБ и совместима с Windows XP, Vista, 7, 8 и 10 . Поскольку это очень легкое приложение, оно практически не потребляет ресурсы нашей системы. Установка выполняется быстро с помощью мастера, без необходимости заставлять нас устанавливать нежелательные сторонние программы.
Альтернативные варианты для Window On Top
Если мы ищем программу, которая позволяет нам фиксировать окно, мы предлагаем несколько альтернатив Window On Top, которые мы можем принять во внимание:
Окно TopMost Control
Это с приложение encilla позволит нам сохранить любое окно приложения в Windows, закрепленное на переднем плане , оставаясь над всеми остальными, чтобы его всегда было видно. Это программное обеспечение можно настроить так, чтобы оно соответствовало нашим потребностям, с возможностью установить фиксированное окно вверху или составить список фиксированных окон. Мы можем бесплатно скачать Window TopMost Control с сайт разработчика .
Инструмент Pip
Это инструмент с очень простым и минималистичным интерфейсом, который позволит нам вывести на первый план и исправить любое окно, которое мы используем в Windows. Мы должны создать поле выбора, чтобы определить точную область, в которой будет создано окно, чтобы оно оставалось над другими. Это бесплатное приложение, которое можно скачать с этой ссылке .
PinWin
Еще одно простое приложение с открытым исходным кодом, которое позволяет нам устанавливать окна на переднем плане. Нам просто нужно выбрать желаемое окно или выбрать его из списка и поставить рядом с ним галочку. Он также имеет сочетание клавиш для выбора окна для настройки. Мы можем бесплатно скачать PinWin с здесь .
WindowTop
Set window on top, make it dark, transparent and more
WindowTop
WindowTop SW (FREE for Windows 7 – 10) enables you to manage your windows practically and efficiently with several awesome features:
- You can pin any window on top of other windows [ALT+Z]
- Enable window transparency (so you can see through the window) and even click through transparent window. [ALT+A]
- Exclusive feature of “Shrink Window” – an innovative way to minimize windows (video time: 1:42) [ALT+Q]
- And lastly the Dark/Reading Mode (video time: 1:29)
Set Window On Top

Easly set any window on top from the toolbar menu
Click Through

Only see the window without interact with it
Set Transparency

Easly set window transparency from the slider in the toolbar menu and instantly see the result
Shrink Windows

Innovative way to minimize windows — it will not minimize to the taskbar to keep your taskbar clean as you like. it will make the window smaller so you have the space you need.
Dark/Reading Mode

Easly set the window to be dark. Useful for coding, and for reading at night. This should ease the eye strains!


01. Set window on top
Easly set any window on top from the toolbar menu
04. Shrink Window
Innovative way to minimize windows — it will not minimize to the taskbar to keep your taskbar clean as you like. it will make the window smaller so you have the space you need.
03. Dark Mode
Easly set the window to be dark. Useful for coding, and for reading at night. This should ease the eye strains!

02. Set Transparency
Easly set window transparency from the slider in the toolbar menu and instantly see the result
05. Enable Smart-Transparency
Easly set the window to be dark. Useful for coding, and for reading at night. This should ease the eye strains!
6.2. Delete window configuration
Use this option to delete the window configuration so that non of the features will be automatically enabled for the window
06. Other Options
Right click on the arrow

6.1. Save window configuration
Use this option to save the configurations such as Set-Top, Opacity, Dark-Mode If you saved the configuration, the window will automatically have one of these options enabled with the specified configuration
Watch videos/windows in small view-box while you do your work You can shrink window and enable for it live preview by right click on the shrink box and select “Enable live preview”.

Have bigger preview when the mouse is hovering above shrinked window, and use other windowtop fetchers on shrinked window
View your code while you see it’s results behind!

A better dark mode that will not invert colors of images and will automatically turn off when the window is already dark

No need to manually enable every time some feature to the selected window.
Nice Looking

Replace the unpleasant white background of the window with the desktop background to get a better user experience.
Good for coding
Transparent code editor is very useful and this is made possible thanks to the Glass feature in the software. This allows you to see the result of the code right behind the code. Instead of having 2 windows next to each other, this solution lets you have both windows on top of each other.


