- Give permissions to files and folders in Windows 10
- Replies (24)
- Open Notepad as Admin to Avoid “Access is Denied”
- Open Notepad As Admin Using The Right-Click Menu
- Run Notepad As Admin By Creating a Shortcut
- Launch Notepad With Admin Rights From Cortana Search
- Use A Third-Party App To Access Notepad With Admin Rights
- Directly Open Files With Admin Rights In Notepad
- Разрешения на доступ к файлам File access permissions
- Расположения, доступные всем приложениям Locations that all apps can access
- Папка установки приложения Application install directory
- Расположения данных приложения Application data locations
- Съемные устройства Removable devices
- Расположения, доступные приложениям UWP Locations that UWP apps can access
- Папка скачиваемых файлов пользователя User’s Downloads folder
- Доступ к дополнительным расположениям Accessing additional locations
- Сохранение доступа к файлам и папкам Retaining access to files and folders
- Возможности доступа к другим расположениям Capabilities for accessing other locations
- Пример Example
Give permissions to files and folders in Windows 10
Original title: REad only
Windows 10 has set all my files and folders to read only. I am not able to turn this off. Is there a trick to this as right clicking and unchecking read only I get you need admin rights message and it doesn’t work. This is causing some games and programs I have to not work correctly.
Replies (24)
* Please try a lower page number.
* Please enter only numbers.
* Please try a lower page number.
* Please enter only numbers.
![]()
Thank you for posting in Microsoft Community. I understand your concern and I’ll be glad to assist you.
Please follow through.
- In Windows Explorer, right-click the file or folder you want to work with.
From the pop-up menu, select Properties, and then in the Properties dialog box click the Security tab.
In the Name list box, select the user, contact, computer, or group whose permissions you want to view. If the permissions are dimmed, it means the permissions are inherited from a parent object.
Turn off UAC (User Account Control)
Before you can do anything, you must turn off the UAC, or you will be locked out of the following steps.
1) Start -> Settings -> Control Panel -> User Accounts
2) Click «Change User Account Control Settings»
3) Move slider all the way down to «Never Notify»
4) Reboot
2) Take Ownership
Yes take ownership. Even though you are logged on as an Administrator, you can’t change files that don’t belong to you. The Program Files folder is set to the Trusted Installer group and the Administrator doesn’t have the rights to change anything. So now we have to claim all the files and folders.
1) Open Windows Explorer
2) R-Click on Program Files -> Properties -> Security Tab
3) Click Advanced -> Owner
4) Click Edit
5) Select Administrators -> Put a checkmark in Replace owner on subcontainers & objects -> Apply
6) Wait a while.
7) When it finishes, Click OK on all boxes to close everything
3) Fix Permissions
Now that you own the files, you have to give yourself permission to modify them
1) R-Click on Program Files -> Properties -> Security Tab
2) Click Advanced -> Change Permission
3) Select Administrators (any entry) -> Edit
4) Change the Apply To drop down box to This Folder, Subfolder & Files
5) Put check in Full Control under Allow column -> OK -> Apply
6) Wait some more.
7) When it finishes, the dialog boxes may hide behind the Explorer window. Minimize it and click OK on all the the dialog boxes
Hope this post helps. Get back to us for further queries. We are happy to help.
Open Notepad as Admin to Avoid “Access is Denied”
This will make your life a whole lot easier
If you’ve ever tried to edit a system file using Notepad on your Windows PC, you’ve likely seen the error that says “Notepad access denied”. It usually happens when you try to modify a system file from a standard user account on a PC. Windows does this to ensure your system files are protected and that only the administrator can make changes to them.
If you still need to access and edit the file using Notepad, you’ll need to open Notepad as admin. It should then give you the privileges you need to modify any of the system files on your machine. There are multiple ways to run Notepad as admin and here we show you some of those.

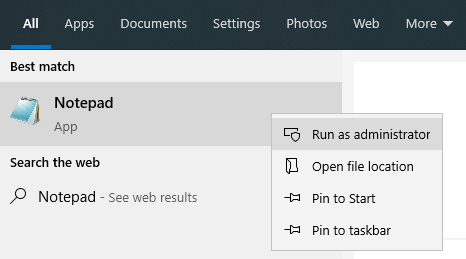
Open Notepad As Admin Using The Right-Click Menu
The easiest way to run Notepad as an admin is to use an option from your context menu. You’ve likely used this option before if you’ve ever tried running an app as an admin.
- Locate the Notepad app on your machine. It may be on your desktop if you use it frequently.
- Right-click on the app and select the option that says Run as administrator.
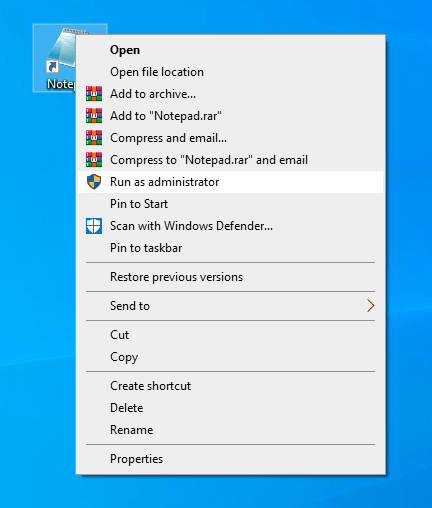
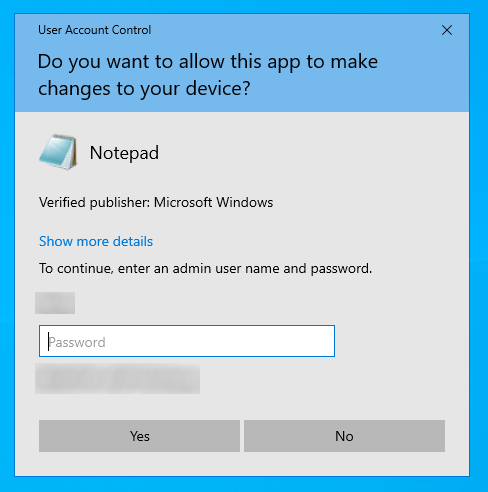
- You’ll be prompted to enter your admin password. Enter the password and hit Yes.
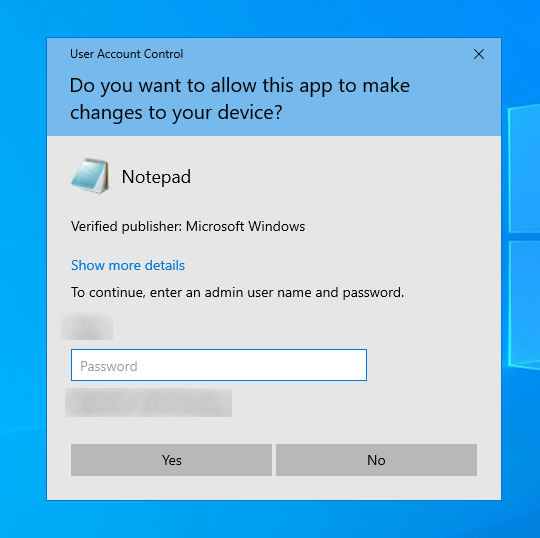
Notepad will launch with admin privileges letting you modify any files on your system.
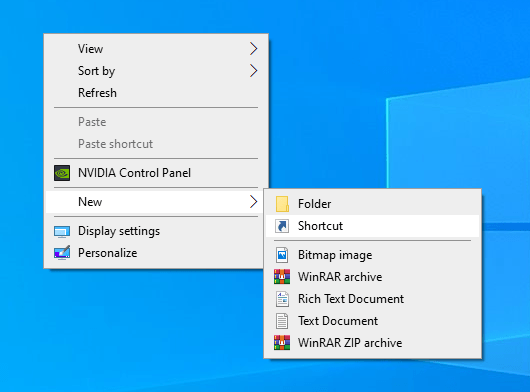
Run Notepad As Admin By Creating a Shortcut
The above method might not be convenient for you if you need to run the Notepad with admin privileges too frequently.
Fortunately, there’s a method that eliminates right-clicking on the file and automatically launches the Notepad app with admin rights. It’ll require you to input the admin password each time, though.
- Right-click anywhere blank on your desktop and choose New followed by Shortcut. It’ll let you add a new shortcut to your desktop.
- It’ll ask you to enter the location of the item that you want to create a shortcut for. Type the following into the box and hit Next. This is the path to the Notepad app.
%windir%\system32\notepad.exe
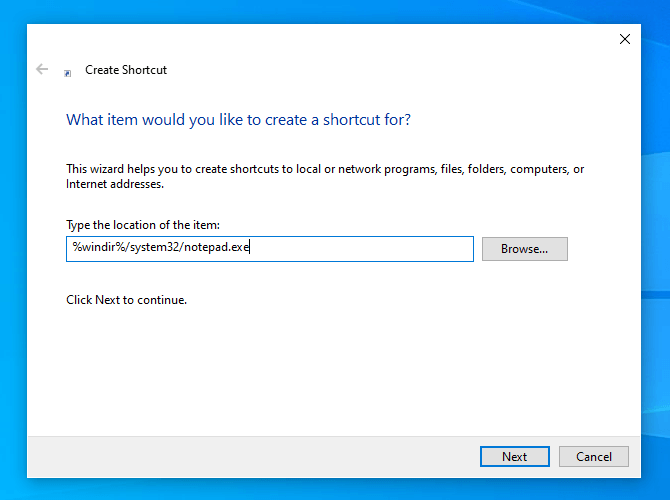
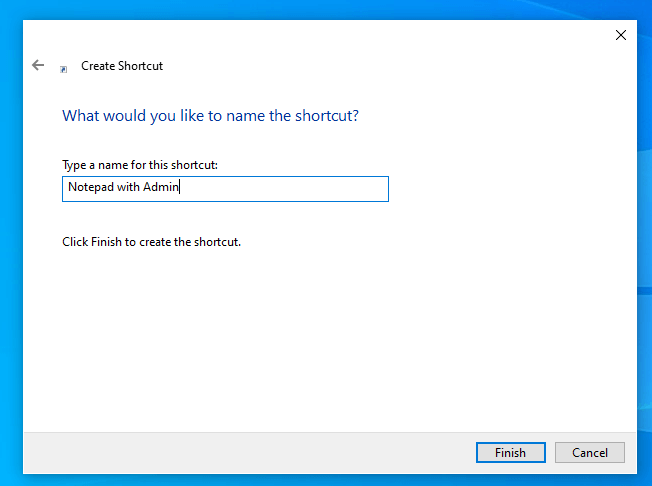
- You’ll now enter a name for your shortcut. This should be something that clearly tells you what the shortcut is for. We’d suggest using something like Notepad with Admin. Click on Finish when you’ve named your shortcut.
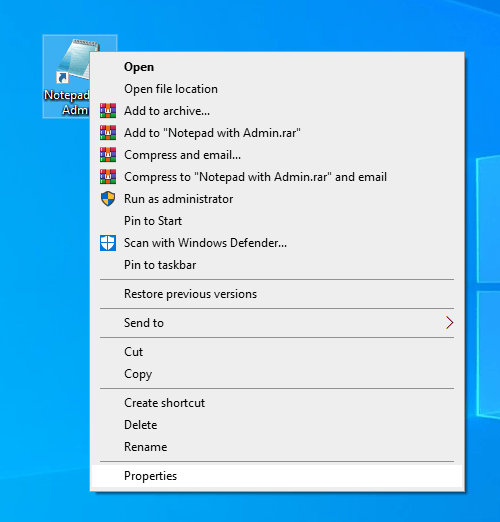
- The newly created shortcut should be available on your desktop. Right-click on it and select the option that says Properties to give it admin rights.
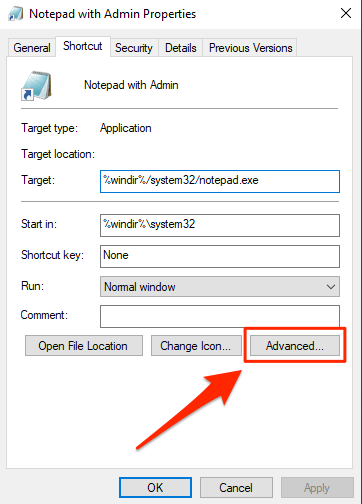
- Head to the Shortcut tab and find and click on the Advanced button.
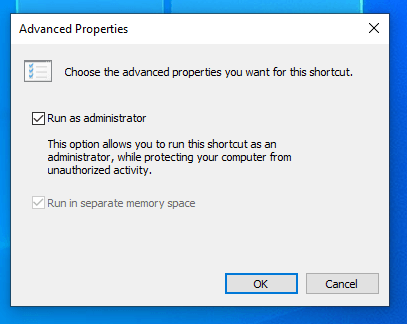
- On the following screen, put a checkmark in the Run as administrator box and click on OK.
From now on, whenever you double-click on the newly created shortcut, it’ll open the Notepad app with admin rights.
Launch Notepad With Admin Rights From Cortana Search
Cortana search also allows you to open an instance of Notepad with admin rights. You basically need to search for the app and then choose an option that launches it.
- Put your cursor in the Cortana search box and type in Notepad.
- When Notepad appears in the search results, right-click on it and select Run as administrator.
- Enter your administrator password and the app will open.
Use A Third-Party App To Access Notepad With Admin Rights
Since most users prefer using Notepad to edit system files, there’s now even an app that lets you run this text editor as admin each time you open it.
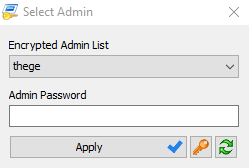
The app’s called RunAsTool and it lets you run any app on your computer as an administrator. It’s available for free to download and use.
- Download and launch RunAsTool on your PC. It’s portable so you don’t need to install it.
- You’ll be asked to select your admin account. Select it and then enter the password for the account. Then hit Apply to continue.
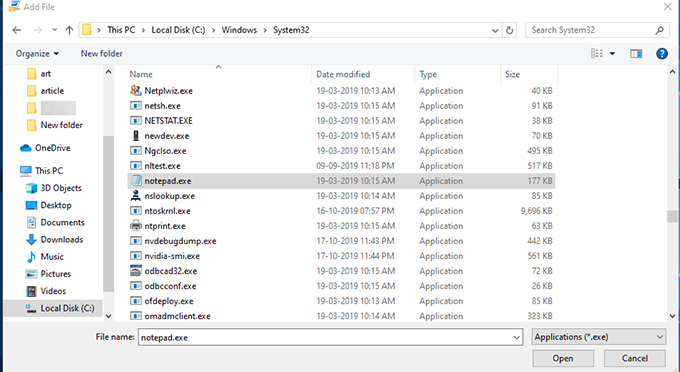
- Click on the File menu at the top and select Add File.
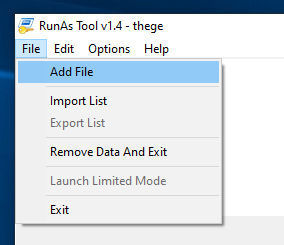
- Navigate to your Windows folder, head into System32, and double-click on Notepad.exe.
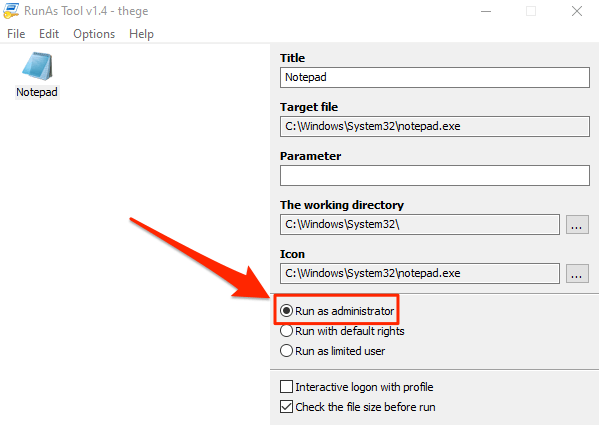
- Select Notepad in the app and ensure Run as administrator is enabled in the right-hand side pane.
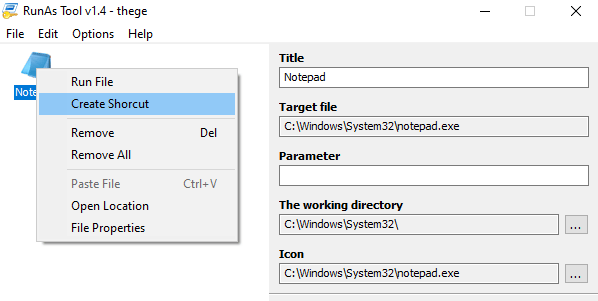
- Right-click on Notepad in the app and select Create Shortcut.
- Choose a location where you want to place the shortcut.
Double-clicking on this newly created shortcut will launch Notepad as admin on your PC. It won’t ask for an admin password but it will ask for UAC permissions.
Directly Open Files With Admin Rights In Notepad
If you’ve noticed, all of the methods above require you to first open Notepad to then edit your files. What if there was a way you could directly open the files you want to edit in Notepad with the admin rights? Well, there is.
Using Windows registry editor, you can add an option to your right-click menu that lets you open any of your files in Notepad with administrator privileges.
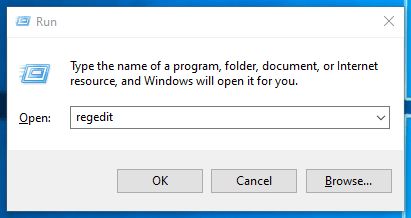
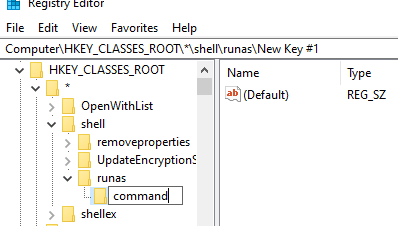
- Sign-in to an admin account on your PC. Press the Windows + R keys at the same time, type in regedit, and hit Enter. It’ll open registry editor.
- Access the following path in the editor.
HKEY_CLASSES_ROOT\*\shell
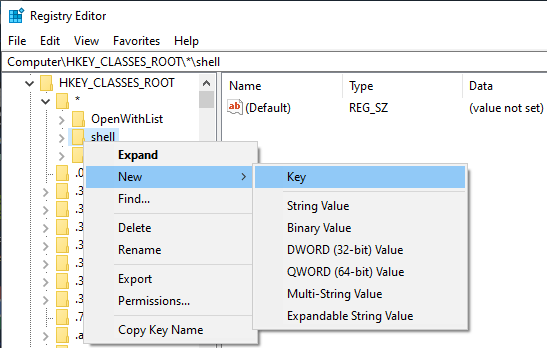
- Enter runas as the name of the key.
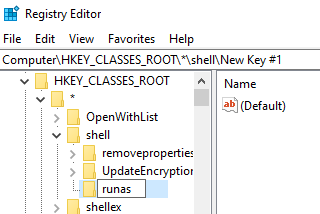
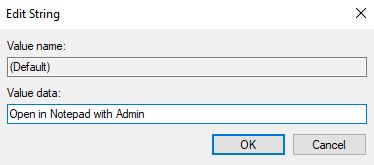
- Click on the newly created runas key and then double-click on Default in the right-hand side pane.
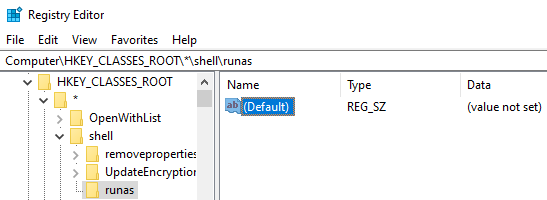
- Type Open in Notepad with Admin and press Enter.
- Create a new key under runas by right-clicking on runas and selecting New followed by Key. Name this key command.
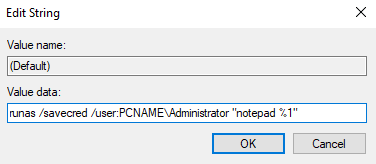
- Double-click on Default for the command key and enter in the following. Replace PCNAME with your computer’s name. Your PC name can be found in Control Panel > System.
runas /savecred /user:PCNAME\Administrator “notepad %1”
- Now right-click on any file you want to edit and select Open in Notepad with Admin.
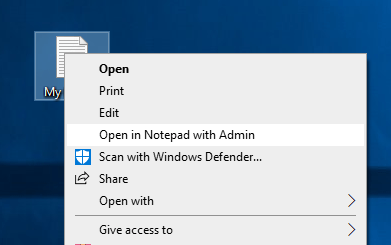
- You’ll be asked to enter your admin password.

It’s only a one-time password prompt and you won’t be asked to enter the password the next time you use the option.
Mahesh has been obsessed with technology since he got his first gadget a decade or so ago. Over the last few years, he’s written a number of tech articles on various online publications including but not limited to MakeTechEasier and Android AppStorm. Read Mahesh’s Full Bio
Разрешения на доступ к файлам File access permissions
Приложения UWP могут иметь доступ к определенным расположениям в файловой системе по умолчанию. Universal Windows Platform (UWP) apps can access certain file system locations by default. Приложения также могут получить доступ к дополнительным расположениям через средство выбора файлов или с помощью объявления возможностей. Apps can also access additional locations through the file picker, or by declaring capabilities.
Расположения, доступные всем приложениям Locations that all apps can access
Создавая новое приложение, вы по умолчанию получаете доступ к следующим расположениям в файловой системе: When you create a new app, you can access the following file system locations by default:
Папка установки приложения Application install directory
Папка, в которую устанавливается ваше приложение в системе пользователя. The folder where your app is installed on the user’s system.
Существуют два основных способа получения доступа к файлам и папкам в папке установки вашего приложения. There are two primary ways to access files and folders in your app’s install directory:
Так вы можете получить класс StorageFolder, соответствующий папке установки вашего приложения: You can retrieve a StorageFolder that represents your app’s install directory, like this:
Затем вы можете получить доступ к файлам и папкам каталога с помощью методов StorageFolder. You can then access files and folders in the directory using StorageFolder methods. В примере этот класс StorageFolder хранится в переменной installDirectory . In the example, this StorageFolder is stored in the installDirectory variable. Вы можете узнать больше о работе с пакетом приложения и папкой установки из примера сведений о пакете приложения на сайте GitHub. You can learn more about working with your app package and install directory from the App package information sample on GitHub.
Так вы можете загрузить файл непосредственно из каталога установки приложения с помощью URI приложения: You can retrieve a file directly from your app’s install directory by using an app URI, like this:
После завершения метод GetFileFromApplicationUriAsync возвращает класс StorageFile, который представляет файлу file.txt в папке установки приложения ( file в примере). When GetFileFromApplicationUriAsync completes, it returns a StorageFile that represents the file.txt file in the app’s install directory ( file in the example).
Префикс «ms-appx:///» в универсальном коде ресурса относится к папке установки приложения. The «ms-appx:///» prefix in the URI refers to the app’s install directory. Дополнительные сведения об использовании универсальных кодов ресурсов: Добавление ссылок на содержимое с помощью URI. You can learn more about using app URIs in How to use URIs to reference content.
Кроме того, доступ к файлам в каталоге установки приложения (в отличие от иных расположений) также можно получить, используя некоторые модели Win32 и COM для приложений универсальной платформы Windows (UWP) и функции стандартной библиотеки C/C++ из Microsoft Visual Studio. In addition, and unlike other locations, you can also access files in your app install directory by using some Win32 and COM for Universal Windows Platform (UWP) apps and some C/C++ Standard Library functions from Microsoft Visual Studio.
Папка установки приложения предназначена только для чтения. The app’s install directory is a read-only location. Невозможно получить доступ к папке установки с помощью средства выбора файлов. You can’t gain access to the install directory through the file picker.
Расположения данных приложения Application data locations
Папки, в которых ваше приложение может хранить данные. The folders where your app can store data. Эти папки (локальная, перемещаемая и временная) создаются при установке вашего приложения. These folders (local, roaming and temporary) are created when your app is installed.
Существуют два основных способа получения доступа к файлам и папкам из расположения данных вашего приложения. There are two primary ways to access files and folders from your app’s data locations:
Используйте свойства ApplicationData, чтобы получить папку данных приложения. Use ApplicationData properties to retrieve an app data folder.
Например, вы можете использовать ApplicationData.LocalFolder, чтобы получить класс StorageFolder, соответствующий локальной папке вашего приложения, следующим образом: For example, you can use ApplicationData.LocalFolder to retrieve a StorageFolder that represents your app’s local folder like this:
Если вы хотите получить доступ к перемещаемой или временной папке вашего приложения, вместо этого используйте свойство RoamingFolder или TemporaryFolder. If you want to access your app’s roaming or temporary folder, use the RoamingFolder or TemporaryFolder property instead.
Загрузив класс StorageFolder, соответствующий расположению данных приложения, вы получите доступ к файлам и папкам этого расположения с помощью методов StorageFolder. After you retrieve a StorageFolder that represents an app data location, you can access files and folders in that location by using StorageFolder methods. В примере эти объекты StorageFolder хранятся в переменной localFolder . In the example, these StorageFolder objects are stored in the localFolder variable. Больше об использовании расположений данных приложений можно узнать в рекомендации на странице Класс ApplicationData, а также скачав пример данных приложения с сайта GitHub. You can learn more about using app data locations from the guidance on the ApplicationData class page, and by downloading the Application data sample from GitHub.
Вы можете получить файл непосредственно из локальной папки своего приложения с помощью универсального кода ресурса (URI) приложения, как показано ниже. You can retrieve a file directly from your app’s local folder by using an app URI, like this:
После завершения метод GetFileFromApplicationUriAsync возвращает класс StorageFile, представляющий файл file.txt в локальной папке приложения ( file в примере). When GetFileFromApplicationUriAsync completes, it returns a StorageFile that represents the file.txt file in the app’s local folder ( file in the example).
Префикс «ms-appdata:///local/» в универсальном коде ресурса относится к локальной папке приложения. The «ms-appdata:///local/» prefix in the URI refers to the app’s local folder. Чтобы получить доступ к файлам в перемещаемой или временной папке приложения, используйте вместо этого «ms-appdata:///roaming/» или «ms-appdata:///temporary/». To access files in the app’s roaming or temporary folders use «ms-appdata:///roaming/» or «ms-appdata:///temporary/» instead. Дополнительные сведения об использовании универсальных кодов ресурсов приложения см. в разделе Загрузка файловых ресурсов. You can learn more about using app URIs in How to load file resources.
Кроме того, доступ к файлам в каталоге установки приложения (в отличие от иных расположений) также можно получить, используя некоторые модели Win32 и COM для приложений UWP и функции стандартной библиотеки C/C++ из Visual Studio. In addition, and unlike other locations, you can also access files in your app data locations by using some Win32 and COM for UWP apps and some C/C++ Standard Library functions from Visual Studio.
Невозможно получить доступ к локальной, перемещаемой и временной папкам с помощью средства выбора файлов. You can’t access the local, roaming, or temporary folders through the file picker.
Съемные устройства Removable devices
Кроме того, ваше приложение по умолчанию имеет доступ к некоторым файлам на подключенных устройствах. Additionally, your app can access some of the files on connected devices by default. Этот вариант подходит, если ваше приложение использует расширение «Автозапуск», чтобы запускаться автоматически при подключении к системе устройства, например камеры или USB-устройства флэш-памяти. This is an option if your app uses the AutoPlay extension to launch automatically when users connect a device, like a camera or USB thumb drive, to their system. Доступ вашего приложения к файлам ограничен определенными типами файлов, указанными с помощью объявлений сопоставлений типов файлов в манифесте приложения. The files your app can access are limited to specific file types that are specified via File Type Association declarations in your app manifest.
Конечно, вы также можете получить доступ к файлам и папкам на съемном устройстве, вызвав средство выбора файлов (с помощью FileOpenPicker и FolderPicker) и позволив пользователю выбирать файлы или папки, предоставляя приложению доступ к ним. Of course, you can also gain access to files and folders on a removable device by calling the file picker (using FileOpenPicker and FolderPicker) and letting the user pick files and folders for your app to access. Сведения об использовании средства выбора файлов см. в статье Открытие файлов и папок с помощью средства выбора. Learn how to use the file picker in Open files and folders with a picker.
Подробнее о доступе к SD-карте или другим съемным устройствам рассказывается в статье Доступ к SD-карте. For more info about accessing an SD card or other removable devices, see Access the SD card.
Расположения, доступные приложениям UWP Locations that UWP apps can access
Папка скачиваемых файлов пользователя User’s Downloads folder
Папка, в которой по умолчанию сохраняются скачиваемые файлы. The folder where downloaded files are saved by default.
По умолчанию ваше приложение имеет доступ к файлам и папкам только в папке скачиваемых файлов пользователя, созданной этим приложением. By default, your app can only access files and folders in the user’s Downloads folder that your app created. Однако вы можете получить доступ к файлам и папкам в папке скачиваемых файлов пользователя, вызвав средство выбора файлов (FileOpenPicker или FolderPicker), чтобы пользователь мог осуществлять навигацию и выбирать файлы или папки, предоставляя приложению доступ к ним. However, you can gain access to files and folders in the user’s Downloads folder by calling a file picker (FileOpenPicker or FolderPicker) so that users can navigate and pick files or folders for your app to access.
Вы можете создать файл в папке скачиваемых файлов пользователя следующим образом: You can create a file in the user’s Downloads folder like this:
DownloadsFolder.CreateFileAsync перегружен таким образом, чтобы вы могли указать системе алгоритм действий, если в папке скачиваемых файлов уже существует файл с таким же именем. DownloadsFolder.CreateFileAsync is overloaded so that you can specify what the system should do if there is already an existing file in the Downloads folder that has the same name. После завершения эти методы возвращают класс StorageFile, соответствующий созданному файлу. When these methods complete, they return a StorageFile that represents the file that was created. В примере этот файл назван newFile . This file is called newFile in the example.
Вы можете создать вложенную папку в папке скачиваемых файлов пользователя следующим образом: You can create a subfolder in the user’s Downloads folder like this:
DownloadsFolder.CreateFolderAsync перегружен таким образом, чтобы вы могли указать системе алгоритм действий, если в папке скачиваемых файлов уже существует вложенная папка с таким же именем. DownloadsFolder.CreateFolderAsync is overloaded so that you can specify what the system should do if there is already an existing subfolder in the Downloads folder that has the same name. После завершения эти методы возвращают класс StorageFolder, соответствующий созданной вложенной папке. When these methods complete, they return a StorageFolder that represents the subfolder that was created. В примере этот файл назван newFolder . This file is called newFolder in the example.
Доступ к дополнительным расположениям Accessing additional locations
Кроме расположений по умолчанию, приложение может получить доступ к дополнительным файлам и папкам с помощью объявления возможностей в манифесте приложения или с помощью вызова средства выбора файлов, что позволяет пользователю выбирать файлы и папки, предоставляя приложению доступ к ним. In addition to the default locations, an app can access additional files and folders by declaring capabilities in the app manifest or by calling a file picker to let the user pick files and folders for the app to access.
Приложения, объявляющие расширение AppExecutionAlias, имеют разрешения файловой системы, начиная с каталога, откуда они запускаются в окне консоли, и далее вниз по иерархии. Apps that declare the AppExecutionAlias extension have file-system permissions from the directory that they are launched from in the console window, and downwards.
Сохранение доступа к файлам и папкам Retaining access to files and folders
Когда приложение получает файл или папку с помощью средства выбора, активации файла, операции перетаскивания и т. д., доступ к этому файлу или папке сохраняется, только пока приложение работает. When your app retrieves a file or folder via a picker, a file activation, a drag-and-drop operation, etc. it only has access to that file or folder until the app is terminated. Если вы хотите автоматически получать доступ к файлу или папке в будущем, можно добавить эти элементы в FutureAccessList. If you would like to automatically access the file or folder in the future, you can add it to the FutureAccessList so that your app can readily access that item in the future. Можно также использовать MostRecentlyUsedList, чтобы управлять списком недавно использовавшихся файлов. You can also use the MostRecentlyUsedList to easily manage a list of recently-used files.
Возможности доступа к другим расположениям Capabilities for accessing other locations
В таблице ниже перечислены дополнительные расположения, к которым можно получить доступ, объявив возможности и используя связанные API Windows.Storage. The following table lists additional locations that you can access by declaring one or more capabilities and using the associated Windows.Storage API.
| Расположение Location | Функция Capability | API Windows.Storage Windows.Storage API |
|---|---|---|
| Все файлы, к которым у пользователя имеется доступ. All files that the user has access to. Например: документы, изображения, фотографии, скачанные файлы, рабочий стол, OneDrive и т. д. For example: documents, pictures, photos, downloads, desktop, OneDrive, etc. | broadFileSystemAccess broadFileSystemAccess Это ограниченная возможность. This is a restricted capability. Доступ настраивается в разделе Параметры > Конфиденциальность > Файловая система. Access is configurable in Settings > Privacy > File system. Так как пользователи могут предоставить или отменить разрешение в любой момент в разделе Параметры, следует убедиться, что приложение устойчиво к этим изменениям. Because users can grant or deny the permission any time in Settings, you should ensure that your app is resilient to those changes. Если вы обнаружили, что у приложения нет доступа, вы можете предложить пользователю изменить этот параметр, предоставив ссылку на статью Доступ к файловой системе и конфиденциальность в Windows 10. If you find that your app does not have access, you may choose to prompt the user to change the setting by providing a link to the Windows 10 file system access and privacy article. Обратите внимание на то, что пользователь должен закрыть приложение, изменить параметр и перезапустить приложение. Note that the user must close the app, toggle the setting, and restart the app. Если он изменит параметр во время работы приложения, платформа приостановит ваше приложение, чтобы можно было сохранить состояние, а затем принудительно завершит его, чтобы применить новый параметр. If they toggle the setting while the app is running, the platform will suspend your app so that you can save the state, then forcibly terminate the app in order to apply the new setting. В обновлении за апрель 2018 года по умолчанию это разрешение включено. In the April 2018 update, the default for the permission is On. В обновлении октябрь 2018 по умолчанию оно отключено. In the October 2018 update, the default is Off. Если приложение отправляется в Store, объявляющий эту возможность, потребуется дополнительно обосновать, зачем приложению нужна эта возможность и как планируется ее использовать. If you submit an app to the Store that declares this capability, you will need to supply additional descriptions of why your app needs this capability, and how it intends to use it. Эта возможность подходит для интерфейсов API в пространстве имен Windows.Storage. This capability works for APIs in the Windows.Storage namespace. В разделе Пример в конце этой статьи показано, как включить эту возможность в приложении. See the Example section at the end of this article for an example of how to enable this capability in your app. Примечание. Эта возможность не поддерживается в Xbox. Note: This capability is not supported on Xbox. | н/д n/a |
| Документы Documents | documentsLibrary documentsLibrary Примечание. Необходимо добавить сопоставления типов файлов в манифест приложения, в котором указаны конкретные типы файлов, доступные приложению в этом расположении. Note: You must add File Type Associations to your app manifest that declare specific file types that your app can access in this location. Используйте данную возможность, если ваше приложение: Use this capability if your app: | KnownFolders.DocumentsLibrary KnownFolders.DocumentsLibrary |
| Музыка Music | musicLibrary musicLibrary См. также статью Файлы и папки в библиотеках музыки, изображений и видео Also see Files and folders in the Music, Pictures, and Videos libraries. | KnownFolders.MusicLibrary KnownFolders.MusicLibrary |
| Изображения Pictures | picturesLibrary picturesLibrary См. также статью Файлы и папки в библиотеках музыки, изображений и видео Also see Files and folders in the Music, Pictures, and Videos libraries. | KnownFolders.PicturesLibrary KnownFolders.PicturesLibrary |
| Видео Videos | videosLibrary videosLibrary См. также статью Файлы и папки в библиотеках музыки, изображений и видео Also see Files and folders in the Music, Pictures, and Videos libraries. | KnownFolders.VideosLibrary KnownFolders.VideosLibrary |
| Съемные устройства Removable devices | removableStorage removableStorage Примечание. Необходимо добавить сопоставления типов файлов в манифест приложения, в котором указаны конкретные типы файлов, доступные приложению в этом расположении. Note You must add File Type Associations to your app manifest that declare specific file types that your app can access in this location. См. также статью Получение доступа к SD-карте Also see Access the SD card. | KnownFolders.RemovableDevices KnownFolders.RemovableDevices |
| Библиотеки домашней группы Homegroup libraries | Требуется по меньшей мере одна из следующих возможностей: At least one of the following capabilities is needed. — musicLibrary — musicLibrary — picturesLibrary — picturesLibrary — videosLibrary — videosLibrary | KnownFolders.HomeGroup KnownFolders.HomeGroup |
| Устройства сервера мультимедиа (DLNA) Media server devices (DLNA) | Требуется по меньшей мере одна из следующих возможностей: At least one of the following capabilities is needed. — musicLibrary — musicLibrary — picturesLibrary — picturesLibrary — videosLibrary — videosLibrary | KnownFolders.MediaServerDevices KnownFolders.MediaServerDevices |
| Папки UNC Universal Naming Convention (UNC) folders | Требуется комбинация следующих возможностей: A combination of the following capabilities is needed. Возможность домашней и рабочей сетей: The home and work networks capability: Добавьте по меньшей мере одну возможность общедоступных сетей и Интернета: And at least one internet and public networks capability: Если применимо, добавьте возможность учетных данных домена: And, if applicable, the domain credentials capability: Примечание. Необходимо добавить сопоставления типов файлов в манифест приложения, в котором указаны конкретные типы файлов, доступные приложению в этом расположении. Note: You must add File Type Associations to your app manifest that declare specific file types that your app can access in this location. | Получение папки с помощью: Retrieve a folder using: StorageFolder.GetFolderFromPathAsync StorageFolder.GetFolderFromPathAsync Получение файла с помощью: Retrieve a file using: |
Пример Example
В этом примере добавляется возможность с ограниченным доступом broadFileSystemAccess. This example adds the restricted broadFileSystemAccess capability. Нужно не только указать возможность, но и добавить пространство имен rescap , а также добавить его в IgnorableNamespaces . In addition to specifying the capability, the rescap namespace must be added, and is also added to IgnorableNamespaces .
Полный список возможностей приложения приведен в разделе Объявления возможностей приложения. For a complete list of app capabilities, see App capability declarations.


