- Adding OpenCV 4.1.2 to Visual Studio 2019 Project in Windows using Pre-built binaries
- Step 1: Download and extract the pre-built library
- Step 2: Add to path
- Step 3: Create a project in Visual Studio 2019
- Wait, what if I don’t see the “Console App” option in the previous step?
- Step 4: Check out demo code!
- Windows opencv visual studio
- Шаг 1. Загрузка и установка OpenCV
- Шаг 2. Настройка переменных среды
- Установка OpenCV 3 в Windows
- Как установить OpenCV в Windows
- Как создать проект Visual Studio с OpenCV
- Windows opencv visual studio
- OpenCV Download and Installation:
- Visual Studio Project Configuration:
- OpenCV Tutorial C++
- Install OpenCV with Visual Studio
- Finding the System Type of your Windows 7 Computer
- What you should download
- Installation
- Set up Environment Variables
- Configure Visual Studio Project
- Your First OpenCV HelloWorld Application
Adding OpenCV 4.1.2 to Visual Studio 2019 Project in Windows using Pre-built binaries

Jul 23, 2019 · 5 min read

Note: This uses an older version (4.1.2) of OpenCV. A newer version (4.2.0) with many new features has been released. Unless you have a very specific reason to stick to version 4.1.2, you should use the 4.2.0 version. Please refer to https://medium.com/@subwaymatch/adding-opencv-4-2-0-to-visual-studio-2019-project-in-windows-using-pre-built-binaries-93a851ed6141 for an updated tutorial on adding the newer version to Visual Studio 2019.
For some reason, the official documentation for OpenCV 4.1.2 has vastly outdated contents on setting up OpenCV for Visual Studio (for C++). So, let’s take a quick dive into how to setup OpenCV 4.1.2 on Visual Studio 2019.
- Windows 10 (64-bit)
- Visual Studio 2019

Step 1: Download and extract the pre-built library
Downlo a d the latest binary from opencv’s Github repository. The latest version as of October 17, 2019 is 4.1.2 (opencv-4.1.2-vc14_vc15.exe). Release files for 4.1.2 are listed at https://github.com/opencv/opencv/releases/tag/4.1.2.

Run the downloaded .exe file to extract the archive.
For the sake of uniformity, this tutorial will assume that you’ve extracted the contents to c:\ .


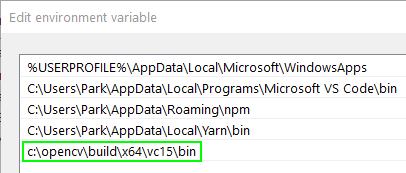
Step 2: Add to path
Add opencv’s bin directory to path.
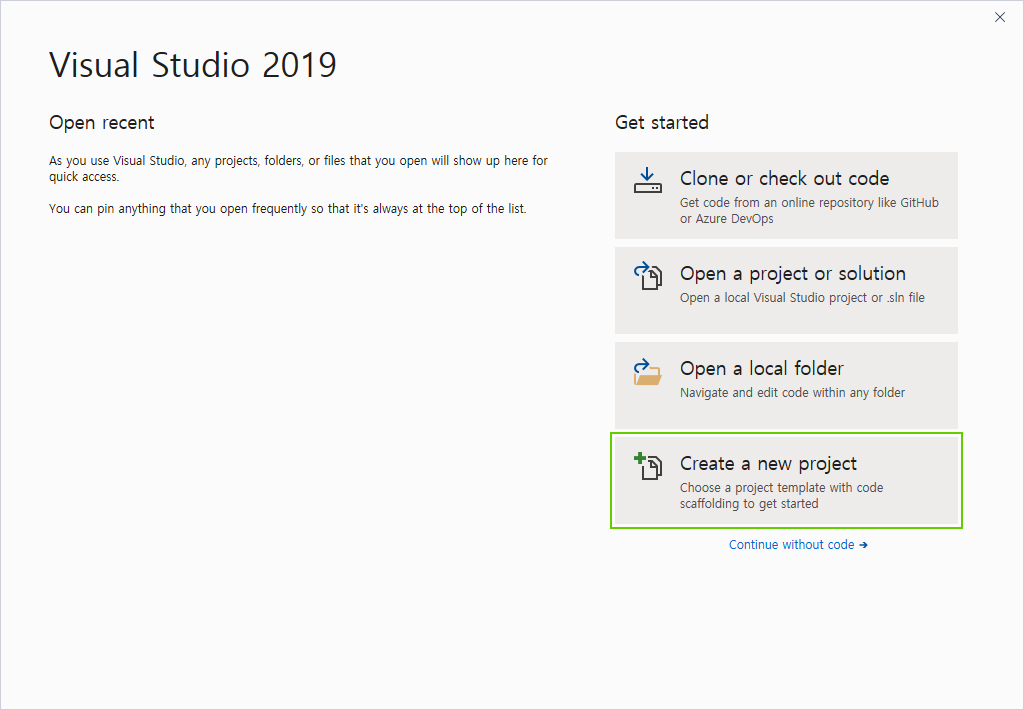
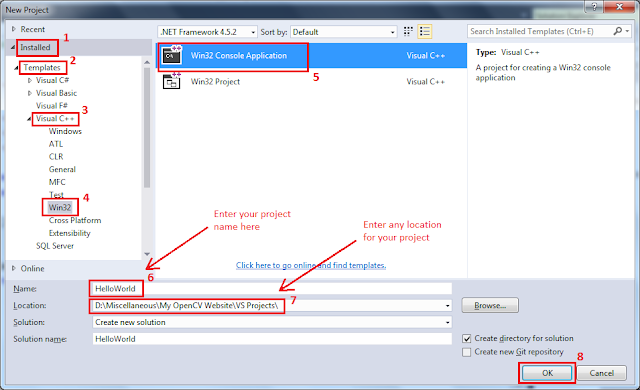
Step 3: Create a project in Visual Studio 2019
In this step, we’re creating a new project in Visual Studio 2019. Note that the settings we set below are only applied to the new project. If you create a new project, you’ll need to repeat the steps below.
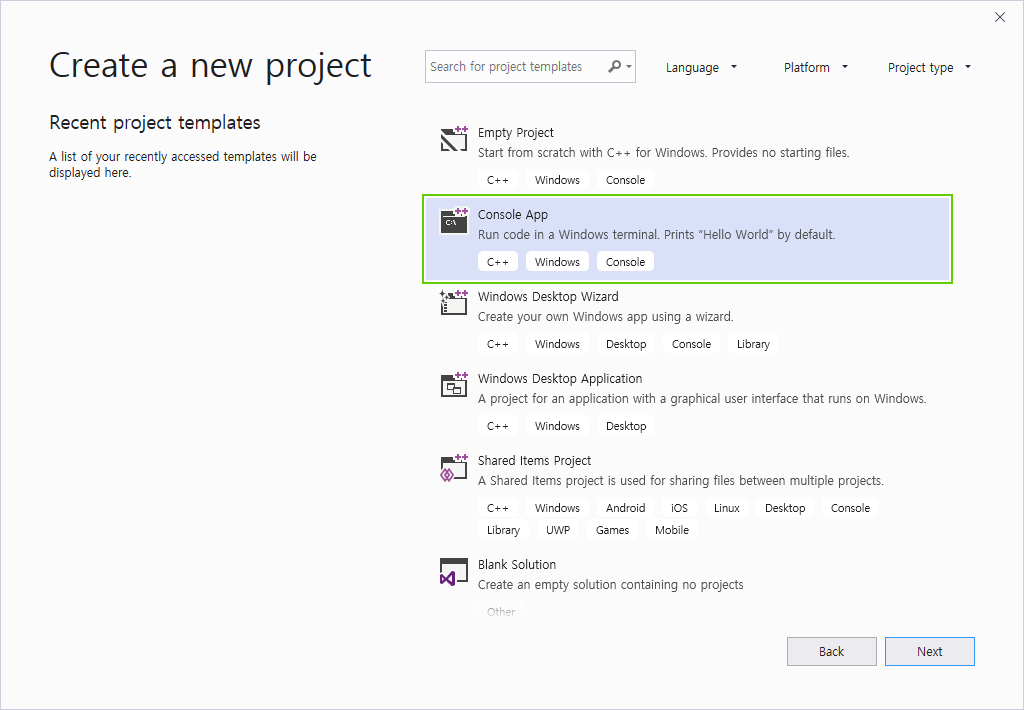
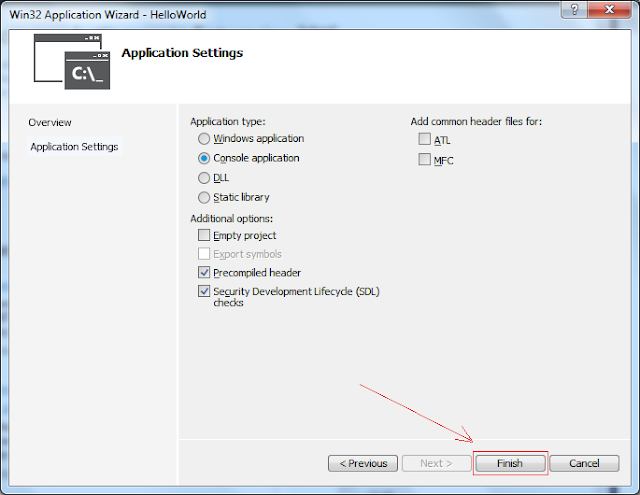
Wait, what if I don’t see the “Console App” option in the previous step?
If you don’t see the “Console App” option in “Create a new project” window, it’s because you haven’t installed the required components for C++ development.
Click on Install more tools and features, and install Desktop development with C++ workload module.


Configure your project and continue. You can name the project however you’d like.


Before we go any further, I want to outline the steps we’re taking and why we are performing each step.
- Set platform target to x64 — Pre-built binaries are built for x64 Windows platforms.
- Add to Include Directories —Tell the compiler how the OpenCV library looks. This is done by providing a path to the header files ( build/include ).¹
- Add to Library Directories — Tell the linker where it can find the lib files for different modules.
- Add Additional Dependencies — List .lib files for different modules. Note that we’re only going to list a single all-in-one file named opencv_world .
Let’s move on. First, set platform target to x64.

Now, go to Project → YourProjectName properties in menu.

Once new window opens up, go to VC++ Directories on the left and click on Include Directories row. Once you see the down arrow on the rightmost part of the row, click on the arrow, and select .

In Include Directories window, add c:\opencv\build\include .

Click OK. In the same tab, look for Library Directories. Again, click on the down arrow and select .


The VC++ Directories tab should look like below:

It’s time to list the module dependencies. As mentioned above, we are only going to add a single all-in-one module named opencv_world .


We now should be ready to write some OpenCV code and see it in action.
Step 4: Check out demo code!
Copy and paste the code below and press F5 to run (or click on the Run button with the label “Local Windows Debugger”.
Windows opencv visual studio
OpenCV (англ. Open Source Computer Vision Library, библиотека компьютерного зрения с открытым исходным кодом) — библиотека алгоритмов компьютерного зрения, обработки изображений и численных алгоритмов общего назначения с открытым кодом. Реализована на C/C++, также разрабатывается для Python, Java, Ruby, Matlab, Lua и других языков[2]. Может свободно использоваться в академических и коммерческих целях — распространяется в условиях лицензии BSD. [Википедия]
Рассмотрим подготовку и использование этой библиотеки в средах Visual Studio 2014 и 2015. К счастью, в новых сборках OpenCV поставляются уже собранные библиотеки, их и будем использовать.
Шаг 1. Загрузка и установка OpenCV
Первым делом необходимо скачать установочный файл OpenCV (Доступен на официальном сайте проекта: http://opencv.org/*). Нас интересует версия для Windows.
*Сейчас на главной странице версия 2.4.13, версия 3.1.0 доступна на странице opencv.org/downloads.html)

Шаг 2. Настройка переменных среды
Открываем: «Панель управления» -> «Система» -> «Дополнительные параметры системы» ->Дополнительно->»Переменные среды. «
Установка OpenCV 3 в Windows

Большинство мануалов в интернетах предлагают собрать opencv самостоятельно. Это процесс не быстрый да и требует некоторых умений.
Гораздо проще воспользоваться готовой сборкой библиотеки.
Обратите внимание, что так Вы не сможете использовать статическую библиотеку. В поставке для Windows таковые отсутствуют. Их можно только собрать самостоятельно.
Но какая нам разница. Мы будем пользоваться собранной DLL, которую не нужно собирать.
Как установить OpenCV в Windows
Сперва качаем «opencv for windows» с сайта opencv.org.
Запускаем архив (он в формате exe. самораспаковывающийся). Распаковываем в диск C.

Теперь идем в Мой компьютер — Свойства — Дополнительные параметры системы — Переменные среды
Создаем переменную OPENCV_DIR:

Теперь добавляем opencv в системный путь. Редактируем переменную PATH:

Как создать проект Visual Studio с OpenCV
Создаем новый проект — Win32 Console Application.

Жмем Finish, можно конечно понастраивать, но мы этого делать не будем.

Идем в настройки проекта — Project — Properties.
Переключаем в верхней части окна Platforms в положение All Platforms.
Выбираем в левом столбце C/C++ — General.
Добавляем путь к заголовкам opencv — Additional Include Directories.

Переходим в настройки компановщика — Linker — General.
Здесь указываем путь к файлам lib opencv.

Добавляем DLL opencv как зависимость.
Переходим в Linker — Input и добавляем в поле Additional Dependencies:
или debug версию

Теперь в каталог с исходными файлами кладем любимую картинку.
Для теста используем такую программу.
Эта программа в качестве параметра использует параметр командной строки — имя файла изображения.
Укажем его. Переходим в Project Properties — Debugging.
Указываем имя файла в строке Command Arguments.


Радуемся. Мы собрали наше первое 64 битное Windows приложение OpenCV в Visual Studio.
Windows opencv visual studio

OpenCV is the Real-Time Computer Vision library which provides various real-time computer vision, video capturing, image processing, and machine learning functionalities. Using OpenCV with Visual Studio you can build robust applications for object detection, image transformation, video capturing, and analysis with fast C++ computations. Follow the given steps and instructions for your OpenCV C++ Windows Setup:
OpenCV Download and Installation:
Follow the below steps to download and install OpenCV on your local machine:
Step 1: Go to https://opencv.org/releases/ and under the latest version (4.5.0) select the windows button. You will be directed to another link and the setup file will be downloaded.
Step 2: Open the downloaded file. A self-extracting zip will open. Before proceeding with installation go and create a folder named OpenCV inside your C:\ drive. Run the installer and extract the zip file to the created folder C:\opencv
Step 3: Now that you have successfully installed OpenCV. The next step is to add binaries to the system path. Open a command prompt with admin privileges and write the command: setx -m OPENCV_DIR C:\opencv\build\x64\vc15 This will add OPENCV_dir as a system variable.
Step 4: Open Environment Variables Settings. Go to Path and add %OPENCV_DIR%\bin
OpenCV Setup is done here. The next step is to go ahead with the Visual Studio Project Configurations.
Visual Studio Project Configuration:
Step 1: Start a new Visual Studio project, and choose the C++ Console App template.
Step 2: After the Project has been created change the Debug to x64 platforms since we are using the x64 version at C:\opencv\build\x64\vc15
Step 3: Inside the Project, tab Open the Properties.
Step 4: Inside Configuration properties select VC++ Directories. The next step is to edit the included directories and library directories to add the OpenCV include directories and library directories. First Select Include Directories then Click on edit. A new window Pops up. Click on Add a new line which is a yellow colored button and enter the path for OpenCV include directories C:\opencv\build\include
Similarly for Library Directories Select Library directories and repeat the above steps. The only change will be the Library Directories path for OpenCV directories i.e. C:\opencv\build\x64\vc15\lib
After this is done go to Linker/Input inside the Project Properties and edit the Additional Dependencies to include the OpenCV DLL opencv_world450d.lib inside our linker.
Apply all the changes made and close the properties. Your OpenCV setup is done. Now you are ready to build amazing apps using OpenCV in C++. You have to repeat all these property changes every time you start a new OpenCV project with Visual Studio 2019.
Try this demo code to check your installation works properly.
OpenCV Tutorial C++
Install OpenCV with Visual Studio
In this lesson, I will show you how to install OpenCV 3.3.1 with Visual Studio 2015 on Microsoft Windows 7. But it is almost same for other versions of OpenCV, Microsoft Visual Studio and Microsoft Windows.
If you want, you can refer to my older posts
- Installing & Configuring OpenCV 2.4.5 with Visual Studio 2012
- Installing & Configuring OpenCV 2.1 with Visual Studio 2010
There are 2 ways to install OpenCV into your computer. One way is to build the OpenCV from the latest source in the GitHub and use it. But for a beginner, the most suitable way is to use OpenCV pre-built libraries. Therefore I am going to discuss with you how to install and configure OpenCV pre-built libraries with your the most popular C++ IDE, Visual Studio.
Finding the System Type of your Windows 7 Computer
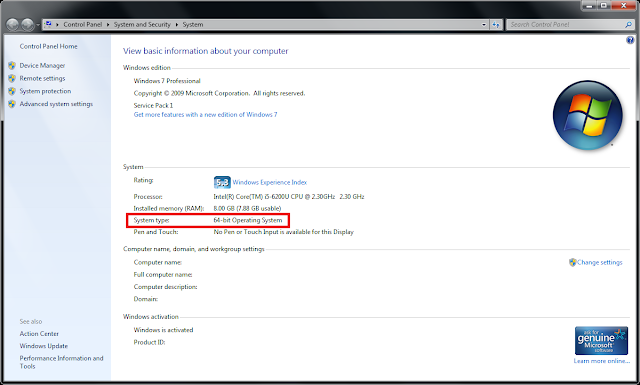 |
Here the system type is 64 bit operating system. So the system architecture is x64. If your system type is 32-bit operating system, please refer my old post Installing & Configuring OpenCV 2.4.5 with Visual Studio 2012.
What you should download
First of all, you should have to download Microsoft Visual Studio 2015, if it is not installed in your computer. I download Visual Studio Community 2015 which is a free, fully-featured Visual Studio edition for students, open-source and individual developers for their commercial and non-commercial development activities. (You will need to register by giving your email address to obtain the free product key).
Then you have to download the OpenCV pre-built, self-extracting executable on Microsoft Windows from SourceForge. You can choose whatever version, you want. But I choose OpenCV 3.3.1 which was the latest stable release when I wrote this tutorial.
Installation
First you have to Install Visual Studio 2015 if it is not installed in your computer. Because this step is straightforward, I’m not going to explain it here.
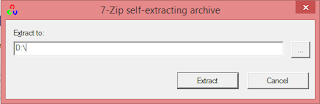
Then double click the downloaded opencv-3.3.1-vc14.exe file which was downloaded from SourceForge and OpenCV pre-built libraries will be extracted to whatever location, you give. I gave C:\ as the Extract To location in the popped up dialog box.
The default compiler type of the Microsoft Visual Studio 2015 is VC14. And the opencv-3.3.1-vc14.exe file also contains OpenCV libraries, built with VC14 compiler. Therefore if you are using the OpenCV 3.3.1 downloaded from SourceForge and Visual Studio 2015, you are good to go.
You can find supporting compiler types of the installed OpenCV pre-built libraries, if you go to C:\opencv\build\x64. In this particular OpenCV pre-built version, the only supporting compiler type is VC14.
If you want to use a newer version of Microsoft Visual Studio, you should change the compiler type of your Visual Studio project to VC14. Please refer this page on MSDN.
The next step is to set up environment variables correctly in your computer.
Set up Environment Variables
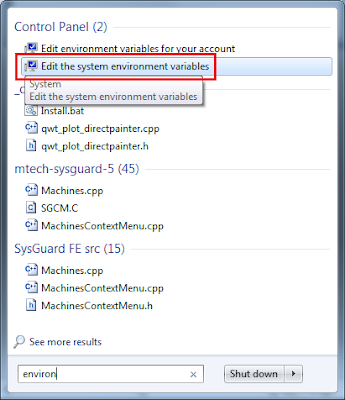
- Then click the ‘Edit the system environment variables’ link in the top of the search results as highlighted in the above image to open the ‘System Properties’ dialog box.
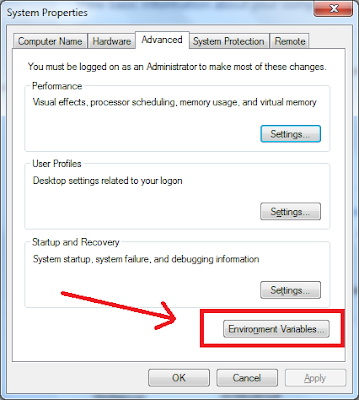
- In the ‘System Properties’ dialog box, click the ‘Environment Variables. ‘ button window as highlighted in the below image to open the ‘Environment Variables’ dialog box.
- Click ‘New’ button at the bottom of the Environment Variables window to create a new environment variable.
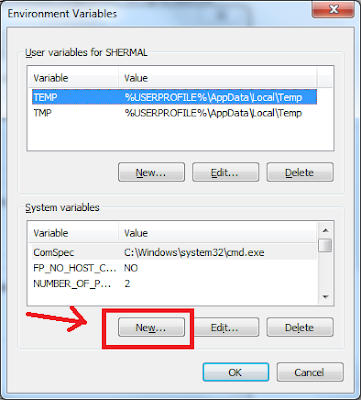
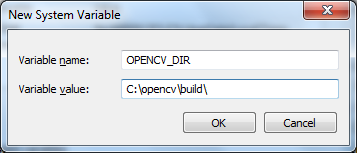
- Type OPENCV_DIR against Variable name field and type the location C:\opencv\build\ against the Variable value field in the popped up dialog box. Please note that I have installed OpenCV pre-built libraries into C: location. If you have used another location as the OpenCV installation location, the Variable value field should be updated accordingly. (e.g. OPENCV_DIR= \opencv\build\).
Hooray!! You have completed the installation of OpenCV. Next thing you have to do is to configure Visual Studio to use OpenCV pre-built libraries in your computer vision application.
Configure Visual Studio Project
- Click ‘Next’ button in the popped up ‘Win32 Application Wizard’ dialog box.
- Then click ‘Finish’ button in the next window as shown below.
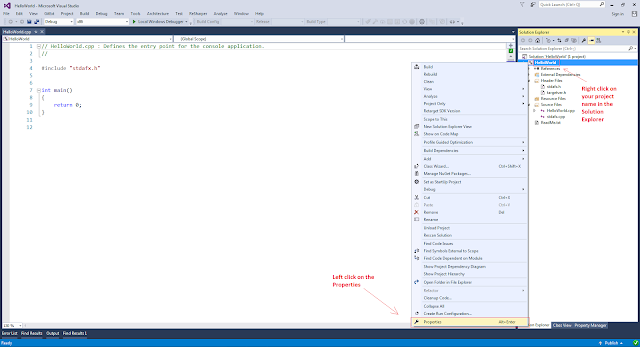
- Then right click on the project name (you have entered this name in a previous step) on the solution explorer and then click ‘Properties’ in the opened context menu to open the Property Pages window.
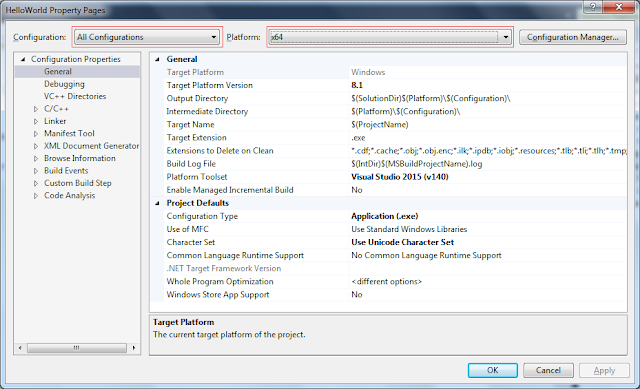
- In Property Pages window, choose ‘All Configurations’ as the configuration and ‘x64’ as the Platform as shown in the below image.
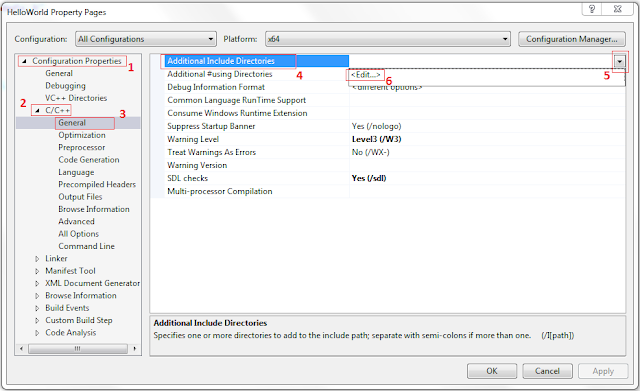
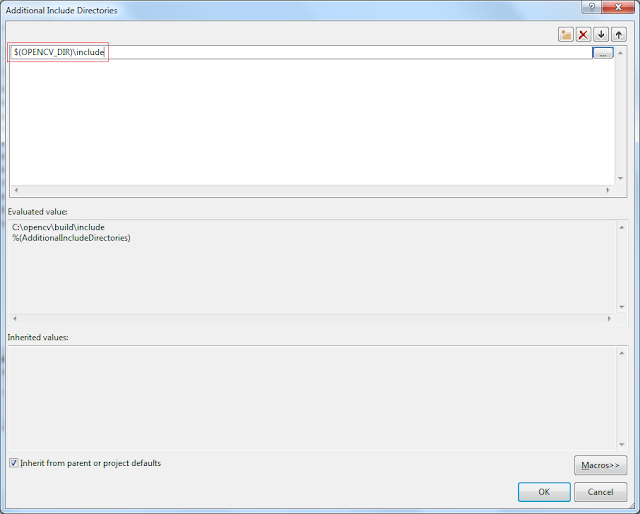
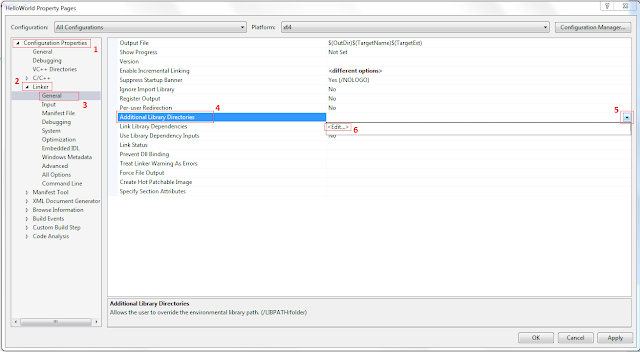
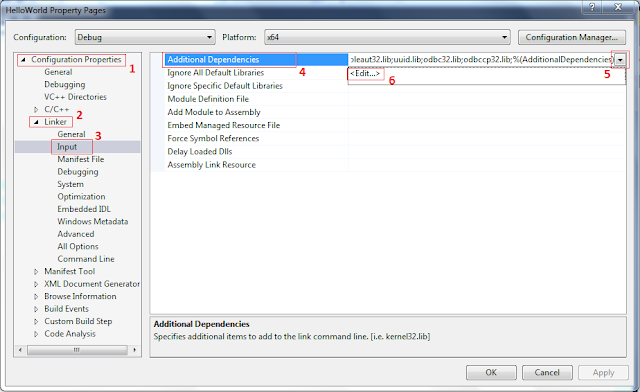
- Click the 6 places in the given order in the Property Pages window as shown in the below image. Then copy and paste $(OPENCV_DIR)\include in the opened dialog box and click OK.
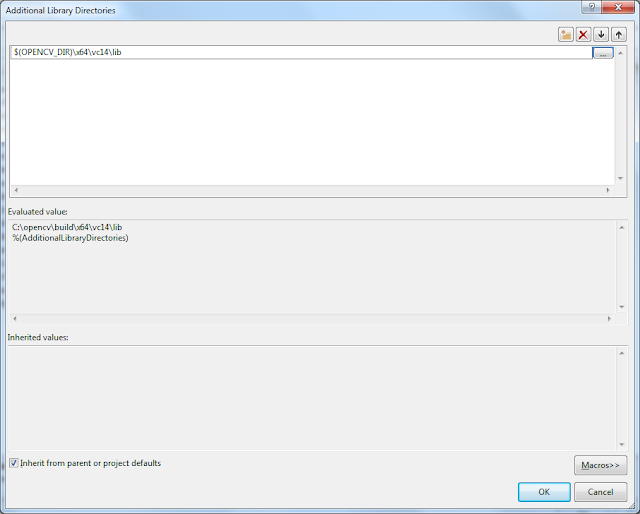
- Click the 6 places in the given order in the Property Pages window as shown in the below image. Then copy and paste $(OPENCV_DIR)\x64\vc14\lib in the opened dialog box and click OK.
- Click the 5 places in the given order in the Property Pages window as shown in the below image. Then copy and paste PATH=$(OPENCV_DIR)\x64\vc14\bin;%PATH% in the opened dialog box and click OK.


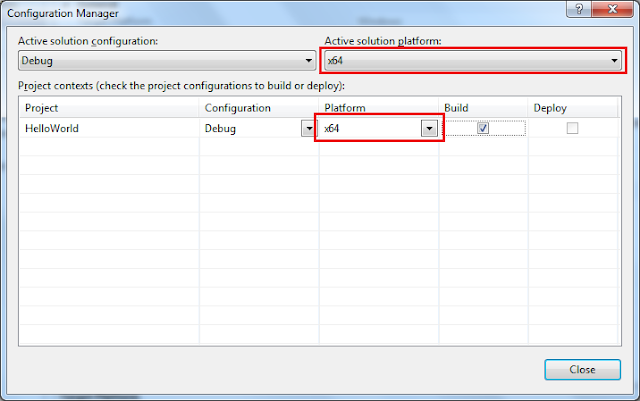
- Click the Configuration Manager in the top right corner of the Property Pages window to open the Configuration Manager dialog box.

- In the Configuration Manager dialog box, set the solution platform to x64 in both locations as highlighted in the below image. Then click Close button to close the Configuration Manager dialog box.
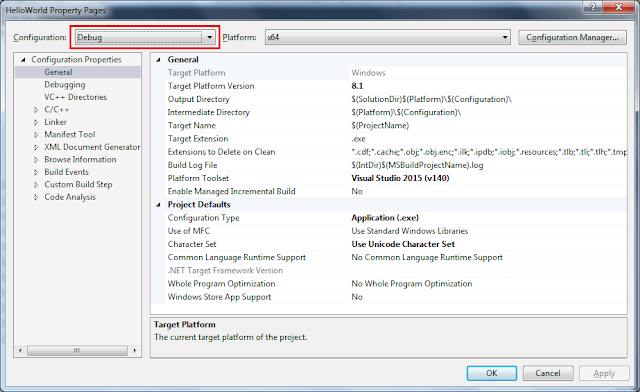
- Change the Configuration of the Property Pages window to ‘Debug’ as shown in the below image.
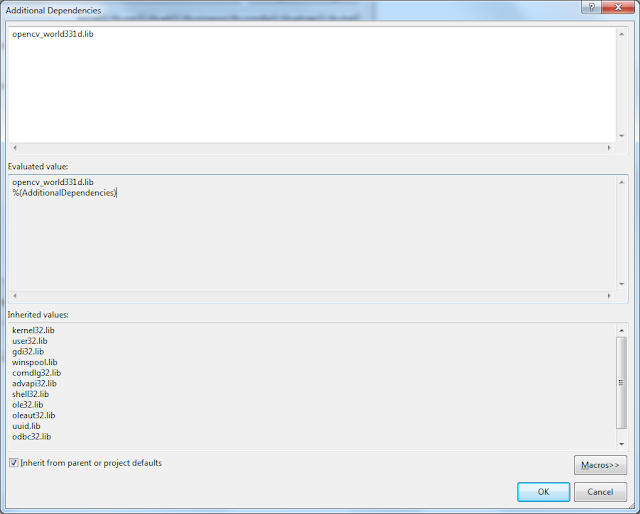
- Click the 6 places in the given order in the Property Pages window as shown in the below image. Then copy and paste the opencv_world331d.lib in the opened dialog box and click OK. Please verify that this filename can be found in the %OPENCV_DIR%\x64\vc14\lib location.
- Change the Configuration of the Property Pages window to ‘Release’ as shown in the below image.
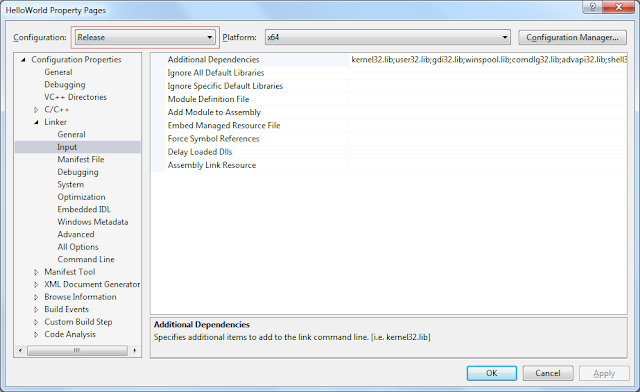
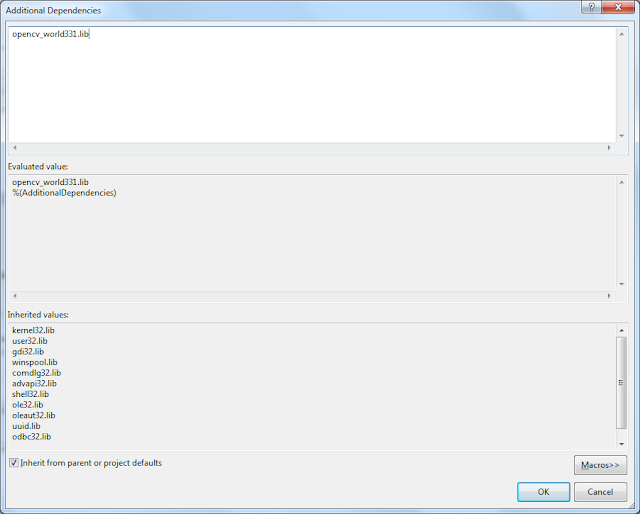
- Click the 6 places in the given order in the Property Pages window as shown in the below image. Then copy and paste the opencv_world331.lib in the opened dialog box and click OK. Please verify that this filename can be found in the %OPENCV_DIR%\x64\vc14\lib location.

- Click OK button in the bottom right corner of the Property Pages window to save all configurations you have done in previous steps.
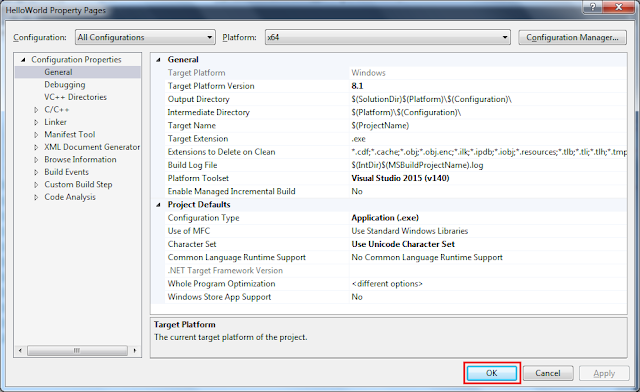
Congratulations!! You have done with all of the configurations of your visual studio IDE. Now you are ready to write your first HelloWorld OpenCV application.
Your First OpenCV HelloWorld Application
Copy and paste above simple code snippet into the text area of your visual studio project and run it. Please note that you have to replace «D:/My OpenCV Website/Eagle.jpg» in the code with a valid location to an image in your computer. Then you should see a output like the below image.
(If this is not working, try restarting the Visual Studio IDE)


