- Создание виртуального коммутатора для виртуальных машин Hyper-V Create a virtual switch for Hyper-V virtual machines
- Создание виртуального коммутатора с помощью диспетчера Hyper-V Create a virtual switch by using Hyper-V Manager
- Создание виртуального коммутатора с помощью Windows PowerShell Create a virtual switch by using Windows PowerShell
- Create a virtual switch for Hyper-V virtual machines
- Create a virtual switch by using Hyper-V Manager
- Create a virtual switch by using Windows PowerShell
Создание виртуального коммутатора для виртуальных машин Hyper-V Create a virtual switch for Hyper-V virtual machines
Область применения: Windows 10, Windows Server 2016, Microsoft Hyper-V Server 2016, Windows Server 2019, Microsoft Hyper-V Server 2019 Applies To: Windows 10, Windows Server 2016, Microsoft Hyper-V Server 2016, Windows Server 2019, Microsoft Hyper-V Server 2019
Виртуальный коммутатор позволяет виртуальным машинам, созданным на узлах Hyper-V, взаимодействовать с другими компьютерами. A virtual switch allows virtual machines created on Hyper-V hosts to communicate with other computers. Виртуальный коммутатор можно создать при первой установке роли Hyper-V в Windows Server. You can create a virtual switch when you first install the Hyper-V role on Windows Server. Чтобы создать дополнительные виртуальные коммутаторы, используйте диспетчер Hyper-V или Windows PowerShell. To create additional virtual switches, use Hyper-V Manager or Windows PowerShell. Дополнительные сведения о виртуальных коммутаторах см. в статье виртуальный коммутатор Hyper-V. To learn more about virtual switches, see Hyper-V Virtual Switch.
Сеть виртуальных машин может быть сложной темой. Virtual machine networking can be a complex subject. И существует несколько новых функций виртуального коммутатора, которые можно использовать, например, объединение внедренных коммутаторов (Set). And there are several new virtual switch features that you may want to use like Switch Embedded Teaming (SET). Но основная сеть довольно проста. But basic networking is fairly easy to do. В этом разделе описывается достаточно просто, чтобы можно было создавать сетевые виртуальные машины в Hyper-V. This topic covers just enough so that you can create networked virtual machines in Hyper-V. Чтобы узнать больше о том, как можно настроить сетевую инфраструктуру, ознакомьтесь с документацией по сети . To learn more about how you can set up your networking infrastructure, review the Networking documentation.
Создание виртуального коммутатора с помощью диспетчера Hyper-V Create a virtual switch by using Hyper-V Manager
Откройте диспетчер Hyper-V и выберите имя компьютера узла Hyper-V. Open Hyper-V Manager, select the Hyper-V host computer name.
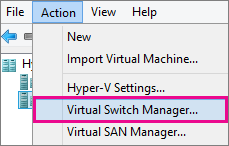
Выберите действие > Диспетчер виртуальных коммутаторов. Select Action > Virtual Switch Manager.
 диспетчера виртуальных коммутаторов» data-linktype=»relative-path»/>
Выберите тип нужного виртуального коммутатора. Choose the type of virtual switch you want.
| Тип подключения Connection type | Описание Description |
|---|---|
| External External | Предоставляет виртуальным машинам доступ к физической сети для взаимодействия с серверами и клиентами во внешней сети. Gives virtual machines access to a physical network to communicate with servers and clients on an external network. Позволяет виртуальным машинам на одном сервере Hyper-V взаимодействовать друг с другом. Allows virtual machines on the same Hyper-V server to communicate with each other. |
| Внутренние Internal | Разрешает обмен данными между виртуальными машинами на одном сервере Hyper-V, а также между виртуальными машинами и операционной системой узла управления. Allows communication between virtual machines on the same Hyper-V server, and between the virtual machines and the management host operating system. |
| Личные Private | Разрешает обмен данными только между виртуальными машинами на одном сервере Hyper-V. Only allows communication between virtual machines on the same Hyper-V server. Частная сеть изолирована от всего внешнего сетевого трафика на сервере Hyper-V. A private network is isolated from all external network traffic on the Hyper-V server. Этот тип сети полезен, если необходимо создать изолированную сетевую среду, например изолированный тестовый домен. This type of network is useful when you must create an isolated networking environment, like an isolated test domain. |
Выберите создать виртуальный коммутатор. Select Create Virtual Switch.
Добавьте имя для виртуального коммутатора. Add a name for the virtual switch.
Если выбран параметр внешний, выберите сетевой адаптер, который вы хотите использовать, и любые другие параметры, описанные в следующей таблице. If you select External, choose the network adapter (NIC) that you want to use and any other options described in the following table.

| Имя параметра Setting name | Описание: Description |
|---|---|
| Разрешить управляющей операционной системе предоставлять общий доступ к этому сетевому адаптеру Allow management operating system to share this network adapter | Выберите этот параметр, если вы хотите разрешить узлу Hyper-V совместно использовать виртуальный коммутатор и сетевую карту или группу сетевых адаптеров с виртуальной машиной. Select this option if you want to allow the Hyper-V host to share the use of the virtual switch and NIC or NIC team with the virtual machine. Если этот параметр включен, узел может использовать любые параметры, настроенные для виртуального коммутатора, такие как параметры качества обслуживания (QoS), параметры безопасности или другие функции виртуального коммутатора Hyper-V. With this enabled, the host can use any of the settings that you configure for the virtual switch like Quality of Service (QoS) settings, security settings, or other features of the Hyper-V virtual switch. |
| Включить виртуализацию SR-IOV Enable single-root I/O virtualization (SR-IOV) | Выберите этот параметр, только если вы хотите разрешить трафику виртуальной машины обходить коммутатор виртуальной машины и перейти непосредственно к физическому сетевому адаптеру. Select this option only if you want to allow virtual machine traffic to bypass the virtual machine switch and go directly to the physical NIC. Дополнительные сведения см. в статье Виртуализация ввода-вывода с единым корнем в справочнике по основам для плакатов: сети Hyper-V. For more information, see Single-Root I/O Virtualization in the Poster Companion Reference: Hyper-V Networking. |
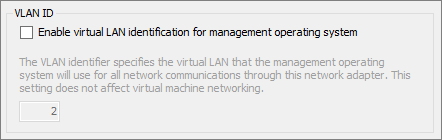
Если вы хотите изолировать сетевой трафик от операционной системы узла управления Hyper-V или других виртуальных машин, использующих один и тот же виртуальный коммутатор, выберите параметр включить идентификацию виртуальной локальной сети для операционной системы управления. If you want to isolate network traffic from the management Hyper-V host operating system or other virtual machines that share the same virtual switch, select Enable virtual LAN identification for management operating system. Можно изменить идентификатор виртуальной ЛС на любое число или оставить значение по умолчанию. You can change the VLAN ID to any number or leave the default. Это идентификационный номер виртуальной локальной сети, который будет использоваться операционной системой управления для всех сетевых подключений через этот виртуальный коммутатор. This is the virtual LAN identification number that the management operating system will use for all network communication through this virtual switch.

Нажмите кнопку OK. Click OK.
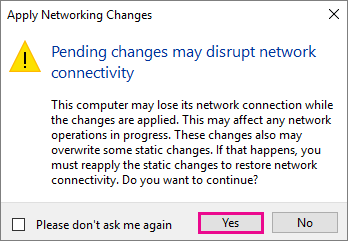
Нажмите кнопку Да. Click Yes.

Создание виртуального коммутатора с помощью Windows PowerShell Create a virtual switch by using Windows PowerShell
На рабочем столе Windows нажмите кнопку «Пуск» и введите любую часть имени Windows PowerShell. On the Windows desktop, click the Start button and type any part of the name Windows PowerShell.
Щелкните правой кнопкой мыши Windows PowerShell и выберите команду Запуск от имени администратора. Right-click Windows PowerShell and select Run as Administrator.
Найдите существующие сетевые адаптеры, выполнив командлет Get-NetAdapter . Find existing network adapters by running the Get-NetAdapter cmdlet. Запишите имя сетевого адаптера, который вы хотите использовать для виртуального коммутатора. Make a note of the network adapter name that you want to use for the virtual switch.
Создайте виртуальный коммутатор с помощью командлета New-VMSwitch . Create a virtual switch by using the New-VMSwitch cmdlet. Например, чтобы создать внешний виртуальный коммутатор с именем Екстерналсвитч, используя сетевой адаптер Ethernet и разрешить операционной системе управления включить общий доступ к этому сетевому адаптеру , выполните следующую команду. For example, to create an external virtual switch named ExternalSwitch, using the ethernet network adapter, and with Allow management operating system to share this network adapter turned on, run the following command.
Чтобы создать внутренний коммутатор, выполните следующую команду. To create an internal switch, run the following command.
Чтобы создать частный коммутатор, выполните следующую команду. To create an private switch, run the following command.
Дополнительные сценарии Windows PowerShell, посвященные усовершенствованным или новым функциям виртуального коммутатора в Windows Server 2016, см. в разделе Удаленный доступ к памяти и переключение на объединение внедренныхэлементов. For more advanced Windows PowerShell scripts that cover improved or new virtual switch features in Windows Server 2016, see Remote Direct Memory Access and Switch Embedded Teaming.
Create a virtual switch for Hyper-V virtual machines
Applies To: Windows 10, Windows Server 2016, Microsoft Hyper-V Server 2016, Windows Server 2019, Microsoft Hyper-V Server 2019
A virtual switch allows virtual machines created on Hyper-V hosts to communicate with other computers. You can create a virtual switch when you first install the Hyper-V role on Windows Server. To create additional virtual switches, use Hyper-V Manager or Windows PowerShell. To learn more about virtual switches, see Hyper-V Virtual Switch.
Virtual machine networking can be a complex subject. And there are several new virtual switch features that you may want to use like Switch Embedded Teaming (SET). But basic networking is fairly easy to do. This topic covers just enough so that you can create networked virtual machines in Hyper-V. To learn more about how you can set up your networking infrastructure, review the Networking documentation.
Create a virtual switch by using Hyper-V Manager
Open Hyper-V Manager, select the Hyper-V host computer name.
Select Action > Virtual Switch Manager.
 Virtual Switch Manager» data-linktype=»relative-path»/>
Choose the type of virtual switch you want.
| Connection type | Description |
|---|---|
| External | Gives virtual machines access to a physical network to communicate with servers and clients on an external network. Allows virtual machines on the same Hyper-V server to communicate with each other. |
| Internal | Allows communication between virtual machines on the same Hyper-V server, and between the virtual machines and the management host operating system. |
| Private | Only allows communication between virtual machines on the same Hyper-V server. A private network is isolated from all external network traffic on the Hyper-V server. This type of network is useful when you must create an isolated networking environment, like an isolated test domain. |
Select Create Virtual Switch.
Add a name for the virtual switch.
If you select External, choose the network adapter (NIC) that you want to use and any other options described in the following table.

| Setting name | Description |
|---|---|
| Allow management operating system to share this network adapter | Select this option if you want to allow the Hyper-V host to share the use of the virtual switch and NIC or NIC team with the virtual machine. With this enabled, the host can use any of the settings that you configure for the virtual switch like Quality of Service (QoS) settings, security settings, or other features of the Hyper-V virtual switch. |
| Enable single-root I/O virtualization (SR-IOV) | Select this option only if you want to allow virtual machine traffic to bypass the virtual machine switch and go directly to the physical NIC. For more information, see Single-Root I/O Virtualization in the Poster Companion Reference: Hyper-V Networking. |
If you want to isolate network traffic from the management Hyper-V host operating system or other virtual machines that share the same virtual switch, select Enable virtual LAN identification for management operating system. You can change the VLAN ID to any number or leave the default. This is the virtual LAN identification number that the management operating system will use for all network communication through this virtual switch.
Click OK.
Click Yes.
Create a virtual switch by using Windows PowerShell
On the Windows desktop, click the Start button and type any part of the name Windows PowerShell.
Right-click Windows PowerShell and select Run as Administrator.
Find existing network adapters by running the Get-NetAdapter cmdlet. Make a note of the network adapter name that you want to use for the virtual switch.
Create a virtual switch by using the New-VMSwitch cmdlet. For example, to create an external virtual switch named ExternalSwitch, using the ethernet network adapter, and with Allow management operating system to share this network adapter turned on, run the following command.
To create an internal switch, run the following command.
To create an private switch, run the following command.
For more advanced Windows PowerShell scripts that cover improved or new virtual switch features in Windows Server 2016, see Remote Direct Memory Access and Switch Embedded Teaming.


