- 8 Solutions to Fix The ‘Page Fault In Nonpaged Area’ Error in Windows 10
- How to fix Windows stop code page_fault_in_nonpaged_area error? Read the guide below and explore 8 ways to get the “’Page Fault in Nonpaged Area” error fixed on your Windows 10.
- Part 1: The Reasons for Windows PAGE FAULT IN NONPAGED AREA
- Part 2: How To Fix The ‘Page Fault In Nonpaged Area’ Error In Windows 10?
- Solution 1: Check Your Disk For Errors
- Solution 2: Run Windows Memory Diagnostic Tool
- Solution 3: Close Fast Startup
- Solution 4: Increase Virtual Memory
- Solution 5: Update Device Drivers
- Solution 6: Disable Automatically Manage Paging File Size for All Drives
- Solution 7: Repair System Files
- Solution 8: Reset this PC
- Part 3: How to recover unsaved or lost date due to page_fault_in_nonpaged_area error?
- The Bottom Line
- PAGE FAULT IN NONPAGED AREA Windows 10 — как исправить?
- Почему появляется окно с ошибкой PAGE FAULT IN NONPAGED AREA в Windows 10?
- Как избавиться от конфликтов в памяти?
- Удаление ненужных данных и ПО в Windows 10
- Прочие способы исправления ошибки «PAGE FAULT IN NONPAGED AREA»
8 Solutions to Fix The ‘Page Fault In Nonpaged Area’ Error in Windows 10
How to fix Windows stop code page_fault_in_nonpaged_area error? Read the guide below and explore 8 ways to get the “’Page Fault in Nonpaged Area” error fixed on your Windows 10.

David Darlington
Dec 21, 2020 • Filed to: Windows Computer Solutions • Proven solutions
Windows is a friendly OS out there for most of us. But, it has lots of BSOD (Blue Screen of Death) errors that can madden you. The Page Fault in Nonpaged Area is one of the most common BSOD errors you can encounter on your Windows 10 PC. When the error occurs, it will automatically halt your PC and turn the background of your system’s screen into blue, along with stop error codes. But, the good news is that there are several solutions to help you fix Windows 10 stop code page_fault_in_nonpaged_area error. So, continue reading to learn 8 ways to get the error fixed.
Part 1: The Reasons for Windows PAGE FAULT IN NONPAGED AREA
There could be several reasons to encounter this error on your Windows 10 PC:
- The Nonpaged area compromises crucial data for system operation. The error occurs when Windows PC can’t find the data that should be in the nonpaged area.
- Page Fault In Nonpaged Area error also occurs when the incorrect system service or the wrong driver code is installed on the PC.
- You can encounter the error if there are faulty hardware/hardware problems on the PC — RAM is corrupted or there is a corrupted sector on the hard drive.
- Corrupted NTFS and antivirus software can be the culprit.
Part 2: How To Fix The ‘Page Fault In Nonpaged Area’ Error In Windows 10?
After knowing the possible causes of the Windows stop code page_fault_in_nonpaged_area error, let’s now try the solutions to get the error fixed.
Solution 1: Check Your Disk For Errors
Sometimes, the Page Fault In Nonpaged Area can occur due to an error on your disk. In this case, the Windows Snap-in tool comes in handy to check the disk for errors. So, follow the below steps to learn how to do so:
Step 1: To commence that, enter «cmd» in the search box, then right-tap the «Command Prompt» and select «Run as administrator».
Step 2: Now, type the command: chkdsk C: /f /r (C is the letter of the disk where you store your OS) and hit Enter to continue.

Step 3: In a while, you can reboot your PC to see whether the error has been resolved.
Solution 2: Run Windows Memory Diagnostic Tool
To fix the Windows stop code page_fault_in_nonpaged_area error, you can also try running the Windows Memory Diagnostic tool. Below are the steps to help you learn how to use the Windows Memory Diagnostic Tool to fix the error:
Step 1: Enter «memory diagnostic» in the search bar and then tap on «Windows Memory Diagnostic» to continue with the process.

Step 2: Click on the «Restart now and check for problems (recommended)».

Step 3: Wait until the PC find the issues. Once the scan is complete, the system will show the detected problem on your screen.
If no problem is detected, then try out the following methods.
Solution 3: Close Fast Startup
Fast Startup reduces Windows startup time. However, this feature might cause numerous blue or black screen problems on your Windows PC. Therefore, turning off the Fast Startup feature can help you fix the startup problems, which include Page Fault In Nonpaged Area. You can try this method only when you can boot up your PC normally or you can boot into safe mode.
Below is the quick guide to boot into Safe Mode:
Step 1: Boot into «WinPE» via two consecutive failed attempts to start Windows/installed media.
Step 2: To boot into safe mode, go to «Troubleshoot»>» Advanced Options»>» Startup Settings». In a while, press the F5 to select the «Enable Safe Mode with Networking» option.

Now, you can turn off the Fast Startup feature by following the below steps:
Step 1: Tap the «Start» button and click the «Settings» icon.
Step 2: Select «System»>» Navigate to Power & Sleep». After then, tap «Additional Power Settings».

Step 3: Click «Choose what the power button does» at the upper left corner.
Step 4: Click «Change settings that are currently unavailable». After then, uncheck «Tap on fast startup» and click the «Save changes» button.

Solution 4: Increase Virtual Memory
To fix the Windows stop code page_fault_in_nonpaged_area error, you can try increasing the virtual memory. Below is how to increase virtual memory:
Step 1: First, you need to launch the setting window of the virtual memory.
- Open «File Explorer». Right-tap «This PC» and choose «Properties».
- Choose «Advanced System Settings». In the «Performance» box Under Advanced Page of System Properties, click «Settings».
- Go to the «Advanced» page in the pop-up «Performance Options» window and click «Change» in the Virtual Memory box.

Step 2: Turn off automatic paging file size management.
- Uncheck «Automatically manage paging file size for all drives».
- Choose partition C and check «No paging file» and then click «Set» to save it.
- Click «Yes».

Step 3: Set an appropriate virtual memory on a non-system partition.
- Choose a non-system partition and then check ‘Custom Size».
- Set the same value in «Initial Size» and «Maximum Size» to avoid the system frequently requesting page files of different sizes.
- Click «Set»>» Ok» to save.

Solution 5: Update Device Drivers
If drivers have compatibility issues, then you could encounter Windows page fault in Nonpaged error. To fix the error, you can try updating device drivers. Of course, this method is applicable when your PC can boot normally or you can boot into Safe Mode.
Below is the quick guide on how to update device drives:
Step 1: To commence the process, press the «Windows + X» keys and choose «Device Manager».
Step 2: Expand the right directory to locate the culprit driver. After then, you need to right-tap the driver and select «Update Driver».

Step 3: Choose «Search automatically for updated driver software» in the pop-up window.
Solution 6: Disable Automatically Manage Paging File Size for All Drives
If you have tried the solution 4, then you already know how to disable automatically manage paging file size for all drives. It could be the case that virtual memory is causing the error on your Windows PC. And disabling the automatically manage paging file size for all drives could help you fix the problem. To learn how to do so, follow Step 1 & Step 2 of Solution 4.
Solution 7: Repair System Files
It could be the cause that Windows stop code page_fault_in_nonpaged_area error is due to damaged system files. If yes, then you can use built-in utility tools such as SFC (System File Checker) or DISM (Deployment Image Servicing and Management» to repair system files.
Below is how to repair corrupted system files:
Step 1: Open the command prompt on your computer. To do so, enter «cmd» in the search box, then right-tap the «Command Prompt» and select «Run as administrator».
Step 2: If you can’t, then try boot into WinRE and then launch Command Prompt. After then, type the command: sfc /scannow to run SFC scan.

Step 3: If the SFC scan doesn’t work for you, then try the following the command to use the DISM tool:
- exe /Online /Cleanup-image /Scanhealth
- exe /Online /Cleanup-image /Restorehealth
This will restore system files.
Solution 8: Reset this PC
If none of the above methods help you fix the error, then it’s time to reset your PC.
Step 1: Open the «Settings» page on the computer and then, click «Update & Security».
Step 2: Click «Recovery» and then, click «Get Started».

Step 3: Select whether to «Keep my files» or «Remove Everything» while resetting the PC.

Step 4: Follow the instructions to continue.
Part 3: How to recover unsaved or lost date due to page_fault_in_nonpaged_area error?
Have you ended up losing some important files due to stop code page_fault_in_nonpaged_area on your Windows 10 PC? No worries!! With the help of Recoverit Data Recovery, getting back unsaved or lost data on the computer is easier and quicker. You can use this powerful data recovery software to rescue any type of file — photos, videos, documents, etc.
As soon as you realize you lost your important data, get Recoverit Data Recovery on your computer and then follow the below steps to recover the lost files in three steps:
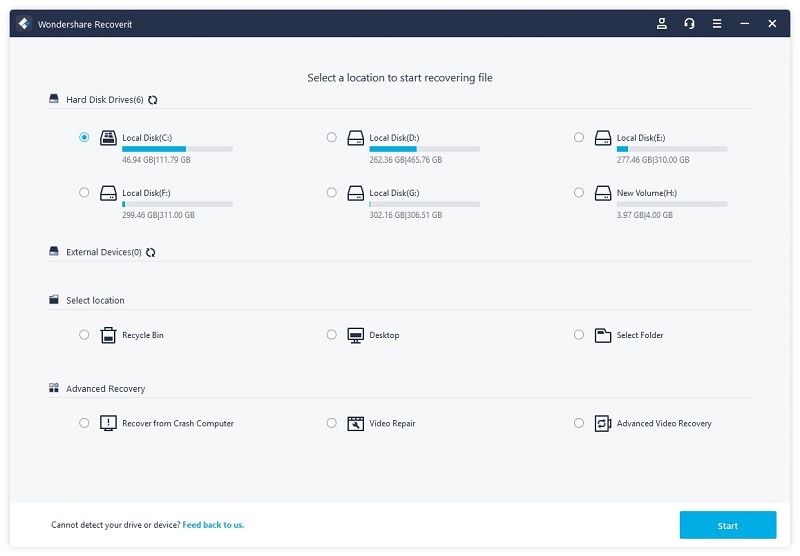
Step 1: Select a location
Open Recoverit Data Recovery on the computer and then select a target location that you want to scan for the lost data. Then, hit the «Start» button to continue.
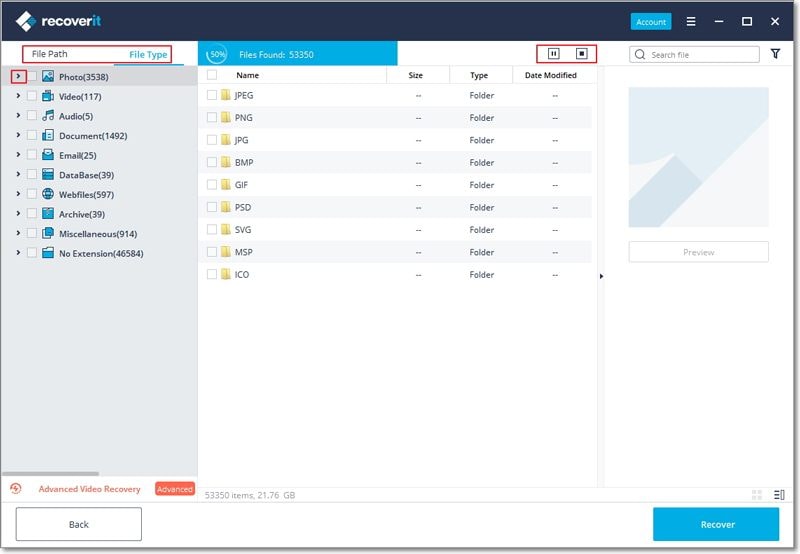
Step 2: Scan the location
Now, the software will initiate an all-round scan to scan the selected location for the missing, deleted, or unsaved files on the computer.
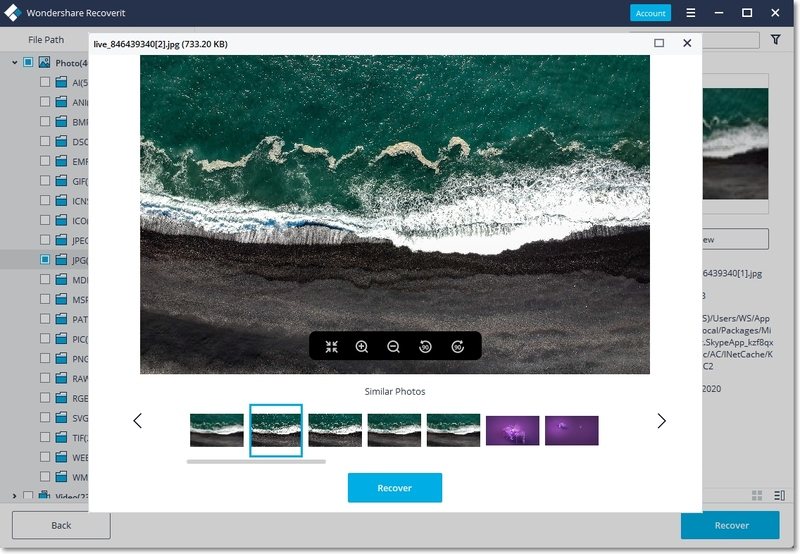
Step 3: Preview and recover data
After the scan completes, you can preview the recoverable files. Then, select the target files you want to recover and hit on the «Recover» button to get them back. And finally, you just need to select the location where you want to save the recovered data.
The Bottom Line
So, you now know how to fix Windows stop code page_fault_in_nonpaged_area error. As you can see that there are several solutions to help you fix the error, so no need to panic if you encounter the error. Just try the above methods one by one until the error is resolved. Of course, don’t forget to use Recoverit Data Recovery to rescue your lost or unsaved data with ease.
PAGE FAULT IN NONPAGED AREA Windows 10 — как исправить?
Пока наш компьютер работает исправно, никто и не думает о мерах безопасности. Или может попросту о них не знать. Это часто приводит к тому что, когда случаются критические сбои, предпринимать что-то уже поздно. Темой сегодняшней статьи будет PAGE FAULT IN NONPAGED AREA Windows 10. Как исправить её и что делать, прочитайте далее. Когда вам удастся решить данную проблему, ознакомьтесь подробно с точками восстановления и сделайте их в своем компьютере. Они очень пригодятся вам в будущем.
Почему появляется окно с ошибкой PAGE FAULT IN NONPAGED AREA в Windows 10?
Когда появляется этот сбой на экране, это может означать, что драйвер какого-либо устройства компьютера пытается вызвать блок памяти, которого нет. Возможно, она была когда-то, но позже, в результате дефрагментации или перезаписи исчезла. Некоторые программы, а вернее их процессы, могут блокировать антивирусные системы вашего компьютера. Такое может случиться даже из-за сбойных процессов самого антивируса.
Нередко ошибки возникают из-за неполадок в файловой системе. В Windows она далеко не безупречна. Но, к счастью, в ней есть несколько инструментов для их исправления. Поэтому мы далее рассмотрим утилиты в действии. Вирусная активность — это тоже распространенная причина экранов смерти (BSOD) и других ошибок в Windows. Очень важно исследовать окно, которое сообщает вам о неприятности. В дополнительных данных текста сообщения о неполадке могут быть указаны её действительные истоки. Здесь можно прочитать название устройства, которое барахлит.
Как избавиться от конфликтов в памяти?
Если свой ПК вы включить не можете из-за ошибки PAGE FAULT IN NONPAGED AREA в Виндовс, у вас есть возможность запустить систему в безопасном режиме. Его запустить не трудно. Но этот процесс отличается от других версий ОС.
- Если ваша система не загружается, продолжайте попытки, перезагружая компьютер. Со второй или третьей попытки должен открыться режим RE.
- После очередной перезагрузки теперь уже самой системой вы попадете в меню, где нужно нажать на «Диагностика».
- Далее в еще одном экране укажите «Дополнительные параметры» и затем нажмите «Параметры загрузки».
- Перед собой вы увидите несколько вариантов.
Выберите строчку «С поддержкой сетевых драйверов», так как нам необходимо будет найти драйвера по сети. Не зависимо от того, как проявляется ошибка — на синем экране или в сообщении на рабочем столе, её нужно внимательно изучить. Если вы нашли проблемное оборудование в тексте ошибки, переходим в диспетчер устройств (ДУ).
 Выбираем в параметрах загрузки нужный нам пункт
- Диспетчер можно запустить разными способами. Особенно в десятой версии. Самым быстрым является — щелчок правой кнопкой мыши по пиктограмме «Пуск». Укажите нужный пункт. Или WIN+PAUSE и слева нажмите «Диспетчер устройств».
- Находим нужное оборудование в списке. Вы его сразу сможете определить, так как здесь будет значок с восклицательным знаком.
- Его нужно также выбрать правой кнопкой мыши и нажать на появившемся окне пункт «Обновить драйверы».
- В следующем окне необходимо указать первые вариант. И дождаться завершения процесса.
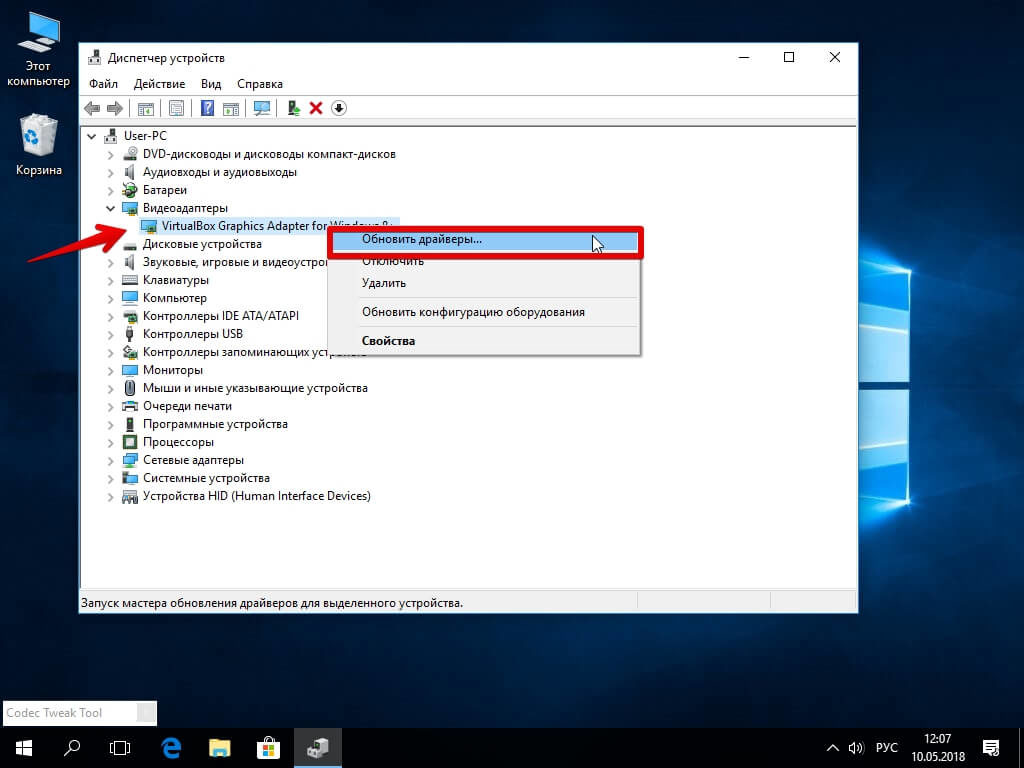 Обновление необходимого драйвера в диспетчере устройств
Когда необходимое ПО будет установлено, компьютер снова заработает без сбоев. И вы сможете воспользоваться любимыми программами или играми. Если устройство или программа являются не важными для работы системы, вы можете их удалить или выключить. Выключение оборудования выполняется в том же ДУ. Также испробуйте при загрузке в окне выбора режимов пункт без проверки цифровой подписи ПО. Если у вас получиться избавиться от error-окна, то необходимо искать сбойный драйвер.
Удаление ненужных данных и ПО в Windows 10
Если после применения всех указаний выше вам не удалось решить системный конфликт в последней Windows 10 PAGE FAULT IN NONPAGED AREA, не нужно отчаиваться. Нам это точно удастся с помощью следующих способов. Вспомните, возможно, это явление впервые возникло после того, как вы установили свою новую игру. Или это произошло после того, как система установила свои обновления, что довольно часто происходит в последнее время.
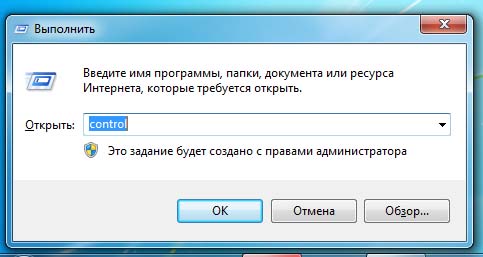 Вызов окна панели управления
- После того, как вы вспомнили, их нужно удалить. Нажмите WIN+R и пропишите текст на английском «control».
- Убедитесь, что вверху, в строке «Просмотр» установлено «Категории» (иначе исправьте) и обратите внимание на «Удаление программ».
- Отыщите в перечне последнее приложение, которое было инсталлировано, укажите на него курсором и вверху выберите пункт «Удалить».
- Не уходите с этого окна. Найдите слева его дополнительные параметры. Выберите среди них «Просмотр установленных обновлений».
- Удалите последнее в списке. Последнее можно определить по дате установки.
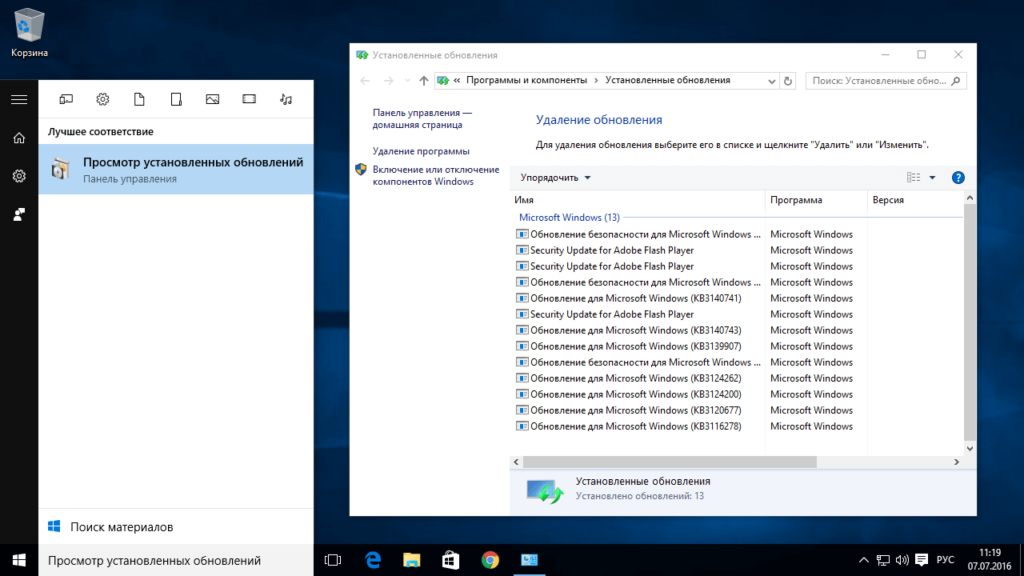 Удаляем последнее установленное обновление
После удаления программ нужно избавиться в компьютере от ненужных файлов и данных программ. Для этого нам нужно открыть проводник (WIN+E).
- Выбираем для начала системный том (локальный диск) правой кнопкой мыши.
- Жмем «Свойства»;
- Найдите в окне кнопку «Очистить диск» и нажмите её.
- Когда система оценит все вспомогательные файлы, разместите галочки по всем пунктам и подтвердите удаление.
Проделайте эту процедуру со всеми дисками на вашем компьютере. Некоторые временные и другие вспомогательные файлы могут нарушать работу системы. Нужно еще сделать кое-что. А именно — запустить диспетчер задач. Для этого можно также выбрать значок Windows внизу рабочего стола правой кнопкой мыши и нажать нужный пункт. Если список не полный, выберите «Подробнее».
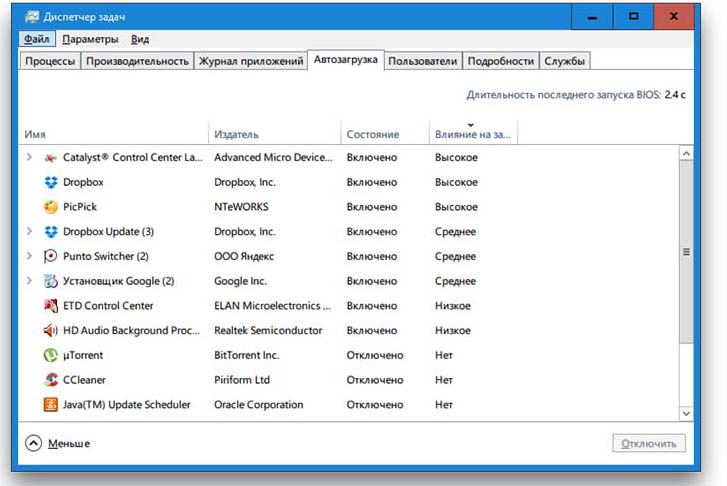 Отключаем всё лишнее в автозагрузке
Откройте вкладку «Автозагрузки». В этом окне отображаются все программы и утилиты, которые начинают работать вместе с запуском системы. Оставьте в нём самые необходимые — защитное ПО и подобные. Отключите всякие uTorrent, Steam, CCleaner. Чтобы это сделать, необходимо курсором выделить из списка один вариант и кликнуть на пункте в нижней части «Отключить». Перезагрузите ПК.
Прочие способы исправления ошибки «PAGE FAULT IN NONPAGED AREA»
На ПК с материнскими платами под названием Gigabyte вместе с драйвером пользователи устанавливают вспомогательный программный продукт On/Off Charge. По утверждениям разработчиков, это ПО не способно работать под управлением последней версии ОС. Поэтому из-за неё могут быть неполадки и конфликты внутри системы. Необходимо снова вернуться в окно удаления и найти её, если это ваш случай.
Окно «PAGE FAULT IN NONPAGED AREA» в ОС Windows 10 отображается из-за проблем с модулями вашей машины. Проверьте ваш HD на сбои. Для этой процедуры есть также системные инструменты. Запустите окно cmd.
- Это можно сделать, нажав WIN+R. Введите в окно «cmd» и нажмите клавишу Ввода.
- Запишите в черном окошке «chkdsk /f /r». Необходимости писать без кавычек.
- Подтвердите команду и подождите результатов. Компьютер выключать при выполнении команд строки не рекомендуется.
Если с диском будут какие-либо неисправности, попробуйте обратиться на тематические форумы и описать свою проблему. Есть множество утилит, которые способны вылечить его. Но иногда это сделать уже не удается. В этом случае вам нужно будет приобрести новый жесткий диск. В системном блоке проверьте все кабеля на нарушения. Крышку «системника» снять очень просто. Во многих случаях она крепится винтами, которые откручиваются вручную. Без отвертки. Проверять оборудование нужно в обесточенном устройстве. Отсоедините все модули компьютера, прочистить контакты, поставить на место и снова включите. Теперь проверьте, отображается ли окно с оповещением.


