- How to Change Pagefile Size and Location in Windows
- What is Pagefile
- Change Pagefile Size
- Change Pagefile Location
- How to change the pagefile.sys file in Windows 10
- What is pagefile.sys and how do we use it?
- 1.Changing the size of pagefile.sys
- 2. Move pagefile.sys to a different drive
- How To Optimize The Paging File In Windows
- What Is a “Paging File” Anyway?
- OK, But Why Optimize The Paging File?
- General Tips To Improve Paging Performance
- How To Optimize Your Paging File In Windows 10
- How To Optimize Your Paging File In Older Versions Of Windows
- Paging Dr. Performance
How to Change Pagefile Size and Location in Windows

Every now and then, you will see a suggestion in the Internet telling you to change the location and/or the size of the pagefile file in your Windows PC. Changing pagefile isn’t anything hard, but it is buried deep inside Windows settings as to avoid any unwanted changes. Let’s check out the way to change the location and size of pagefile in Windows.
Note: Even though it is easy to change pagefile settings, it is not recommended that you change these settings unless you know what you are doing. Any misconfiguration may result in your system not working as it should. Also, this procedure is the same for all the Windows versions.
What is Pagefile
Pagefile is like a virtual memory in your Windows PC. Whenever Windows runs low on the physically installed memory (RAM), it creates a hidden file named “pagefile.sys” and dumps all the least-used memory bits into that file. That way, Windows can clear up the physical RAM for any excess work.
Change Pagefile Size
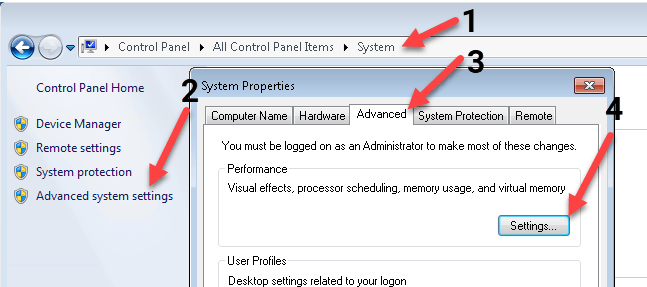
1. To change pagefile size, we need to access Windows Advanced System Settings. To do that, press the Windows start button, search for “System” and then click on the “System” item displayed under the Control Panel in the results. If you are using Windows 8, press “Win + X” and then select “System” from the power user menu.

2. In this screen, click on the link “Advanced System Settings” displayed in the left pane. This will open the Advanced System Properties window.

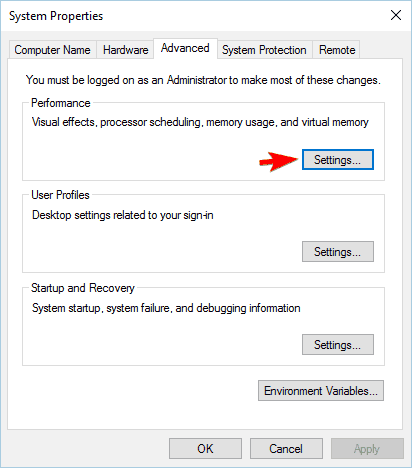
3. Click on the “Settings” button under the Performance section. This action will open the Performance Options window.

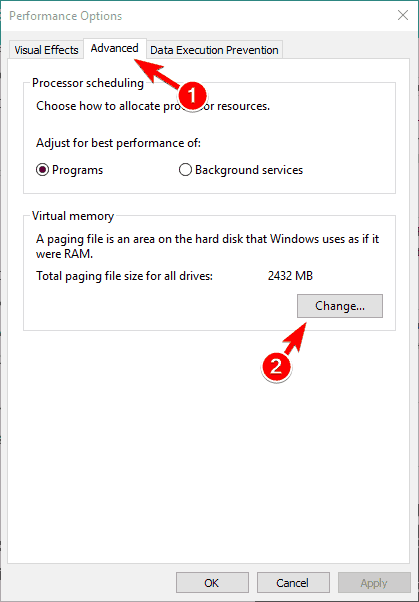
4. Navigate to the “Advanced” tab and click on the “Change” button under Virtual Memory.

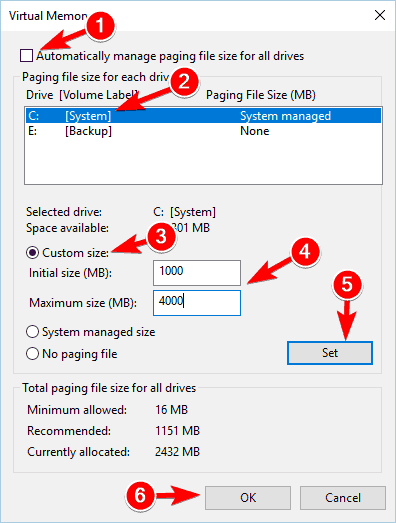
5. The above action will open the “Virtual Memory” window. Here uncheck the check box “Automatically manage paging file size for all drives,” select the paging file drive and again select the radio button “custom size.” Enter the initial size and maximum size for your pagefile and click on the “Ok” button to save the changes.

That’s all there is to do. Once you are done, close all the windows and restart your system to apply the changes.
Change Pagefile Location
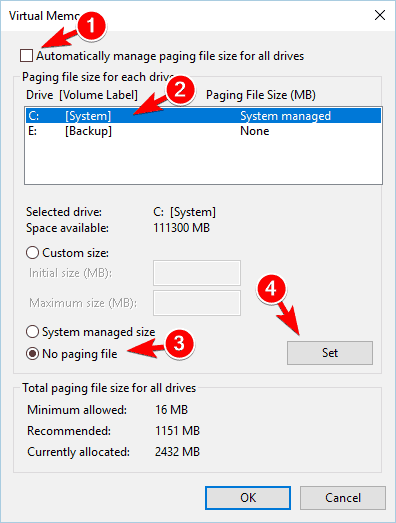
To change the pagefile location, first follow the steps 1 through 4 above. Here in this window, uncheck the check box “Automatically manage paging file size for all drives.” Now select the default paging file drive, select the radio button “No Paging File” and click on the “Set” button. This action will effectively disable the paging file feature.

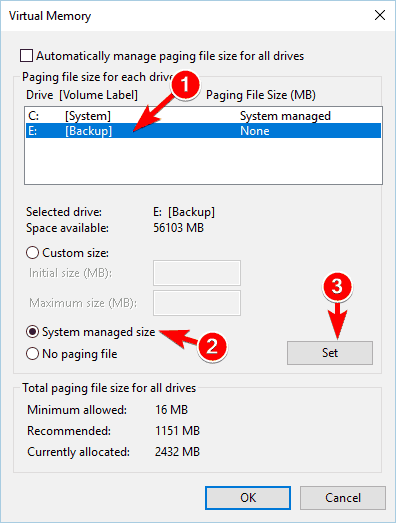
Select the drive where you want to store the paging file, select the radio button “System managed size” and click on the button “Set” to apply the changes. Once you are done, click on the “Ok” button and close all the windows.

That’s all there is to do. Just restart your system and you have successfully changed the paging file location in Windows.

In fact, if you head over to the drive you just selected, you will see the paging file with the name “Pagefile.sys.” Make sure that you have changed the Folder Options to show the protected operating system files.

Changing paging file settings is fairly easy in Windows, and it is particularly helpful when you are using SSD. That being said, only change the paging file settings if you are hundred percent sure.
Hopefully that helps, and do comment below with any suggestions and thoughts.
Vamsi is a tech and WordPress geek who enjoys writing how-to guides and messing with his computer and software in general. When not writing for MTE, he writes for he shares tips, tricks, and lifehacks on his own blog Stugon.
How to change the pagefile.sys file in Windows 10

- Download Restoro PC Repair Tool that comes with Patented Technologies (patent available here).
- Click Start Scan to find Windows issues that could be causing PC problems.
- Click Repair All to fix issues affecting your computer’s security and performance
- Restoro has been downloaded by 0 readers this month.
Pagefile.sys is a special type of file in Windows 10 that stores crash dumps. In addition, this file can also help you achieve better performance by writing the contents of your RAM to it. Pagefile.sys is a rather useful component of Windows, and today we’re going to show you how to use it properly.
What is pagefile.sys and how do we use it?
As we already mentioned, pagefile.sys is a component of Windows that can store contents of your RAM once your RAM is completely used. By doing so, Windows will perform better overall. However, you can also modify pagefile.sys and change its configuration, something we’ll go into in this article.
1.Changing the size of pagefile.sys
In order to improve your machine’s performance, you can easily change the size of the pagefile.sys file:
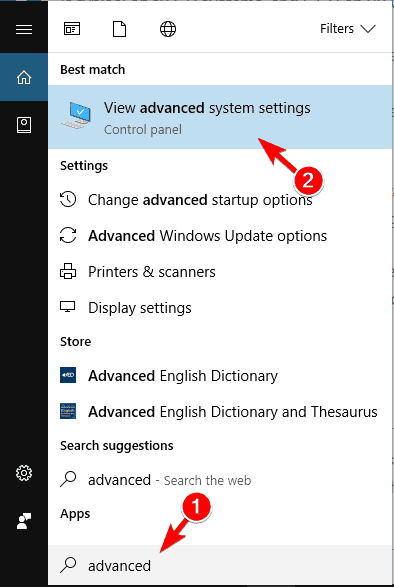
- Press Windows Key + S and enter advanced. Select View advanced system settings from the menu.

- When the SystemProperties window opens, click the Settings button in the Performance section.
- Navigate to the Advanced tab. From there, you’ll see the size of the paging file for all drives. To change it, click the Change button in the Virtualmemory section.
- Uncheck Automatically manage paging file size for all drives. Select your system drive from the list. By default, it should be labeled as C. Select the Custom size option and set the Initial and Maximum size. Once you’re done, click Set and OK to save changes.
As for the maximum size of the paging file, if you have 16GB of RAM you should set it to about 2.5GB. If you have 32GB of RAM, set the paging file to about 5GB.
2. Move pagefile.sys to a different drive
If your pagefile.sys is taking too much space on your system drive, you can move it to another drive easily. To do that, follow these steps:
- Open Advanced system settings. Go to the Performance section and click the Settings button. Now, go to Advanced tab and click the Change button. For more information on how to do that, be sure to check our previous section.
- Uncheck the Automatically manage paging file size for all drives option.
- Select your C drive and then set No paging file option. Now click the Set button.
- Choose the drive that you want to use to store pagefile.sys. Select System managed size option and click the Set button. Click OK to save changes.
- Restart your PC to apply changes.
How To Optimize The Paging File In Windows
Can make a big difference in low-end computers
Computers these days are pretty fast and the latest operating systems are pretty good at keeping them that way. Gone are the days of the annual “format and reinstall” ritual most tech-savvy Windows users performed. That’s not to say your fresh new installation of Windows 10 will remain snappy forever though.
Some users may notice that if they alt-tab from a video game or swap between heavy-hitting apps such as video editors or 100-tab browser windows, things grind to a halt. This is a sign that you’ve run out of the ultra-fast Random Access Memory installed in your PC, and Windows now has to rely on your much slower secondary storage as an overflow.

The slowdown you’re witnessing occurs when Windows swaps information from your RAM chips with an overflow area known as the “page file”.
You can improve performance when you optimize the paging file in Windows 10.
What Is a “Paging File” Anyway?
Before we get to how you can optimize the paging file, let’s dig a little deeper into what the file is. If you’ve set up Windows explorer to show you hidden system files, you’ll find it at the root of your C drive with the name “pagefile.sys”. Assuming that your PC has the default configuration.
The pagefile has a reserved size and is divided into “pages” internally. This is the data format that RAM data is stored in for any operating system that uses RAM paging as a memory management method.
“Pages” are blocks of information that each have a unique address and exactly the same size. The software on your computer keeps a record of which pages have its information, so when it wants that information, it requests the page from Windows.

When your apps need more RAM than your computer physically has, it needs to use “virtual memory” which is exactly what the page file is. From the application’s point of view, it’s just more RAM. The only difference is that reading information from a hard drive is much, much slower than RAM. Which is rather the point of having RAM!
So if the page file is so slow, why even have it? Without a page file, your applications will crash or seriously malfunction, as any additional information that needs to be stored in RAM will simply be lost. Having a bit of slowdown to handle peak RAM demands is better than having the system go down as a whole.
OK, But Why Optimize The Paging File?
RAM paging is one of the oldest memory management methods in existence. Mainframe computers from the 1960s were already using it! It made a lot of sense when RAM was measured in dozens of kilobytes. It still made sense when 640KB of memory was “enough for anyone”.
These days most mainstream computers have way more RAM than the user is likely to need unless they routinely run memory-hungry applications. If you’re always running out of RAM because of your daily user case, a far better strategy to solve the issue is adding more RAM to your system.

Like most computer components in modern times, RAM is relatively cheap!
Given that your computer has the right amount of RAM, there may still come a day when something makes RAM paging necessary. At which time you’ll be thankful you had the presence of mind to make sure paging takes no longer than necessary.
General Tips To Improve Paging Performance
Apart from tweaking Windows’ own management settings, there are a few things you can do to improve the performance of RAM paging when it happens. One of the most common pieces of advice is to set your page file to a different drive than your operating system drive.
The thing is, most new computers have a solid state drive (SSD) as their primary disk these days. While SSDs using the SATA interface still have to queue read and write requests sequentially, they are orders of magnitude faster than mechanical drives with spinning platters.
The logic behind this makes sense, since hard drives have to queue requests for reads and writes. The read/write heads have to physically travel to different parts of the disk platter where data is stored. So if Windows is trying to swap information from your page file and also trying to use the disk for other purposes it will all slow down to a crawl. If you put your page file on a separate hard drive, then this problem goes away.

So if you have two SATA SSDs in your computer, then it still makes sense to put your page file on the secondary drive. If you have a main drive that uses the NVMe over PCIe interface however, you gain nothing by moving the page file That’s because NVMe over PCIe is parallel, which means read and write requests are handled simultaneously.
On mechanical hard drives, fragmentation can also be an issue. Files are not stored continuously, but written into any available gaps left by deleted files. This means that over time as files are written and deleted, a specific file might exist in bits and pieces all over the drive.
If your page file is physically scattered all over the disk platter, it takes longer for the drive heads to put it all together. On solid state drives, this is a non-issue. If you are using a mechanical drive, creating a dedicated partition after first defragmenting the drive in question can be a good way around this. By putting the page file on a defragmented partition, you’ll ensure all the data is physically in the same location.
How To Optimize Your Paging File In Windows 10
Now that you have a good understanding of the context and rules to optimize the paging file, it’s time to actually dig into the settings themselves. It’s up to you to decide what specific settings to use based on your specific configuration.
- First, open the start menu and then type performance into the search bar.
- Look for Adjust the appearance and performance of Windows under the settings category as you can see in the screenshot below.

- The Performance Options window should now open. Switch to the advanced tab.

- With the Advanced tab open, click on Change under the Virtual memory section.

- The Virtual Memory window will now open. All of the options are greyed out by default. So first we have to uncheck Automatically manage paging file size for all drives.

- Now you’ll see the following options open up for you to change.

- Each drive’s settings can be managed independently. Click on the desired drive in the window above to change its specific settings. Logical partitions will also show up as independent drives.
- Select custom size to specify your own minimum and maximum paging file size. Select No Paging File if you don’t want a particular drive to have one at all.
- The default automatic behavior is to have a minimum size 1.5 times the amount of actual RAM. We don’t recommend you choose a minimum size below this. Once you have set a particular drive the way you like it, remember to click Set to lock those choices in.
How To Optimize Your Paging File In Older Versions Of Windows
The way in which virtual memory is tweaked and managed on older versions of Windows is virtually identical to how it works on Windows 10. Specifically, Windows 7,8 and 8.1 still have exactly the same virtual memory interface.
We aren’t going to include anything older than Windows 7 in this discussion since there should be no extant machines still running these unsupported operating systems anymore.
The process is identical to the Windows 10 steps outlined above from the point where you have reached the Performance Options window. However, getting there is a little different.
- Go to Start, then the Control Panel.
- Once there, open System. Then click on Advanced System Settings.
- Under the Advanced tab of the System Properties window, click on Settings.
From here you can follow the same instructions as above. If you are running Windows 7, consider upgrading as soon as possible. Regular support for Windows 7 ended in 2015 and extended support ends early in 2020.
Paging Dr. Performance

While most modern computers aren’t going to perform any differently if you change their paging settings, a little bit of tweaking can make a difference on low-end computers with limited RAM. Even on high-end machines that occasionally need to punch above their weight in terms of memory.
So if you next encounter a computer grinding to a halt, it might very well be that it needs a visit from the paging file doctor to set things right again.
Sydney Butler is a social scientist and technology fanatic who tries to understand how people and technology coexist. He has two decades of experience as a freelance computer technician and more than a decade as a technologies researcher and instructor. Sydney has been a professional technology writer for more than five years and covers topics such as VR, Gaming, Cyber security and Transhumanism. Read Sydney’s Full Bio


