- Create and format a hard disk partition
- Powershell – Working with devices, partitions and volumes
- How to extend partition for Windows 10 computer
- 1. How to extend partition in Windows 10 using DiskPart cmd
- 2. How to extend volume with Windows 10 Disk Management
- 3. How to extend Windows 10 volume with free partition editor
- In Summary
- How to merge Windows 10 partitions without losing data
- 3 ways to merge partitions in Windows 10/8/7 computer
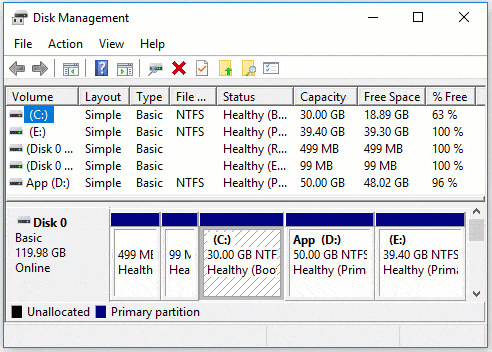
- ① How to combine partitions in Windows 10 Disk Management
- ② How to merge partitions using Diskpart command
- ③ How to merge partitions with free partition editor software
- Shortages to merge 2 partitions in Windows 10/8/7
- About merging partitions on disk 0 and disk 1 (separate disk)
Create and format a hard disk partition
To create a partition or volume (the two terms are often used interchangeably) on a hard disk, you must be logged in as an administrator, and there must be either unallocated disk space or free space within an extended partition on the hard disk.
If there is no unallocated disk space, you can create some by shrinking an existing partition, deleting a partition, or by using a third-party partitioning program.
Open Computer Management by selecting the Start button. The select Control Panel > System and Security > Administrative Tools, and then double-click Computer Management.
In the left pane, under Storage, select Disk Management.
Right-click an unallocated region on your hard disk, and then select New Simple Volume.
In the New Simple Volume Wizard, select Next.
Enter the size of the volume you want to create in megabytes (MB) or accept the maximum default size, and then select Next.
Accept the default drive letter or choose a different drive letter to identify the partition, and then select Next.
In the Format Partition dialog box, do one of the following:
If you don’t want to format the volume right now, select Do not format this volume, and then select Next.
To format the volume with the default settings, select Next.
Review your choices, and then select Finish.
Note: When you create new partitions on a basic disk, the first three will be formatted as primary partitions. Beginning with the fourth, each one will be configured as a logical drive within an extended partition.
Powershell – Working with devices, partitions and volumes
Windows storage
Disks, partitions and volumes have the following relation:
Let’s focus on every one of them on the following sections.
Disk
Get-Disk
To list all operating system visible disks type:
You’ll get something like:
Note: If you run Get-Disk without Admin rights you will receive the following error: “Access to a CIM resource was not available to the client”.
If you’re already Admin remember to run powershell console as Administrator or you will receive the same error.
To restrict query results we can pipe the output of Get-Disk to the Where-Object cmdlet.
To get all USB disks you have to type:
Note: ? is alias for Where-Object. So you can type the same command this hay:
To list all system disks type:
Clear-Disk
To clear all partition and volumes from a disk (disk numb 3), type (you will lose all data and the operation can’t be undone):
Note: If the disk has a OEM partition in it it’s also necessary to specify the –RemoveOEM parameter
Initialize-Disk
To initialize a disk (disk numb 3) in order to create partitions and volume type:
Note: All disks are initialized as GPT (GUID Partition Table) unless you specify differently. To initialize as MBR (Master Boot Record), type:
Set-Disk
To change disk properties you have to use Set-Disk.
In this case piping the result of the Get-Disk cmdlet and changing all objects (disks) to an online state. Just type:
To change read-only disk property type:
Partition
Get-Partition
A Disk object can have one or more logical regions called partitions.
To list all partition on all disks, type:
To list all partition of a specific disk (disk numb 3), type:
New-Partition
To create a new partition (on disk numb 3), type:
Volume
Get-Volume
To list all volumes of a drive letter (drive letter C), type:
Format-Volume
To format a volume (drive letter C) with NTFS, type:
Drives
Get-PSDrive
The following cmdlet gives to the current session the following drives:
– Windows logical drives, including mapped drives and network shares
– Drives exposed by powershell providers, HKLM, HKCU, Registry drives…
– Drives created with New-PSDrive
Note: Get-PSDrive alias is gdr
New-PSDrive
Cmdlet used to map a drive to a path.
In this example we create a drive X mapped to folder C:\Scripts:
Note: Get-PSDrive alias is ndr or you can use mount
Storage Settings
Get-StorageSetting
To see storage setting like disk policy (previously SAN policy), type:
Set-StorageSetting
To change a storage setting like new disk policy, type:
These are the existing disk policy options:
| Policy settings | Description |
| OfflineAll | All new disks are left offline by default |
| OfflineInternal | All disks on busses that are detected as internal are left offline as default |
| OfflineShared | All Disks on sharable busses, such as iSCSI, FC, or SAS are left offline by default |
| OnlineAll | All disks are automatically brought online |
… WMI
WMI remains in most cases the primary automation technology for system administration, so Get-WmiObject cmdlet is essential in order to do routine management tasks. And unlike most cmdlets, Get-WmiObject can be run against remote computers.
To obtain information about volumes, type:
To obtain same information remotely but only for drive type 3, type:
The same output data on table format:
…most commonly used
To physical disks information use class: win32_logicaldisk class
To see disk partitions information use: win32_diskpartition
To see map of physical disk and partition use class: win32_logicadisktopartition
To see volumes use: win32_volume
To check drives mapped to a computer use: win32_mappedlogicaldisk
How to extend partition for Windows 10 computer
by John, Updated on: January 26, 2021
This article introduces how to extend volume in Windows 10 32/64 bit with native Disk Management, diskpart command and free partition editor software.

Many people have installed or upgraded to Windows 10, from the feedback of Windows 10 users, there are many wonderful features and improvement. However, the same with previous versions, the common disk space issue still exists: system C drive runs out of space and getting full after running Windows 10 laptop or desktop for a period of time. Low disk space issue could also occur in the volume for applications and backup.
No matter on system partition or data volume, the fastest way to solve this problem is by extending volume with existing Unallocated space or free space in other volumes. In this article I’ll introduce how to extend Windows 10 volume with 3 different tools.
1. How to extend partition in Windows 10 using DiskPart cmd
DiskPart is a text-mode command interpreter in Windows 10 and previous versions. This tool enables you to manage objects (disks, partitions, or volumes) by using scripts or direct input at a command prompt. Before extending Windows 10 partition with diskpart, there are several points you should know:
- Diskpart can only extend NTFS partition, another common FAT32 partitions are not supported.
- There must be other partition(s) on the same disk.
- Before extending a partition, you must delete its contiguous partition on the right. If you cannot delete it, do not run diskpart. If you can delete it, remember to transfer all files in advance.
- Diskpart cannot extend a partition with Unallocated space that is on the left or nonadjacent.
Steps to extend Windows 10 partition using DiskPart cmd:
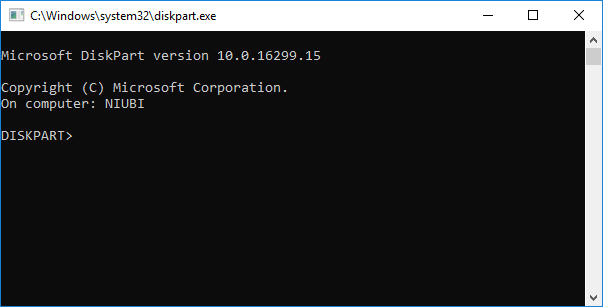
① Press Windows and R together on your keyboard, input diskpart and press Enter.
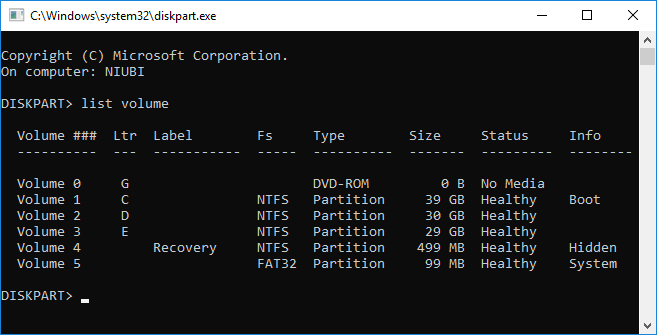
② Input list volume and you’ll see all partitions in a list (Unallocated space is not shown).
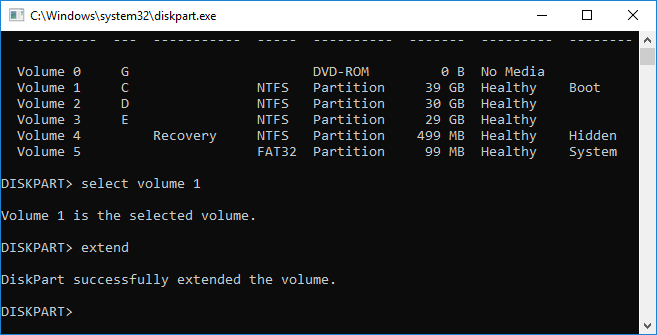
③ Input select volume 1 to give focus to the system C: drive.

④ Input extend to proceed extending.
If there’s no Unallocated space next to C drive, you’ll receive error message ‘There is not enough usable free space on specified disk(s) to extend the volume.‘
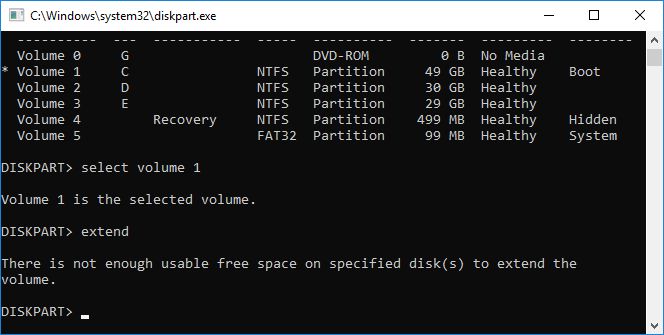
To get such required Unallocated space, you must delete the contiguous D drive. To do this, run select volume D and delete volume commands one by one before step 3.
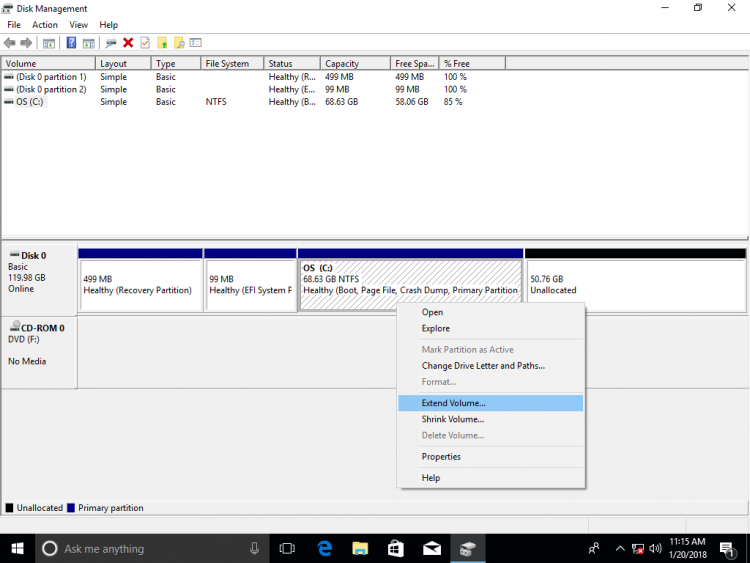
2. How to extend volume with Windows 10 Disk Management
If you think it’s too difficult to extend Windows 10 partition with diskpart command, there’s another native tool — Disk Management, which has graphic interface. It has Extend Volume Wizard, so you just need to click in the dialog box.
However, the same with Diskpart, there must be adjacent Unallocated space on the right side of the partition that you want to expand. That means, you must delete the right coniguous partition, too. The partition to be extended must be formatted with NTFS file system, too, otherwise Extend Volume is grayed out.
Steps to extend partition in Windows 10 using Disk Management:
- Press Windows and X together on your keyboard and click Disk Management in the list.
- Right click the right contiguous partition (such as D:) and select Delete Volume.
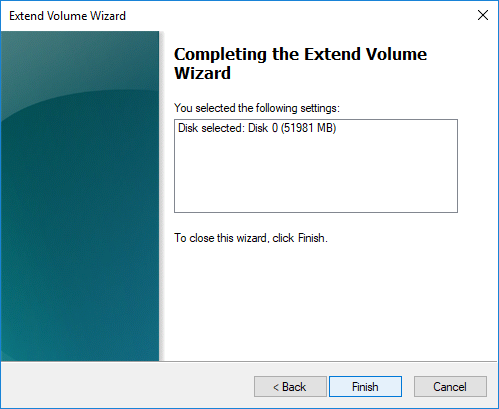
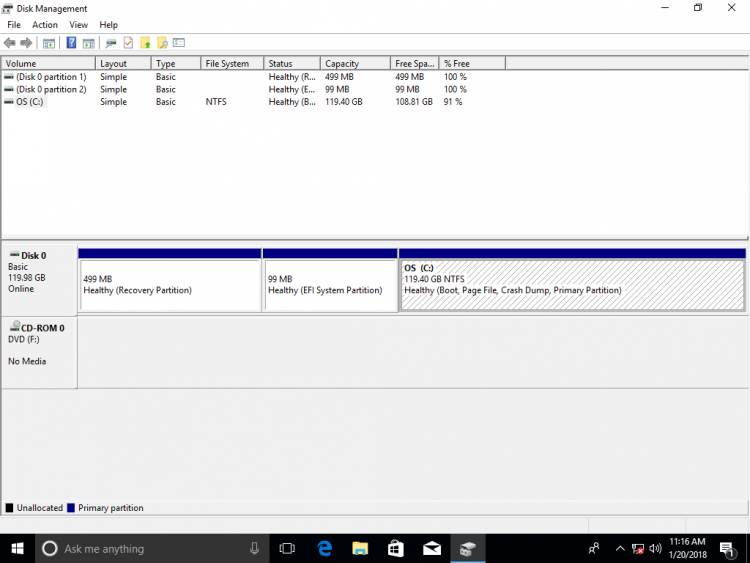
- Right click C drive and select Extend Volume.
- Simply click Next till Finish in the pop-up Extend Volume Wizard windows.

Unlike diskpart command, Disk Management cannot extend C drive after deleting D if D is a Logical drive. Remind again, do not delete D if you installed programs or any Windows services in it. Otherwise, the programs/services will stop working even if you move all files to other partition.
3. How to extend Windows 10 volume with free partition editor
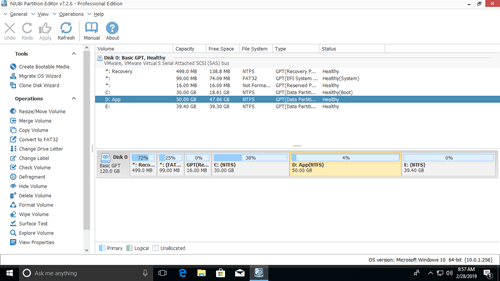
Comparing with Windows native tools, NIUBI Partition Editor has advantages while extending partition for Windows 10 computer:
- Support shrinking and extending both NTFS and FAT32 partitions.
- Make Unallocated space on either left or right while shrinking partition.
- Extend partition with either contiguous Unallocated space in 1 step.
- Move and extend Unallocated space to any nonadjacent partition on the same disk.
There are many free and commercial partition extender for Windows 10 laptop/desktop. But better than other software, NIUBI Partition Editor has unique 1-Second Rollback, Cancel-at-well and Virtual Mode technologies to protect system and data. It is 30% to 300% faster because of its advanced file-moving algorithm. It has free edition for Windows 10/8/7/Vista/XP (32/64 bit) home users. (Free edition is the same with professional edition except lacking of 1-Second Rollback and bootable media builder.)
Download this program, you’ll see the main window with disk partition structure and other information on the right, available operations are listed on the left and by right clicking.
Steps to extend volume in Windows 10 laptop/desktop with NIUBI:
Step 1: Right click D: drive and select «Resize/Move Volume«, drag left border towards right in the pop-up window, or enter an amount in the box of Unallocated space before .
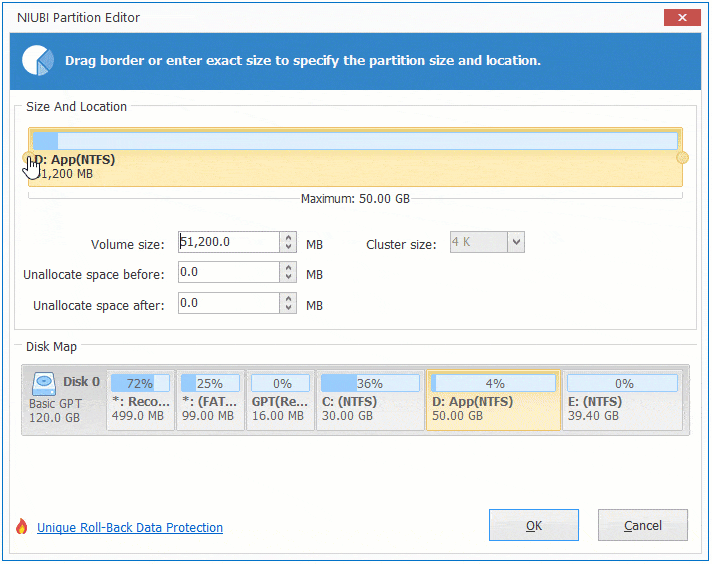
Then D drive is shrunk and Unallocated space is made on the left.
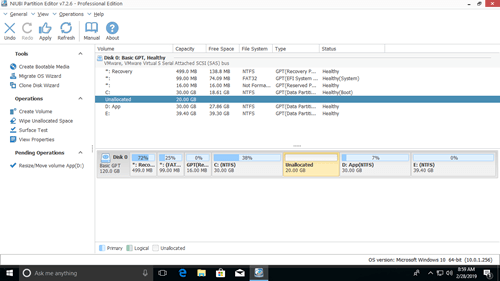
Step 2: Right click C: drive and select «Resize/Move Volume» again, drag right border towards right in the pop-up window.
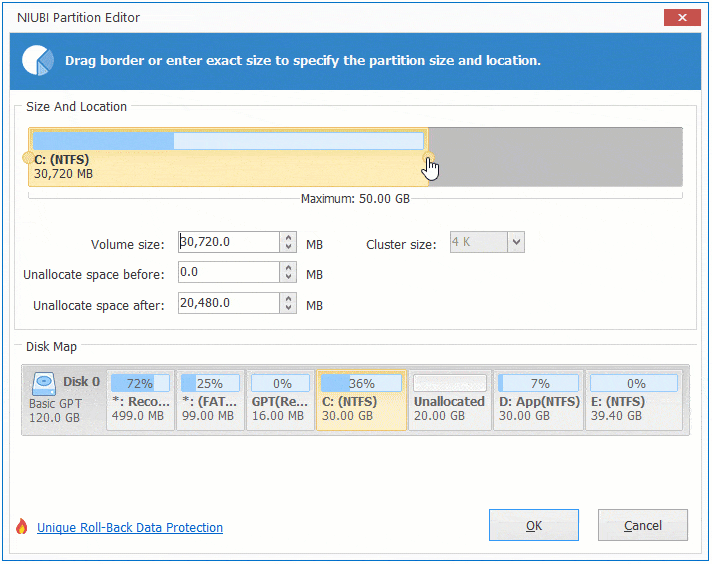
Then C drive is extended by merging this Unallocated space.
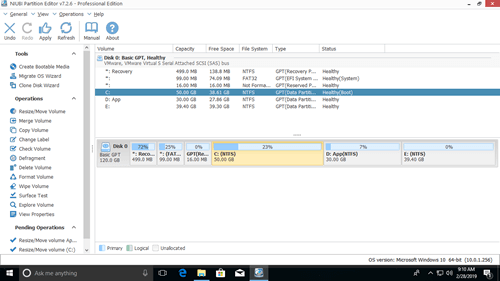
Step 3: Click Apply on top left to execute. (Real disk partitions won’t be changed until click Apply to confirm).
Watch the videos how to extend system and data partition in Windows 10 laptop/desktop:
How to extend system partition C:
How to extend data partition D:
In Summary
Windows built-in Diskpart and Disk Management can only extend NTFS partition by deleting the right contiguous one. To extend volume in Windows 10/8/7/Vista/XP, NIUBI Partition Editor is better choice. Besides shrinking and extending partitions, it helps you do many other disk partition management operations such as merge, copy, convert, defrag, hide, wipe, scan bad sectors, etc.
How to merge Windows 10 partitions without losing data
by John, Updated on: April 14, 2021
To optimize disk space, sometimes you need to shrink, extend, move or combine 2 partitions. Two typical example why merging partitions for Windows 10/8/7 computer: 1, system C drive runs out of space, by combining it with another partition you can increase C drive free space. 2, there are too many volumes causing it difficult to locate the partition and files that you need. In this article, I’ll introduce detailed steps to merge partitions in Windows 10/8/7 without losing data. Combine partitions with Windows native tools and best free partition software. Select the corresponding tool and method according to your own disk partition configuration.
3 ways to merge partitions in Windows 10/8/7 computer
To combine partitions in Windows 10 and Windows 8/7, there are 3 choices: Disk Management, diskpart and 3rd-party partition software. Disk Management is a built-in component of all Windows Operating System, which can do some basic management operations such as create, delete and format volume. From Windows 7 Disk Management, new Shrink and Extend Volume functions are added to help change partition size without losing data (in most cases).
Windows 8 and 10 inherited the same functions without any improvements. There’s no Merge Volumes function built in Disk Management, but you can merge 2 partitions via another Extend Volume function indirectly.
Unlike Disk Management that has graphic interface, Diskpart works via command line. It is a bit difficult to common users. Although these 2 native tools work in different way, they have same limitations while merging partitions in Windows 10/8/7 computers:
- Both partitions to be combined should be the same Primary or Logical.
- Both partitions are on the same disk.
- The destination partition must be formatted with NTFS file system.
- They cannot merge 2 non adjacent partitions.
- They can only merge a volume into the left contiguous one, for example: merge drive D to C, or merge drive E to D.
Third party software has no such restrictions, and it’s much easier via several clicks. Let’s see how to merge partitions in Windows 10/8/7 with each tool.
① How to combine partitions in Windows 10 Disk Management
As I said above, Windows 10 has no merge volume function. The merging operation is realized via another Extend Volume function. This function can only combine Unallocated space to the contiguous partition on the left. Therefore, you have to delete the right partition in advance by yourself. If you cannot delete this partition, run third party software. If you can, remember to back up or transfer files before deleting.
Steps to merge partitions in Windows 10 using Disk Management:
- Press Windows and X together on the keyboard and then click Disk Management in the list.
- Right click the right partition (such as D: drive) and select Delete Volume, then its disk space will be converted to Unallocated.
- Right click the left partition (such as C: drive) and select Extend Volume.

- Click Next till Finish on the pop-up dialog boxes.
In a short time, original drive D is merged into C drive.
If you use Windows 7 or 8, press Windows and R keys together, type diskmgmt.msc and press Enter to open Disk Management.
② How to merge partitions using Diskpart command
The same with Disk Management, to merge Windows 10 partitions with diskpart command, you must delete the right partition in advance and merge Unallocated space to the left partition. If you don’t want to delete any partition, jump to the next section.
Steps to merge partitions in Windows 10/8/7 with Diskpart cmd:
- Transfer all files in the right partition to another place.
- Press Windows and R hot-keys, type diskpart and press Enter, then the command prompt window will be opened.
- Input list volume and press Enter, then you’ll see all partitions in a list.
- Input select volume D and press Enter. (D is drive letter or number of the right partition.)
- Input delete volume and press Enter.
- Input select volume C and press Enter. (C is drive letter or number of the left partition.)
- Input extend and press Enter.
Some people like to use Windows native tools thinking they have best compatibility, but it’s not true at least to disk partition management. 3 major reasons why third partition software is better:
- Neither Disk Management nor Diskpart command is 100% secure, I’ve encountered the issue several times that Disk Management destroyed my partitions.
- Both native tools cannot cancel or undo any operations, even if you did anything wrong.
- Third party software has much more features such as convert, copy, wipe, scan.
③ How to merge partitions with free partition editor software
To help merge partitions for Windows 10 computer, there are many third party partition software. Better than other tools, NIUBI Partition Editor has unique 1-Second Rollback, Virtual Mode and Cancel-at-well technologies to protect your system and data. It has free edition for Windows 10/8/7/Vista/XP home computer users. To do any operations, you just need to click, drag and drop on the disk map. When you merge 2 contiguous partitions, all files will be moved to a folder in root directory of the destination partition automatically.
Steps to merge Windows 10 partitions without deleting volume or losing data:
Step 1: Download NIUBI Partition Editor, right click either partition that you want to combine and select «Merge Volume«.
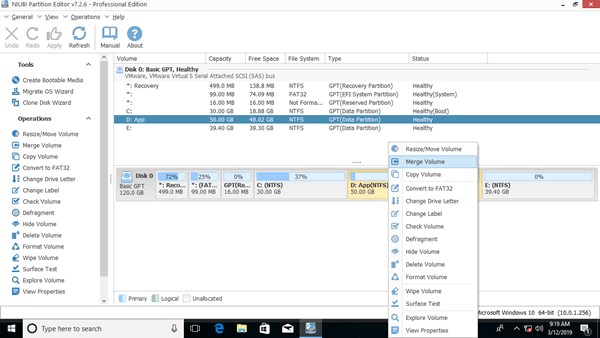
Step 2: In the pop-up window, click the check-boxes of both partitions and then click OK.
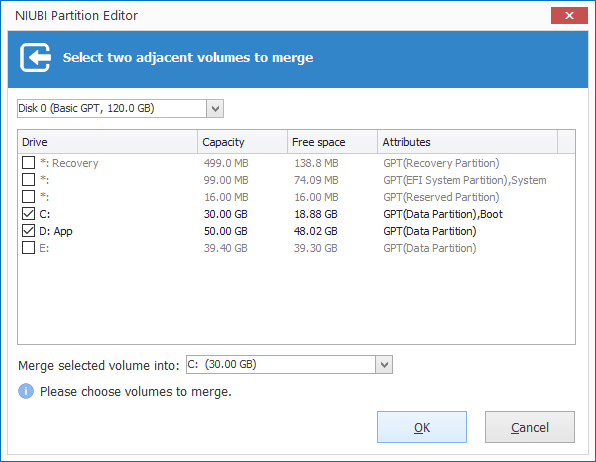
When you merge two data volumes, you can select either one as destination in the drop-down box. But when merging C and D drives, you can only select C as destination, because system partition can’t be removed. So, merging system partition C: to data volume (D:) is disabled.
Step 3: Press Apply button on top left to take effect. (Real disk partitions won’t be changed until you click Apply to confirm).
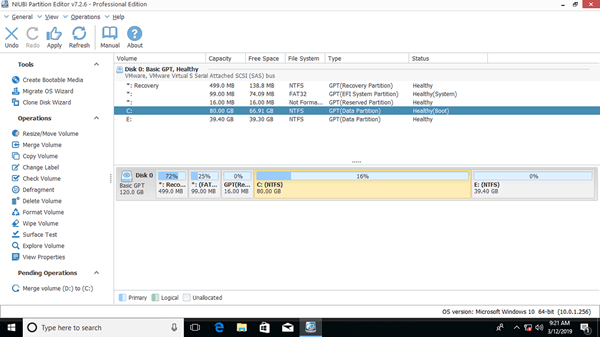
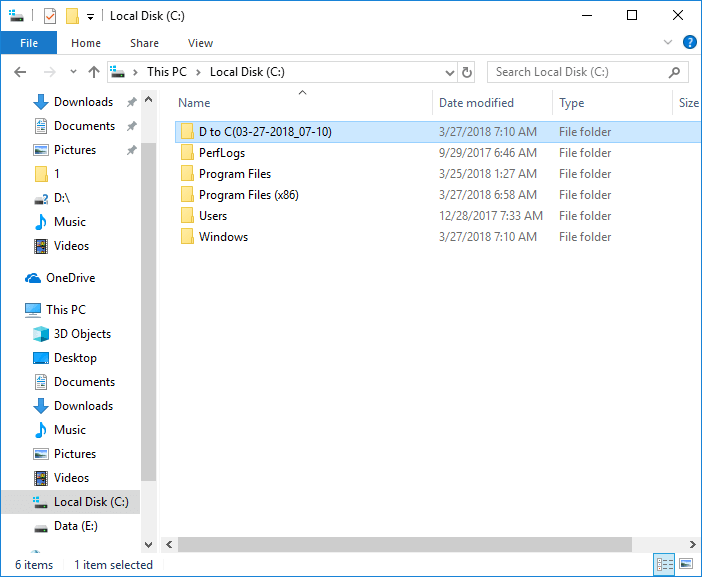
After merging volumes complete, open the destination partition (here is C:) in Windows Files Explorer and you’ll see a fold that that is named as D to C(date and time). All files of D will be moved to this folder automatically.
Watch the video how to combine partitions in Windows 10/8/7/Vista/XP (32 and 64 bit):
Shortages to merge 2 partitions in Windows 10/8/7
One of the partitions will be deleted no matter which tool you use, it doesn’t matter if you want to combine two data drives. But if you want to extend C drive by merging D, it is not suggested, because:
- You’ll lose data if you forget to back up or transfer before deleting partition (with Windows native tools).
- All Windows services, application, shortcuts that point to D: drive will stop working after deleting.
- In some cases, you still cannot extend C drive after deleting D.
The best idea is shrinking D drive instead, part of free space will be released and all files keep intact, then add the Unallocated space to C drive. In this way, nothing will be changed except partition size. Better than Windows native tools, NIUBI Partition Editor can make Unallocated space on either left or right side when shrinking a partition, and merge Unallocated space to either contiguous or nonadjacent partition on the same disk. Follow the steps to expand C drive by shrinking other partitions:
About merging partitions on disk 0 and disk 1 (separate disk)
If you want to merge a data volume in Disk 1 to system C drive in Disk 0, no partitioning software can do this, because the size of a disk is fixed. If there is not enough free space on the same disk, you have two choices:
- Move a data partition in Disk 0 to another disk, then delete it and merge Unallocated space to C drive.
- Copy entire system disk to another larger one and extend partition with extra space..
Besides merging partitions in Windows 10/8/7/Vista/XP computer, NIUBI Partition Editor helps you do many other operations such as shrink, extend, convert, defrag, hide, wipe, scan bad sectors.


