- How do I password protect my files and folders in Windows?
- Microsoft Windows Vista, 7, 8, and 10 users
- Microsoft Windows XP Professional users
- Encrypt contents to secure data is grayed out
- Show «Encrypt» on the context menu
- Microsoft Windows XP Home users
- Make this folder private is grayed out
- Other security solutions for protecting your files and folders in Windows
- File and folders frequently used or accessed
- How to Find Hidden & Saved Passwords in Windows
- View Windows Saved Passwords Using The Credentials Manager
- View Saved WiFi Passwords On Windows 10
- Use Command Prompt To Reveal Saved WiFi Passwords
- Use An App To Access Saved WiFi Passwords
- View Windows Vault Passwords Using An App
- Delete Saved Passwords On Windows 10
How do I password protect my files and folders in Windows?
Because most versions of Windows do not include a method of password protecting your files and folders, this page provides steps for encrypting files and folders instead. To password protect your files and folders in Windows, you need to use a third-party program.
Before password protecting any document, you may want to create a backup of the non-password protected files and folder in case you forget the password in the future.
Microsoft Windows Vista, 7, 8, and 10 users
Unfortunately, Windows Vista, Windows 7, Windows 8, and Windows 10 do not provide any features for password protecting files or folders. You need to use a third-party software program to accomplish this.
If you want to encrypt a file or folder, this can be done by following these steps:
- Select the file or folder you want to encrypt.
- Right-click the file or folder and select Properties.
- On the General tab, click the Advanced button.
- Check the box for the «Encrypt contents to secure data» option, then click OK on both windows.

If the «Encrypt contents to secure data» option is not selectable or available, you likely have a Home edition of Windows, which does not support this feature. It is also possible that the hard drive where the files are located is not formatted as NTFS, which is required.
Microsoft Windows XP Professional users
The steps below for encrypting the files on Windows XP Professional apply to users who are using a computer with two or more accounts. If you are using a single account, see the other security solutions section.
- Select the file or folder you want to encrypt.
- Right-click the file or folder, and click Properties.
- On the General tab, click the Advanced button.
- Check the box for the Encrypt contents to secure data option.
- Click Apply and then OK.
You won’t be prompted to enter a password when encrypting a folder in Windows XP Professional. However, other user accounts on your computer won’t have access to files contained in the encrypted folder.
Encrypt contents to secure data is grayed out
If you are using the Home edition of Microsoft Windows XP, see the Windows XP Home steps.
Show «Encrypt» on the context menu
The newest version of TweakUI also enables you to show the Encrypt option in the context menu. To do this, follow the steps below.
- Open TweakUI.
- In the TweakUI window, select Explorer.
- In the right side of the window under Settings, locate Show ‘Encrypt’ on the context menu and check the box. This option should be below Prefix ‘shortcut to’ on new shortcuts and above Show ‘View workgroup computers’ in NetPlaces.
- I’m missing Show Encrypt on the context menu in TweakUI.
Microsoft Windows XP Home users
- Select the file or folder you want to encrypt.
- Right-click the file or folder and click Properties.
- Click the Sharing tab.
- Check the box Make this folder private.
- Click Apply and then OK.
Make this folder private is grayed out
For this option to work on Microsoft Windows XP Home edition, you must meet the below requirements.
- The hard drive must be formatted in NTFS and not FAT32 file system.
- The folder you are attempting to encrypt is your folder. For example, if your name is Bob, you must encrypt the following folder, or a folder within it:
C:\Documents and Settings\Bob\
You cannot encrypt any folders outside of this folder. If you want to encrypt folders outside of this folder, see the other security solutions section below.
Other security solutions for protecting your files and folders in Windows
File and folders not frequently used — An easy way to password protect files is to create an archive of the files using a compression tool. When the archive is created, you can encrypt the contents by specifying a password.
Windows ME and Windows XP users — Windows ME and Windows XP comes with a compression utility. This utility can also be used to compress and password protect files.
Windows Vista and Windows 7 users — Windows Vista and Windows 7 also include a compression utility. However, password protection for the compressed files is not possible without the use of a third-party software program.
Users can still view a list of the files within a compressed file. If you want both your file names and contents to be hidden, move all the files into a single folder and password protect that folder.
File and folders frequently used or accessed
If you need to password protect or encrypt data you frequently use, you need to install a third-party program that allows you to protect your files and folders. Below are some free and commercial solutions.
- 7-Zip — A free file and folder zipping utility, that also includes the ability to password protect zipped files and folders.
- AxCrypt — An excellent free encryption utility that enables users to encrypt all files within a folder and not allow those files to be viewed unless a passphrase (password) is known.
- Folder Guard — A commercial version of a password protection software that enables you to password protect files, folders, and other Windows resources.
- Protected Folder — For a small fee, it’s an excellent software program that enables you to password protect folders.
How to Find Hidden & Saved Passwords in Windows
They may end up in the registry, within credential files, or within the Windows Vault
If you’ve forgotten a password but you know it was saved somewhere on your computer, you can access your Windows saved passwords and see if it’s there. Windows actually keeps a list of all of your saved passwords and lets you access them when you want.
These saved passwords are from your web browsers, WiFi networks, and other services that you use on your computer. Revealing these passwords is fairly easy as there’s a built-in tool on your computer that lets you do it.
View Windows Saved Passwords Using The Credentials Manager
The feature that saves your login details on your Windows 10 computer is called Windows Credentials Manager. It keeps a track of all of your web as well as other Windows passwords, and lets you access and use them when needed.
The web passwords that it saves are usually from Internet Explorer and Edge. Your Chrome, Firefox, and other web browsers’ passwords won’t appear in the tool. For those browsers, you can check out their settings menu to find and access the option that shows your passwords.
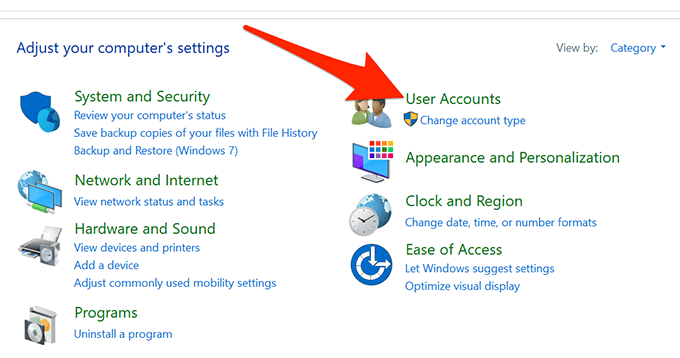
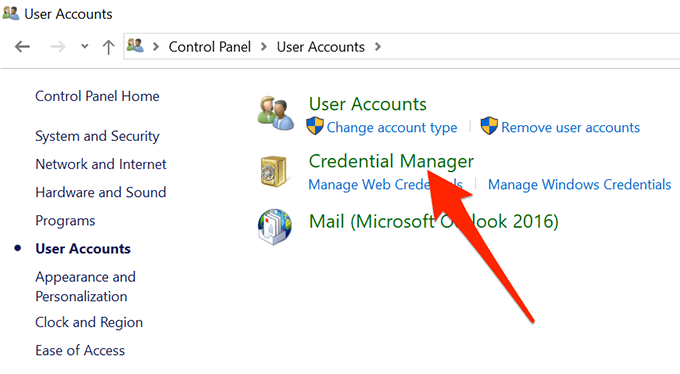
- Search for Control Panel using Cortana search and open the panel.
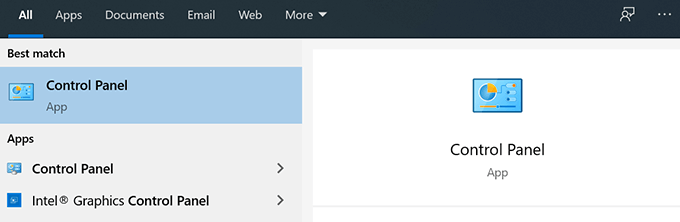
- Click on the option that says User Accounts as the option you’re looking for is located there.
- On the following screen, click on the option that says Credential Manager to open the tool on your computer.
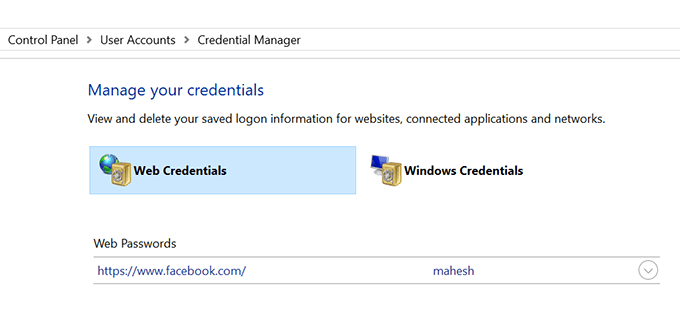
- When the Credential Manager opens, you’ll see mainly two tabs called Web Credentials and Windows Credentials.
The Web Credentials section hosts all of your browser passwords. These are the passwords that you use to log-in to various websites.
The Windows Credentials stores your other passwords, such as your NAS drive password, and so on. Unless you’re in a corporate environment, you likely won’t use this section.
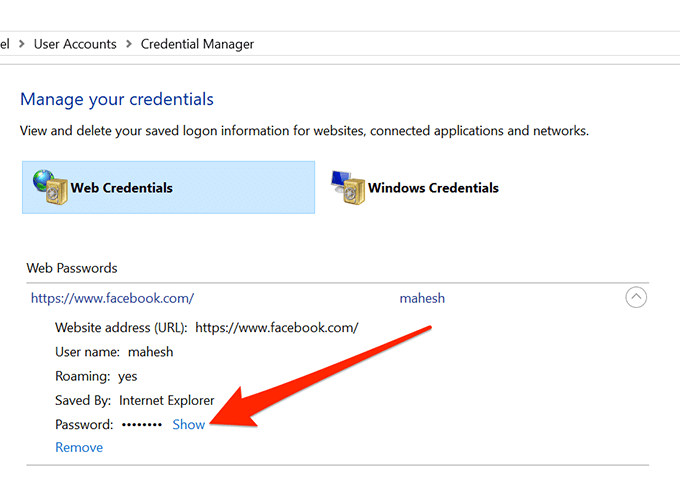
- To reveal the password for an entry, click on the down-arrow icon next to it. Then, click on the link that says Show next to Password.
- It’ll ask you to enter your Windows account password. If you use a fingerprint to unlock your machine like I do, you’ll be prompted to scan it to continue.
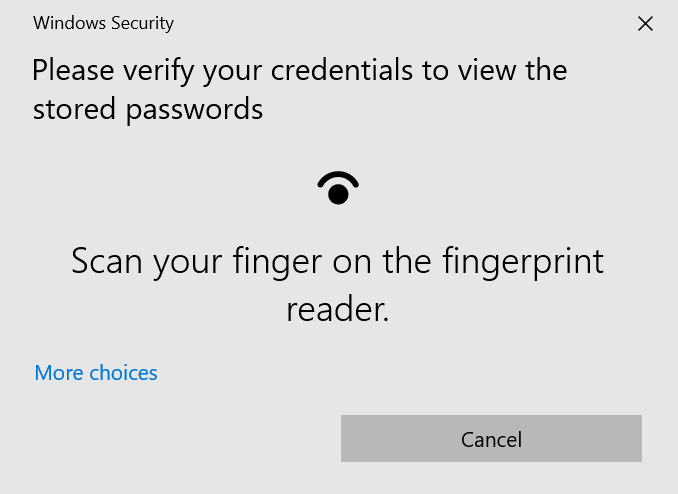
- It’ll then immediately display the password on your screen.
View Saved WiFi Passwords On Windows 10
The Credentials Manager, unfortunately, doesn’t let you view your saved WiFi passwords. However, there are two other ways you can use to access the Windows saved passwords for your wireless networks.
These methods should let you access passwords for all the WiFi networks you’ve ever connected to.
Use Command Prompt To Reveal Saved WiFi Passwords
The Command Prompt utility lets you perform a number of tasks on your computer, and one of these is to let you view your saved WiFi passwords. It can be used to retrieve a list of all of your networks, and then you can choose the network you want to view the password for.
You’re basically going to just copy and paste the commands, so even if you haven’t used the tool before, you should still be fine.
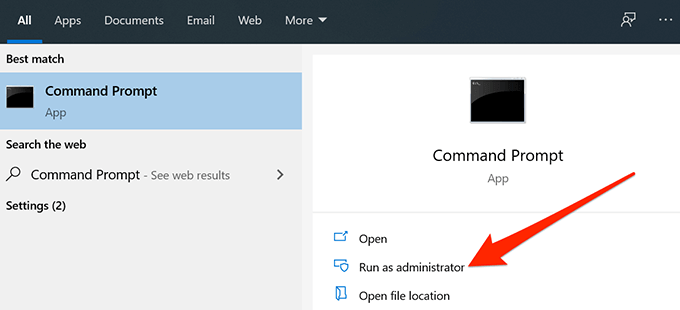
- Search for Command Prompt using Cortana search and click on Run as administrator.
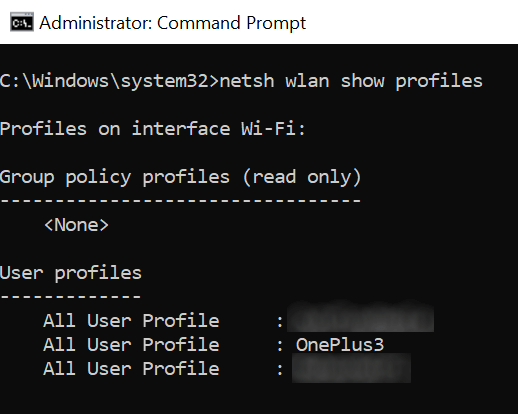
- Type in the following command into the Command Prompt window and press Enter. It’ll show the WiFi networks it has saved passwords for.
netsh wlan show profiles
- Note down the WiFi network name you want to find the password for.
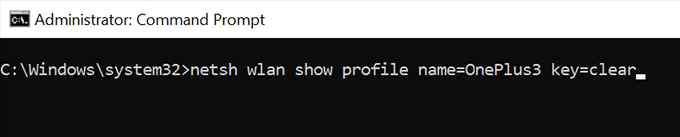
- Type in the following command replacing NAME with your WiFi network’s name and hit Enter.
netsh wlan show profile name=NAME key=clear
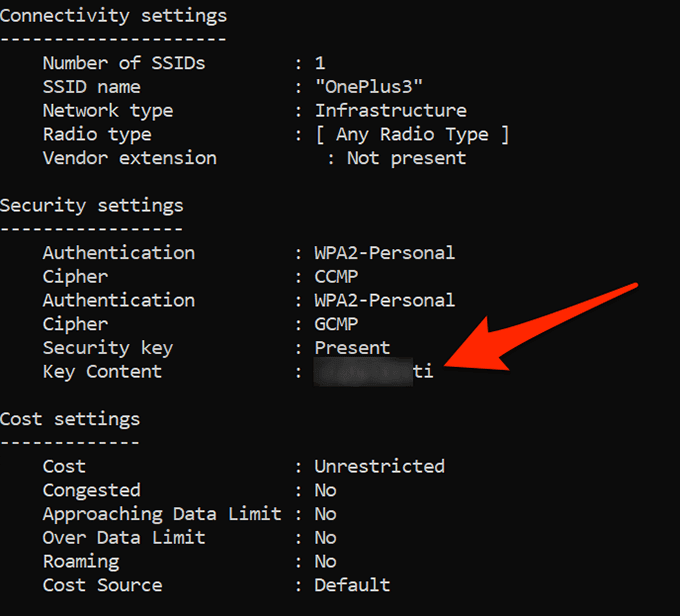
- Look towards the section that says Security settings. Here, you’ll find an entry saying Key Content. The value next to it is your WiFi password.
Use An App To Access Saved WiFi Passwords
If you need to access your saved WiFi passwords too frequently, the command line method isn’t ideal for you as it requires you to type in a command each time you want to view a password. A better option would be to use a third-party app that lets you easily and quickly reveal your Windows saved passwords.
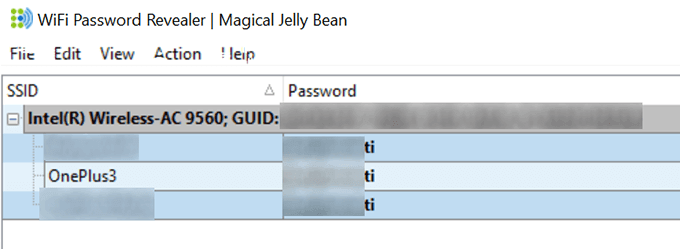
One of these apps is WiFi Password Revealer by Magical Jelly Bean. It’s a free app you can use on your Windows 10 computer to view your WiFi passwords.
- Download and launch the app on your computer.
- It’ll immediately scan and display all the WiFi passwords it could find on your screen.
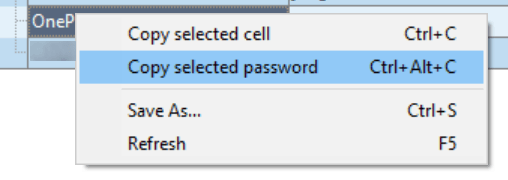
- If you want to copy a password, right-click on it in the app and select Copy selected password.
View Windows Vault Passwords Using An App
Some of the Windows saved passwords are stored in Windows Vault on a Windows 10 computer. If the password you’re looking for is located there, then you can use a free app to find and reveal it on your machine.
There’s an app called VaultPasswordView that lets you access all the passwords saved in the Windows Vault on your machine.
- Download and launch the app on your machine.
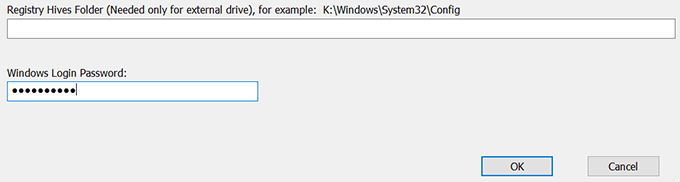
- Use the Root Folder dropdown menu to select your root folder. Then click on the Automatic Fill button to auto-fill some of the options on the screen.
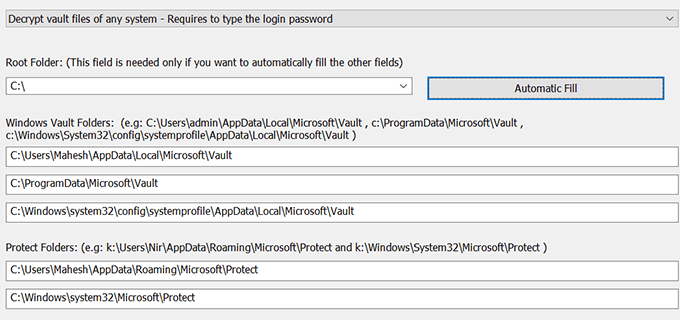
- Enter your account password in the Windows Login Password field and hit OK.
- You should be able to view your Windows Vault saved passwords.
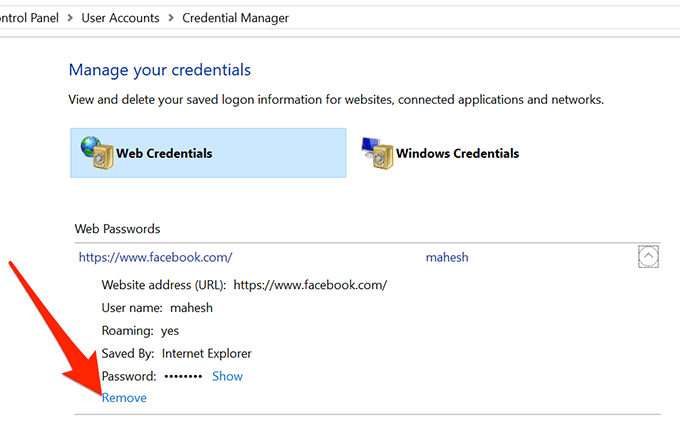
Delete Saved Passwords On Windows 10
Since your computer saves most passwords that you use on your computer, it may even have the passwords that you don’t actually use. If you want, you can delete these saved passwords on your Windows 10 computer.
These can be deleted from the Windows Credentials Manager on your PC.
- Launch Windows Credentials Manager from Control Panel.
- Click on the arrow icon next to the password you want to delete.
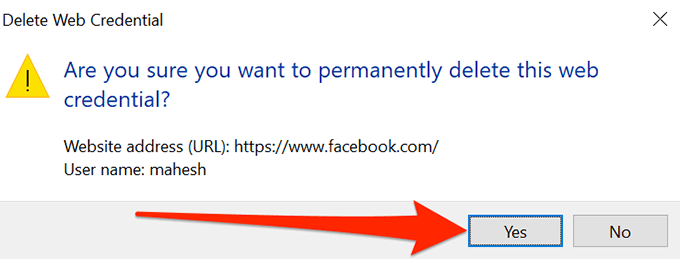
- Select the option that says Remove at the end of your credential details.
- It’ll ask if you’d really like to remove the password from your computer. Click on Yes to continue.
It’s easy to forget passwords especially if you have a lot of those to remember. Are you someone who needs to look at the saved passwords to log in somewhere or do you remember all of your passwords? Chime in in the comments below.
Mahesh has been obsessed with technology since he got his first gadget a decade or so ago. Over the last few years, he’s written a number of tech articles on various online publications including but not limited to MakeTechEasier and Android AppStorm. Read Mahesh’s Full Bio


