- Windows 10 won’t turn off password protected sharing [FIX THIS]
- How do I turn off password protected sharing?
- 1. Turn off Password Protected Sharing from the Control Panel
- 2. Remove Guest account password
- Run a System Scan to discover potential errors
- 3. Remove Password Protected Sharing from User Accounts
- 4. Modify registry entries using the Registry Editor
- 5. Check the Password never expires property
- Password Recovery
- Password-protected Sharing in Windows 7 Exposes the C:\Users\Username folders (and files) to others if Public Folders are shared.
- Replies (10)
Windows 10 won’t turn off password protected sharing [FIX THIS]

- Download Restoro PC Repair Tool that comes with Patented Technologies (patent available here).
- Click Start Scan to find Windows issues that could be causing PC problems.
- Click Repair All to fix issues affecting your computer’s security and performance
- Restoro has been downloaded by 0 readers this month.
After installing the latest Windows 10 updates, many Windows users reported not being able to turn off the password for protected sharing.
Password protected sharing is a Windows 10 feature that stops other users from accessing shared files, printers or public folders.
Some users reported that the Off button wouldn’t stick when trying to use this feature.
Other users were able to move the button to the Off position, but reported that the settings didn’t change after restarting the computer.
Here’s a series of solutions that should help you to fix this problem once and for all.
How do I turn off password protected sharing?
- Turn off Password Protected Sharing from the Control Panel
- Remove Guest account password
- Remove Password Protected Sharing from User Accounts
- Modify registry entries using the Registry Editor
- Check the Password never expires property
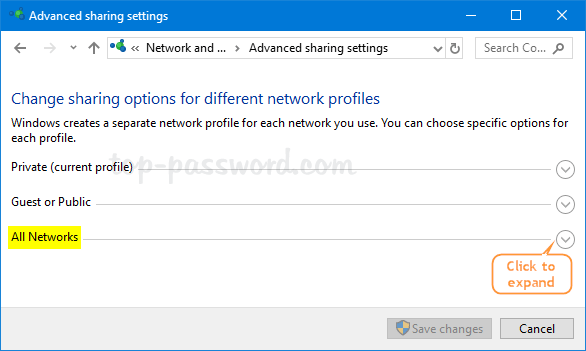
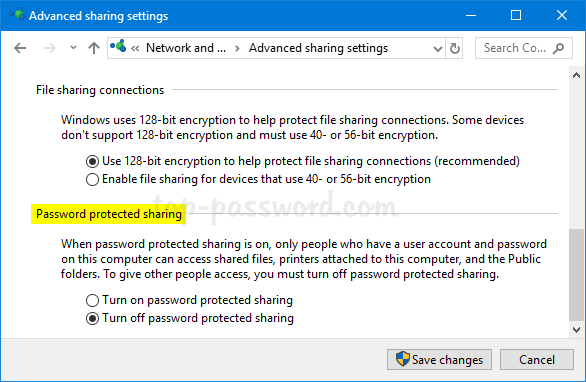
1. Turn off Password Protected Sharing from the Control Panel
First, you can try to turn off the Password Protected Sharing from the Control Panel, and see if it works properly for you.
If you already tried this method, go straight to the next solution.
To do so, you need to follow these steps:
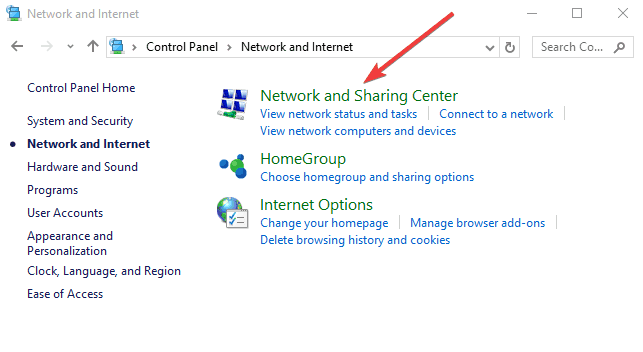
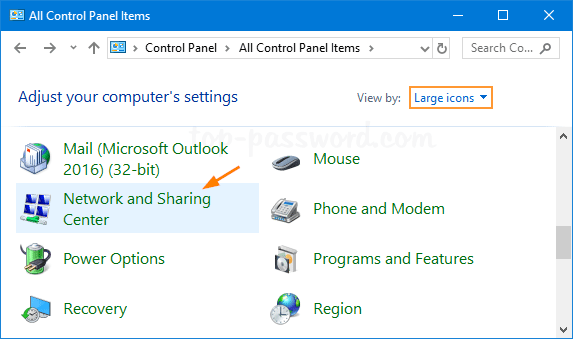
- Click on the Start button and open the Control Panel
- Click on the Network and Sharing Center

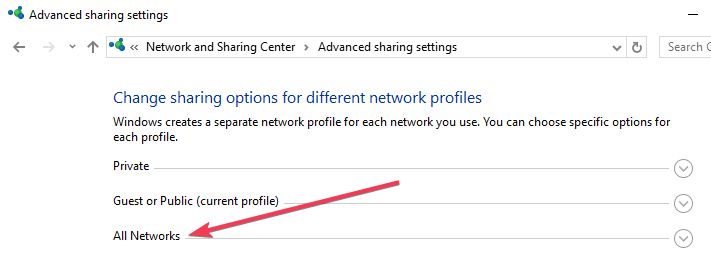
- Click Change advanced sharing settings which you can find in the left side
- Click the arrow next to All Networks to expand the section
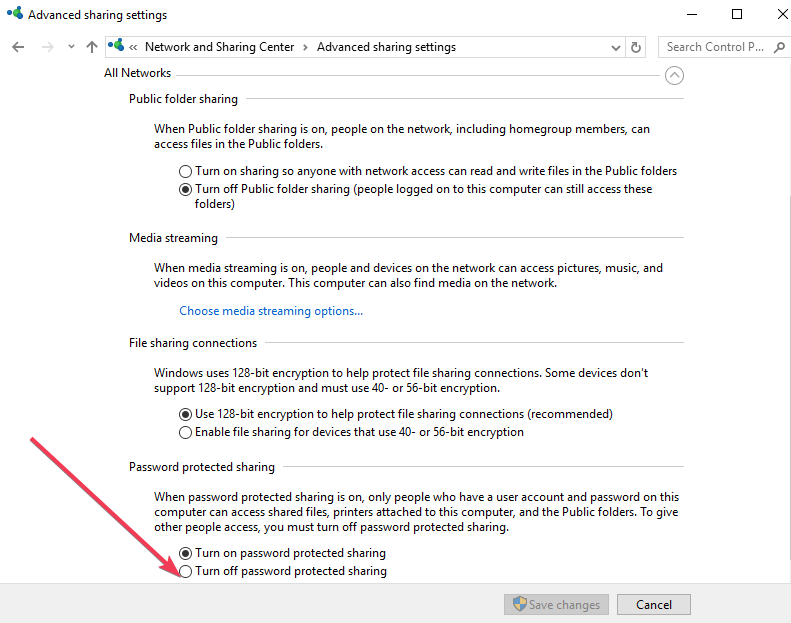
- Select Turn off password protected sharing option under Password protected sharing
- Click Save changes.

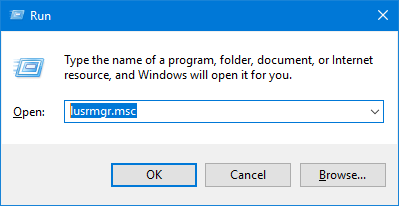
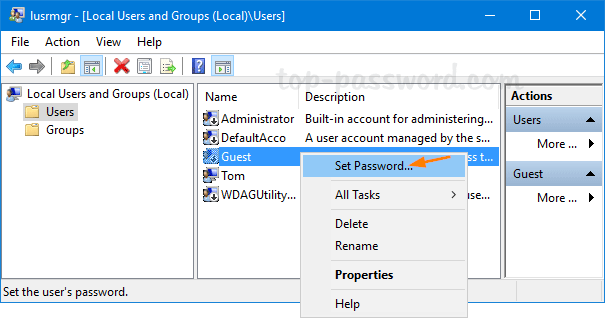
2. Remove Guest account password
Run a System Scan to discover potential errors


If method 1 does not work, you could have to remove the Guest account password. To do so, follow these steps:
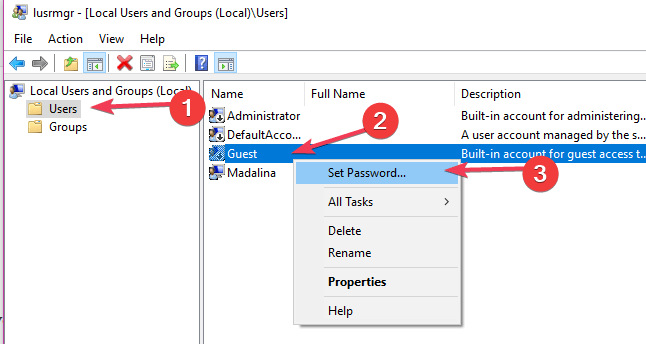
- Open the Run box by pressing Windows Key + R on your keyboard > type lusrmgr.msc in the box and hit Enter.
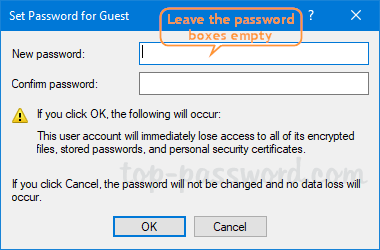
- In the Local Users and Groups box, click Users in the left pane > right click Guest and press Set Password…
- In the Set Password for Guest box that pops up, you need to leave the New Password and Confirm Password fields empty > click OK
3. Remove Password Protected Sharing from User Accounts
Alternatively, you can try removing the password using the Registry Editor.
Follow the guide below:
- Open the Run box by Windows Key + R on your keyboard > type control userpasswords2 in the box and hit Enter
- User Accounts window will open
- Under the Users for this computer section, select Guest > click Reset Password…
- Leave the New Password and Confirm Password fields empty > click OK

4. Modify registry entries using the Registry Editor
We recommend modifying the registry entries manually, being very careful while making these changes. A simple mistake could have dramatic impacts on your system.
To modify the registry entries, follow these steps:
- Open the Run box by pressing R + Windows buttons on your keyboard > type regedit in the box and hit Enter
- The Registry Editor window will pop up > find this location in the left pane:
- HKEY_LOCAL_MACHINE\SYSTEM\CurrentControlSet\Control\Lsa
- In the right pane, find the REG_DWORD type registry named everyoneincludeanonymous
- Double click on the registry > edit DWORD window will pop up > modify value in Value data box from 0 to 1
- Click OK > go the next registry location:
- HKEY_LOCAL_MACHINE\SYSTEM\CurrentControlSet\Services\LanmanServer\Parameters
- Click on the parameters folder > find the REG_DWORD type registry named restrictnullsessaccess
- Double click on the registry > edit DWORD window will pop up > modify value in Value data box from 1 to 0
- Close the window and restart the computer > verify if the password is turned off.


5. Check the Password never expires property
An alternative solution would be to change the password‘s expiry status. These next steps will help in completing this task:
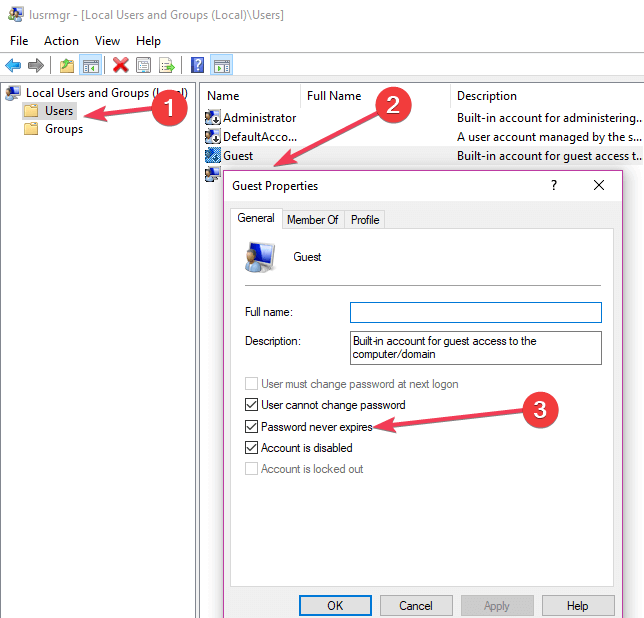
- Open the Run box by Windows Key + R buttons on your keyboard > type lusrmgr.msc in the box and hit Enter
- Select Users in the Local Users and Groups window > right click Guest >Properties
- In the Guest Properties window that pops up, check the box next to Password never expires
- Click Apply > OK > reboot PC and check if the password was removed
If you are able to remove the sharing security password, be aware that public folders and printers are now accessible to other devices. Let us know if these methods helped you out. Comment below.
RELATED GUIDES TO CHECK OUT:
Password Recovery
In Windows 10, password protected sharing is turned on by default, so your shared files could be accessed by only network users who have the login credentials of your computer. If you want to allow others to access the shared files on your PC without any username/password, follow the below step-by-step tutorial to turn off password protected sharing in Windows 10.
Steps to Disable Password Protected Sharing in Windows 10
- Open the Control Panel and change the View by setting to Large icons, then click on Network and Sharing Center.
Click on the “Change advanced sharing settings” link on the left side.
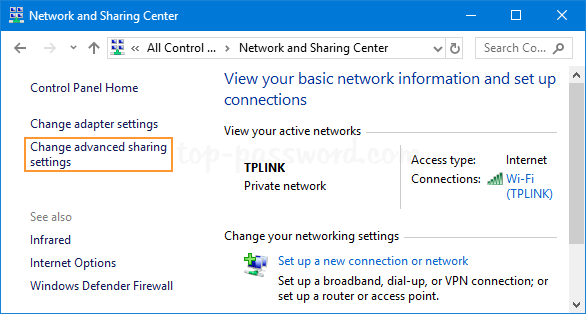
Click on the downward arrow to expand the All Networks section.
Under Password protected sharing, check the option “Turn off password protected sharing” and click Save changes.
Can’t Turn off Password Protected Sharing?
After you’ve followed the above steps to disable password protected sharing, go back to the Advanced sharing settings and sometimes you may find the password protected sharing is still turned on. This issue usually happens when your Guest account is protected with a password. To fix this issue, you have to remove the Guest password:
- Press the Windows key + R together to open the Run box, type lusrmgr.msc and press Enter to open Local Users and Groups.
Click Users in the left pane, then right-click on Guest and select Set Password.
Leave the New password and Confirm password fields blank, then click OK.
If you’re unable to run the lusrmgr.msc (Local Users and Groups snap-in), you can use other methods described in the following article to remove the Guest account password.
After removing the Guest password, you should now be able to turn off password protected sharing successfully.
Password-protected Sharing in Windows 7 Exposes the C:\Users\Username folders (and files) to others if Public Folders are shared.
Greetings to all,
I’ve tried sharing files in Windows 7 with a computer running XP over a Home network. These are some of
my finding and CONCERN over the files that are actually being shared if Public Folders Sharing is turned ON
in Windows 7.
I will refer the computer running on Win 7 as Comp A
and the on running on XP as Comp B for the rest of the entry
In the Advanced Sharing Settings on Windows 7 I’ve made these changes
NOTE: C:\Users\Username is an ADMINISTRATOR Profile on Comp A (running Win 7).
Case 1
In Home or Work (which is my current profile)
i) I’ve turned Public Folder sharing ON
ii) Password Protected Sharing sharing is turned OFF
Both Comp A and Comp B has been set to the SAME Workgroup name
Everything is fine, I can view all the network computers on both PC’s although I’ve
have to run a search on Comp B to find Comp A.
What I can see on Comp B (running XP) are ONLY the Public Folders of Comp A (Win 7)
OK, Good. it’s the expected behavior. BUT.
There is a PROBLEM if Password Protected Sharing is turned ON in Win 7
as explained in Case 2
Case 2
i) Public Folder sharing is still turned ON
but
ii) Password Protected Sharing is turned ON
When I did this, I was prompt for a Username and Password (on Comp B) when I tried
to view the files on Comp A. So I keyed in the Username and Password of Comp A in Comp B
and I can gain access to the files shared on Comp A.
Here is where the «NIGHTMARE» begins.
I’ve noticed that not only the Public Folders (in Comp A) and be accessed, but the
C:\Users\Usersname Folder and every folder and files in it is EXPOSED to Comp B.
Though some files cannot be accessed but I some files CAN be ACCESSED (e.g. files in the DOWNLOAD folders
and DESKTOP).
What is happening here: Shouldn’t ONLY the PUBLIC Folders be shared.
Even with the Username and Password, that does not mean that I want all my PERSONAL
folders to SHARED by DEFAULT (if the person has my Password).
This was not the case in Vista. (which was GREAT)
So this lead me to do some ivestigation on the Properties of the C:\Users\Username folder on Comp A.
This are my findings and it’s very SUPRISING and WORRYING and CONFUSING indeed.
i) By selecting the C:\Users\Username Folder and checking the STATUS BAR
there is NO indication that the folder is SHARED (meaning windows 7 is telling that it’s NOT SHARED)
ii) Selecting the C:\Users\Public folder and checking the Status Bar, there IS a indication:
State:Shared and also Shared With:XXXX (meaning windows 7 is telling that it’s SHARED)
So, the JACKPOT question here is:
If, C:\Users\Username folder in Comp A is NOT SHARED, WHY IS IT that it CAN BE ACCESSED in Comp B .
FURTHER investigation revealed this:
By Right-Click on C:\Users\Username, Click Properties, Sharing Tab
The indication here is that C:\Users\Username is SHARED complete with a Network Path.
(wished I can give a SCREEN SHOT here showing the DIFFERENT STATUS in the STATUS BAR and SHARING TAB under the Folder Properties)
So the 2nd JACKPOT question is:
Is C:\Users\Username SHARED or NOT SHARED in Windows 7.
I’ve tried turning OFF the sharing but it’s NOT successful if the Public Folder is shared.
What I did is to manually UN-SHARE the WHOLE C:\Users folder in Windows 7 (just to be safe)
and share my folder from some other location(s).
Hope Microsoft will FIX this ASAP as many of us will be caught unaware that our PERSONAL files are
EXPOSED if PASSWORD PROTECTED SHARING is TURNED ON in Win 7
(as most of us will think it will be MORE SECURED by using a PASSWORD and not the other around: EXPOSING our PERSONAL files unawared)
Replies (10)
you have a a few issues here..
1 create a non administrator user and try again and you find it work the way it should.
2. if you log in to any windows computer as administrator in any share then by defaule you can go to the hidden drive shares and see the whole drive
for example
map to share user with administratior/password get in then do a
map z: = //computername/c$ and you be at root of the computer c drive
map y: = //computername/d$ and you be at root of the computer d drive
that becasue you using an Administrator Account — this will not working as a non — adminstrator account
by the way you can just map to the hidden share as administrator any time
Jayf CISSP, CISM, MCDBA, MCSE, MCT NSA-IAM
Was this reply helpful?
Sorry this didn’t help.
Great! Thanks for your feedback.
How satisfied are you with this reply?
Thanks for your feedback, it helps us improve the site.
How satisfied are you with this reply?
Thanks for your feedback.
To cut the long story short I’m not sure what Microsoft did WRONG with the DEFAULT settings for sharing PUBLIC folders in Windows 7.
Prob: Sharing C:\Users\Public folder AUTOMATICALLY shares the WHOLE C:\Users folder.
Yes I know if u check , the C:\Users\Username folder is shown as: i) NOT SHARED in STATUS BAR but ii) SHARED if you right-click
and check the sharing properties
IF you go to the computer management by right-click on Computer Icon -> Manage
The WHOLE C:\User folder is actually shared.
This WAS NOT the case with XP or VISTA
Sharing the C:\Users\Public or C:\Document and Settings\Public folder does not AUTOMATICALLY share it’s PARENT directory
and this should be the case.
You don’t want to share any files WITHOUT YOU KNOWING don’t you?
The WEIRDEST thing of all usually the sharing permission is inherited by the CHILD FROM PARENT and NOT PARENT FROM CHILD.
IN window 7 for this case it’s the PARENT FROM CHILD. CHILD: C:\Users\Public , PARENT: C:\Users
Anywhere I’ve found the solution BUT i must remember to check this everytime I share files just to be SAFE and SURE.
I just go to the Computer Management as mentioned about and unshare the C:\Users folder from there.
This way only the C:\Public folder remained shared but not the WHOLE C:\Users folder.
Was this reply helpful?
Sorry this didn’t help.
Great! Thanks for your feedback.
How satisfied are you with this reply?
Thanks for your feedback, it helps us improve the site.
How satisfied are you with this reply?
Thanks for your feedback.
JimmyLeo, I recently found the same problem, and was amazed such a simple error had been overlooked. No matter how I tried to share Public without sharing my entire directory, I couldn’t work it out, but I finally found the solution.
Your idea of going through Computer Management and unsharing Users meant unsharing Public as well, but if you right-click in some blank space in that management window and select Add Share, the wizard allows you to share Public without sharing Users as well.
I really hope this major oversight hasn’t caused too much grievance to Win7 users.
Was this reply helpful?
Sorry this didn’t help.
Great! Thanks for your feedback.
How satisfied are you with this reply?
Thanks for your feedback, it helps us improve the site.
How satisfied are you with this reply?
Thanks for your feedback.
I have notice this same Issue but I want to through a couple of informational facts in here.
1- With Microsoft and many other OS’s and NOS’s inherited rights are always assumed.
For example — If I share the root of the C: drive — everything on the c: whether they are marked as shared or not is in fact shared.
At the root of the issue is that when you enabled Pubic Folder sharing Windows 7 do not enabled the public folder but \users folder.
The Public Folders are stored in a folder called «public» in the \Users directory. The net effect is that EVERY — USERS folder is Shared
when you «enable» sharing public through the network and sharing center.
2- There was comment made about not wanting your personal files and folders shared even if you share the public folder and given your user ID and password. Frankly, EVEN if this worked correctly and it does NOT, if you have a concern about this, you should never share your user id and Password EVER — all someone needs is a few second directly in front of your computer with the password and ID you have given them to get to those files. It does not take much, they already have to be close for you to share the files, one visit to the john and files are quickly copied to a flash drive! — Solution create a different ID or an id for each person who you need to share with this should be a non-admin user. There is a little more that you need to truly make sure your file are truly protected but that’s for another day.
Since, I brought up the adding of users ids and password — I want to comment on JayTF’s reply it does not matter if the users is an admin user or not. The sharing permissions granted through the Networking and Sharing center when «Turn on Public Folder Sharing» is enabled grants «everyone» full access to the \users directory. SO every user has full access to the every folder under the \users directory — including the public folder as well as folders and files for any other user that has been added to that computer or domain.
My findings do not support Jimmyleo either — The parent inherent from the child — Only the parent (c:\users) has been shared maybe that has been fixed with a patch and I do not see it today.
So the sum this up..
If through the networking and sharing center, Change Advanced sharing setting, for Public Folder share you enable “turn on so anyone with network access can read and read in the public folders” is Shares the %root%\users folder and grant share permission to Everyone with full access.
This not only grants access to the public folders but all the folders for all the users on that computer. It is not just administrative users the have this access, it truly sets everyone with full access.
To make the issue worse, if you turn off public folder sharing through the network and sharing center it does nothing. The share of the %root%\users and the permissions all remain..
Surly this is not the intended or proper functions.
The work around for this simply do not use, ever, the network and sharing to enable public folder share.. do it either through fsmgmt.msc.
or go old school drill down through the drive to the specific folder you wish to share — right click go to properties —> sharing tab —> Advanced sharing button —> Click share this folder —> add the permissions for the appropriate users and apply.
IF you have already enable public folder sharing through the network and sharing center — you will need to follow that old school method to un-share the user directory.


