- Анализ загруженности оборудования для Windows
- Сбор информации по загруженности оборудования
- Настройка сборка данных в Performance Monitor (Windows Server 2012 R2)
- Анализ сохраненного замера
- How to use Performance Monitor on Windows 10
- How to open Performance Monitor
- How to use Performance Monitor
- Adding new counters
- Customizing Performance Monitor view
- Performance Monitor counters
- Physical Disk
- Processor
- Network Adapter
- Memory
- Page File
- How to use Data Collector Sets
- Creating a custom Data Collector Set
- Customizing a custom Data Collector Set
- How to use Reports
- Wrapping things up
- More Windows 10 resources
- Halo: MCC’s live service elements make it better, not worse
- Microsoft’s Surface Duo is not ‘failing up’
- Here’s what you can do if Windows 10 update KB5001330 is causing issues
- These are the best PC sticks when you’re on the move
Анализ загруженности оборудования для Windows
Для своевременного обнаружения узких мест в оборудовании необходимо проводить постоянный мониторинг загруженности всех основных аппаратных компонентов системы. К ним в первую очередь относятся:
- Все рабочие сервера кластера 1С:Предприятия
- Сервер СУБД
- Клиентские рабочие станции, работающие под большой нагрузкой
Для каждого из этих компьютеров необходимо настроить сбор информации по загруженности оборудования.
Сбор информации по загруженности оборудования
Во время работы системы рекомендуется осуществлять постоянный мониторинг и запись основных показателей загруженности оборудования. Для этого можно использовать разные средства, в данной статье будет рассказано, как это можно сделать с помощью Performance Monitor, входящего в состав операционной системы Windows, и ЦКК – Центра контроля качества, типовой конфигурации, входящая в Корпоративный инструментальный пакет.
Настройка сборка данных в Performance Monitor (Windows Server 2012 R2)
Для запуска Performance Monitor выберите соответствующий пункт меню раздела Administrative Tools контрольной панели Windows.
Добавьте в список наборов счетчиков (Data Collector Sets) новый набор (User Defined – пользовательский):

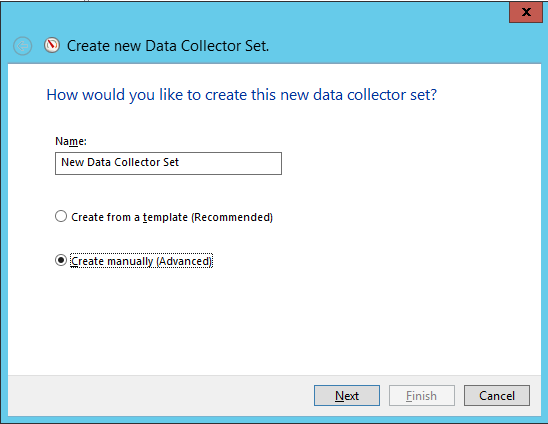
Настройка будет осуществляться вручную – в диалоговом окне нужно выбрать соответствующий пункт и нажать «Далее»:
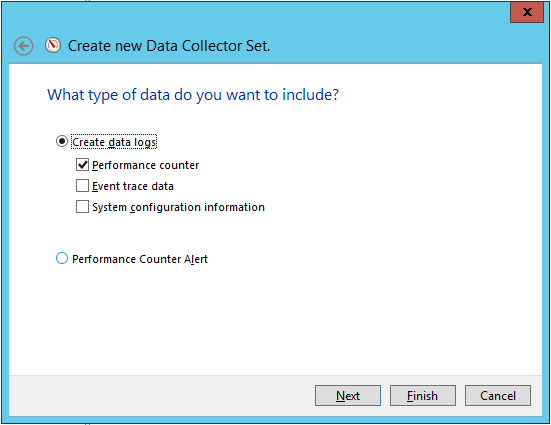
Выберите, какие именно данные будут собираться. Нас интересуют Счетчики производительности:
На следующем шаге выбираются сами счетчики, которые будут входить в набор.

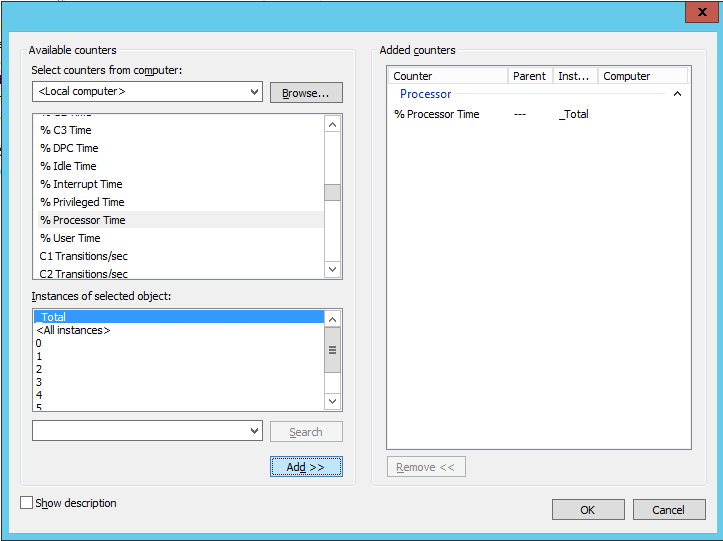
Мы рекомендуем в обязательном порядке собирать данные по следующим счетчикам:
«\Processor(_Total)\Interrupts/sec»
«\LogicalDisk(_Total)\% Free Space»
«\Memory\Available Mbytes»
«\PhysicalDisk(_Total)\Avg. Disk Queue Length»
«\PhysicalDisk(_Total)\Avg. Disk Sec/Read»
«\PhysicalDisk(_Total)\Avg. Disk Sec/Write»
«\Processor(_Total)\% Idle Time»
«\Processor(_Total)\% Processor Time»
«\Processor(_Total)\% User Time»
«\System\Context Switches/sec»
«\System\File Read Bytes/sec»
«\System\Context Switches/sec»
«\System\File Read Bytes/sec»
«\System\File Write Bytes/sec»
«\System\Processes»
«\System\Processor Queue Length»
«\System\Threads»
Состав счетчиков может меняться в зависимости от роли компьютера. Например, для сервера приложений 1С:Предприятие к перечисленным выше стоит добавить показатели работы процессов 1с:Предприятие:
«\Process(«1cv8*»)\% Processor Time»
«\Process(«1cv8*»)\Private Bytes»
«\Process(«1cv8*»)\Virtual Bytes»
«\Process(«ragent*»)\% Processor Time»
«\Process(«ragent*»)\Private Bytes»
«\Process(«ragent*»)\Virtual Bytes»
«\Process(«rphost*»)\% Processor Time»
«\Process(«rphost*»)\Private Bytes»
«\Process(«rphost*»)\Virtual Bytes»
«\Process(«rmngr*»)\% Processor Time»
«\Process(«rmngr*»)\Private Bytes»
«\Process(«rmngr*»)\Virtual Bytes»
Обратите внимание, что имена счетчиков могут незначительно отличаться в зависимости от версии вашей операционной системы
Рекомендуемая частота получения значений для рабочей системы – один раз в 15 секунд. В нагрузочных тестах рекомендуем собирать счетчики чаще, например, один раз в 1 секунду, т.к. длительность каждого непрерывного нагрузочного теста обычно не превышает десятка часов, а анализировать более детальные данные удобнее.По окончании выбора нажмите «Далее», укажите директорию хранения логов, при необходимости – пользователя, от имени которого будет запускаться процесс сборщика, и сохраните набор.
Откройте для дальнейшего редактирования его свойства (например, кликнув по нему в списке двойным щелчком мыши):

Можно выбрать формат файла логирования: бинарный удобен, если планируется анализировать графические данные, CSV – если планируется как-либо программно обрабатывать данные. В данном примере выбран бинарный.

На закладке «Files» можно настроить шаблон имени файлов и режим записи. Для сохраненного набора также можно настроить расписание и задать ограничения и условия окончания сбора.

В данном случае замер не стартует автоматически, но на продуктивных площадках рекомендуется не забыть настроить планировщик задач на автозапуск выбранного счетчика, например, каждый час, если сбор данных ещё не запущен.
После сохранения можно запустить замер (при помощи кнопки Start контекстного меню).
Создать набор счетчиков Performance Monitor и управлять сбором данных можно не только интерактивно, но и при помощи консольной утилиты logman. Подробно работа с ней описана на сайте Microsoft https://docs.microsoft.com/en-us/windows-server/administration/windows-commands/logman
Команда создания набора будет выглядеть так:
logman create counter 1C_counter -f bincirc -c «\Processor(_Total)\Interrupts/sec» «\LogicalDisk(_Total)\% Free Space» «\Memory\Available Mbytes» «\PhysicalDisk(_Total)\Avg. Disk Queue Length» «\PhysicalDisk(_Total)\Avg. Disk Sec/Read» «\PhysicalDisk(_Total)\Avg. Disk Sec/Write» «\Processor(_Total)\% Idle Time» «\Processor(_Total)\% Processor Time» «\Processor(_Total)\% User Time» «\System\Context Switches/sec» «\System\File Read Bytes/sec» «\System\Context Switches/sec» «\System\File Read Bytes/sec» «\System\File Write Bytes/sec» «\System\Processes» «\System\Processor Queue Length» «\System\Threads» -si 5 -v mmddhhmm
Анализ сохраненного замера
Для просмотра данных откройте бинарный файл замера .blg, по умолчанию Windows откроет такой тип при помощи Performance Monitor:
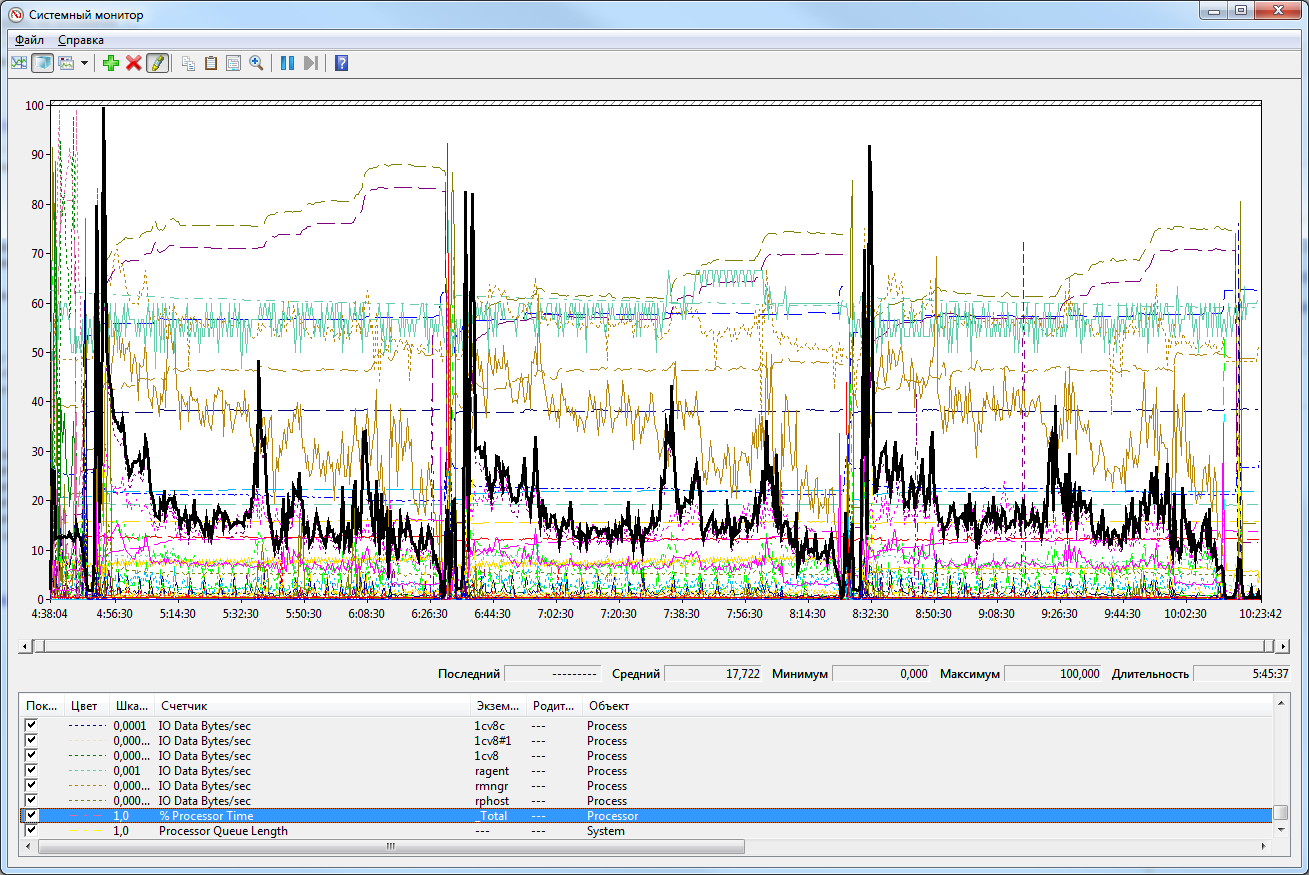
Выделить график, относящийся к конкретному счетчику, можно, встав на линию графика либо на строку счетчика в списке снизу. Для него при этом отобразятся среднее, минимальное, максимальное и последнее значение за период замера:

Интерес представляют, как правило, среднее значение и «пики» — максимум / минимум в зависимости от смысла счетчика.
Ниже в таблице приведены описания и предельные значения некоторых из них:
How to use Performance Monitor on Windows 10

When your computer suddenly isn’t fast as usual, or keeps freezing up, you’re likely dealing with performance issues that could be caused by a number of reasons. It could be as a result of problems with the hardware, apps or drivers poorly designed, the operating system using excessive system resources, or even be a malware that infected your device.
Although Windows 10 includes a number of tools to troubleshoot performance issues, such as the «Performance» tab in Task Manager, you’ll find that the Performance Monitor is the most complete tool you can use to view and analyze application and hardware data to fix system performance related problems. You can also customize what data to collect in log files, define alerts, generate reports, and replay collected performance data in many ways.
In this Windows 10 guide, we’ll walk you through the steps to use the Performance Monitor to analyze your computer’s performance.
How to open Performance Monitor
On Windows 10, you can use Performance Monitor to analyze data, such as processor, hard drive, memory, and network usage, but first, you must know how to open the tool. Here are three ways to open Performance Monitor:
- Open Start, do a search for Performance Monitor, and click the result.
- Use the Windows key + R keyboard shortcut to open the Run command, type perfmon, and click OK to open.
- Use the Windows key + X keyboard shortcut to open the Power User menu, select Computer Management, and click on Performance.
How to use Performance Monitor
When you first open the tool, it’ll open in the main page with a brief overview, as well as a system summary with real-time data about memory, network adapter, physical disk, and processor usage.

On the left, you’ll find the navigation pane with access to Performance Monitor, Data Collector Sets, and Reports.
Switching to Performance Monitor, you’ll see a screen with a single counter. This is typically the «Processor Time» counter, which displays the processor load in the last 100 seconds. However, the beauty of this tool is that you can add tons of other counters to monitor virtually anything on your computer.
Adding new counters
To add new counters to monitor applications and hardware performance on your computer, do the following:
Click the green plus button above the Performance Monitor graph.
Select the counters you want to monitor (e.g., Bytes Total/sec).
Quick Tip: If you’re trying to add multiple counters, press and hold the Ctrl key and click to select each item you want to add. Also, you can check the Show description option to get more information about the counter you’re selecting.
Click the Add button.
Customizing Performance Monitor view
Once you have configured all the counters you want to monitor, you can also customize various aspects of the data shown in the graph.
To customize the Performance Monitor view, do the following:
- Double-click one of the counters to open the Performance Monitor Properties window.
- On the «Data» tab, select the counter you want to customize.
- At the bottom, choose the color, scale, width, and style you want to use.
Repeat steps 2 and 3 for each item you want to customize.
Quick Tip: If you’re trying to change the properties for multiple counters, press and hold the Ctrl key, select each item you want to customize, and change the available settings.
In addition, you can also change the graph’s style, simply click the «Change graph type» in the toolbar and select one of the available views, including Line, Histogram bar, and Report.
Performance Monitor Line view
Performance Monitor Histogram bar view
Performance Monitor Report view
Other options available in the toolbar include the ability to remove and highlight counter, and an option to freeze the display to analyze the current data on the screen.
If you look at the context menu, you’ll also see the «Save Settings as» option, which comes in handy when you want to save the counters and configuration for later use. Interesting enough, once you save the settings as an HTM file, you won’t be able to load the configuration with Performance Monitor.
However, you can open the file using Internet Explorer, which actually loads a fully functional instance of Performance Monitor in the web browser.
Alternatively, you can open the settings file with Notepad and copy its content. Then you can open Performance Monitor and click the Paste Counter List (Ctrl + V) button in the toolbar to load your saved settings. (This option may not work for everyone.)
Performance Monitor counters
Now that you have a basic understanding of what’s Performance Monitor and how to set it up let’s look at some common counters you can use to monitor your system.
Physical Disk
Includes the counters to monitor the physical performance of your computer’s hard drive.
You can select counters, such as % Disk Time to monitor the time a drive is taking to complete read and write requests. If this counter stays in high numbers for a long time, it could be an indication that the hard drive is ready for replacement.
Adding other counters like Disk Bytes/sec, Disk Read Bytes/sec, Disk Read/sec, Disk Write Bytes/sec, and Disk Writes/sec can help you to figure out the read and write speeds of the hard drive.
Processor
Includes the counters to monitor the processor activity.
You can select counters, such as % Interrupt Time to monitor the time the CPU takes to complete hardware requests (interrupts). If this counter stays above 30%, it could be an indication that there is a hardware problem.
Add the % Privileged Time counter monitors the time the processor is using to execute in Kernel (Privileged) mode. A high percentage of privileged time may indicate a poorly written driver or hardware malfunction.
Network Adapter
Includes a number of counters to monitor the sent and received bytes for one or multiple network adapters.
You can select counters, such as Bytes Received/sec, Bytes Sent/sec, Bytes Total/sec to see how much bandwidth is being utilized by your wireless or Ethernet adapter. If you’re always downloading files or streaming high-resolution videos and bandwidth is consistently hitting 85%, you may want to consider upgrading your data speed plan.
However, if you’re not using your internet connection heavily, but you still see high network activity, it could be a sign of something not working correctly, or it could also be a malware hidden on your computer.
Memory
Includes an array of counters to monitor your PC’s RAM usage.
You can select counters, such as % Committed Bytes in Use to monitor the total memory currently in use by your system. If the number is continuously greater than 80%, then you don’t have enough memory on your system.
Adding the Available Mbytes, you can measure the amount of physical memory, available for running processes. If this value is less than 5% of the total RAM installed on your computer, then you may need to add more memory.
Page File
Includes counters to monitor how page files are being utilized.
If your computer is slow and the page file counters (% Usage and % Usage Peak) are constantly high. It could be an indication that you need to upgrade your computer’s memory.
How to use Data Collector Sets
The Performance Monitor also includes Data Collectors Sets, which is where you can create custom sets containing performance counters and alerts based on specific criteria.
Creating a custom Data Collector Set
If you want to create custom Data Collector Set when to collect specific performance information, do the following:
- While in Performance Monitor, expand Data Collector Sets.
Right-click «User Defined», select New, and click on Data Collector Set.
Click Next.
Click Next.
Click OK.
Click Next.
Click Next.
Check the Save and Close option.
Once you completed the steps, you can right-click your Data Collector Set under «User Defined,» and click Start to run it or Stop to shut it down.
Customizing a custom Data Collector Set
The wizard will only let you configure some of the settings when creating a custom Data Collector Set. If you want your custom set to stop automatically after a period of time, or run it on schedule, you’ll need to manually configure those options.
To allow a set to stop automatically after a period of time, do the following:
Right-click the Data Collector Set you want, and select Properties.
Configure the limits as needed.
![]()
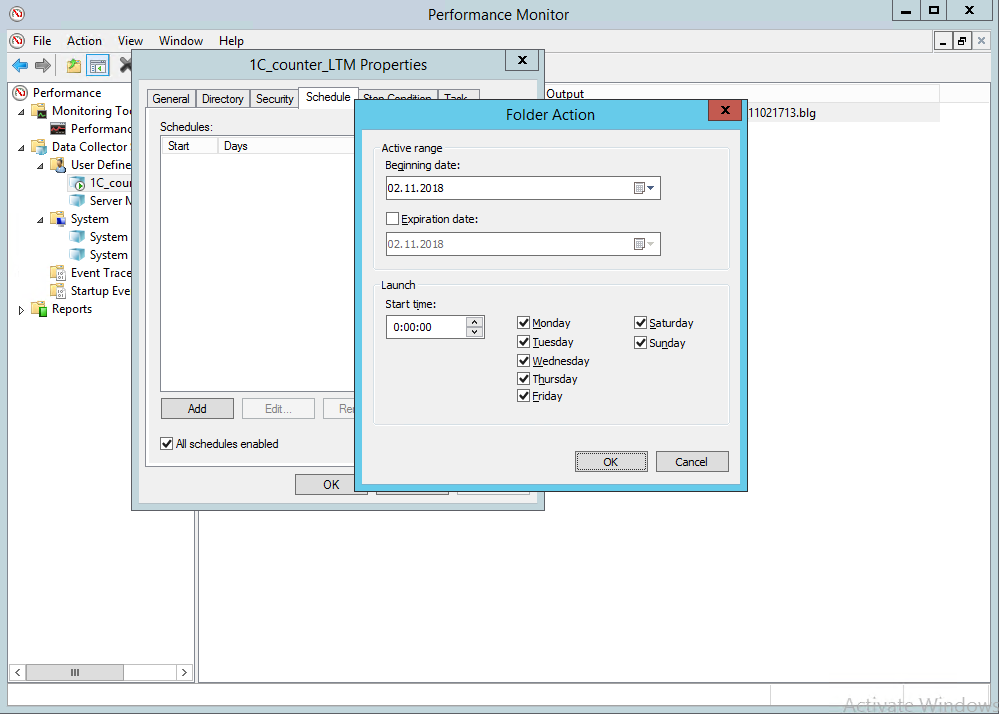
To schedule a set to run automatically, do the following:
Right-click the Data Collector Set you want, and select Properties.
Click the Add button.
![]()
Click OK.
![]()
Alongside the ability to create your own sets, Windows 10 bundles two custom Data Collectors Sets to analyze performance, which are located inside the System folder.
- System Diagnostics: Collects various detailed system information, and it includes the counters found in System Performance.
- System Performance: Collects valuable performance data about the processor, hard drive, memory, and network adapters on your computer.
How to use Reports
You can view and analyze the data collected with pre-defined and custom sets using the Reports option.
To view and analyze the data collected, simply go to Reports, and select the report you want to see.
If you’re opening one of the System reports, you’ll see data arrange in a more meaningful way allowing you to quickly identify any issues on your computer.
On the other hand, when you open a custom report, you’ll only be able to see a recording of the data collected, which still useful to help analyze your custom set.
Wrapping things up
Although you can use other tools, such as Task Manager to monitor your system’s performance, the Performance Monitor is a more advanced tool that allows you to monitor virtually anything on your computer. And once you understand it, Performance Monitor can be a valuable tool to analyze and fix any performance problems on Windows 10.
More Windows 10 resources
For more help articles, coverage, and answers on Windows 10, you can visit the following resources:
![]()
Halo: MCC’s live service elements make it better, not worse
Halo: The Master Chief Collection is more popular than ever, but some fans don’t agree with the live service approach 343 Industries has taken with it. Here’s why those elements are, at the end of the day, great for the game and for Halo overall.
![]()
Microsoft’s Surface Duo is not ‘failing up’
Microsoft announced this week that it was expanding Surface Duo availability to nine new commercial markets. While Surface Duo is undoubtedly a work in progress, this is not a sign of a disaster. It’s also doesn’t mean that Surface Duo is selling a ton either. Instead, the reason for the expansion is a lot more straightforward.
![]()
Here’s what you can do if Windows 10 update KB5001330 is causing issues
In this guide, we’ll show you the steps to get rid of the update KB5001330 to fix profile, gaming, and BSoD problems with the Windows 10 October 2020 Update and May 2020 Update.
![]()
These are the best PC sticks when you’re on the move
Instant computer — just add a screen. That’s the general idea behind the ultra-portable PC, but it can be hard to know which one you want. Relax, we have you covered!


