- How to use the Microsoft Authenticator app
- Использование приложения Microsoft Authenticator
- Authentication methods in Azure Active Directory — phone options
- Mobile phone verification
- Text message verification
- Phone call verification
- Office phone verification
- Troubleshooting phone options
- Next steps
- Windows Authentication
- Overview
- New in IIS 7.5
- Compatibility
- Setup
- Windows Server 2012 or Windows Server 2012 R2
- Windows 8 or Windows 8.1
- Windows Server 2008 or Windows Server 2008 R2
- Windows Vista or Windows 7
- How To
- How to enable Windows authentication for a Web site, Web application, or Web service
- How to enable Extended Protection for Windows authentication
- Configuration
- Attributes
- Child Elements
- Configuration Sample
- Sample Code
How to use the Microsoft Authenticator app
Sign in securely without a password
Are you tired of trying to remember your password? With this free app, you can sign into your personal Microsoft account without one. For security, you’ll use a fingerprint, face recognition, or a PIN. And don’t worry—if anything happens to your mobile device or if you forget your PIN, your password will still get you into your account.
The Microsoft Authenticator app is available for Android and iOS.
You can use the app with a mobile phone or a tablet. Learn what it’s like to sign in and how you can backup and recover account credentials.
Use two-step verification for more security
If you need more security, you can require a password along with your fingerprint, face recognition, or PIN. This is called two-step verification. For a personal account, you can turn two-step verification on or off, and reset your password. You can also manage app passwords and change your settings. For a work or school account, your administrator will likely decide whether you’ll use two-step verification, and then you’ll complete the registration process and set it up.
Use time-based, one-time passcodes
The Microsoft Authenticator app also supports the industry standard for time-based, one-time passcodes (also known as TOTP or OTP). Because of that, you can add any online account that also supports this standard to the Microsoft Authenticator app. This will help keep your other online accounts secure.
For instructions on how to add other online accounts, read Add your non-Microsoft accounts.
Использование приложения Microsoft Authenticator
Безопасный вход без пароля
Надоело запоминать пароль? С помощью этого бесплатного приложения вы можете входить в свою личную учетную запись Майкрософт без него. Чтобы сделать процесс входа безопасным, можно использовать отпечаток пальца, распознавание лица или PIN-код. Не стоит волноваться — если что-то произойдет с вашим мобильным устройством или если вы забудете свой PIN-код, вы сможете по-прежнему использовать свой пароль для входа в учетную запись.
Приложение Microsoft Authenticator доступно для систем Android и iOS.
Это приложение можно использовать на мобильном телефоне или планшете. Узнайте, как входить в учетную запись таким образом и как можно сделать резервную копию учетных данных и восстановить их.
Использование двухфакторной проверки подлинности для обеспечения лучшей защиты
Если вам требуется дополнительный уровень безопасности, вы можете использовать пароль вместе с отпечатком пальца, распознаванием лица или PIN-кодом. Это называется двухфакторной проверкой подлинности. Для личной учетной записи вы можете включить или отключить двухфакторную проверку подлинности и сбросить пароль. Кроме того, вы можете управлять паролями приложений, а также изменять параметры. При настройке рабочей или учебной учетной записи решение об активации двухфакторной проверки подлинности, как правило, принимает ваш администратор, после чего вы самостоятельно завершаете процесс регистрации и настройки.
Использовать временные одноразовые пароли
Приложение Microsoft Authenticator также поддерживает стандартные в отрасли временные одноразовые пароли (также известные как TOTP или OTP). Поэтому вы можете добавить любую учетную запись интернет-служб, которая также поддерживает этот стандарт в приложении Microsoft Authenticator. Это поможет обеспечить безопасность других ваших учетных записей интернет-служб.
Инструкции о том, как добавить другие учетные записи интернет-служб, см. в разделе Добавление учетных записей для сторонних продуктов.
Authentication methods in Azure Active Directory — phone options
For direct authentication using text message, you can Configure and enable users for SMS-based authentication. SMS-based sign-in is great for Frontline workers. With SMS-based sign-in, users don’t need to know a username and password to access applications and services. The user instead enters their registered mobile phone number, receives a text message with a verification code, and enters that in the sign-in interface.
Users can also verify themselves using a mobile phone or office phone as secondary form of authentication used during Azure AD Multi-Factor Authentication or self-service password reset (SSPR).
To work properly, phone numbers must be in the format +CountryCode PhoneNumber, for example, +1 4251234567.
There needs to be a space between the country/region code and the phone number.
Password reset doesn’t support phone extensions. Even in the +1 4251234567X12345 format, extensions are removed before the call is placed.
Mobile phone verification
For Azure AD Multi-Factor Authentication or SSPR, users can choose to receive a text message with a verification code to enter in the sign-in interface, or receive a phone call.
If users don’t want their mobile phone number to be visible in the directory but want to use it for password reset, administrators shouldn’t populate the phone number in the directory. Instead, users should populate their Authentication Phone attribute via the combined security info registration at https://aka.ms/setupsecurityinfo. Administrators can see this information in the user’s profile, but it’s not published elsewhere.

Microsoft doesn’t guarantee consistent SMS or voice-based Azure AD Multi-Factor Authentication prompt delivery by the same number. In the interest of our users, we may add or remove short codes at any time as we make route adjustments to improve SMS deliverability. Microsoft doesn’t support short codes for countries / regions besides the United States and Canada.
Text message verification
With text message verification during SSPR or Azure AD Multi-Factor Authentication, an SMS is sent to the mobile phone number containing a verification code. To complete the sign-in process, the verification code provided is entered into the sign-in interface.
Phone call verification
With phone call verification during SSPR or Azure AD Multi-Factor Authentication, an automated voice call is made to the phone number registered by the user. To complete the sign-in process, the user is prompted to press # on their keypad.
Office phone verification
With phone call verification during SSPR or Azure AD Multi-Factor Authentication, an automated voice call is made to the phone number registered by the user. To complete the sign-in process, the user is prompted to press # on their keypad.
Troubleshooting phone options
If you have problems with phone authentication for Azure AD, review the following troubleshooting steps:
- “You’ve hit our limit on verification calls” or “You’ve hit our limit on text verification codes” error messages during sign-in
- Microsoft may limit repeated authentication attempts that are perform by the same user in a short period of time. This limitation does not apply to the Microsoft Authenticator or verification code. If you have hit these limits, you can use the Authenticator App, verification code or try to sign in again in a few minutes.
- «Sorry, we’re having trouble verifying your account» error message during sign-in
- Microsoft may limit or block voice or SMS authentication attempts that are performed by the same user, phone number, or organization due to high number of failed voice or SMS authentication attempts. If you are experiencing this error, you can try another method, such as Authenticator App or verification code, or reach out to your admin for support.
- Blocked caller ID on a single device.
- Review any blocked numbers configured on the device.
- Wrong phone number or incorrect country/region code, or confusion between personal phone number versus work phone number.
- Troubleshoot the user object and configured authentication methods. Make sure that the correct phone numbers are registered.
- Wrong PIN entered.
- Confirm the user has used the correct PIN as registered for their account (MFA Server users only).
- Call forwarded to voicemail.
- Ensure that the user has their phone turned on and that service is available in their area, or use alternate method.
- User is blocked
- Have an Azure AD administrator unblock the user in the Azure portal.
- SMS is not subscribed on the device.
- Have the user change methods or activate SMS on the device.
- Faulty telecom providers such as no phone input detected, missing DTMF tones issues, blocked caller ID on multiple devices, or blocked SMS across multiple devices.
- Microsoft uses multiple telecom providers to route phone calls and SMS messages for authentication. If you see any of the above issues, have a user attempt to use the method at least five times within 5 minutes and have that user’s information available when contacting Microsoft support.
Next steps
Learn more about configuring authentication methods using the Microsoft Graph REST API beta.
Windows Authentication
Overview
The element defines configuration settings for the Internet Information Services (IIS) 7 Windows authentication module. You can use Windows authentication when your IIS 7 server runs on a corporate network that is using Microsoft Active Directory service domain identities or other Windows accounts to identify users. Because of this, you can use Windows authentication whether or not your server is a member of an Active Directory domain.
Windows authentication (formerly named NTLM, and also referred to as Windows NT Challenge/Response authentication) is a secure form of authentication because the user name and password are hashed before being sent across the network. When you enable Windows authentication, the client browser sends a strongly hashed version of the password in a cryptographic exchange with your Web server.
Windows authentication supports two authentication protocols, Kerberos and NTLM, which are defined in the
element. When you install and enable Windows authentication on IIS 7, the default protocol is Kerberos. The element can also contain a useKernelMode attribute that configures whether to use the kernel mode authentication feature that is new to Windows Server 2008.
Windows authentication is best suited for an intranet environment for the following reasons:
- Client computers and Web servers are in the same domain.
- Administrators can make sure that every client browser is Internet Explorer 2.0 or later.
- HTTP proxy connections, which are not supported by NTLM, are not required.
- Kerberos version 5 requires a connection to Active Directory, which is not feasible in an Internet environment.
New in IIS 7.5
The element was introduced in IIS 7.5, which allows you to configure the settings for the new extended protection features that have been integrated into Windows authentication.
Compatibility
| Version | Notes |
|---|---|
| IIS 10.0 | The element was not modified in IIS 10.0. |
| IIS 8.5 | The element was not modified in IIS 8.5. |
| IIS 8.0 | The element was not modified in IIS 8.0. |
| IIS 7.5 | The element was added in IIS 7.5. |
| IIS 7.0 | The element was introduced in IIS 7.0. |
| IIS 6.0 | The element replaces portions of the IIS 6.0 AuthType and AuthFlags metabase properties. |
Setup
The default installation of IIS 7 and later does not include the Windows authentication role service. To use Windows authentication on IIS, you must install the role service, disable Anonymous authentication for your Web site or application, and then enable Windows authentication for the site or application.
After you install the role service, IIS 7 commits the following configuration settings to the ApplicationHost.config file.
Windows Server 2012 or Windows Server 2012 R2
- On the taskbar, click Server Manager.
- In Server Manager, click the Manage menu, and then click Add Roles and Features.
- In the Add Roles and Features wizard, click Next. Select the installation type and click Next. Select the destination server and click Next.
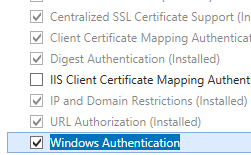
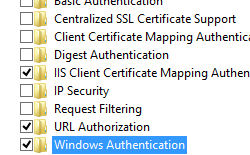
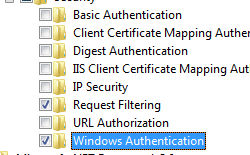
- On the Server Roles page, expand Web Server (IIS), expand Web Server, expand Security, and then select Windows Authentication. Click Next.
 .
. - On the Select features page, click Next.
- On the Confirm installation selections page, click Install.
- On the Results page, click Close.
 .
.Windows 8 or Windows 8.1
- On the Start screen, move the pointer all the way to the lower left corner, right-click the Start button, and then click Control Panel.
- In Control Panel, click Programs and Features, and then click Turn Windows features on or off.
- Expand Internet Information Services, expand World Wide Web Services, expand Security, and then select Windows Authentication.
- Click OK.
- Click Close.
Windows Server 2008 or Windows Server 2008 R2
- On the taskbar, click Start, point to Administrative Tools, and then click Server Manager.
- In the Server Manager hierarchy pane, expand Roles, and then click Web Server (IIS).
- In the Web Server (IIS) pane, scroll to the Role Services section, and then click Add Role Services.
- On the Select Role Services page of the Add Role Services Wizard, select Windows Authentication, and then click Next.
- On the Confirm Installation Selections page, click Install.
- On the Results page, click Close.

Windows Vista or Windows 7
- On the taskbar, click Start, and then click Control Panel.
- In Control Panel, click Programs and Features, and then click Turn Windows Features on or off.
- Expand Internet Information Services, then World Wide Web Services, then Security.
- Select Windows Authentication, and then click OK.
How To
How to enable Windows authentication for a Web site, Web application, or Web service
Open Internet Information Services (IIS) Manager:
If you are using Windows Server 2012 or Windows Server 2012 R2:
- On the taskbar, click Server Manager, click Tools, and then click Internet Information Services (IIS) Manager.
If you are using Windows 8 or Windows 8.1:
- Hold down the Windows key, press the letter X, and then click Control Panel.
- Click Administrative Tools, and then double-click Internet Information Services (IIS) Manager.
If you are using Windows Server 2008 or Windows Server 2008 R2:
- On the taskbar, click Start, point to Administrative Tools, and then click Internet Information Services (IIS) Manager.
If you are using Windows Vista or Windows 7:
- On the taskbar, click Start, and then click Control Panel.
- Double-click Administrative Tools, and then double-click Internet Information Services (IIS) Manager.
In the Connections pane, expand the server name, expand Sites, and then the site, application, or Web service for which you want to enable Windows authentication.
Scroll to the Security section in the Home pane, and then double-click Authentication.
In the Authentication pane, select Windows Authentication, and then click Enable in the Actions pane. 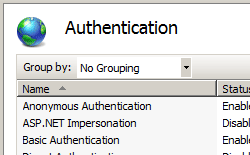
How to enable Extended Protection for Windows authentication
Open Internet Information Services (IIS) Manager:
If you are using Windows Server 2012 or Windows Server 2012 R2:
- On the taskbar, click Server Manager, click Tools, and then click Internet Information Services (IIS) Manager.
If you are using Windows 8 or Windows 8.1:
- Hold down the Windows key, press the letter X, and then click Control Panel.
- Click Administrative Tools, and then double-click Internet Information Services (IIS) Manager.
If you are using Windows Server 2008 or Windows Server 2008 R2:
- On the taskbar, click Start, point to Administrative Tools, and then click Internet Information Services (IIS) Manager.
If you are using Windows Vista or Windows 7:
- On the taskbar, click Start, and then click Control Panel.
- Double-click Administrative Tools, and then double-click Internet Information Services (IIS) Manager.
In the Connections pane, expand the server name, expand Sites, and then the site, application, or Web service for which you want to enable Extended Protection for Windows authentication.
Scroll to the Security section in the Home pane, and then double-click Authentication.
In the Authentication pane, select Windows Authentication.
Click Enable in the Actions pane. 
Click Advanced Settings in the Actions pane.
When the Advanced Settings dialog box appears, select one of the following options in the Extended Protection drop-down menu:
- Select Accept if you want to enable extended protection while providing down-level support for clients that do not support extended protection.
- Select Required if you want to enable extended protection without providing down-level support.
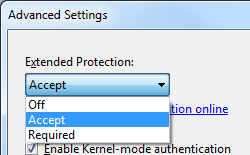
Click OK to close the Advanced Settings dialog box.
Configuration
The element is configurable at the site, application, or virtual directory level in the ApplicationHost.config file.
Attributes
| Attribute | Description |
|---|---|
| authPersistNonNTLM | Optional Boolean attribute. |
Specifies whether IIS automatically reauthenticates every non-NTLM (for example, Kerberos) request, even those on the same connection. False enables multiple authentications for the same connections.
Note: A setting of true means that the client will be authenticated only once on the same connection. IIS will cache a token or ticket on the server for a TCP session that stays established.
The default is false .
Setting this flag to true specifies that authentication persists only for a single request on a connection. IIS resets the authentication at the end of each request, and forces reauthentication on the next request of the session.
The default value is false .
Specifies whether Windows authentication is enabled.
The default value is false .
Specifies whether Windows authentication is done in kernel mode. True specifies that Windows authentication uses kernel mode.
Kernel-mode authentication may improve authentication performance and prevent authentication problems with application pools that are configured to use a custom identity.
As a best practice, do not disable this setting if you use Kerberos authentication and have a custom identity on the application pool.
The default is true .
Child Elements
| Element | Description |
|---|---|
| extendedProtection | Optional element. |
Specifies extended protection options for Windows authentication.
Note: This element was added in IIS 7.5.
Specifies security support providers used for Windows authentication.
Configuration Sample
The following default element is configured at the root ApplicationHost.config file in IIS 7.0, and disables Windows authentication by default. It also defines the two Windows authentication providers for IIS 7.0.
The following example enables Windows authentication and disables Anonymous authentication for a Web site named Contoso.
Sample Code
The following examples disable Anonymous authentication for a site named Contoso, then enable Windows authentication for the site.


