- Файл debug.log в папках, на рабочем столе – что это такое, причины появления
- Спонтанное появление файла debug.log в различных папках
- How to enable debug logging in Microsoft User Experience Virtualization (UE-V)
- Summary
- More information
- Scenario 1: Tracing an Application
- Scenario 2: Tracing a desktop settings issue
- Alternate method: Event Viewer logging
- Enabling debug logging for the Netlogon service
- More information
- For Windows Server 2019, Windows Server 2016, Windows Server 2012 R2
- Alternative methods to enable Netlogon logging
Файл debug.log в папках, на рабочем столе – что это такое, причины появления
В процессе работы за компьютером могут возникать различные ситуации, проблемы и прочие не совсем понятные и объяснимые вещи. И одной из таких проблем может являться появление файла под именем debug.log, который может быть пустым, и, соответственно, файл имеет размер в 0 байт, а может содержать не сильно понятные строки с текстом.
Давайте разберёмся, какова причина этого явления и как с ней справиться.
Спонтанное появление файла debug.log в различных папках
Дабы понять, что происходит, для начала стоит рассказать о предназначении данного файла. В данный файл прописывается различная отладочная информация, события, которые могут возникать в процессе работы программы. Данный функционал необходим программистам при разработке софта, его отладки (доведения до полностью безошибочной работы в тех или иных сценариях). Для обычных пользователей данная информация не несёт никакой пользы, она является избыточной. Так почему же тогда порой данные файлы всё равно можно наблюдать? Ответ прост – программисты порой забывают отключить данный функционал при релизе программы, или при выходе её очередного обновления.
Причём изредка данные файлы создаются не из-за действий самих разработчиков, а из-за действий третьих лиц, которые включают режим отладки при создании так называемых сборок. Под сборками подразумеваются неофициальные дистрибутивы программных продуктов, игр.
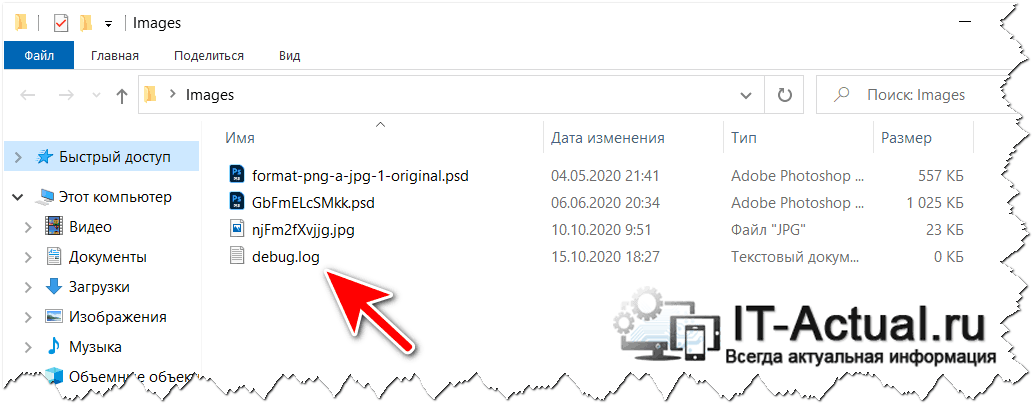
К примеру, не так давно данная проблема была замечена у весьма серьёзного и довольно популярного программного продукта – графического редактора Adobe Photoshop. При его использовании создаётся файл debug.log в тех папках, откуда берутся изображения и куда сохраняются.
Так как же исправить проблему с появлением файла debug.log. Об этом далее.
Исправить данную проблему достаточно легко – просто установить обновление данного программного обеспечения, где оная проблема устранена. Если на текущий момент более новая версия программы отсутствует, то можно установить предыдущую версию программы.
В конце концов, можно и немного подождать, благо сам софт же функционирует корректно и в полном объёме. А появляющийся файл debug.log можно удалить, ни к какому сбою это не приведёт. Единственное, необходимо отметить, что пока работает программа, которая его создала, оный файл удалить не получится, необходимо предварительно закрыть оную.
Ну вот, теперь вы знаете, что за файл такой под именем debug.log, почему он появляется на компьютере и как можно исправить ситуацию.
В свою очередь, Вы тоже можете нам очень помочь.
Просто поделитесь статьей в социальных сетях и мессенджерах с друзьями.
Поделившись результатами труда автора, вы окажете неоценимую помощь как ему самому, так и сайту в целом. Спасибо!
How to enable debug logging in Microsoft User Experience Virtualization (UE-V)
This article describes how to enable debug logging for the Microsoft User Experience Virtualization (UE-V) agent.
Original product version: В Windows 10 — all editions
Original KB number: В 2782997
Summary
It’s useful when troubleshooting issues where settings or files aren’t replicating as expected. Typically, this process is run on at least two different client machines to test replication.
More information
First, identify the scenario you wish to trace. The two main variations for UE-V are tracing applications and tracing desktop settings. User application traces can be collected when an executable is launched; desktop settings must be recorded during logoff and subsequent logoff.
Traces collect data for all users logged in to a computer. If you wish to record a trace for a non-administrator account, you will need to either log into a second desktop session (in the case of a Terminal Server, for example), or else launch a command prompt in the context of a member of the machine’s local Administrators group by holding down the shift key and right-clicking on a shortcut to a Command Prompt. In addition, these commands must be run in an elevated token.
Scenario 1: Tracing an Application
Log on to the computer as a member of the local administrators group.
Launch an elevated command prompt by right-clicking on a shortcut to Command Prompt and selecting Run as administrator.
Create the trace definition by running these two commands in the elevated Command Prompt window:
Start the trace by typing the command logman start UEV .
Close any running instances of the application you are investigating, then launch the application.
Reproduce the issue you are investigating, then close the application.
Stop the trace by typing logman stop UEV .
Delete the trace definition by typing logman delete UEV .
Decode the trace by typing the command netsh trace convert uevtrace_000001.etl DUMP=TXT .
The first trace you take will be named uevtrace_000001.etl by default. Edit the command above if you take multiple traces to reflect the name of the ETL file.
Scenario 2: Tracing a desktop settings issue
Log on to the computer as a member of the local administrators group.
Launch an elevated command prompt by right-clicking on a shortcut to Command Prompt and selecting Run as administrator.
Create the trace definition by running these two commands in the elevated Command Prompt window:
Start the trace by typing the command logman start UEV .
Reproduce the issue you are investigating, then log off.
Log back on to the server.
Launch an elevated command prompt by right-clicking on a shortcut to Command Prompt and selecting Run as administrator.
Stop the trace by typing logman stop UEV .
Delete the trace definition by typing logman delete UEV .
Decode the trace by typing the command netsh trace convert uevtrace_000001.etl DUMP=TXT .
The first trace you take will be named uevtrace_000001.etl by default. Edit the command above if you take multiple traces to reflect the name of the ETL file.
Alternate method: Event Viewer logging
If you wish to use Event Viewer rather than text file logging, use the steps below.
- Log on to the computer as a member of the local administrators group.
- Launch Event Viewer.
- Select View\Show Analytic and Debug Logs.
- Navigate to Event Viewer (Local)\Applications and Service Logs\Microsoft\User Experience Virtualization\App Agent.
- Right-click on Debug under App Agent and select Enable Log.
- Select OK when presented with the «Analytic and Debug logs may lose events when they are enabled. Do you want to enable this log?» dialog.
- Reproduce your issue.
- Right-click Debug and select Refresh.
- Right-click Debug and select Disable Log.
—>
Enabling debug logging for the Netlogon service
This article describes the steps to enable logging of the Netlogon service in Windows to monitor or troubleshoot authentication, DC locator, account lockout, or other domain communication-related issues.
Original product version: В Windows 10 — all editions, Windows Server 2016, Windows Server 2019, Windows Server 2012 R2
Original KB number: В 109626
More information
This section, method, or task contains steps that tell you how to modify the registry. However, serious problems might occur if you modify the registry incorrectly. Therefore, make sure that you follow these steps carefully. For added protection, back up the registry before you modify it. Then, you can restore the registry if a problem occurs. For more information about how to back up and restore the registry, click the following article number to view the article in the Microsoft Knowledge Base:
322756 How to back up and restore the registry in Windows
The version of Netlogon.dll that has tracing included is installed by default on all currently supported versions of Windows. To enable debug logging, set the debug flag that you want by using Nltest.exe, the registry, or Group Policy. To do it, follow these steps:
For Windows Server 2019, Windows Server 2016, Windows Server 2012 R2
These steps also apply to Windows 10.
To enable Netlogon logging:
Open a Command Prompt window (administrative Command Prompt window for Windows Server 2012 R2 and later versions).
Type the following command, and then press Enter:
It’s typically unnecessary to stop and restart the Netlogon service for Windows Server 2012 R2 or later to enable Netlogon logging. Netlogon-related activity is logged to %windir%\debug\netlogon.log. Verify new writes to this log to determine whether a restart of the Netlogon service is necessary. If you have to restart the service, open a Command Prompt window (administrative Command Prompt window for Windows 10, and Windows Server 2012 R2 and later versions). Then run the following commands:
- In some circumstances, you may have to perform an authentication against the system in order to obtain a new entry in the log to verify that logging is enabled.
- Using the computer name may cause no new test authentication entry to be logged.
To disable Netlogon logging, follow these steps:
Open a Command Prompt window (administrative Command Prompt window for Windows Server 2012 R2 and higher).
Type the following command, and then press Enter:
It’s typically unnecessary to stop and restart the Netlogon service for Windows Server 2012 R2 or later versions to disable Netlogon logging. Netlogon-related activity is logged to %windir%\debug\netlogon.log. Verify that no new information is being written to this log to determine whether a restart of the Netlogon service is necessary. If you have to restart the service, open a Command Prompt window (administrative Command Prompt window for Windows 10, and Windows Server 2012 R2 and later versions). Then run the following commands:
Alternative methods to enable Netlogon logging
In all versions of Windows, you can use the registry method that’s provided in the Enable/Disable logging by using registry method section.
On computers that are running Windows Server 2012 R2 and later versions of the operating system, you can also use the following policy setting to enable verbose Netlogon logging (value is set in bytes):
\Computer Configuration\Administrative Templates\System\Net Logon\Specify log file debug output level
A value of decimal 545325055 is equivalent to 0x2080FFFF (which enables verbose Netlogon logging). This Group Policy setting is specified in bytes.
The Group Policy method can be used to enable Netlogon logging on a larger number of systems more efficiently. We don’t recommend that you enable Netlogon logging in policies that apply to all systems, such as the Default Domain Policy. Instead, consider narrowing the scope to systems that may be causing problems by using one of the following methods:
- Create a new policy by using this Group Policy setting, and then provide the Read and Apply Group Policy rights to a group that contains only the required computer accounts.
- Move computer objects into a different OU, and then apply the policy settings at that OU level.
Enable/Disable logging by using registry method
To enable logging, you may have to obtain a checked build of Netlogon.dll.
Start Registry Editor.
If it exists, delete the Reg_SZ value of the following registry entry, create a REG_DWORD value with the same name, and then add the 2080FFFF hexadecimal value:
HKEY_LOCAL_MACHINE\SYSTEM\CurrentControlSet\Services\Netlogon\Parameters\DBFlag
It’s typically unnecessary to stop and restart the Netlogon service for Windows Server 2012 R2 and later versions to enable Netlogon logging. Netlogon-related activity is logged to %windir%\debug\netlogon.log. Verify the new writes to this log to determine whether a restart of the Netlogon service is necessary. If you have to restart the service, open a Command Prompt window (administrative Command Prompt window for Windows Server 2012 R2/Windows 10 and above). Then run the following commands:
- In some circumstances, you may have to do an authentication against the system to obtain a new entry in the log to verify that logging is enabled.
- Using the computer name may cause no new test authentication entry to be logged.
To disable Netlogon logging, follow these steps:
In Registry Editor, change the data value to 0x0 in the following registry key:
Exit Registry Editor.
It’s typically unnecessary to stop and restart the Netlogon service for Windows Server 2012 R2, Windows 10, or later versions to disable Netlogon logging. Netlogon-related activity is logged to %windir%\debug\netlogon.log. Verify that no new information is being written to this log to determine whether a restart of the Netlogon service is necessary. If you have to restart the service, open a Command Prompt window (administrative Command Prompt window for Windows Server 2012 R2/Windows 10 and later versions of the operating system). Then run the following commands:
Set the maximum log file size for Netlogon logs:
The MaximumLogFileSize registry entry can be used to specify the maximum size of the Netlogon.log file. By default, this registry entry doesn’t exist, and the default maximum size of the Netlogon.log file is 20 MB. When the file reaches 20 MB, it’s renamed to Netlogon.bak, and a new Netlogon.log file is created. This registry entry has the following parameters:
- Path: HKEY_LOCAL_MACHINE\SYSTEM\CurrentControlSet\Services\Netlogon\Parameters
- Value Name: MaximumLogFileSize
- Value Type: REG_DWORD
- Value Data:
Remember that the total disk space that’s used by Netlogon logging is the size that’s specified in the maximum log file size times two (2). It’s required to accommodate space for the Netlogon.log and Netlogon.bak file. For example, a setting of 50 MB can require 100 MB of disk space, which provides 50 MB for Netlogon.log and 50 MB for Netlogon.bak.
As mentioned earlier, on Windows Server 2012 R2 and later versions of the operating system, you can use the following policy setting to configure the log file size (value is set in bytes):
\Computer Configuration\Administrative Templates\System\Net Logon\Maximum Log File Size
For more information, click the following article numbers to view the articles in the Microsoft Knowledge Base:
247811 How domain controllers are located in Windows


