- Unlink a device in the Your Phone app
- Step 1: Complete unlinking steps on your PC
- Step 2: Complete unlinking steps on your Android device
- If you have Link to Windows:
- If you have Your Phone Companion:
- How To Uninstall Microsoft Store Apps
- What Are Microsoft Store Apps?
- Uninstall Microsoft Store Apps From Start Menu
- Uninstall Microsoft Store Apps via Settings
- Uninstalling Microsoft Store Apps with Third-Party Software
- Удаляем не нужные приложения Windows Phone
- Как удалить системные приложения Windows Phone 10
- Как восстановить удаленное приложение на Windows Phone
- How to Delete Apps on Windows Phone
- Part 1. How to Delete Apps on Windows Phone
- Part 2. How to Wipe Windows Phone Remotely
Unlink a device in the Your Phone app
To successfully remove a device, follow the steps below. You’ll need to complete all steps for both your PC and your mobile device in order to successfully unlink your device.
Step 1: Complete unlinking steps on your PC
Open your browser and go to accounts.microsoft.com/devices/android-ios. Sign in with your Microsoft account.
You’ll be presented with a list of all your connected devices. For each, select Unlink.
Go back to the Your Phone app, and close and reopen the app to apply the unlinking changes.
Move on to Step 2 to finish the unlinking process from your mobile device.
Step 2: Complete unlinking steps on your Android device
Start by checking which mobile app your Android device has. You can reference this list to see if your device supports Link to Windows. If your device is not in this list, move down to the section named «If you have Your Phone Companion.»
If you have Link to Windows:
On your Android device, open Link to Windows by going into the Quick Access panel, tap and hold on the Link to Windows icon.
Click on Microsoft account.
Scroll down to Your Phone Companion where you will see your previously used Microsoft account email address.
Click on Your Phone Companion and click Remove account.
If you have Your Phone Companion:
On your Android device, open Your Phone Companion.
In the upper right-hand corner, click the Settings gear.
Find the Microsoft account and click the button to the right Sign out.
Your device is now unlinked from the Your Phone app. You can continue to use any other linked devices with Your Phone. If you’d like to use this device with Your Phone in the future, you will need to link your devices again.
How To Uninstall Microsoft Store Apps
It’s extremely easy and safe to do
The introduction of the Microsoft Store was one of the largest changes to Windows in modern history. This change was accentuated by one of the most controversial “upgrades” the operating system has ever seen: the Windows 8 Start menu.
Whether you love it, hate it, or use a Windows shell replacement to avoid it altogether, the Microsoft Store and its apps are likely things you’re going to have to interact with at some point in your PC’s life.

For those of you not so crazy over the Microsoft Store’s apps, it’s worth it to know the uninstallation process. Your PC will likely come with several apps from the Microsoft Store installed out of the box, so tidying up your PC involves pruning those.
For whatever reason you’re looking to uninstall Microsoft Store apps, this article has you covered. Let’s discuss the two easiest ways to uninstall Microsoft Store apps, as well as a brief overview of what these apps are in the first place.
What Are Microsoft Store Apps?
The Microsoft Store started as an app store on Windows 8, then known as the Windows Store, to distribute Universal Windows Platform apps. In Windows 10, Microsoft consolidated all of its other storefronts and distribution platforms into a single app and gave it a new name.
Those platforms include the Xbox Store, Windows Phone Store, Windows Marketplace, and more.

In late 2018, Microsoft revealed that the Microsoft Store was home to over 35 million application titles. Similar to Apple’s App Store and Google’s Play Store, the Microsoft Store helps distribute applications after a certification process. Unlike many other third-party applications you may download off the web, apps on the Microsoft Store are vetted for safety and compliance.
However, not everyone is a fan of the tablet-like interfaces that many of these apps bring to the desktop. One of the best examples is Skype—if you’re like me, you much prefer the more compact, standalone desktop version to the app listed on the Microsoft Store. That being said, let’s look into how you can uninstall any Microsoft Store app.
Uninstall Microsoft Store Apps From Start Menu
The simplest and most intuitive way to uninstall Microsoft Store apps is directly from the Windows 8 or Windows 10 Start menu. It takes just a few clicks.
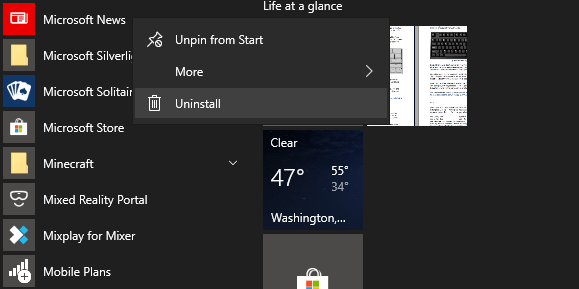
All you have to do is open your Start menu, scroll down the list of installed applications, and find the Microsoft Store app that you never want to see again. Right-click on it, click Uninstall, and that’s it—you’ll never be bothered by it again.
Some applications, such as Microsoft Edge, don’t have the Uninstall button. Applications like this are considered to be core to Windows and are blocked from any simple means of uninstallation. Doing so could affect the functionality of other programs.
Uninstall Microsoft Store Apps via Settings
The next-easiest method to uninstalling Microsoft Store apps is by doing it through your Windows Settings.
To access Settings, press the Windows + I key combination.
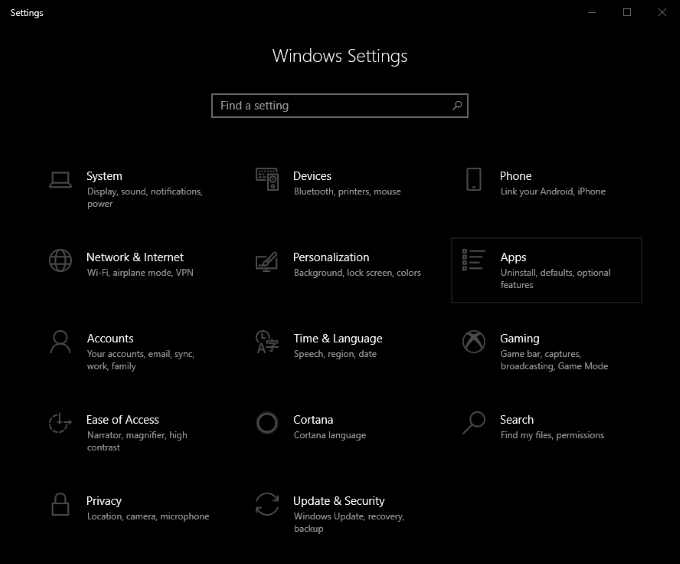
From this screen, click on the Apps tile. This will take you to a page that, if you scroll down, has a long list of all of the applications installed on your PC. There’s also a search field so you can easily filter and find the application you may be looking for.
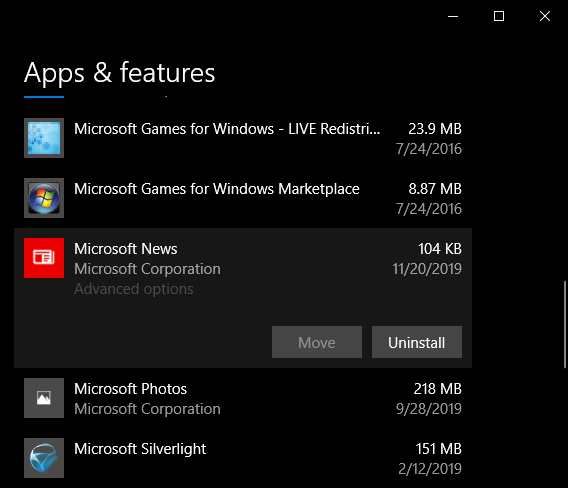
Clicking on any application in this list will unveil the Move and Uninstall buttons for it. The Uninstall button will—unsurprisingly—start the uninstallation process for the respective application.
Uninstalling Microsoft Store Apps with Third-Party Software
The simplest alternative to uninstalling Microsoft Store apps from within Windows Explorer involves third-party software. It’s worth noting that this isn’t always safe, and we personally don’t recommend going down this road unless you’re out of options.
Of these options, TheWindowsClub’s 10AppManager for Windows 10 is one of the best. It will allow you to uninstall and reinstall applications that come preinstalled with Windows 10. However, it must be stated that this software may be updated, changed, or patched in a way that could have unintended consequences at any time past the date of publishing this post.
There are other freeware applications out there that can uninstall Microsoft Store apps, such as CCleaner—but we’ve already explained why you shouldn’t download CCleaner in a past post, and we haven’t changed our minds. Understand the risks that come with modifying Windows with third-party software and only do so if you’ve created a backup and/or system restore point.
Whether they came preinstalled with Windows or were installed by you, getting rid of Microsoft Store apps is extremely easy and can be safely performed all within the Windows UI. Whichever apps you wish to uninstall can be nixed away in just a matter of seconds by following the instructions above.
Do you know any other ways to get rid of Microsoft Store Apps? Want to let us know what you think or get some help? Feel free to drop us a comment below!
Craig is a long-time writer, coder, and marketer with years of experience in the technology and gaming spaces. Since 2008, he’s worked remotely with some of the most notable publications in these industries, specializing in Windows, PC hardware and software, automation, and the like. Read Craig’s Full Bio
Удаляем не нужные приложения Windows Phone
Уже при покупке нового смартфона в нем можно найти предустановленные производителями утилиты. Они называются системными. Деинсталлировать их стандартным способом нельзя. Но некоторые пользователи мобильных устройств задаются вопросом о том, как удалить стандартные приложения Windows Phone? Для этого есть небольшая хитрость. Однако, делать этого не рекомендуется, т.к. деинсталляция системной утилиты может нарушить корректную работу смартфона.
Наряду с этим существуют способы для восстановления удаленных утилит. После сброса настроек потерянные приложения можно быстро переустановить заново.

Как удалить системные приложения Windows Phone 10
Вопрос о том, как удалить приобретенные приложения на Windows Phone не вызывает у пользователей плиточных смартфонов трудностей. Достаточно просто зажать пальцем на нужной утилите и удерживать до момента появления контекстного меню. Здесь нужно выбрать пункт «Удалить”, а затем подтвердить выбранное действие.
В отношении стандартных, предустановленных изготовителями утилит, такого варианта в контекстном меню не предоставляется. Поэтому возникает вопрос как удалить системные приложения на Windows Phone? Существует простой способ, посредством которого можно произвести деинсталляцию. Нужно «запутать” календарь смартфона. Для этого требуется выполнить следующий алгоритм действий.
- Зайти в раздел настроек, отвечающий за установку даты и времени.
- Отключить автоматическую синхронизацию с сетью.
- Установить дату на 100 лет больше текущей. Приложение «Календарь” сообщит об ошибке. Достаточно просто проигнорировать это предупреждение.
- Найти приложение, которое планируется удалить и открыть его. Смартфон сообщит об ошибке утилиты и предложит его удалить. Нужно выбрать такой вариант.

Таким образом можно удалить встроенные приложения Windows Phone 10, или другой версии программного обеспечения. Однако, перед тем как делать это необходимо убедиться, что данные утилиты действительно не нужны. Восстановить некоторые из них можно из магазина, или с помощью сброса системы до заводских настроек.
Как восстановить удаленное приложение на Windows Phone
Если удалить приложения Windows Phone 10, или другой версии программного обеспечения, не сложно, то восстановить деинсталлированную утилиту может вызвать трудности. Если перед возвратом к изначальным настройкам не было произведено резервного копирования приложений и игр, заново искать их в Магазине и устанавливать на свой девайс может оказаться довольно долгим процессом.
Однако существует способ быстрого восстановления утерянных данных с помощью истории загрузок Магазина. Для этого нужно, в первую очередь, настроить сихронизацию девайса с аккаунтом Microsoft. Сделать это можно зайдя в раздел настроек, посвященный почте и учетным записям. Далее необходимо проверить, чтобы сеть WiFi была доступна, а в ее настройках не была активирована опция отключения соединения при блокировке экрана. Она должна быть доступна в фоновом режиме, чтобы большие приложения могли загружаться, даже при выключенном экране устройства.

После того, как настройки проверены нужно убедиться в корректной работе Магазина приложений. Для этого нужно попытаться установить какую-либо утилиту из него. Затем нужно зайти в раздел настроек смартфона, посвященный обновлениям утилит и проверить наличие доступных. Если есть какие-либо из них, готовые к установке, их нужно загрузить.
Также важно уделить внимание тому, чтобы в устройстве была SIM-карта. Это не является обязательным условием, но смартфон при загрузке приложений будет пытаться установить синхронизацию с мобильной сетью.
После того, как все необходимые настройки проверены, можно приступать к восстановлению удаленных приложений. Для этого следует выполнить следующий алгоритм действий.
- Зайти в раздел настроек, посвященный поиску телефона. Здесь нужно активировать опцию отправки приложений на телефон с помощью push-уведомлений.
- Включить на устройстве WiFi подключение.
- С компьютера зайти на официальную страницу программного обеспечения Windows Phone. Активировать свой аккаунта, используя логин и пароль учетно записи.
- Здесь в истории загрузок можно найти все ранее установленные утилиты. Они имеют возможность повторной установки. И даже если, какая-то утилита была загружена на платной основе, повторно ее оплачивать не придется.
- В списке выбрать нужное приложение и нажать кнопку «Переустановить”. Подготовка к установке может занять некоторое время, около минуты. После, чего появится сообщение о том, что в ближайшее время утилита появится на мобильном устройстве.
Таким образом можно, используя приведенные методы удалить системные приложения с мобильного устройства Windows Phone. А также восстановить утилиты, утерянные после возврата к первоначальным настройкам девайса.

осторожно есть ненормативная лексика
How to Delete Apps on Windows Phone
There may be any reason why you would want to know how to delete apps on windows phone. You may want to free up a little storage space on your phone or simply the app you want to delete is no more useful to you. Regardless of the reason, the process that is required for deleting any app is not intuitive. It may seem a bit difficult especially for beginners or for the first time users of windows phone. But, deleting apps on windows phone is quick and extremely simple. When you will remove an app from your device, all the information related to that app will be deleted from your smartphone altogether.
Part 1. How to Delete Apps on Windows Phone
This easy-to-follow guide will clearly instruct you on how to delete apps on windows phone. The instructions are given along with the specific screenshots in order to make the whole process immensely easy to decipher. So, find out how it works.
Step-By-Step Guide to Delete Apps on Windows Phone
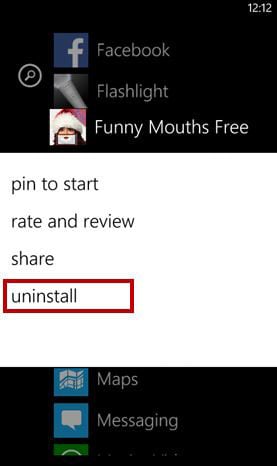
Step 1. First of all, go to your Apps list and locate the app which you want to delete or uninstall from your device. There will be several apps on this list. You can delete as many apps you want to. But you cannot delete multiple apps together and would need to delete one app at a time.
Step 2. After deciding on which app or apps you want to delete, you need to tap and hold the app. Keep holding the option until a contextual menu appears. The pop-up menu will show several options to choose from. Click «Uninstall».
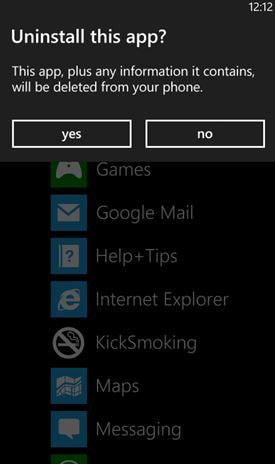
Step 3. The device will once again confirm whether you actually want to uninstall the particular app or not. If you have not changed your mind and still want to continue deleting the app, then click «yes» or you can also click «no» if your decision is somehow changed.
These steps will help you to delete all those apps which are unnecessarily filling the storage space of your phone.
Part 2. How to Wipe Windows Phone Remotely
Your expensive smartphones are very likely to get snatched or stolen because they can be concealed easily and then resold. So, in order to sidestep any chance of smartphone robbery, it is advised to activate a remote-wipe service on your device.
For windows phone, there is a feature in your phone called «Find My Phone» which can be used to lock or wipe your device remotely. This free service can be found under the section «My Phone» on WindowsPhone.com. If you want to activate the locking and erasing of your phone data remotely, then go through these instructions
Step-By-Step Guide to Wipe Windows Phone Remotely
Step 1. On your computer, navigate to «Your Devices» at Microsoft.
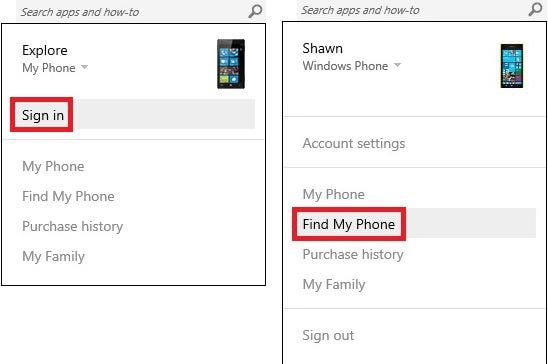
Step 2. If you have no account here, then create a Microsoft account because you will have to sign in at this page via your Microsoft account. This account will be the same that you usually use to sign in on your windows phone. After signing in, click on «Find My Phone».
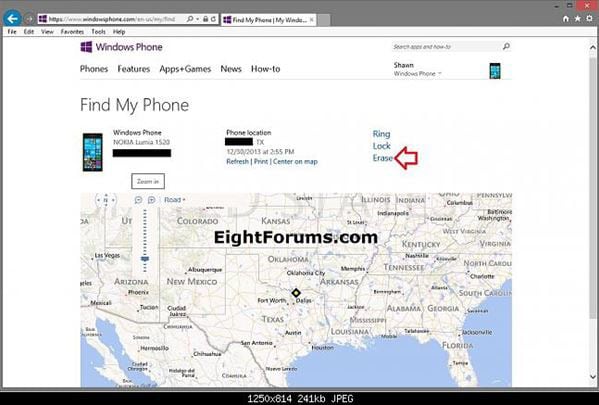
Step 3. On the right side of your screen, you will see three options to select from. From these three options, click on «Erase».
Step 4.When you are about to set up «Find My Phone», you will have to verify your phone number. You can do it by checking the «I authorize…» statement given in the box. After this, tap on «Done».

Step 5. When you have clearly made your mind that you want to reset or erase your phone, confirm it by checking on the box- Yes! Erase my phone immediately. Then, click «erase». But note that, these steps cannot be undone.
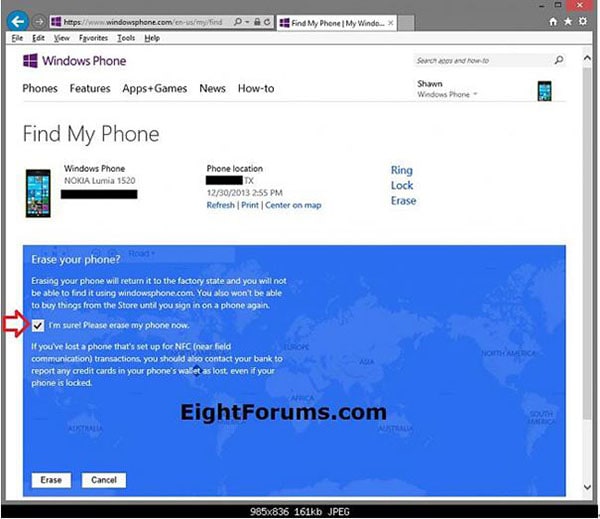
Step 6. If you will properly follow all the above-mentioned instructions, your phone will be appropriately erased and then it will reset back to its factory setting. Then, finally click «OK».
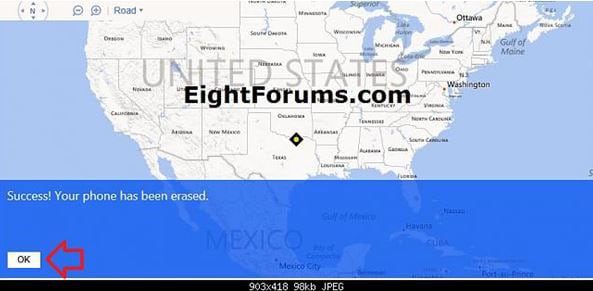
So, now you have successfully learned how to wipe your windows phone remotely. But always remember that you cannot undo the permanent erasing once it is successfully done, therefore make sure that you actually want to do it. Using the Find my Phone feature, you can effectively ring, lock or erase your phone to enhance its safety. This is a location-based service which will not work when your phone is off or when its battery is dead.


