- Troubleshooting the Your Phone app
- Data syncing and connectivity issues
- Updates
- Troubleshooting features in the Your Phone app
- How do I check I’m using the same Microsoft account for all my devices?
- I’m having issues with the Your Phone app when using Samsung DeX at the same time
- Why can’t I use the Your Phone app as a non-default user or two phone mode user (available in Korea only)?
- Provide feedback
- Four ways to transfer data from Windows phone to Android device for free
- Solution 1. How to transfer files from Winphone to Android with 1 Click
- Dr.Fone — Phone Transfer
- Steps about how to transfer data from Windows phone to Android device with Dr.Fone
- Step 1. Launch Winphone to Android Transfer
- Step 2. Connect Windows Phone and Android
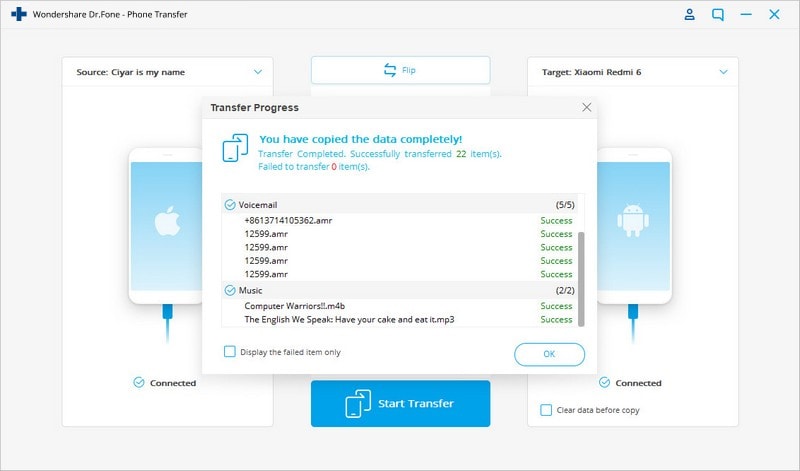
- Step 3. Transfer from Windows Phone to Android
- Solution 2. Transfer data from Windows phone to Android device with computer
- Pros and cons of this way
- Solution 3. Transfer content from Windows Phone to Android with OneDrive
- Pros and cons of this way
- Solution 4. Transfer contacts with Outlook and Gmail
Troubleshooting the Your Phone app
Data syncing and connectivity issues
To keep your devices synced, your Windows PC and Android device need to be on, connected to the Internet, and we recommend having Battery saver turned Off (it may interfere with important notifications for the app).
Yes, you can use your mobile data to sync with your PC. However, if you’re concerned about the effect on your data allowance, we recommend remaining on a Wi-Fi connection.
On your Android device:
Open the Your Phone Companion app.
Select Sync over mobile data.
Turn this option On.
To ensure the fastest, most reliable connection, your Android device and PC must be connected to the same trusted Wi-FI network. This optimization isn’t possible on a public connection—for example, in a coffee shop, hotel, or airport.
When you first connect to a Wi-Fi network through Windows 10, you’ll be prompted to set it as public or private (trusted). You can also change it at any time.
These changes might not always be possible—for example, if your workplace controls your network connection.
Before we begin to change settings, we recommend quickly running through the following checks:
Double-check you’re using the same Microsoft account to sign in to both the Your Phone app and the companion app on your Android device.
Ensure Battery saver isn’t running on your PC or Android device, as this might affect connectivity.
You have an active Wi-Fi connection. Can you open your browser and navigate to your favorite website?
For some Android devices, your Battery Optimization settings may interrupt your connection. We recommend turning it off for the companion app on your Android device (either Your Phone Companion or Link to Windows). Here’s how to turn it off based on which companion app you have:
If you have Your Phone Companion*:
Open Android Settings > Apps & notifications > App info > Your Phone Companion > Advanced > Battery > Manage Battery Usage > Battery optimization. Scroll down to Your Phone Companion and select Don’t optimize.
If you have Link to Windows*:
Open Android Settings > Apps > Link to Windows Service > Battery > Optimize battery usage. Select All from the drop-down list, scroll to find Link to Windows service, and turn the toggle Off.
*Note: These steps may vary based on your Android device model.
Still not working? Continue with the following troubleshooting advice.
Check if the Your Phone app can run in the background.
Select Start (or press the Windows logo key on your keyboard), then select Settings > Privacy > Background apps.
In the list Choose which apps can run in the background, ensure Your Phone is enabled.
Ensure nothing is stopping you from sharing across devices.
Select Start (or press the Windows logo key on your keyboard), then select Settings > System > Shared experiences.
If you see Fix now in Accounts, select it and follow the instructions.
On your Android device:
Make sure you can receive app notifications.
Go to your Android device Settings > Apps (or Apps & Notification on some devices) > Your Phone Companion and check that notifications are enabled.
Make sure Do not disturb is turned Off.
Go to your Android device Settings > Sounds (on some devices this may be Sounds & Vibration or Sounds & Notifications) and check that Do not disturb is turned Off.
If you’re still having trouble, follow the steps to unlink your Android device.
If both of your devices are using the same Wi-Fi network but you still see an error message, this could be caused by a setting on your router.
Many routers have a Wireless isolation feature that allows you to lock down the network. If this Wireless Isolation (or AP Isolation) is enabled, then all devices connected to the Wi-Fi network will be blocked from communicating with other.
To disable Wireless/AP Isolation:
On most routers look for the Wireless > Advanced Wireless Setting, and uncheck/toggle AP Isolation.
Updates
Updates will be installed automatically if this option is enabled on your Android device/PC. To ensure a smooth experience to we recommend updating to the latest version where available. Before doing this, ensure both your Android device and PC are connected to Wi-Fi.
On your Android device:
Open the Your Phone Companion app.
Tap Check for Updates.
Wait for the update to complete successfully, then close and reopen the Your Phone app.
Open the Microsoft Store.
Search for Your Phone.
If an update is available to you, you will see an Update button. Select Update and wait for the update to complete successfully, then select Launch.
You can also try this:
Open the Microsoft Store.
Select More … (located next to your Microsoft account picture).
Select Downloads and Updates.
If a Your Phone update is available, you will see an Update button. Select Update and wait for the update to complete successfully, then select Launch.
Note: It can take a few minutes for the updates to be recognized by the app. If the Your Phone app is still in an “update state,» wait a few minutes, then restart your Android device. On your PC, close and reopen the Your Phone app.
After updating to Android 10, if you are unable to launch permissions for features (notifications, messages, photos) please complete the following steps:
To get photos and messages working:
Go to Settings on your Android device.
Search for App Info and tap on it.
Tap on See all apps.
Find Your Phone Companion and tap on it.
Tap on Permissions and allow the following:
To get notifications working:
Go to Settings on your Android device.
Search for “ Notification access.”
Find Your Phone Companion in the list and tap to toggle off/on.
A pop-up will appear; select Allow when prompted.
Troubleshooting features in the Your Phone app
If you’re looking for troubleshooting for a specific feature in the Your Phone app, find it in the list below:
How do I check I’m using the same Microsoft account for all my devices?
In order to successfully link your PC and Android device, you should sign in to the same Microsoft account on both. You can check this by following these steps:
Open your browser and visit accounts.microsoft.com/devices/android-ios. Sign in with your Microsoft account.
Check if you Android device is listed under your account information.
On your Android device:
If you have the Your Phone Companion app:
Go to Settings > Accounts.
If you have the Link to Windows app (for select Samsung devices):
Go to Settings > Advanced features > Link to Windows.
Review the email address under Microsoft account.
I’m having issues with the Your Phone app when using Samsung DeX at the same time
Having both the Your Phone app and DeX open may cause issues with both apps. To ensure the best experience, only have one of these apps open at a time.
Why can’t I use the Your Phone app as a non-default user or two phone mode user (available in Korea only)?
You may encounter two phone mode if your mobile provider is in Korea. The Your Phone app does not currently support two phone mode or multiple profiles mode. Please contact your mobile provider to disable two phone mode so you can use the Your Phone app.
If you have multiple profiles on your mobile device, the Your Phone app will only work if your mobile device is set to the default profile.
Provide feedback
We’re still actively working on making the Your Phone experience the best we possibly can and we welcome your ideas and insights.
On your Android device:
Open the Your Phone Companion app or the Link to Windows app, depending on your device.
Select the Provide Feedback option.
Open Your Phone > Settings > Help & Feedback.
Fill out the form with as much detail as you can provide.
Four ways to transfer data from Windows phone to Android device for free

Alice MJ
Dec 21, 2020 • Filed to: Data Transfer Solutions • Proven solutions
Solution 1. How to transfer files from Winphone to Android with 1 Click
Dr.Fone — Phone Transfer can transfer your photos, videos, music contacts, messages and other files directly from your Winphone to Android. It can also restore your contacts from Onedrive backup of Winphone to your Android device totally hassle-free. With Dr.Fone — Phone Transfer, you can transfer files from Windows phone to Android in batch.
![]()
Dr.Fone — Phone Transfer
Transfer Data from Windows Phone to Android in 1 Click!.
- Easily transfer all videos, music, contacts and photos from Windows phone to Android devices.
- Enable to transfer from HTC, Samsung, Nokia, Motorola and more to iPhone X/8/7S/7/6S/6 (Plus)/5s/5c/5/4S/4/3GS.
- Works perfectly with Apple, Samsung, HTC, LG, Sony, Google, HUAWEI, Motorola, ZTE, Nokia and more smartphones and tablets.
- Fully compatible with major providers like AT&T, Verizon, Sprint and T-Mobile.
- Fully compatible with iOS 11 and Android 8.0
- Fully compatible with Windows 10 and Mac 10.13.


Steps about how to transfer data from Windows phone to Android device with Dr.Fone
Step 1. Launch Winphone to Android Transfer
Open the Dr.Fone on your computer and click on the “Phone Transfer” option.
Step 2. Connect Windows Phone and Android
Use USB cables to connect both your Android device and windows device to your computer. On connecting both devices, click the “Flip” button on the program in order to switch the destination and source phones.
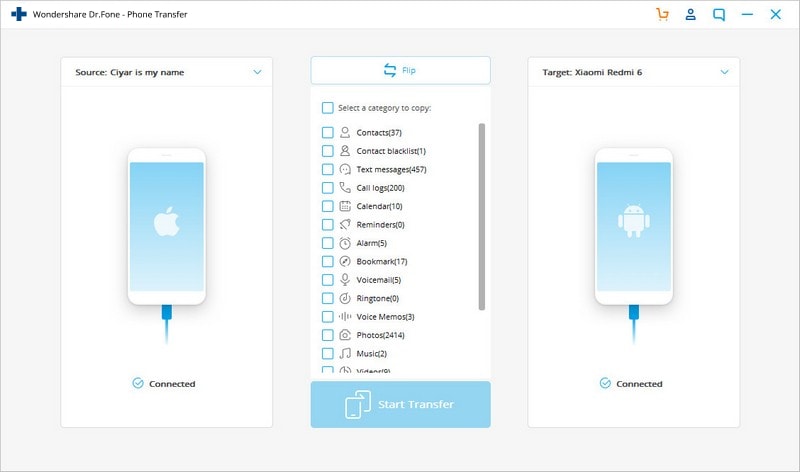
At this point, you will have to select the desired files to transfer by ensuring the box beside the file types is checked. You also have the choice of clearing the data in the destination phone if desired.
Note: Transferring contacts from windows phone to Android device will require you to backup contact to you Onedrive first while Dr.Fone — Phone Transfer helps you restore it to your Android device.
Step 3. Transfer from Windows Phone to Android
Click “Start Transfer” to start transferring. Ensure both phones stay connected during the transfer process.
Solution 2. Transfer data from Windows phone to Android device with computer
When it comes to transferring contacts, documents, audio video files and other data from Windows phone to Android devices, connecting both devices to your PC for data transferring is the most preferred Solution.
All that you need to do is to connect both devices to your computer or laptop with the help of data cables. Open each folder one by one, and simply copy-paste the content from windows phone folders to Android device folders.
Pros and cons of this way
This is the simplest method to transfer content from one device to the other. There is no need for an internet connection. Files are transferred within just few seconds.
The negative aspect is perhaps the fact that files and folders are transferred in their existing format. So, some videos, images, and files that you open in your Windows phone might not be compatible with Android device and may not even open after transferring. Same is the problem with transferring phone contacts, as every handset stores contacts in a different format. This method cannot be used to transfer text messages from one device to another.
Solution 3. Transfer content from Windows Phone to Android with OneDrive
Microsoft’s smart phone operating system may not be as popular as Android or iOS. But, some of Microsoft’s apps are impressive for sure! Microsoft’s OneDrive app is one of those apps that can really prove to be helpful for transferring data from one device to the other. The app supports Windows, iOS and Android devices. With OneDrive, you can transfer Windows Phone files to Android as well. Check the detailed steps below.
![]()
First step is to download OneDrive app in both devices. After downloading, the app will prompt you to sign in using your Microsoft account.
![]()
Once you sign-in using your outlook username and password, the app will open its home page and display your existing content that you have stored in OneDrive.
![]()
Now, open the same app in your windows phone and click on upload icon.
![]()
Click on «Upload files» Solution if you wish to upload documents, audio files, and other supported formats. If you wish to upload videos and photos from your device, just choose the dedicated Solution.
The app will display all the folders and sub-folders from your Windows phone. Open the folder one by one and choose the content that you wish to transfer in your new phone.
![]()
Once you select the concerned files, just click on «upload». The app will start uploading all the selected content on OneDrive server.
![]()
After uploading all the necessary content from Windows phone on OneDrive, open the OneDrive app on your Android device.
Select the content that you wish to sync with your Android phone and simply download the same.
![]()
This Solution is suitable for people who travel in various countries around the world and change their cell phone several times. As all the important content remains stored on OneDrive, users can retrieve it any time and from anywhere. All that they need is an Android, Windows, or iOS handset that supports the OneDrive app.
Pros and cons of this way
As mentioned earlier, this Solution is best suitable for people who wish to transfer contacts, documents, and files without using PC. Several people use this method to transfer their content from one phone to another while on the go. Images, documents and videos can be viewed with the help of OneDrive app, and can be downloaded in compatible format.
Now the drawback! You need an active internet connection in your Windows and Android device, most preferably, Wi-Fi. Transferring data may take considerable time, as files are first transferred to OneDrive, and then, from OneDrive to your Android device.
Unfortunately, this app cannot help in transferring contacts or text messages from one phone to another.
Solution 4. Transfer contacts with Outlook and Gmail
Follow the steps below to transfer contacts from Windows phone to Android phone:
In-order to transfer contacts from Windows phone to Android device, sync your contacts from Windows phone with Outlook. Then, sign-in to your Outlook account from desktop PC or tablet, and click on «People» Solution from the drop down menu.
![]()
In the next screen, click on «Manage» and select «Export for Outlook and other service» from drop down menu.
![]()
Once you click on that Solution, Outlook will automatically download contacts on your device in the form of .CSV file.
![]()
Now, open Gmail, and click on Gmail’s contact Solution.
![]()
The next screen will show you several Solutions, and you need to select «import.»
![]()
Once the pop-up window appears, click on choose file Solution, and select the Outlook contacts CSV file that you downloaded from Outlook. Then, simply click on import.
![]()
Within few seconds, Gmail will sync all the contacts from the Outlook’s file and merge them with your existing contacts on Google. Start your Android device, and simply sync Google’s contacts with your phone’s contacts. That’s it! This is perhaps the best way to transfer contacts from Windows phone to Android device, and that too, free of cost.


