- Configuring your web browser to allow pop-up windows
- Safari (macOS)
- Chrome .current (Windows/macOS)
- Firefox .current (Windows/macOS)
- Internet Explorer (Windows)
- Edge (Windows 10 only)
- Windows Security pop-up in Windows 10 [QUICK GUIDE]
- How to get rid of Windows Security pop-up in Windows 10?
- 1: Disable Password Protected Sharing
- 2: Change Outlook settings
- Change security and privacy settings for Internet Explorer 11
- Privacy settings
- Security zones
Configuring your web browser to allow pop-up windows
Most web browsers include a feature to block pop-up windows. While this may eliminate unwanted or bothersome pop-up windows, the feature sometimes can impede the functionality of legitimate or useful websites.
Some popular Penn-affiliated websites requiring pop-ups include U@Penn and the Penn Online Directory.
Follow the instructions below to configure your web browser to allow pop-up windows for your selected websites.
- Apple Safari (macOS)
- Google Chrome .current (Windows/macOS)
- Mozilla Firefox.current (Windows/macOS)
- Microsoft Internet Explorer (Windows)
- Microsoft Edge (Windows 10 only)
Note: If you have installed third party applications to block pop-ups (examples include the Google, MSN, and Yahoo! toolbars), be sure to consult the vendor documentation to allow pop-up windows for desired websites.
Safari (macOS)
Safari for macOS has no per-website control over blocking pop-up windows. Pop-ups are either blocked, or they are not. To allow pop-ups:
- From the Safari menu, choose Preferences. and click the Security tab.
- Ensure the Block pop-up windows option is not checked. Unchecking this option will allow pop-ups.
- To block pop-ups once again, check the Block pop-up windows checkbox.
Note: If you are concerned about allowing pop-ups globally for all websites that you browse, consider using another web browser that allows website exceptions such as Chrome or Firefox.
Chrome .current (Windows/macOS)
- Open Chrome, then go to the web page that you want to allow pop-ups.
- In Chrome’s URL window, highlight the entire web address of the current page, then choose the Copy command from the Edit menu or right-click and choose the Copy command.
- Click the icon with three horizontal bars in the upper right side of the browser toolbar.
- Click Settings.
- Scroll to the bottom of the Settings section and click Show advanced settings. .
- In the Privacy section, click Content settings. . The Content settings window appears.
- Scroll to the Pop-ups section, and then ensure the Do not allow any site to show pop-ups radio button is selected.
- Click Manage exceptions. .
- In the Hostname pattern field, choose the Paste command from the Edit menu or right-click and choose the Paste command, and ensure the Behavior dropdown menu is set to Allow.
Notes: Pasting the web address of a page you wish to allow pop-ups is recommended, rather than typing the generic main web address. For example, you might visit www.example.com/requirepopup.html, but the page is actually hosted at popup.example.com/forms/popupform.html. In this example, you must allow popup.example.com, not www.example.com. Note also that entire websites must be allowed, not individual directories or pages, so in this example Chrome will automatically add the top level popup.example.com to its Allowed sites.
Firefox .current (Windows/macOS)
- Open Firefox, then go to the web page that you want to allow pop-ups.
- In Firefox’s URL window, highlight the entire web address of the current page, then choose the Copy command from the Edit menu or right-click and choose the Copy command.
- Click the icon with three horizontal bars in the upper right side of the browser toolbar.
- Select Options (Windows) or Preferences (macOS).
- In the left sidebar, click on the Content icon to display the Content section.
- In the Pop-ups section, ensure the Block pop-up windows checkbox is selected, then click the adjacent Exceptions... button.
- In the Address of web site: field, choose the Paste command from the Edit menu or right-click and choose the Paste command, and then click Allow.
Notes: Pasting the web address of a page you wish to allow pop-ups is recommended, rather than typing the generic main web address. For example, you might visit www.example.com/requirepopup.html, but the page is actually hosted at popup.example.com/forms/popupform.html. In this example, you must allow popup.example.com, not www.example.com. Note also that entire websites must be allowed, not individual directories or pages, so in this example Firefox will automatically add the top level popup.example.com to its Allowed sites.
Internet Explorer (Windows)
When a website attempts to launch a new pop-up window, you may see dialog boxes alerting you of pop-up windows that have been blocked. Follow the instructions below to allow pop-up windows on a per-website basis.
- Open Internet Explorer, then go to the web page that you want to allow pop-ups.
- In Internet Explorer’s Address field, highlight the entire web address of the current page, then right-click and choose the Copy command.
- From the Tools menu (the gear icon on the far right), select Internet options. The Internet Options dialog box opens.
- Click on the Privacy tab.
- Under Pop-up Blocker ensure the Turn on Pop-up Blocker checkbox is checked, and then click Settings. The Pop-up Blocker Settings dialog box opens.
- Right-click in the Address of website to allow: field, then choose the Paste command.
Notes: Pasting the web address of a page you wish to allow pop-ups is recommended, rather than typing the generic main web address. For example, you might visit www.example.com/requirepopup.html, but the page is actually hosted at popup.example.com/forms/popupform.html. In this example, you must allow popup.example.com, not www.example.com. Note also that entire websites must be allowed, not individual directories or pages, so in this example Internet Explorer will automatically add the top level popup.example.com to its Allowed sites.
For more information about pop-ups, see Learn more about Pop-up Blocker, located at the bottom of the dialog box.
Edge (Windows 10 only)
Microsoft Edge for Windows 10 has no per-website control over blocking pop-up windows. Pop-ups are either blocked, or they are not. To allow pop-ups:
- Click the ellipsis icon (. ) in the upper right corner of your web browser, and then click Settings.
- In the Advanced settings section, click View advanced settings.
- In the Block pop-ups section, click the switch to Off. Pop-ups are now allowed.
- To block pop-ups once again, click the switch to On.
Note: If you are concerned about allowing pop-ups globally for all websites that you browse, consider using another web browser that allows website exceptions such as Chrome or Firefox.
Windows Security pop-up in Windows 10 [QUICK GUIDE]


- Download Restoro PC Repair Tool that comes with Patented Technologies (patent available here).
- Click Start Scan to find Windows issues that could be causing PC problems.
- Click Repair All to fix issues affecting your computer’s security and performance
- Restoro has been downloaded by 0 readers this month.
Security-wise, Windows 10 is probably the most secure Windows iteration to date. However, that enforced security something functions without any logic whatsoever.
And even if there’s any logic, they did a sub par job explaining why something happens when it does. Let’s take Windows Security pop-up that blocks connection to Wi-Fi networks and asks for your credentials.
Not once, not twice, but every time you try to connect to Wi-Fi. Forcing your to use LAN in the process.
To make the things even worse, this is the password protection most users never set. Some associate it with Outlook but it doesn’t seem to be the case every time. Fortunately, there’s a solution for this issue.
Few of them, to be exact. So make sure to check them out below.
How to get rid of Windows Security pop-up in Windows 10?
1: Disable Password Protected Sharing
It might come as a surprise but there are multiple reasons for this unpleasant occurrence. One that’s common includes HomeGroup sharing. If you have multiple PCs connected via HomeGroup sharing, you’ll need to disable the password protection.
That’s a common bug that bothered users on Windows XP and it seems it found its place in Windows 10, as well. Here’s how to do it easily in Windows 10:
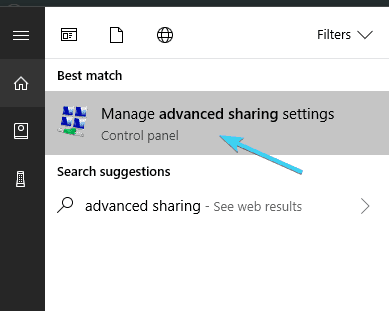
- In the Windows Search bar, type Advanced sharing and open ”Manage advanced sharing settings”.

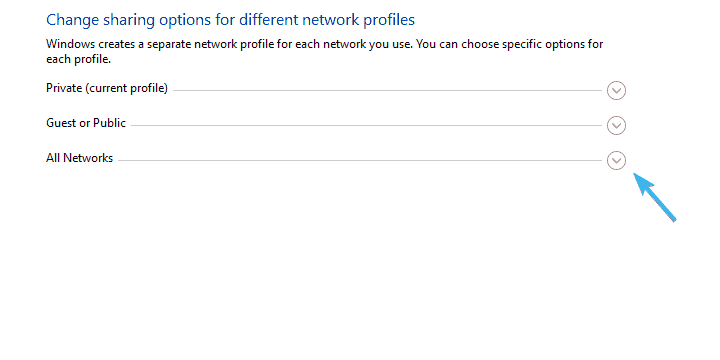
- Expand All networks.
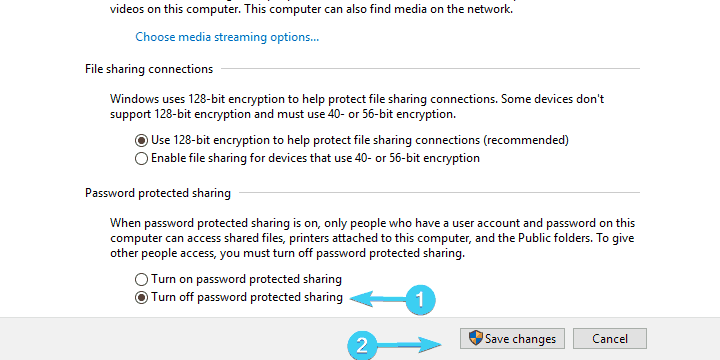
- Navigate to the bottom and select to Turn off password protected sharing.
- Save changes and exit.
2: Change Outlook settings
Outlook security settings are the most common reason for the Windows Security pop-up. Now, there are a lot of variations on the subject and various solutions roaming around. However, the most probable solution is hidden within Outlook’s Account settings.
Here’s what you need to do in order to disable repetitively occurring Windows Security prompts:
- Open Outlook.
- Open ”File” from the main menu.
- Choose Info and then Account Settings.
- Choose the E-mail tab.
- Right-click on the account that inflicts Windows Security prompt and select Change.
- Select More settings.
- Under the Security tab, uncheck the ”Always prompt for login credentials” box and confirm changes.
- Click OK and save changes.
On the other hand, if you’re still constantly annoyed by Windows Security pop-up asking to sign in with who-knows-what credentials, make sure to check the additional steps.
Change security and privacy settings for Internet Explorer 11
The new browser recommended by Microsoft is here
Get speed, security, and privacy with the new Microsoft Edge .
Privacy settings
By adjusting Internet Explorer’s privacy settings, you can affect how websites monitor your online activity. For example, you can decide which cookies are stored, choose how and when sites can use your location info, and block unwanted pop-ups.
Cookies are small files that websites put on your PC to store information about you and your preferences. Cookies can make your browsing experience better by letting sites remember your preferences or letting you avoid signing in each time you visit certain sites. However, some cookies might put your privacy at risk by tracking sites that you visit. For more info, see Delete and manage cookies in Internet Explorer.
When Do Not Track is turned on, Internet Explorer will send a Do Not Track request to the sites you visit and to the third parties whose content is hosted on those sites to let the sites know that you would prefer not to be tracked. For more info, see Do Not Track.
Browsers store some info—like your search history—to help improve your experience on the web. When you use InPrivate Browsing, info like passwords, search history, and page history is deleted once you close the tab.
To open an InPrivate Browsing session, right–click the Internet Explorer icon on the taskbar, and select Start InPrivate Browsing.
To turn off add-ons in InPrivate Browsing sessions
Open the desktop, and then select the Internet Explorer icon on the taskbar.
Select the Tools button , and then select Internet options.
On the Privacy tab, select the Disable toolbars and extensions when InPrivate Browsing starts check box, and select OK.
Location Services lets sites ask for your physical location to improve your experience. For example, a mapping site can request your physical location to center the map for you. Internet Explorer will let you know when a site wants to use your location. When this happens, select Allow once to let a site use your location just one time. If you want the site to use your location each time you visit, select Always allow.
To turn off location sharing
If you don’t want sites to ask for your physical location, you can turn off location sharing. Here’s how:
Open Internet Explorer by selecting the Internet Explorer icon on the taskbar.
Click the Tools button , and then select Internet options.
On the Privacy tab, under Location, select the Never allow websites to request your physical location check box.
Pop-up Blocker limits or blocks pop-ups on sites that you visit. You can choose the level of blocking you prefer, turn on or off notifications when pop-ups are blocked, or create a list of sites that you don’t want to block pop-ups on. Pop-up Blocker settings only apply to Internet Explorer.
To turn Pop-up Blocker on or off
Open Internet Explorer, select the Tools button , and then select Internet options.
On the Privacy tab, under Pop-up Blocker, select or clear the Turn on Pop-up Blocker check box, and then select OK.
Block all pop-ups
Open Internet Explorer, select the Tools button , and then select Internet options.
On the Privacy tab, under Pop-up Blocker, select Settings.
In the Pop-up Blocker settings dialog box, under Blocking level, set the blocking level to High: Block all pop-ups (Ctrl + Alt to override).
Select Close, and then select OK.
Turn off notifications when pop-ups are blocked
Open Internet Explorer, select the Tools button , and then select Internet options.
On the Privacy tab, under Pop-up Blocker, select Settings.
In the Pop-up Blocker settings dialog box, clear the Show Notification bar when a pop-up is blocked check box.
Select Close, and then select OK.
Tracking Protection helps prevent information about your browsing from being sent to third-party content providers on sites you visit. Think of a Tracking Protection Lists as a “do not call” list. Internet Explorer blocks any third-party content from sites on the list, and limits the info that those third-party sites can collect about you.
Security zones
By changing the security settings, you can customize how Internet Explorer helps protect your PC from potentially harmful or malicious web content. Internet Explorer automatically assigns all websites to a security zone: Internet, Local intranet, Trusted sites, or Restricted sites. Each zone has a different default security level that determines what kind of content can be blocked for that site. Depending on the security level of a site, some content can be blocked until you choose to allow it, ActiveX controls might not run automatically, or you might see warning prompts on certain sites. You can customize the settings for each zone to decide how much protection you do or don’t want.
Open Internet Explorer, select the Tools button , and then select Internet options.
Select the Security tab and customize your security zone settings in these ways:
To change settings for any security zone, select the zone icon, and then move the slider to the security level that you want.
To create your own security settings for a zone, select the zone icon, and then select Custom level and choose the settings that you want.
To restore all security levels to their original settings, select the Reset all zones to default level button.
Open Internet Explorer, select the Tools button , and then select Internet options.
Select the Security tab, choose one of the security zone icons ( Local intranet, Trusted sites, or Restricted sites), and then select Sites. You can add sites to the zone you chose, or delete sites that you no longer want in this zone.
If you chose Local intranet in the previous step, select Advanced, and then do one of the following:
Add a site. Enter a URL into the Add this website to the zone box, and then select Add.
Remove a site. Under Websites, select the URL you want to remove, and then select Remove.
Enhanced Protected Mode makes it harder for malware to run in Internet Explorer.
To turn on or off Enhanced Protected Mode
Open Internet Explorer, select the Tools button, and then select Internet Options.
On the Advanced tab, under Security, select (or clear) the Enable Enhanced Protected Mode check box, and then select OK. You’ll need to restart your PC before this setting takes effect.


