- A1.8 Appendix A: Git in Other Environments — Git in PowerShell
- Git in PowerShell
- Installation
- Prerequisites (Windows only)
- PowerShell Gallery
- Update PowerShell Prompt
- Using Git with PowerShell on Windows 10
- Installing Git
- Adjusting the installed shortcuts
- Configure a simple Git PowerShell command window
- Get useful CLI sugar with posh-git
- ssh-agent
- Other tweaks
- Upgrading Git
- Windows powershell and git
A1.8 Appendix A: Git in Other Environments — Git in PowerShell
Git in PowerShell
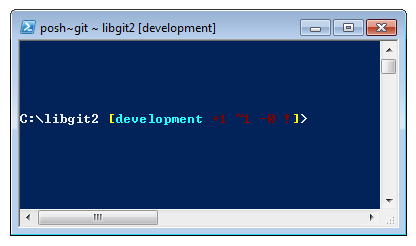
The legacy command-line terminal on Windows ( cmd.exe ) isn’t really capable of a customized Git experience, but if you’re using PowerShell, you’re in luck. This also works if you’re running PowerShell Core on Linux or macOS. A package called posh-git (https://github.com/dahlbyk/posh-git) provides powerful tab-completion facilities, as well as an enhanced prompt to help you stay on top of your repository status. It looks like this:
Installation
Prerequisites (Windows only)
Before you’re able to run PowerShell scripts on your machine, you need to set your local ExecutionPolicy to RemoteSigned (basically, anything except Undefined and Restricted ). If you choose AllSigned instead of RemoteSigned , also local scripts (your own) need to be digitally signed in order to be executed. With RemoteSigned , only scripts having the ZoneIdentifier set to Internet (were downloaded from the web) need to be signed, others not. If you’re an administrator and want to set it for all users on that machine, use -Scope LocalMachine . If you’re a normal user, without administrative rights, you can use -Scope CurrentUser to set it only for you.
To set the value of ExecutionPolicy to RemoteSigned for all users use the next command:
PowerShell Gallery
If you have at least PowerShell 5 or PowerShell 4 with PackageManagement installed, you can use the package manager to install posh-git for you.
If you want to install posh-git for all users, use -Scope AllUsers instead and execute the command from an elevated PowerShell console. If the second command fails with an error like Module ‘PowerShellGet’ was not installed by using Install-Module , you’ll need to run another command first:
Then you can go back and try again. This happens, because the modules that ship with Windows PowerShell are signed with a different publishment certificate.
Update PowerShell Prompt
To include git information in your prompt, the posh-git module needs to be imported. To have posh-git imported every time PowerShell starts, execute the Add-PoshGitToProfile command which will add the import statement into your $profile script. This script is executed everytime you open a new PowerShell console. Keep in mind, that there are multiple $profile scripts. E. g. one for the console and a separate one for the ISE.
Using Git with PowerShell on Windows 10
published on 2018.04.24
This article has been updated to reflect Git for Windows version 2.13.2 and a new version of posh-git; the PowerShell scripts have been changed to address issues raised by commenters. The previous version was posted on 12 March 2016, and any comments on this page that were written prior to 22 July 2017 are referencing that older version.
How to install Git on Windows 10 systems and run Git from a PowerShell command line.
Installing Git
On modern Windows systems, the best way to get Git is to use the installers produced by the Git for Windows project.
Download the install kit from https://git-for-windows.github.io/. This will download the installer for the latest release, and that will install 64-bit software. If you want 32-bit software, or a specific Git for Windows version, then visit the release section of the git-for-windows project: https://github.com/git-for-windows/git/releases.
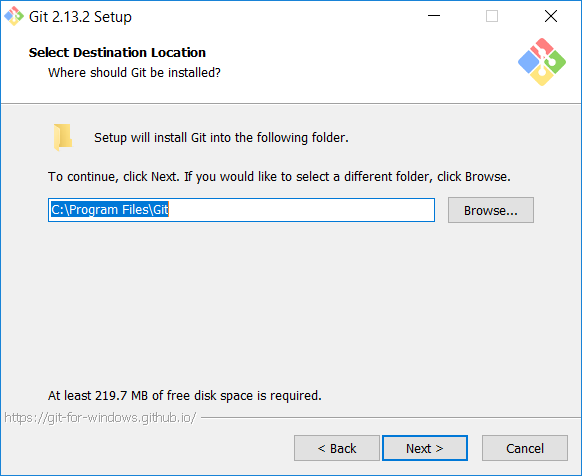
Launch the installer as the administrator 1 and walk through the installation 2 dialog panels as follows:

Install path. If this isn’t installing in Program Files then you probably didn’t run the installer with elevated privilege 1 . Next.
Select options to be installed. Because the goal is to minimize the impact on the Windows system, and to run Git from a PowerShell command line, I recommend only checking the Git LFS (Large File Support).
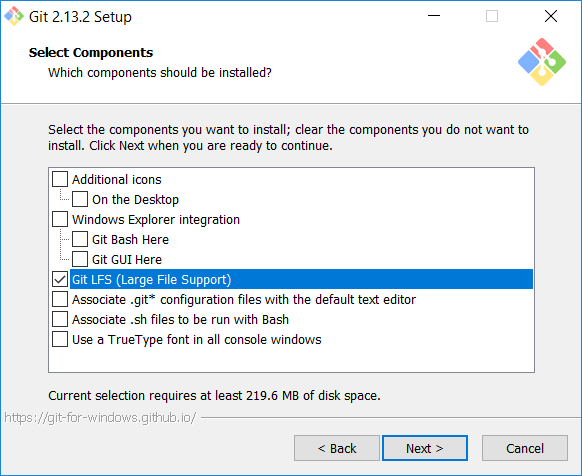
Only Git LFS. Next.
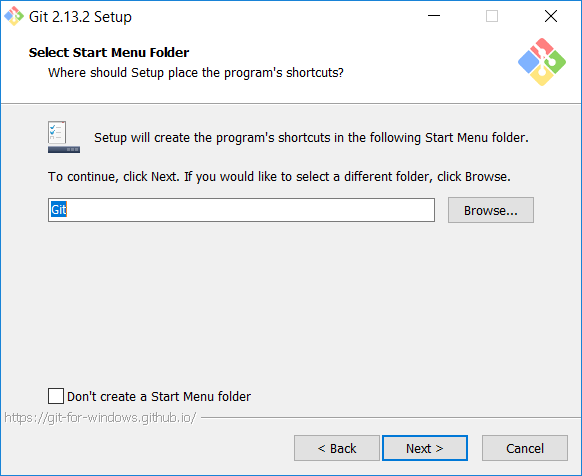
Start menu folder name. Next.
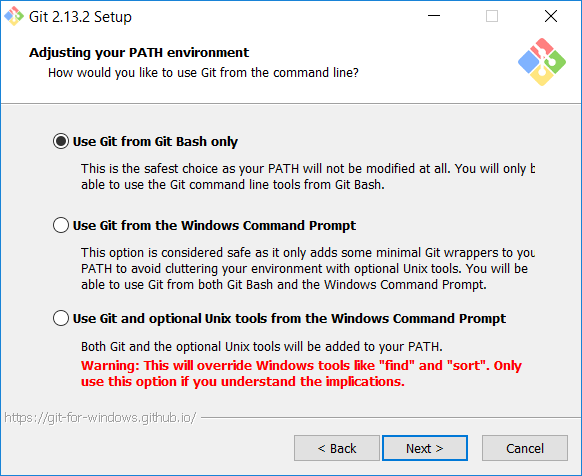
Adjusting the PATH. Leave the default option, the one that does not modify the path. Next.
Choose a trusted store for TLS certificate authorities (CAs). Unless you know you need the OpenSSL CA bundle, select “Use the native Windows Secure Channel library”.
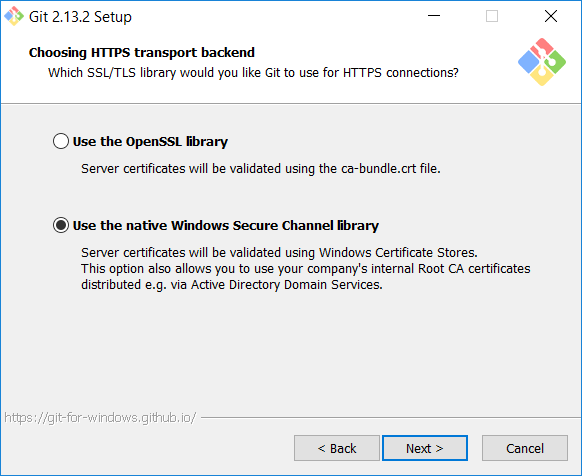
Use the native Windows Secure Channel library. Next.
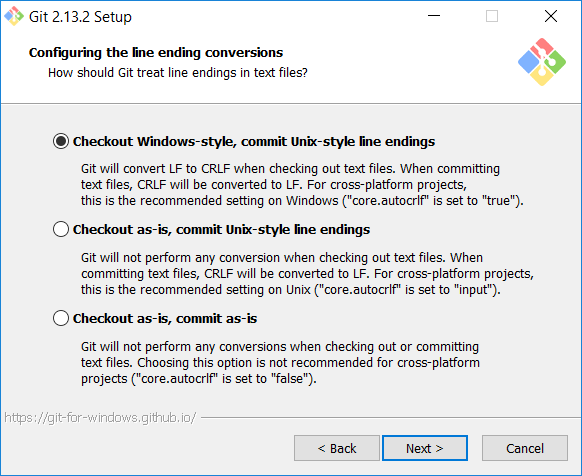
Line ending conversion. Leave the default option, the one that checks out Windows-style line endings and commits Unix-style line endings. Next.
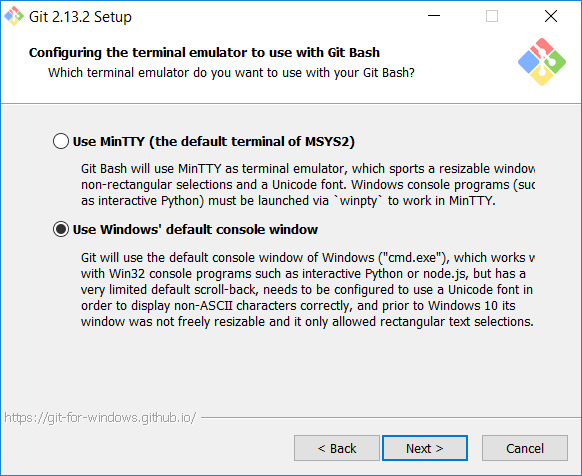
Select the terminal emulator. On a Windows 8.1 (or Server 2012 R2) or earlier system, leave the default selection (MinTTY).
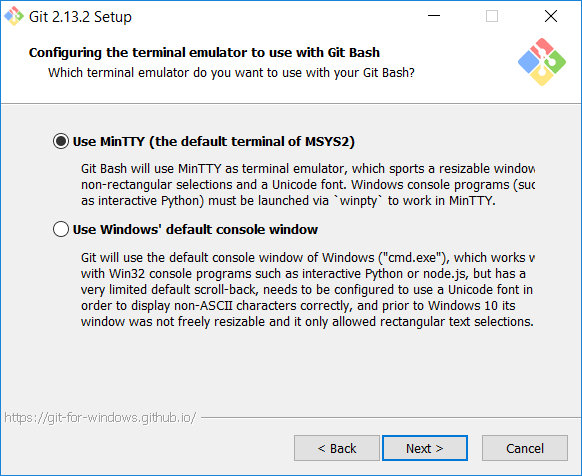
On a Windows 10 system, change to use the Windows’ default console window. Next.
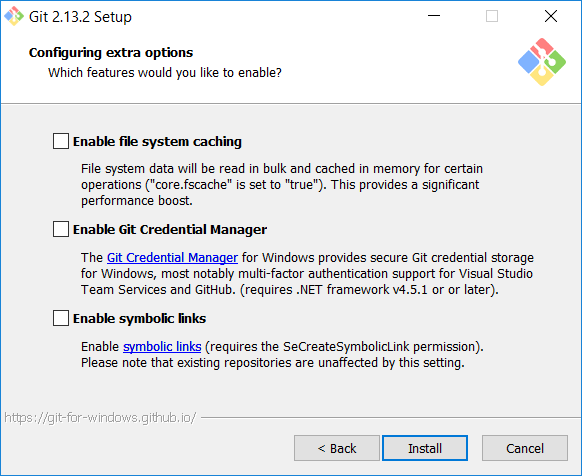
Extra options. Don’t select anything. Next.
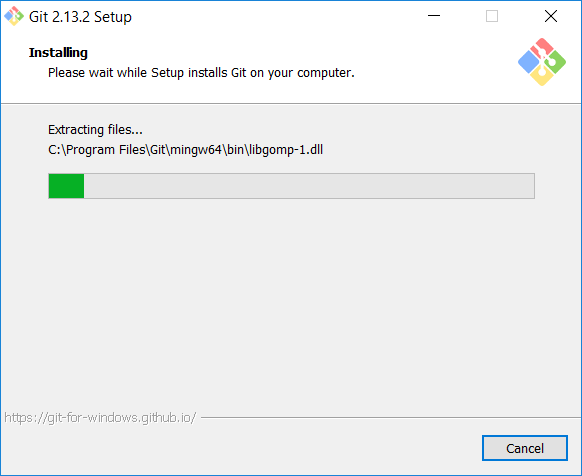
Watch the install proceed.
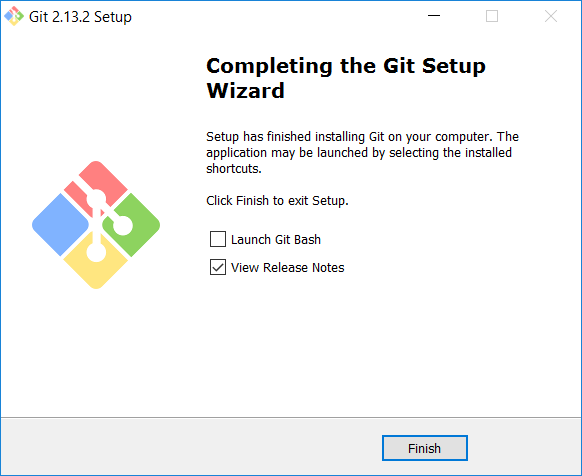
Install completed. Click Finish and read the release notes. Really. Especially the known issues section.
Adjusting the installed shortcuts
The installer will have laid down three shortcuts in the start menu.
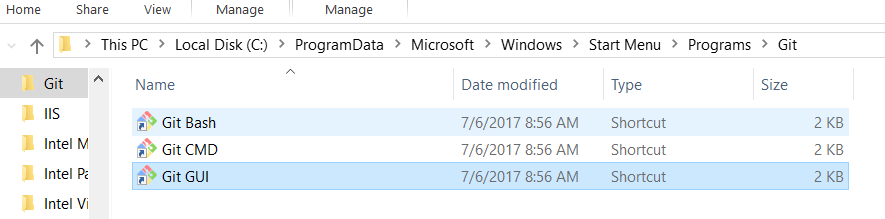
These shortcuts are of secondary importance; the primary goal is to use Git from a PowerShell command line. However, you may find reasons to use either Git Bash or Git CMD . So configure them now; launch each 3 and configure the window properties 4 to enable Quick Edit and set the scroll buffer to 9999 lines.
Go to the “Options” tab. 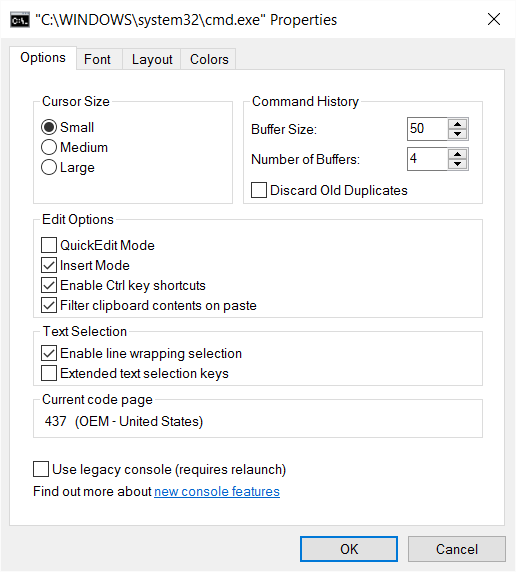
Make sure QuickEdit Mode is checked.

Go to the “Layout” tab.
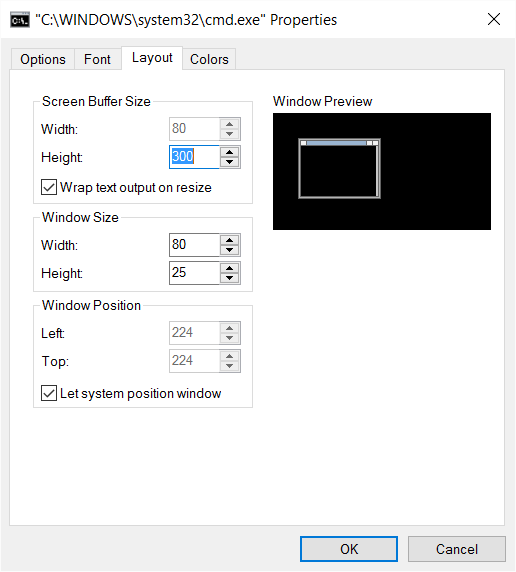
Change the Height property of the Screen Buffer Size to 9999.

Click the “OK” button.
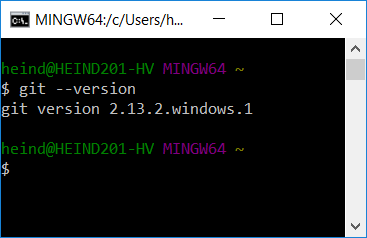
It’s worth launching a command window and checking to see that the expected version of Git is installed and running.
Configure a simple Git PowerShell command window
Use the file explorer to navigate to :\Windows\System32\WindowsPowerShell\v1.0 and right-click on powershell.exe to create a shortcut on the desktop. Rename that shortcut to “Windows PowerShell (bootstrap)” and then move it to the Start Screen folder. 5
Edit shortcut properties to change the shortcut target to:
The -NoProfile argument is important. It prevents any default profiles from loading; and that will avoid introducing issues and injecting kruft that can send you down a troubleshooting rat hole. Yep, I speak from experience.
While you are in properties dialog, you might as well set the scroll buffer to 9999 and enable QuickEdit.
Now, using your favorite programming editor, create the PowerShell profile script %USERPROFILE%\Documents\WindowsPowerShell\bootstrap-git.profile.ps1 with this content:
Launch the shortcut. Enter the command git —version . You should see the expected Git version.
Great! You’ve got Git running in PowerShell. 🙂 .
Get useful CLI sugar with posh-git
posh-git is a PowerShell module that adds tab completion for Git commands and also a very helpful colorized command prompt that shows the branch and status of the current repo, including remote repo status. You will want to install posh-git.
I recommend using the manual install method so that you can keep posh-git up to date with the latest patches.
- In your new PowerShell window, check the execution policy with Get-ExecutionPolicy . It should be RemoteSigned or Unrestricted . 6
- cd
\Documents and create a directory GitHub .
In the current directory you should now see a file called example.profile.ps1 . That is an example of how to load the posh-get module and start the ssh-agent (used to avoid repeated password prompts from SSH—more on that in the next section).
I’ve taken that example and tweaked it a bit to have better colorization in the command prompt and to work from any working directory. I put it in a script file that can be included (via the source command, “ . ”) in any profile. The script is called posh-git.src.ps1 , and it looks like this:
Also create a simple script that sets up the session transcript, called transcript.src.ps1 . Something like this:
Now we can create a new profile script, posh-git.profile.ps1 and use that to launch a PowerShell window that has Git and posh-git activated. My example of that script looks like:
Create another shortcut similar to the “Windows PowerShell (bootstrap)” shortcut you created before, but name it “Windows PowerShell (posh-git)” and set the Target to:
Pin that shortcut to the Start Screen and the Task Bar and you are good to go.
ssh-agent
The script above will launch an ssh-agent process (if one is not already running). ssh-agent caches private key passphrases and supplies them to Git when needed. This is helpful for avoiding a passphrase prompt every time you execute a Git command that touches the remote repo. You will want to use ssh-agent .
To store your passphrase with the ssh-agent process, use the ssh-add command to cache the passphrase for a private key, like so:
That command will prompt you for the passphrase. If you enter the correct one, then all further use of that private key by Git will not again prompt for the passphrase.
Other tweaks
I like slightly different colors in my Git command output, so I set my Git global config 7 to include these colorization overrides:
I also like to use Sublime Text 3 as my editor, so:
And I have a custom commit message template, referenced via:
It just has column numbering so I can see how long my lines are, and keep the first line under 50 characters (to make git commit history looking pretty). The template looks like this:
Upgrading Git
To upgrade Git for Windows to a new version, just run the new installer (making sure to run it as administrator). The installer will remember the configuration choices you made during the last install, so it should just be a matter of repeatedly clicking “Next”. It is probably a good idea to close any command windows that might have activated Git. And you may get prompted to kill any running ssh-agent.exe processes.
Right click on the file and select “Run as administrator”. Or open a command using using “Run as administrator” and run the installer EXE from that command line. ↩ ↩ 2
I downloaded the 2.13.2 installer, Git-2.13.2-64-bit.exe, and ran it (as administrator) on my Windows 10 box. ↩
You may need to launch the command windows using “Run as administrator” to have the privileges needed to save the window property changes. ↩
Edit window properties by pulling down the window’s System Menu (click on the icon in the upper left of the title bar) and selecting “Properties”. You enable QuickEdit Mode from the “Options” tab. You set the scroll buffer size on the “Layout” tab by setting the Height property of the “Screen Buffer size” to 9999. ↩
On my system, the Start Menu folder is C:\Users\heind.CORP\AppData\Roaming\Microsoft\Windows\Start Menu\Programs . You can find the location of your own Start Screen by right-clicking on any Start Screen shortcut, selecting “More” and then “Open file location”. ↩
If not RemoteSigned or Unrestricted then run PowerShell as administrator and call Set-ExecutionPolicy RemoteSigned -Scope CurrentUser -Confirm . ↩
Windows powershell and git


Table of contents:
posh-git is a PowerShell module that integrates Git and PowerShell by providing Git status summary information that can be displayed in the PowerShell prompt, e.g.:
\GitHub\posh-git [main ≡ +0
posh-git also provides tab completion support for common git commands, branch names, paths and more. For example, with posh-git, PowerShell can tab complete git commands like checkout by typing git ch and pressing the tab key. That will tab complete to git checkout and if you keep pressing tab , it will cycle through other command matches such as cherry and cherry-pick . You can also tab complete remote names and branch names e.g.: git pull or ma tab completes to git pull origin main .
| Windows (AppVeyor) | Linux/macOS (Travis) | Code Coverage Status |
|---|---|---|
 |  |
- Supports Windows PowerShell 5.x
- Supports PowerShell Core 6+ on all platforms
- Supports ANSI escape sequences for color customization
- Includes breaking changes from v0.x (roadmap)
- All SSH commands removed from posh-git and moved into the new module posh-sshell
- v1.0.0 ( README • CHANGELOG )
- v1.0.0-beta5 ( README • CHANGELOG )
- v1.0.0-beta4 ( README • CHANGELOG )
- v1.0.0-beta3 ( README • CHANGELOG )
- v1.0.0-beta2 ( README • CHANGELOG )
- v1.0.0-beta1 ( README • CHANGELOG )
| Windows (AppVeyor) | Code Coverage Status |
|---|---|
|
- Supports Windows PowerShell 3+
- Does not support PowerShell Core
- Avoids breaking changes, maintaining v0.x
These installation instructions, as well as rest of this readme, applies only to version 1.x of posh-git. For v0.x installation instructions see this README.
Before installing posh-git make sure the following prerequisites have been met.
Windows PowerShell 5.x or PowerShell Core 6.0. You can get PowerShell Core 6.0 for Windows, Linux or macOS from here. Check your PowerShell version by executing $PSVersionTable.PSVersion .
On Windows, script execution policy must be set to either RemoteSigned or Unrestricted . Check the script execution policy setting by executing Get-ExecutionPolicy . If the policy is not set to one of the two required values, run PowerShell as Administrator and execute Set-ExecutionPolicy RemoteSigned -Scope CurrentUser -Confirm .
Git must be installed and available via the PATH environment variable. Check that git is accessible from PowerShell by executing git —version from PowerShell. If git is not recognized as the name of a command, verify that you have Git installed. If not, install Git from https://git-scm.com. If you have Git installed, make sure the path to git is in your PATH environment variable.
Installing posh-git via PowerShellGet on Linux, macOS and Windows
posh-git is available on the PowerShell Gallery and can be installed using the built-in PowerShellGet module.
Start Windows PowerShell 5.x or PowerShell >= v6 ( pwsh ).
Execute one of the following two commands from an elevated PowerShell prompt, depending on whether (A) you’ve never installed posh-git, or (B) you’ve already installed a previous version:
NOTE: If you’re asked to trust packages from the PowerShell Gallery, answer yes to continue installation of posh-git
Installing posh-git via Chocolatey
If you prefer to manage posh-git as a Windows package, you can use Chocolatey to install posh-git. If you don’t have Chocolatey, you can install it from the Chocolately Install page. With Chocolatey installed, execute the following command to install posh-git:
Installing posh-git via Scoop
Another popular package manager for Windows is Scoop, which you can also use to install posh-git. With Scoop installed, execute these commands to install posh-git and import it into your profile:
Installing posh-git Manually
If you need to test/debug changes prior to contributing here, or would otherwise prefer to install posh-git without the aid of a package manager, you can execute Import-Module
. For example, if you have git cloned posh-git to
\git\posh-git you can import this version of posh-git by executing Import-Module
After you have installed posh-git, you need to configure your PowerShell session to use the posh-git module.
Step 1: Import posh-git
The first step is to import the module into your PowerShell session which will enable git tab completion. You can do this with the command Import-Module posh-git .
Step 2: Import posh-git from your PowerShell profile
You do not want to have to manually execute the Import-Module command every time you open a new PowerShell prompt. Let’s have PowerShell import this module for you in each new PowerShell session. We can do this by either executing the command Add-PoshGitToProfile or by editing your PowerShell profile script and adding the command Import-Module posh-git .
If you want posh-git to be available in all your PowerShell hosts (console, ISE, etc) then execute Add-PoshGitToProfile -AllHosts . This will add a line containing Import-Module posh-git to the file $profile.CurrentUserAllHosts .
If you want posh-git to be available in just the current host, then execute Add-PoshGitToProfile . This will add the same command but to the file $profile.CurrentUserCurrentHost .
If you want posh-git to be available for all users on the system, start PowerShell as Administrator or via sudo ( sudo pwsh ) on Linux/macOS then execute Add-PoshGitToProfile -AllUsers -AllHosts . This will add the import command to $profile.AllUsersAllHosts .
If you want to configure posh-git for all users but only for the current host, drop the -AllHosts parameter and the command will modify $profile.AllUsersCurrentHost .
If you’d prefer, you can manually edit the desired PowerShell profile script. Open (or create) your profile script with the command notepad $profile.CurrentUserAllHosts . In the profile script, add the following line:
Save the profile script, then close PowerShell and open a new PowerShell session. Type git fe and then press tab . If posh-git has been imported, that command should tab complete to git fetch .
If you want posh-git to detect your own aliases for git, then you must have set the alias before importing posh-git. So if you have Set-Alias g git then ensure it is executed before Import-Module posh-git , and g checkout will complete as if you’d typed git .
Git status summary information
The Git status summary information provides a wealth of «Git status» information at a glance, all the time in your prompt.
By default, the status summary has the following format:
- Cyan means the branch matches its remote
- Green means the branch is ahead of its remote (green light to push)
- Red means the branch is behind its remote
- Yellow means the branch is both ahead of and behind its remote
S represents the branch status in relation to remote (tracked origin) branch.
Note: This status information reflects the state of the remote tracked branch after the last git fetch/pull of the remote. Execute git fetch to update to the latest on the default remote repo. If you have multiple remotes, execute git fetch —all .
- ≡ = The local branch in at the same commit level as the remote branch ( BranchIdenticalStatus )
- ↑ = The local branch is ahead of the remote branch by the specified number of commits; a git push is required to update the remote branch ( BranchAheadStatus )
- ↓ = The local branch is behind the remote branch by the specified number of commits; a git pull is required to update the local branch ( BranchBehindStatus )
- ↕ = The local branch is both ahead of the remote branch by the specified number of commits (a) and behind by the specified number of commits (b); a rebase of the local branch is required before pushing local changes to the remote branch ( BranchBehindAndAheadStatus ). NOTE: this status is only available if $GitPromptSettings.BranchBehindAndAheadDisplay is set to Compact .
- × = The local branch is tracking a branch that is gone from the remote ( BranchGoneStatus )
ABCD represent the index; | ( DelimStatus ); EFGH represent the working directory
= Modified files
W represents the overall status of the working directory
- ! = There are unstaged changes in the working tree ( LocalWorkingStatusSymbol )
= There are uncommitted changes i.e. staged changes in the working tree waiting to be committed ( LocalStagedStatusSymbol )
The symbols and surrounding text can be customized by the corresponding properties on $GitPromptSettings .
For example, a status of [main ≡ +0
1 -0] corresponds to the following git status :
posh-git adds variables to your session to let you customize it, including $GitPromptSettings , $GitTabSettings , and $TortoiseGitSettings . For an example of how to configure your PowerShell profile script to import the posh-git module and create a custom prompt function that displays git status info, see the Customizing Your PowerShell Prompt section below.
Note on performance: Displaying file status in the git prompt for a very large repo can be prohibitively slow. Rather than turn off file status entirely ( $GitPromptSettings.EnableFileStatus = $false ), you can disable it on a repo-by-repo basis by adding individual repository paths to $GitPromptSettings.RepositoriesInWhichToDisableFileStatus .
Customizing the posh-git prompt
When you import the posh-git module, it will replace PowerShell’s default prompt function with a new prompt function. The posh-git prompt function will display Git status summary information when the current directory is inside a Git repository. posh-git will not replace the prompt function if it has detected that you have your own, customized prompt function.
The prompt function provided by posh-git creates a prompt that looks like this:
You can customize the posh-git prompt function or define your own custom prompt function. The rest of this section covers how to customize posh-git’s prompt function using the global variable $GitPromptSettings .
If you’d like to make any of following changes permanent, i.e. available whenever you start PowerShell, put the corresponding setting(s) in one of your profile scripts after the line that imports posh-git.
For instance, you can customize the default prompt prefix to display a colored timestamp with these settings:
This will change the prompt to:
If you would prefer not to have any path under your home directory abbreviated with
, use the following setting:
This will change the prompt to:
If you would like to change the color of the path, you can use the following setting on Windows:
Note: Setting the ForegroundColor to a color name, other than one of the standard ConsoleColor names, only works on Windows. On Windows, posh-git uses the [System.Drawing.ColorTranslator]::FromHtml(string colorName) method to parse a color name as an HTML color. For a complete list of HTML colors, see this W3Schools page.
If you are on Linux or macOS and desire an Orange path, you will need to specify the RGB value for Orange e.g.:
This will change the prompt to:
If you would like to make your prompt span two lines, with a newline after the Git status summary, use this setting:
This will change the prompt to:
You can swap the order of the path and the Git status summary with the following setting:
This will change the prompt to:
Finally, you can combine these settings to customize the posh-git prompt fairly significantly. In the DefaultPromptSuffix field below, we are prepending the PowerShell history id number before the prompt char > e.g.:
This will change the prompt to:
Finally, the path portion of the prompt can be contained within delimiters. For instance, if you would like the containing characters to be red, curly braces, the following settings can be used:
With these additional values, the previous prompt would become
For reference, the following layouts show the relative position of the various parts of the posh-git prompt. Note that <> denotes parts of the prompt that may not appear depending on the status of settings and whether or not the current dir is in a Git repository. To simplify the layout, DP is being used as an abbreviation for DefaultPrompt settings.
Default prompt layout:
Prompt layout when DefaultPromptWriteStatusFirst is set to $true:
Displaying Error Information
If you want to display the error status of the last command, you can use the values stored in the $global:GitPromptValues object which includes the value of $LastExitCode and $? (represented by the property DollarQuestion ). Here is a prompt customization that displays a Red exit code value when $LastExitCode is non-zero or a Red ! if $? is $false :
When a PowerShell command fails, this is the prompt you will see:
When an external application returns a non-zero exit code, 1 in this case, you will see the exit code in the prompt:
Note that until you run an external application that sets $LASTEXITCODE to zero or you manually set the variable to 0, you will see the exit code for any error. In addition to LastExitCode and DollarQuestion , $global:GitPromptValues also has IsAdmin and LastPrompt properties. The LastPrompt property contains the ANSI escaped string that was used for the last prompt. This can be useful for debugging your prompt display particularly when using ANSI/VT sequences.
If you require even more customization than $GitPromptSettings provides, you can create your own prompt function to show whatever information you want. See the Customizing Your PowerShell Prompt wiki page for details.
However, if you need a custom prompt just to perform some non-prompt logic, you can still use posh-git’s prompt function to write out the prompt string. This can be done with the $GitPromptScriptBlock variable as shown below e.g.:
And if you’d like to write prompt text before and/or after the posh-git prompt, you can use posh-git’s Write-Prompt command as shown below:


