New-Local User
Creates a local user account.
Syntax
Description
The New-LocalUser cmdlet creates a local user account. This cmdlet creates a local user account or a local user account that is connected to a Microsoft account.
The Microsoft.PowerShell.LocalAccounts module is not available in 32-bit PowerShell on a 64-bit system.
Examples
Example 1: Create a user account
This command creates a local user account and does not specify the AccountExpires or Password parameters. Therefore, the account doesn’t expire or have a password by default.
Example 2: Create a user account that has a password
The first command prompts you for a password by using the Read-Host cmdlet. The command stores the password as a secure string in the $Password variable.
The second command creates a local user account by using the password stored in $Password . The command specifies a user name, full name, and description for the user account.
Parameters
Specifies when the user account expires. To obtain a DateTime object, use the Get-Date cmdlet. If you do not specify this parameter, the account does not expire.
| Type: | DateTime |
| Position: | Named |
| Default value: | None |
| Accept pipeline input: | True |
| Accept wildcard characters: | False |
Indicates that the account does not expire.
| Type: | SwitchParameter |
| Position: | Named |
| Default value: | None |
| Accept pipeline input: | True |
| Accept wildcard characters: | False |
Prompts you for confirmation before running the cmdlet.
| Type: | SwitchParameter |
| Aliases: | cf |
| Position: | Named |
| Default value: | False |
| Accept pipeline input: | False |
| Accept wildcard characters: | False |
Specifies a comment for the user account. The maximum length is 48 characters.
| Type: | String |
| Position: | Named |
| Default value: | None |
| Accept pipeline input: | True |
| Accept wildcard characters: | False |
Indicates that this cmdlet creates the user account as disabled.
| Type: | SwitchParameter |
| Position: | Named |
| Default value: | None |
| Accept pipeline input: | True |
| Accept wildcard characters: | False |
Specifies the full name for the user account. The full name differs from the user name of the user account.
| Type: | String |
| Position: | Named |
| Default value: | None |
| Accept pipeline input: | True |
| Accept wildcard characters: | False |
Specifies the user name for the user account.
If you create a local user account for the local system, the user name can contain up to 20 uppercase characters or lowercase characters. A user name cannot contain the following characters:
A user name cannot consist only of periods . or spaces.
| Type: | String |
| Position: | 0 |
| Default value: | None |
| Accept pipeline input: | True |
| Accept wildcard characters: | False |
Indicates that the user account does not have a password.
| Type: | SwitchParameter |
| Position: | Named |
| Default value: | None |
| Accept pipeline input: | True |
| Accept wildcard characters: | False |
Specifies a password for the user account. You can use Read-Host -GetCredential , Get-Credential , or ConvertTo-SecureString to create a SecureString object for the password.
If you omit the Password and NoPassword parameters, New-LocalUser prompts you for the new user’s password.
| Type: | SecureString |
| Position: | Named |
| Default value: | None |
| Accept pipeline input: | True |
| Accept wildcard characters: | False |
Indicates whether the password expires.
| Type: | SwitchParameter |
| Position: | Named |
| Default value: | None |
| Accept pipeline input: | True |
| Accept wildcard characters: | False |
Indicates that the user cannot change the password on the user account.
| Type: | SwitchParameter |
| Position: | Named |
| Default value: | None |
| Accept pipeline input: | True |
| Accept wildcard characters: | False |
Shows what would happen if the cmdlet runs. The cmdlet is not run.
| Type: | SwitchParameter |
| Aliases: | wi |
| Position: | Named |
| Default value: | False |
| Accept pipeline input: | False |
| Accept wildcard characters: | False |
Inputs
System.String, System.DateTime, System.Boolean, System.Security.SecureString
You can pipe a string, a DateTime object, a boolean value, or a secure string to this cmdlet.
Outputs
System.Management.Automation.SecurityAccountsManager.LocalUser
This cmdlet returns a LocalUser object. This object provides information about the user account.
Notes
- A user name cannot be identical to any other user name or group name on the computer. A user name cannot consist only of periods . or spaces. A user name can contain up to 20 uppercase characters or lowercase characters. A user name cannot contain the following characters:
A password can contain up to 127 characters.
The PrincipalSource property is a property on LocalUser, LocalGroup, and LocalPrincipal objects that describes the source of the object. The possible sources are as follows:
- Local
- Active Directory
- Azure Active Directory group
- Microsoft Account
PrincipalSource is supported only by Windows 10, Windows Server 2016, and later versions of the Windows operating system. For earlier versions, the property is blank.
Use PowerShell to Create Local User Accounts
November 23rd, 2010
Summary: Microsoft Scripting Guy Ed Wilson shows how to use Windows PowerShell to create local user accounts.
 Hey, Scripting Guy! I need to be able to create some local user accounts. We are still using Windows PowerShell 1.0 on our Windows 2008 servers, and on our Windows Vista workstations. Therefore, using Windows PowerShell 2.0 is not an option now. We are hoping to upgrade next year. However, we cannot make any changes now due to this being the end of the year. Can you help me?
 Hello TS, Microsoft Scripting Guy Ed Wilson here. I remembered writing about this topic previously, and I decided to take a look at the Windows PowerShell Scripting Guide book that I wrote for Microsoft Press, and excerpt a portion of one of the chapters in that most excellent book.
Portions of today’s article are excerpted from Ed Wilson’s Windows PowerShell Scripting Guide, Microsoft Press, 2008.
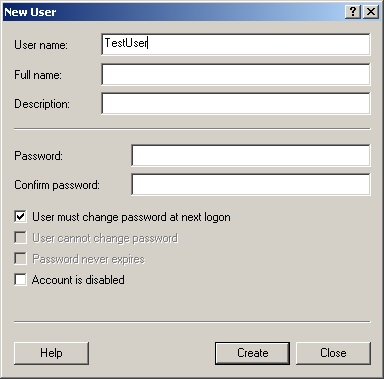
There are two methods to create a local user account. You can use net user, or you can use Active Directory Service Interfaces (ADSI). Of course, you can still use the graphical tool seen in the following figure.
We will use ADSI to create local users and groups. To create local user accounts, we have to use the WinNT ADSI provider. Local user accounts do not have as many attributes as domain user accounts have, and so the process of creating them locally is not very difficult.
We begin the CreateLocalUser.ps1 script with the param statement where we define four parameters: -computer, -user, -password, and –help. This line of code is seen here.
param( $computer =” localhost “, $user , $password , $help )
The next section of code we have is the funhelp function. The funhelp function is used to print the help text. In Windows PowerShell 2.0, of course, there is the comment based help, but in Windows PowerShell 1.0 you must create the help text yourself. This is seen here.
Creates a local user on either a local or remote machine.
-computer Specifies the name of the computer upon which to run the script
-user Name of user to create
-help prints help file
Generates an error. You must supply a user name
CreateLocalUser.ps1 -computer MunichServer -user myUser
Creates a local user called myUser on a computer named MunichServer
with a password of Passw0rd^&!
CreateLocalUser.ps1 -user myUser -password Passw0rd^&!
with a password of Passw0rd^&!
Creates a local user called myUser on local computer with
a password of Passw0rd^&!
Displays the help topic for the script
To determine whether we have to display help we check for the presence of the $help variable. If the $help variable is present, then we will display a string message that states we are obtaining help, and then we call the funhelp function. This line of code is seen here.
Now we have to make sure that both the –user and the –password parameters of the script contain values. We do not check password length, or user naming convention . However, we could do those kinds of things here. Instead, we just accept the user name and the password that are passed to the script when it is run. If these values are not present, then we use the throw statement to generate an error and to halt execution of the script. In Windows PowerShell 2.0, I would just mark the parameter as mandatory and therefore I could avoid this step. This section of code is seen here.
if(! $user -or ! $password )
$ (Throw ‘A value for $user and $password is required.
Try this: CreateLocalUser.ps1 -help ?’)
After we have determined that the user name value and the password string were supplied to the script, we use the [ADSI] type accelerator to connect to the local machine account database. We then use the create() method to create a user with the name supplied in the $user variable. We then call the setpassword() method to set the password. We then call the setinfo() method to write the changes to the database. Next we set the description property, and once again call setinfo(). This section of code is seen here.
$objOu = [ ADSI ]” WinNT ://$ computer “
$objUser = $objOU .Create(“ User “, $user )
$objUser .setpassword( $password )
$objUser .description = “ Test user “
The completed CreateLocalUser.ps1 script is seen here.
CreateLocalUser.ps1
param( $computer =” localhost “, $user , $password , $help )
Creates a local user on either a local or remote machine.
-computer Specifies the name of the computer upon which to run the script
-user Name of user to create
-help prints help file
Generates an error. You must supply a user name
CreateLocalUser.ps1 -computer MunichServer -user myUser
Creates a local user called myUser on a computer named MunichServer
with a password of Passw0rd^&!
CreateLocalUser.ps1 -user myUser -password Passw0rd^&!
with a password of Passw0rd^&!
Creates a local user called myUser on local computer with
a password of Passw0rd^&!
Displays the help topic for the script
if(! $user -or ! $password )
$ (Throw ‘A value for $user and $password is required.
Try this: CreateLocalUser.ps1 -help ?’)
$objOu = [ ADSI ]” WinNT ://$ computer “
$objUser = $objOU .Create(“ User “, $user )
$objUser .setpassword( $password )
$objUser .description = “ Test user “
TS, that is all there is to using Windows PowerShell to create a local user account. Because Windows PowerShell is forward compatible, this script will work on Windows PowerShell 1.0, or on Windows PowerShell 2.0. Local users week will continue tomorrow when I will talk about how to create local groups.
I invite you to follow me on Twitter or Facebook . If you have any questions, send email to me at scripter@microsoft.com or post them on the Official Scripting Guys Forum . See you tomorrow. Until then, peace.
Ed Wilson, Microsoft Scripting Guy
Create Local User with PowerShell
Dear reader, this tutorial is based on PowerShell 5.1 and above, which is installed on Windows 10, Windows Server 2016 and higher by default. To use this command in earlier versions, you must add the linked module to PowerShell or use the commands Use Command Prompt to create a local account with powershell. Making a Windows user with PowerShell 1. Open the PowerShell with Administrator access in Windows. 2. To create the user in PowerShell, the New-local user command is used. The structure is similar to the one below. New-Local User -Name [username] [Option] The New-Local User command structure is in the form of a main part called Name, which is actually the same as User name, and the other parameters that we will be explaining below. Before explaining the various parameters, consider the following two examples to learn more about the structure of the user build command in PowerShell. Example 1: In the example below, a user is created with the name of Elizabet and no password is assigned to it, and in the Description section, an explanation is written for this user that can be customized to your liking. New-LocalUser -Name «Elizabet» -Description «Test User» -NoPassword Example 2: In the following example, as in the first example, a user named Elizabet and Description will be created and assigned to that password. A noteworthy point in this example is that PowerShell does not accept the password in the form of a simple text, or Clear text, and you must first create a variable and enter a password, and then use the variable in the commands.https://monovm.com/blog/how-to-choose-a-secure-password/

Add Local User in Windows Powershell
Dear reader, this tutorial is based on PowerShell 5.1 and above, which is installed on Windows 10, Windows Server 2016 and higher by default. To use this command in earlier versions, you must add the linked module to PowerShell or use the commands Use Command Prompt to create a local account with powershell.
Making a Windows user with PowerShell
1. Open the PowerShell with Administrator access in Windows.
2. To create the user in PowerShell, the New-local user command is used. The structure is similar to the one below.
New-Local User -Name [username] [Option]
The New-Local User command structure is in the form of a main part called Name, which is actually the same as User name, and the other parameters that we will be explaining below.
Before explaining the various parameters, consider the following two examples to learn more about the structure of the user build command in PowerShell.
Example 1:
In the example below, a user is created with the name of Elizabet and no password is assigned to it, and in the Description section, an explanation is written for this user that can be customized to your liking.
New-LocalUser -Name «Elizabet» -Description «Test User» -NoPassword
Example 2:
In the following example, as in the first example, a user named Elizabet and Description will be created and assigned to that password. A noteworthy point in this example is that PowerShell does not accept the password in the form of a simple text, or Clear text, and you must first create a variable and enter a password, and then use the variable in the commands.
https://monovm.com/blog/how-to-choose-a-secure-password/
So, first enter the following command to create a variable named Password and get your password secretly.
$ password = Read-Host -AsSecureString
After entering the above command, you will receive a password that you can use after entering and pressing Inter.
New-LocalUser -Name «Elizabet» -Description «Test User with Password» -Password $ password
This way, you will be able to build the user in a parachute. Now let’s take a look at the description of other application parameters mentioned.
New-Local User command parameters in PowerShell
Account Expires: User expiration date is specified with this parameter.
Account Never Expires: User account expires
Disabled: User account is disabled or disabled
Full Name: Full user name
Password Never Expires: User password expires
User May Not Change Password: The user can change the password
The following is one of the most important parameters of this command, which together with the parameters mentioned in the first and second examples, together constitute the application and specific parameters of this command. Now, in the next section, a complete example is made for the creation of an user whose application are shown below.
New-LocalUser -Name «elizabet» -Description «IT Manager» -Password $ password -FullName «Elizabet -Disabled -PasswordNeverExpires-UserMayNotChangePassword
Also if you need to add user to a local group in powershell follow this article.
You can access to your windows VPS hosting with powershell too, powershell provides you more secure connection to your server.


