- Установка приложений с помощью менеджера пакетов PowerShell
- Модуль PackageManagement
- Провайдеры пакетов
- Установка приложений из репозитория Chocolatey
- Удаление пакета
- Manual Package Download
- Using manual download to acquire a package
- Installing PowerShell modules from a NuGet package
- Installing PowerShell scripts from a NuGet package
- Install-Package (Package Manager Console in Visual Studio)
- Syntax
- Parameters
- Common Parameters
- Скачивание пакета вручную Manual Package Download
- Получение пакета с помощью скачивания вручную Using manual download to acquire a package
- Установка модулей PowerShell из пакета NuGet Installing PowerShell modules from a NuGet package
- Установка сценариев PowerShell из пакета NuGet Installing PowerShell scripts from a NuGet package
Установка приложений с помощью менеджера пакетов PowerShell
В состав Windows 10 разработчики включили новый PowerShell модуль с именем PackageManagement. Модуль PackageManagement (ранее назывался OneGet) позволяет из консоли PoSh устанавливать, управлять и удалять приложения и программы из некого внешнего (или локального) репозитория, а также управлять списком подключенных репозиториев. Проще говоря, в Windows 10/ Windows Server 2016 появилась возможность устанавливать программы из командной строки по аналогии с известной командой Linux apt-get install.
Модуль менеджера пакетов PackageManagement позволяет существенно упростить процедуру установки нового ПО. Вся установка по сути сводиться к выполнению одной команды PowerShell, и, самое главное, пользователю не нужно самостоятельно искать в интернете и выкачивать дистрибутивы софта, рискуя скачать устаревшую или зараженную версию. Установка проводится из доверенного источника программ. При обновлении программного обеспечения в репозитории, оно может быть автоматически обновлено на клиентах.
Модуль PackageManagement
Модуль PackageManagement уже встроен в Windows 10, а для его работы требуется PowerShell 5. Поэтому для работы менеджера пакетов в Windows 8.1 нужно сначала установить Windows Management Framework 5.0. Также Microsoft выпустила отдельный модуль для работы менеджера пакетов и на PowerShell версий 3 и 4.
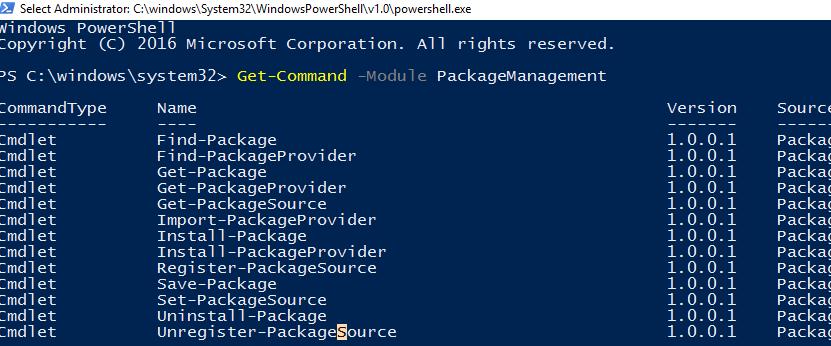
Выведем список доступных командлетов PowerShell в модуле PackageManagement:
Get-Command -Module PackageManagement
В текущей версии модуля (v 1.0.0.1) имеются такие команды:
- Find-Package — поиск пакета (программы) в доступных репозиториях
- Get-Package — получить список установленных пакетов
- Get-PackageProvider — список провайдеров (поставщиков пакетов), доступных на компьютере
- Get-PackageSource — список доступных источников пакетов
- Install-Package — установить пакет (программу) на компьютере
- Register-PackageSource — добавить источник пакетов для провайдера
- Save-Package — сохранить пакет локально без его установки
- Set-PackageSource — задать провайдер в качестве источника пакетов
- Uninstall-Package — удалить программу (пакет)
- Unregister-PackageSource — удалить поставщика из списка источников пакетов
Провайдеры пакетов
Пакеты обслуживаются различными провайдерам, которые могут получать пакеты из разных источников. Чтобы вывести список всех доступных провайдеров, выполните:
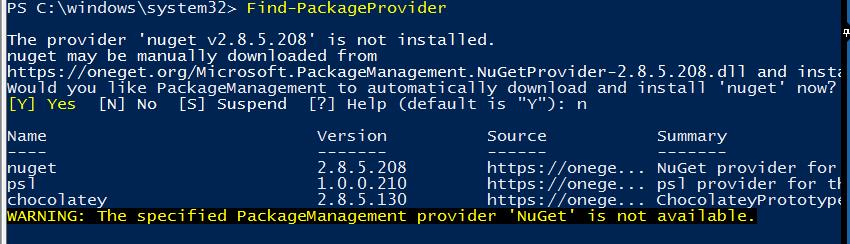 По умолчанию в системе имеются 2 установленных источника пакетов: nuget.org и PSGallery (официальная онлайн галерея скриптов PowerShell от MSFT). Но они предназначены в первую очередь для программистов и системных администраторов.
Чтобы получить доступ к каталогу прикладного ПО, подключим популярный репозитарий ПО – Chocolatey, содержащий на данный момент более 4500 различных программ.
Установим новый провайдер Chocolatey:
Подтвердим установку провайдера, нажав Y.
 Сделаем Chocolatey доверенным источником пакетов, чтобы каждый раз при установке пакета не приходилось подтверждать установку.
Set-PackageSource -Name chocolatey -Trusted
Убедимся, что Chocolatey теперь присутствует среди доступных репозитариев приложений:

Name ProviderName IsTrusted Location
—- ———— ——— ———
PSGallery PowerShellGet False https://www.powershellgallery.com/api/v2/
chocolatey Chocolatey True http://chocolatey.org/api/v2/
Установка приложений из репозитория Chocolatey
Рассмотрим теперь, как установить приложение (пакет) из репозитория Chocolatey.
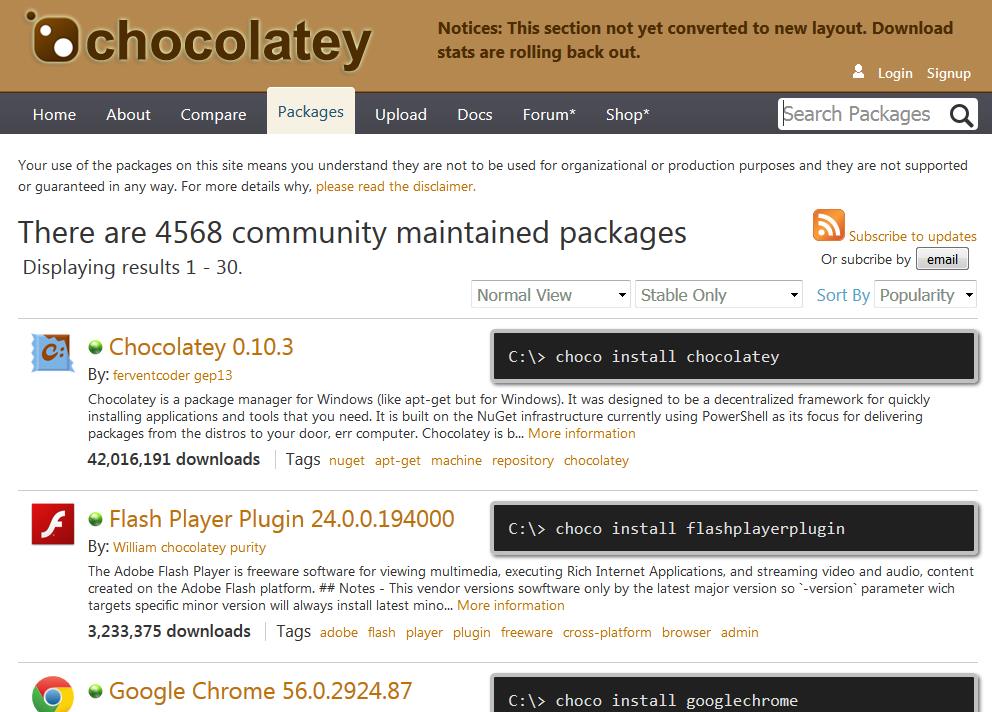
Список доступных для установки приложения можно получить непосредственно на официальном веб сайте Chocolatey (https://chocolatey.org/packages)
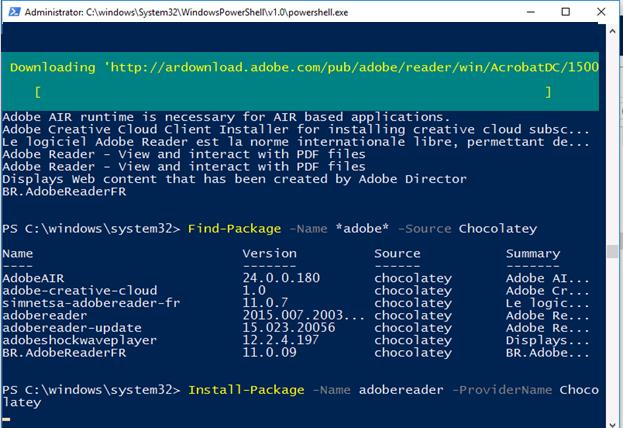
Также можно найти и установить нужное приложение прямо из консоли PowerShell. Например, для просмотра pdf файлов нам понадобилось установить приложение Adobe Acrobat Reader. Т.к. мы не знаем полного названия приложения, для его установки нам нужно получить имя пакета в каталоге. Выполним поиск в репозитории по ключевому слову ‘adobe’:
Find-Package -Name *adobe* -Source Chocolatey
В консоли появится список всех пакетов по данному ключу. Нам нужен пакет adobereader (нужно использовать именно имя пакета из столбца Name).
Запускаем установку пакета Adobe Reader:
Install-Package -Name adobereader -ProviderName Chocolatey
 Вверху окна PowerShell появится ползунок, свидетельствующий о начале загрузки пакета Adobe Reader. Сразу после окончания загрузки, приложение установится в системе.
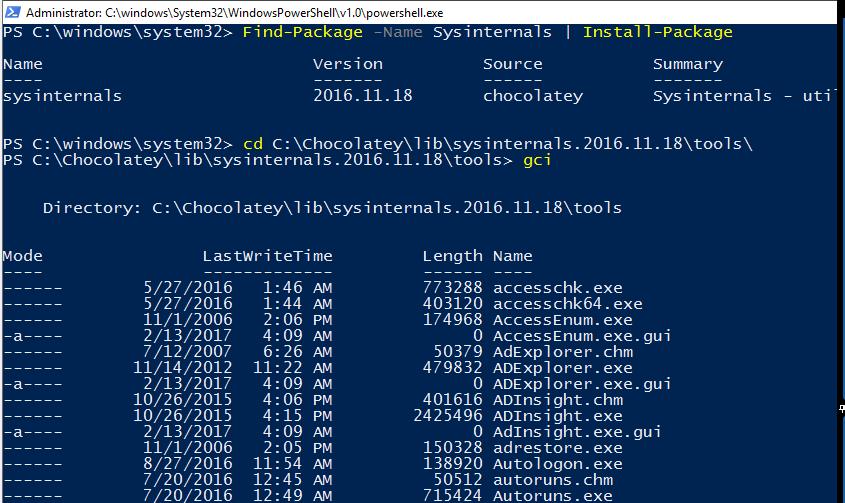
Еще один пример. Допустим, нам понадобилось иметь на компьютере набор утилит SysInternals. Чтобы не качать его вручную, найдем пакет SysInternals в репозитарии Chocolatey и установим его.
Find-Package -Name Sysinternals | Install-Package
Т.к. пакет не требует установки, он сохраняется на компьютер и хранится в каталоге C:\Chocolatey\lib\. В нашем примере это каталог C:\Chocolatey\lib\sysinternals.2016.11.18\tools
Сразу несколько приложений можно установить всего одной командой:
Find-Package -Name firefox, winrar, notepadplusplus, putty, dropbox | Install-Package
Удаление пакета
Удаление приложения на компьютере выполняется также одной командой. К примеру, для удаления Adobe Reader, выполните команду:
Итак, мы рассмотрели новые возможности установки приложений в Windows из командной строки PowerShell. В ближайшем будущем, вероятно, появятся графические надстройки над модулем PackageManagement, позволяющие легко управлять установкой/удалением ПО и простым пользователям без навыков работы с CLI.
Manual Package Download
The PowerShell Gallery supports downloading a package from the website directly, without using the PowerShellGet cmdlets. You can download any package as a NuGet package ( .nupkg ) file, which you can then copy to an internal repository.
Manual package download is not intended as a replacement for the Install-Module cmdlet. Downloading the package doesn’t install the module or script. Dependencies aren’t included in the NuGet package downloaded. The following instructions are provided for reference purposes only.
Using manual download to acquire a package
Each page has a link for Manual Download, as shown here:

To download manually, click on Download the raw nupkg file. A copy of the package is copied to the download folder for your browser with the name . .nupkg .
A NuGet package is a ZIP archive with extra files containing information about the contents of the package. Some browsers, like Internet Explorer, automatically replace the .nupkg file extension with .zip . To expand the package, rename the .nupkg file to .zip , if needed, then extract the contents to a local folder.
A NuGet package file includes the following NuGet-specific elements that aren’t part of the original packaged code:
- A folder named _rels — contains a .rels file that lists the dependencies
- A folder named package — contains the NuGet-specific data
- A file named [Content_Types].xml — describes how extensions like PowerShellGet work with NuGet
- A file named .nuspec — contains the bulk of the metadata
Installing PowerShell modules from a NuGet package
These instructions DO NOT give the same result as running Install-Module . These instructions fulfill the minimum requirements. They aren’t intended to be a replacement for Install-Module . Some steps performed by Install-Module aren’t included.
The easiest approach is to remove the NuGet-specific elements from the folder. Removing the elements leaves the PowerShell code created by the package author. For the list of NuGet-specific elements, see Using manual download to acquire a package.
The steps are as follows:
- Unblock the Internet-downloaded NuGet package ( .nupkg ) file, for example using Unblock-File -Path C:\Downloads\module.nupkg cmdlet.
- Extract the contents of the NuGet package to a local folder.
- Delete the NuGet-specific elements from the folder.
- Rename the folder. The default folder name is usually . . The version can include -prerelease if the module is tagged as a prerelease version. Rename the folder to just the module name. For example, azurerm.storage.5.0.4-preview becomes azurerm.storage .
- Copy the folder to one of the folders in the $env:PSModulePath value . $env:PSModulePath is a semicolon-delimited set of paths in which PowerShell should look for modules.
The manual download doesn’t include any dependencies required by the module. If the package has dependencies, they must be installed on the system for this module to work correctly. The PowerShell Gallery shows all dependencies required by the package.
Installing PowerShell scripts from a NuGet package
These instructions DO NOT give the same result as running Install-Script . These instructions fulfill the minimum requirements. They aren’t intended to be a replacement for Install-Script .
The easiest approach is to extract the NuGet package, then use the script directly.
The steps are as follows:
- Unblock the Internet-downloaded NuGet package ( .nupkg ) file, for example using Unblock-File -Path C:\Downloads\package.nupkg cmdlet.
- Extract the contents of the NuGet package.
- The .PS1 file in the folder can be used directly from this location.
- You may delete the NuGet-specific elements in the folder.
For the list of NuGet-specific elements, see Using manual download to acquire a package.
The manual download doesn’t include any dependencies required by the module. If the package has dependencies, they must be installed on the system for this module to work correctly. The PowerShell Gallery shows all dependencies required by the package.
Install-Package (Package Manager Console in Visual Studio)
This topic describes the command within the Package Manager Console in Visual Studio on Windows. For the generic PowerShell Install-Package command, see the PowerShell PackageManagement reference.
Installs a package and its dependencies into a project.
Syntax
In NuGet 2.8+, Install-Package can downgrade an existing package in your project. For example, if you have Microsoft.AspNet.MVC 5.1.0-rc1 installed, the following command would downgrade it to 5.0.0:
Parameters
| Parameter | Description |
|---|---|
| Id | (Required) The identifier of the package to install. (3.0+) The identifier can be a path or URL of a packages.config file or a .nupkg file. The -Id switch itself is optional. |
| IgnoreDependencies | Install only this package and not its dependencies. |
| ProjectName | The project into which to install the package, defaulting to the default project. |
| Source | The URL or folder path for the package source to search. Local folder paths can be absolute, or relative to the current folder. If omitted, Install-Package searches the currently selected package source. |
| Version | The version of the package to install, defaulting to the latest version. |
| IncludePrerelease | Considers prerelease packages for the install. If omitted, only stable packages are considered. |
| FileConflictAction | The action to take when asked to overwrite or ignore existing files referenced by the project. Possible values are Overwrite, Ignore, None, OverwriteAll, and (3.0+)IgnoreAll. |
| DependencyVersion | The version of the dependency packages to use, which can be one of the following:
You can set the default value using the dependencyVersion setting in the Nuget.Config file. |
| WhatIf | Shows what would happen when running the command without actually performing the install. |
None of these parameters accept pipeline input or wildcard characters.
Common Parameters
Install-Package supports the following common PowerShell parameters: Debug, Error Action, ErrorVariable, OutBuffer, OutVariable, PipelineVariable, Verbose, WarningAction, and WarningVariable.
Скачивание пакета вручную Manual Package Download
В коллекции Powershell поддерживается прямое скачивание пакета с веб-сайта без использования командлетов PowerShellGet. The PowerShell Gallery supports downloading a package from the website directly, without using the PowerShellGet cmdlets. Любой пакет можно скачать в формате NuGet (файла с расширением .nupkg ), который можно копировать во внутренний репозиторий. You can download any package as a NuGet package ( .nupkg ) file, which you can then copy to an internal repository.
Скачивание пакета вручную не является заменой использования командлета Install-Module . Manual package download is not intended as a replacement for the Install-Module cmdlet. При скачивании пакета не выполняется установка модуля или сценария. Downloading the package doesn’t install the module or script. В скачанном пакете NuGet нет зависимостей. Dependencies aren’t included in the NuGet package downloaded. Следующие инструкции приводятся только в информационных целях. The following instructions are provided for reference purposes only.
Получение пакета с помощью скачивания вручную Using manual download to acquire a package
На каждой странице находится ссылка для скачивания вручную, как показано ниже. Each page has a link for Manual Download, as shown here:

Чтобы скачать пакет вручную, щелкните ссылку Скачать необработанный NUPKG-файл. To download manually, click on Download the raw nupkg file. Копия пакета копируется в папку загрузки с именем . .nupkg . A copy of the package is copied to the download folder for your browser with the name . .nupkg .
Пакет NuGet — это ZIP-архив с дополнительными файлами, содержащими сведения о содержимом пакета. A NuGet package is a ZIP archive with extra files containing information about the contents of the package. Некоторые браузеры, например Internet Explorer, автоматически заменяют расширение .nupkg на .zip . Some browsers, like Internet Explorer, automatically replace the .nupkg file extension with .zip . Чтобы развернуть пакет, при необходимости переименуйте файл .nupkg в .zip , затем извлеките его содержимое в локальную папку. To expand the package, rename the .nupkg file to .zip , if needed, then extract the contents to a local folder.
Файл пакета NuGet содержит следующие характерные для NuGet элементы , которые не являются частью исходного упакованного кода: A NuGet package file includes the following NuGet-specific elements that aren’t part of the original packaged code:
- Папка _rels содержит файл .rels со списком зависимостей. A folder named _rels — contains a .rels file that lists the dependencies
- Папка package содержит характерные для NuGet данные. A folder named package — contains the NuGet-specific data
- Файл [Content_Types].xml описывает работу расширений, например PowerShellGet, с помощью NuGet. A file named [Content_Types].xml — describes how extensions like PowerShellGet work with NuGet
- Файл .nuspec содержит основной объем метаданных. A file named .nuspec — contains the bulk of the metadata
Установка модулей PowerShell из пакета NuGet Installing PowerShell modules from a NuGet package
Результат выполнения этих инструкций отличается от результата запуска командлета Install-Module . These instructions DO NOT give the same result as running Install-Module . Эти инструкции отвечают минимальным требованиям. These instructions fulfill the minimum requirements. Они не предназначены для использования в качестве замены Install-Module . They aren’t intended to be a replacement for Install-Module . Некоторые шаги, выполняемые командлетом Install-Module , не указаны. Some steps performed by Install-Module aren’t included.
Проще всего удалить характерные для NuGet элементы из папки. The easiest approach is to remove the NuGet-specific elements from the folder. При удалении элементов код PowerShell, созданный автором пакета, остается без изменений. Removing the elements leaves the PowerShell code created by the package author. Список элементов, относящихся к NuGet, см. в разделе о скачивании пакета вручную. For the list of NuGet-specific elements, see Using manual download to acquire a package.
Для этого необходимо выполнить следующие шаги: The steps are as follows:
- Разблокируйте скачанный из Интернета файл пакета NuGet ( .nupkg ), например с помощью командлета Unblock-File -Path C:\Downloads\module.nupkg . Unblock the Internet-downloaded NuGet package ( .nupkg ) file, for example using Unblock-File -Path C:\Downloads\module.nupkg cmdlet.
- Извлечь содержимое пакета NuGet в локальную папку. Extract the contents of the NuGet package to a local folder.
- Удалить характерные для NuGet элементы из папки. Delete the NuGet-specific elements from the folder.
- Переименовать папку. Rename the folder. По умолчанию используется имя папки . . The default folder name is usually . . Номер версии может содержать -prerelease , если модуль помечен как предварительная версия. The version can include -prerelease if the module is tagged as a prerelease version. Задать для папки имя модуля. Rename the folder to just the module name. Например, azurerm.storage.5.0.4-preview преобразуется в azurerm.storage . For example, azurerm.storage.5.0.4-preview becomes azurerm.storage .
- Скопируйте папку в одну из папок в $env:PSModulePath value . Copy the folder to one of the folders in the $env:PSModulePath value . $env:PSModulePath — это набор разделенных точками с запятой путей, в которых оболочка PowerShell должна искать модули. $env:PSModulePath is a semicolon-delimited set of paths in which PowerShell should look for modules.
При скачивании вручную не включаются зависимости, необходимые для модуля. The manual download doesn’t include any dependencies required by the module. Если у пакета есть зависимости, они должны быть установлены в системе для правильной работы этого модуля. If the package has dependencies, they must be installed on the system for this module to work correctly. В коллекции PowerShell отображаются все зависимости, необходимые для пакета. The PowerShell Gallery shows all dependencies required by the package.
Установка сценариев PowerShell из пакета NuGet Installing PowerShell scripts from a NuGet package
Результат выполнения этих инструкций отличается от результата запуска командлета Install-Script . These instructions DO NOT give the same result as running Install-Script . Эти инструкции отвечают минимальным требованиям. These instructions fulfill the minimum requirements. Они не предназначены для использования в качестве замены Install-Script . They aren’t intended to be a replacement for Install-Script .
Самым простым способом является извлечение пакета NuGet и использование сценария напрямую. The easiest approach is to extract the NuGet package, then use the script directly.
Для этого необходимо выполнить следующие шаги: The steps are as follows:
- Разблокируйте скачанный из Интернета файл пакета NuGet ( .nupkg ), например с помощью командлета Unblock-File -Path C:\Downloads\package.nupkg . Unblock the Internet-downloaded NuGet package ( .nupkg ) file, for example using Unblock-File -Path C:\Downloads\package.nupkg cmdlet.
- Извлечь содержимое пакета NuGet в локальную папку. Extract the contents of the NuGet package.
- Файл .PS1 в папке можно использовать прямо из этого расположения. The .PS1 file in the folder can be used directly from this location.
- Можно удалить характерные для NuGet элементы в папке. You may delete the NuGet-specific elements in the folder.
Список элементов, относящихся к NuGet, см. в разделе о скачивании пакета вручную. For the list of NuGet-specific elements, see Using manual download to acquire a package.
При скачивании вручную не включаются зависимости, необходимые для модуля. The manual download doesn’t include any dependencies required by the module. Если у пакета есть зависимости, они должны быть установлены в системе для правильной работы этого модуля. If the package has dependencies, they must be installed on the system for this module to work correctly. В коллекции PowerShell отображаются все зависимости, необходимые для пакета. The PowerShell Gallery shows all dependencies required by the package.


