- Устранение проблем с подключением VPN в Windows 10
- Важная информация
- Способ 1: Переустановка сетевых адаптеров
- Способ 2: Изменение параметров реестра
- Способ 3: Настройка антивирусного ПО
- Способ 4: Отключение протокола IPv6
- Способ 5: Остановка службы Xbox Live
- Подключение к сети VPN в Windows 10
- Создание профиля VPN
- Подключение к сети VPN
- FIX: Windows 10 PPTP VPN is not connecting
- 5 Best VPNs we recommend
- Fix: Windows 10 PPTP VPN won’t connect
- 1. Check your internet connection
- 2. Use an alternative VPN solution
- Private Internet Access
- 3. Change time and location
- 4. Repair your PC Registry
- 5. Reinstall network drivers
- 6. Reinstall your VPN
- 7. Install the latest Windows Updates
- 8. Temporarily disable security programs
- 9. Enable rule for PPTP
- 10. Manually setup PPTP VPN connection
- Frequently Asked Questions
- Is PPTP VPN safe?
- Why are PPTP VPNs not safe?
- How do I connect to a PPTP VPN in Windows 10?
Устранение проблем с подключением VPN в Windows 10

Важная информация
В первую очередь убедитесь, что у вас есть интернет. Для этого попробуйте открыть какой-нибудь сайт обычным способом. При отсутствии соединения сначала придется его восстановить. О том, как это сделать, мы писали в отдельных статьях.
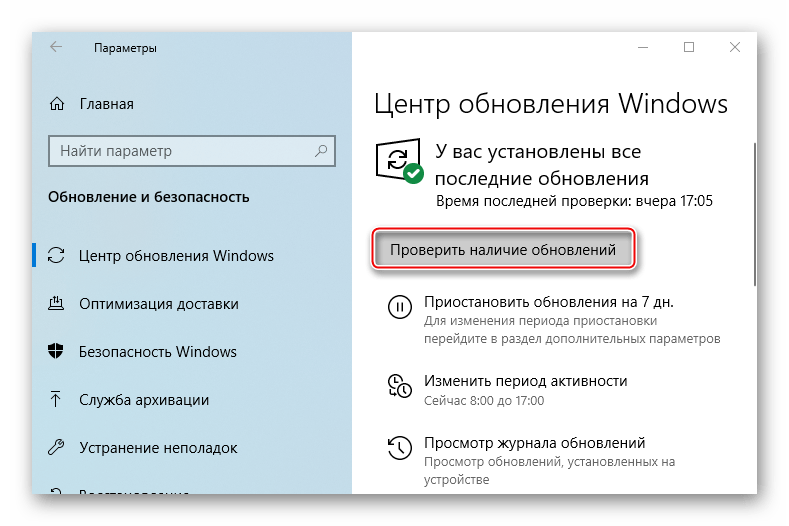
Убедитесь, что вы пользуетесь последней версией Виндовс 10. Для этого проверьте наличие обновлений к ней. О том, как обновить «десятку», мы рассказывали в другой статье.
Причиной отсутствия подключения может быть конкретный ВПН-сервер. В этом случае попробуйте поменять его, например, выберите из списка сервер другой страны.
Если для реализации виртуальной частной сети используется стороннее ПО, а не встроенная в Windows функция, сначала попробуйте обновить его, а при отсутствии такой возможности просто переустановите.
Способ 1: Переустановка сетевых адаптеров
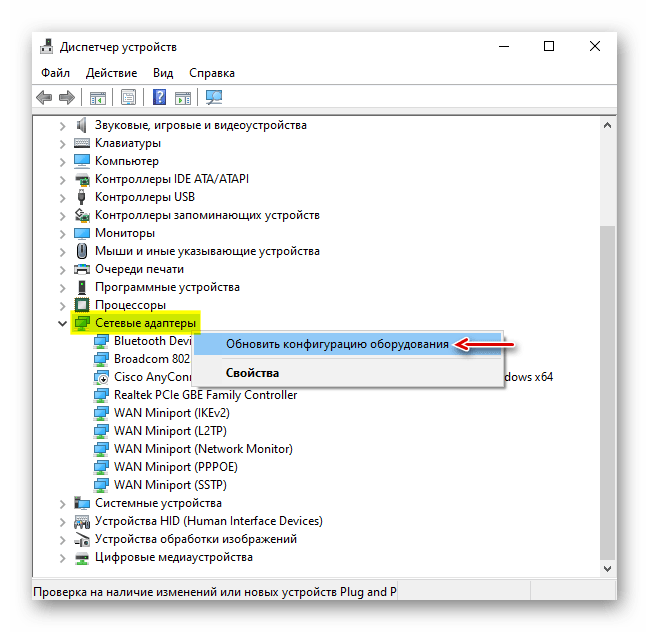
В зависимости от установленного на компьютере оборудования (сетевая карта, датчики Wi-Fi и Bluetooth) в «Диспетчере устройств» будет отображено несколько сетевых адаптеров. Там же будут устройства WAN Miniport – системные адаптеры, которые как раз используются для ВПН-подключения через различные протоколы. Для решения проблемы попробуйте переустановить их.
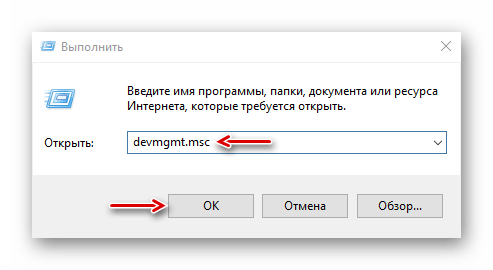
- Сочетанием клавиш Win+R вызываем окно «Выполнить», вводим команду devmgmt.msc и жмем «OK».
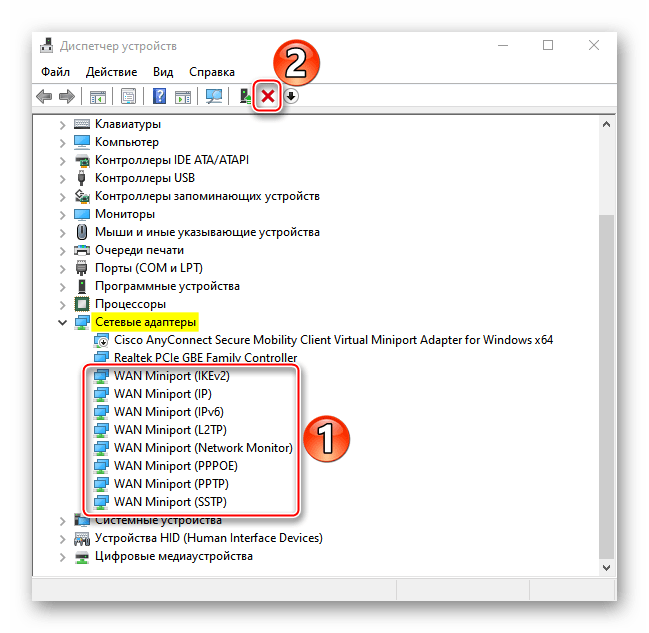
Щелкаем правой кнопкой мышки по вкладке «Сетевые адаптеры» и жмем «Обновить конфигурацию оборудования». Устройства вместе с драйверами будут снова переустановлены. Перезагружаем компьютер.
Способ 2: Изменение параметров реестра
При использовании подключения L2TP/IPsec внешние компьютеры-клиенты под управлением Windows могут не подключиться к VPN-серверу, если он находится за NAT (устройство для преобразования частных сетевых адресов в публичные). Согласно статье, размещенной на странице поддержки Microsoft, обеспечить связь между ними можно, если дать понять системе, что сервер и ПК-клиент находятся за устройством NAT, а также разрешить UDP-портам инкапсулировать пакеты по L2TP. Для этого в реестре необходимо добавить и настроить соответствующий параметр.
- В окне «Выполнить» вводим команду regedit и жмем «OK».

Читайте также: Как открыть реестр в Windows 10
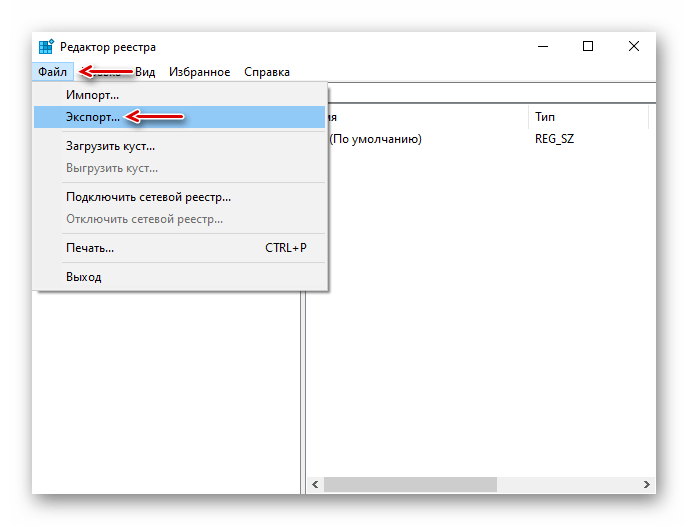
Работать будем с разделом «HKEY_LOCAL_MACHINE (HKLM)», поэтому сначала делаем его резервную копию. Выделяем ветку, открываем вкладку «Файл» и щелкаем «Экспорт».
Выбираем место сохранения копии, указываем ее имя и жмем «Сохранить».

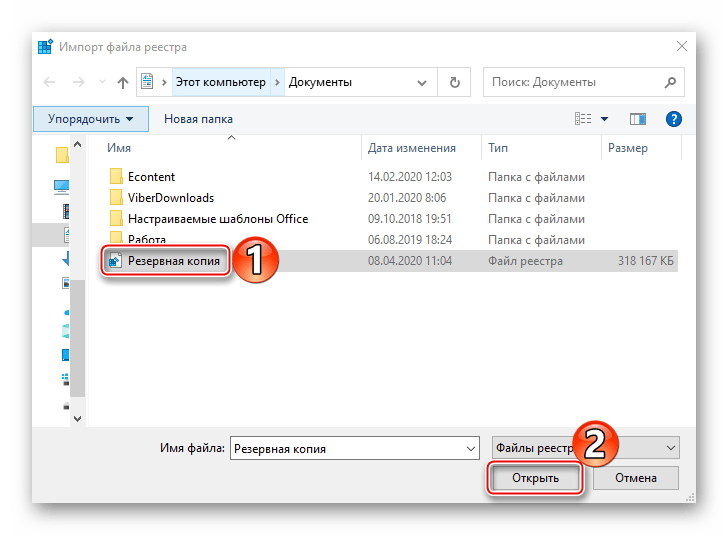
Чтобы потом восстановить раздел, открываем вкладку «Файл» и выбираем «Импорт».

Находим сохраненную копию реестра и нажимаем «Открыть».
Переходим по пути:
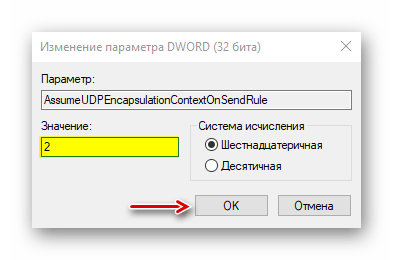
В правой части реестра щелкаем правой кнопкой мышки по свободной области, жмем «Создать» и выбираем «Параметр DWORD (32 бита)».

В названии файла вписываем:

Щелкаем правой кнопкой мышки по созданному файлу и жмем «Изменить».

В поле «Значение» вводим 2 и щелкаем «OK». Перезагружаем компьютер.
Также важно, чтобы на роутере были открыты UDP-порты, необходимые для работы L2TP (1701, 500, 4500, 50 ESP). О пробросе портов на маршрутизаторах разных моделей мы подробно писали в отдельной статье.

Способ 3: Настройка антивирусного ПО
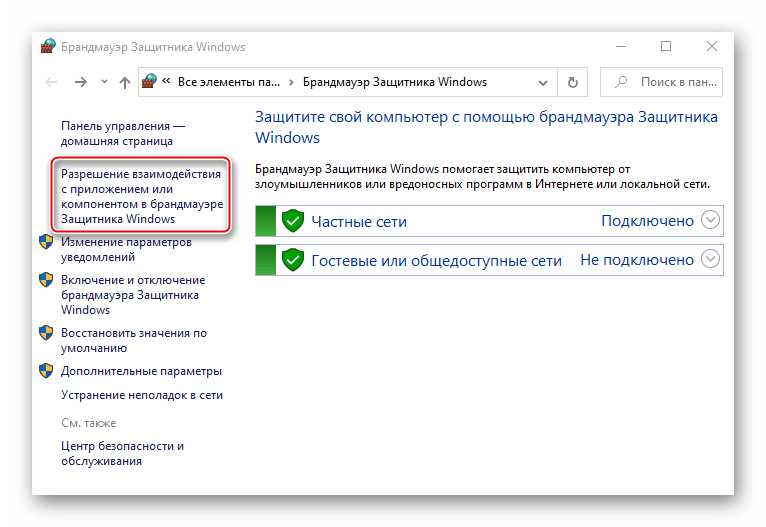
Брандмауэр Windows 10 или файервол антивирусной программы могут блокировать любые подключения, которые считают незащищенными. Чтобы проверить эту версию, отключите на время защитное ПО. О том, как это сделать, мы подробно писали в других статьях.
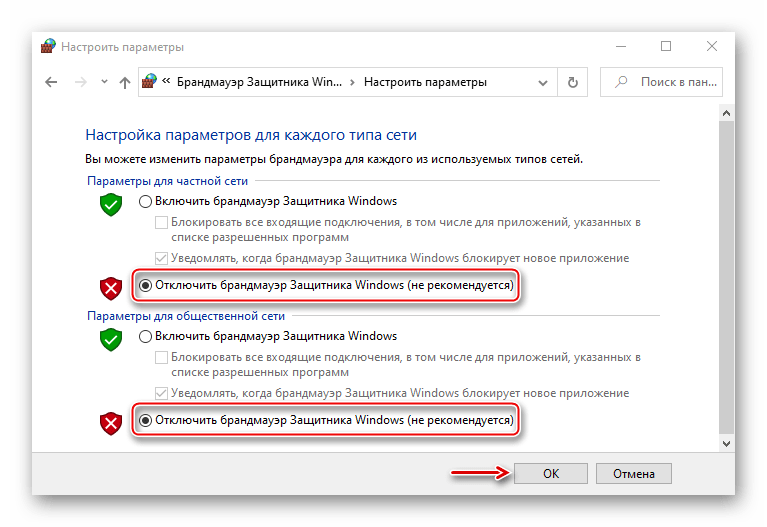
Долго оставлять систему без антивирусного ПО не рекомендуется, но если она блокирует ВПН-клиент, его можно добавить в список исключений антивируса или брандмауэра Виндовс. Информация об этом есть в отдельных статьях у нас на сайте.
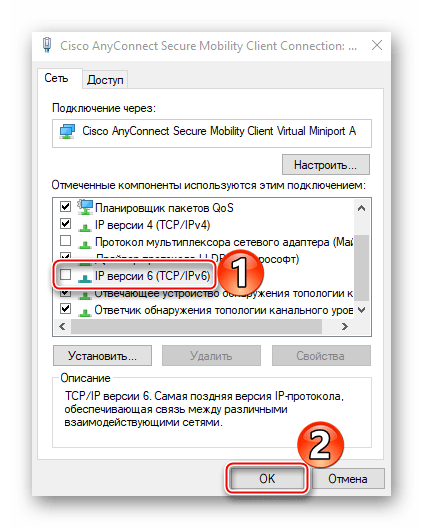
Способ 4: Отключение протокола IPv6
VPN-подключение может оборваться из-за утечки трафика в публичную сеть. Нередко причиной этому становится протокол IPv6. Несмотря на то что ВПН обычно работает с IPv4, в операционной системе по умолчанию включены оба протокола. Поэтому IPv6 также может использоваться. В этом случае попробуйте отключить его для конкретного сетевого адаптера.
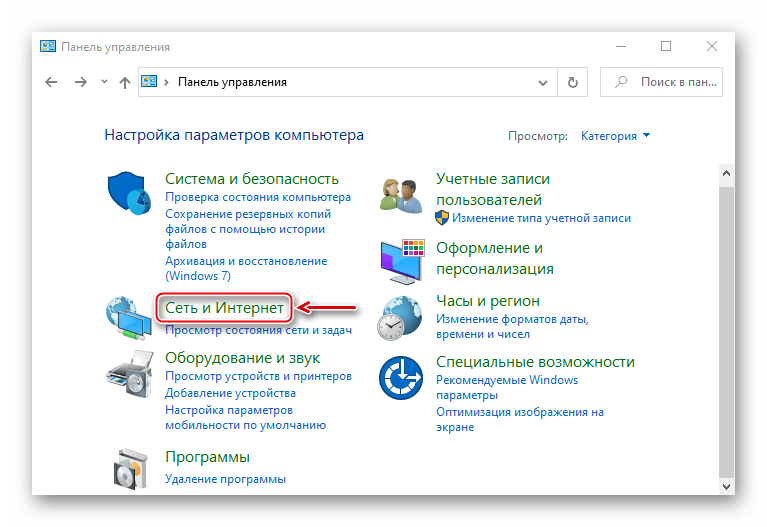
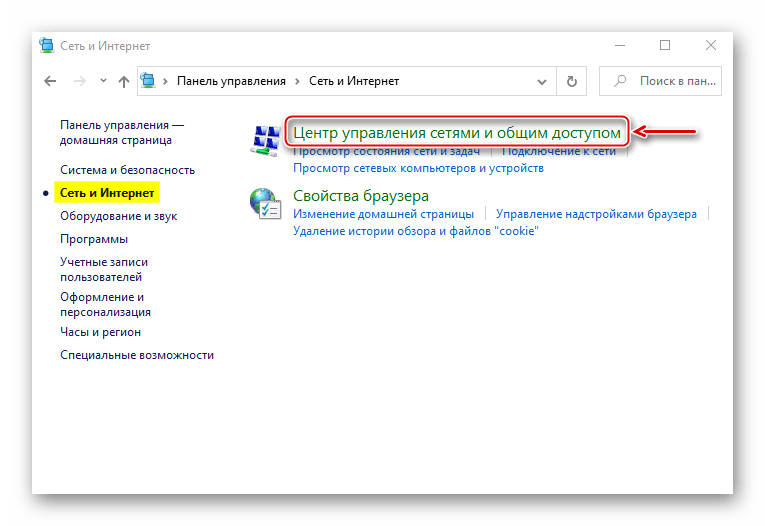
- В поиске Windows вводим «Панель управления» и открываем приложение.

Открываем «Центр управления сетями и общим доступом».
Входим в раздел «Изменение параметров адаптера».

Жмем правой кнопкой мышки по сетевому адаптеру, через который реализуется VPN, и открываем «Свойства».

Снимаем галочку напротив IPv6 и нажимаем «OK». Перезагружаем компьютер.
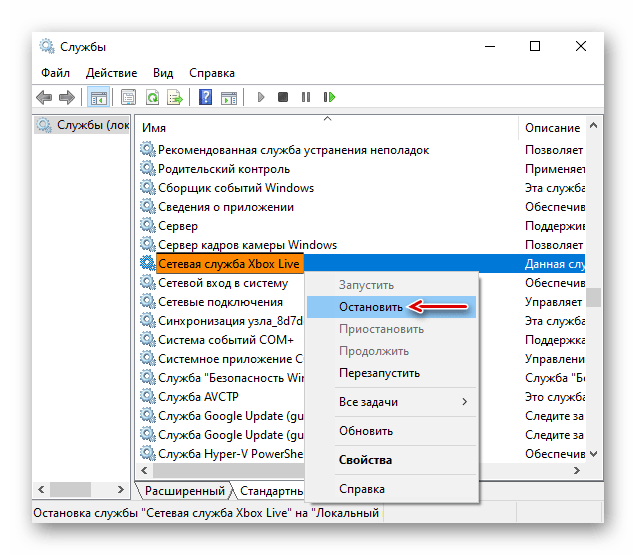
Способ 5: Остановка службы Xbox Live
На стабильность ВПН-соединения может влиять разное ПО, включая системные компоненты. Например, согласно обсуждениям на форумах, многие пользователи смогли решить проблему путем остановки службы Xbox Live.
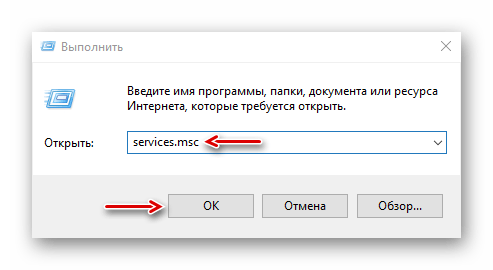
- В окне «Выполнить» вводим команду services.msc и жмем «OK».
Читайте также: Запуск оснастки «Службы» в ОС Windows 10
Находим компонент «Сетевая служба Xbox Live». Если она запущена, щелкаем по ней правой кнопкой мышки и жмем «Остановить».
Надеемся вы решили проблему с подключением к VPN в Windows 10. Мы рассказали о наиболее распространенных и общих способах. Но если вам не помогли наши рекомендации, обратитесь в службу поддержки поставщика ВПН. Со своей стороны, они должны помочь, особенно если вы оплатили услугу.
Подключение к сети VPN в Windows 10
Вы можете подключаться к виртуальной частной сети (VPN) на компьютере с Windows 10 как для работы, так и в личных целях. VPN-подключение может обеспечить более безопасное соединение и доступ к корпоративной сети и Интернету, например, если вы работаете из кафе или похожего общественного места.
Создание профиля VPN
Перед подключением к сети VPN вам необходимо настроить профиль VPN на своем компьютере. Чтобы получить профиль VPN от вашей компании, вы можете либо создать профиль VPN самостоятельно или настроить рабочую учетную запись.
Прежде чем начать, выполните указанные ниже действия.
Если VPN-подключение будет использоваться для работы, проверьте наличие параметров и/или приложения VPN на сайте интрасети вашей компании во время работы или обратитесь к специалисту службы поддержки вашей компании.
Если вы подписываетесь на службу VPN в личных целях, посетите Microsoft Store , чтобы проверить наличие приложения для этой службы, а затем перейдите на веб-сайт службы VPN, где могут быть указаны необходимые параметры VPN-подключения.
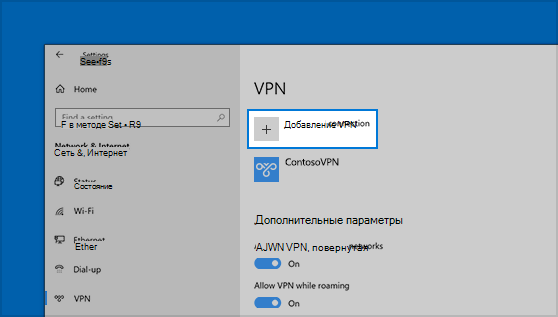
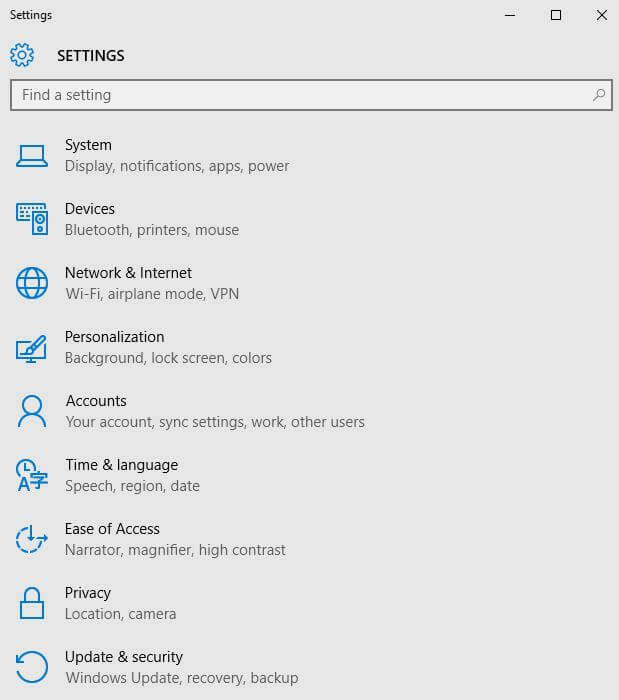
Нажмите Start кнопку «Пуск», а затем выберите Параметры > сеть & Интернет > VPN > Добавить VPN-подключение.
В разделе Добавление VPN-подключения сделайте следующее:
В поле Поставщик услуг VPN выберите Windows (встроенный).
В поле Имя подключения введите понятное вам имя (например, «Мой личный VPN»). Это имя подключения VPN, которое будет нужно искать для подключения.
В поле Имя или адрес сервера введите адрес для сервера VPN.
Выберите Тип VPN-подключения, которое вы хотите создать. Вы должны знать, какой тип VPN-подключения или служба VPN используется в вашей организации.
В поле Тип данных для входа выберите тип данных для входа (или учетные данные), которые следует использовать. Это могут быть имя пользователя и пароль, одноразовый пароль, сертификат или смарт-карта, если вы подключаетесь к сети VPN для работы. Введите свое имя пользователя и пароль в соответствующие поля (при необходимости).
Нажмите кнопку Сохранить.
Если вам требуется изменить сведения о VPN-подключении или указать дополнительные параметры, например параметры прокси-сервера, выберите соответствующее VPN-подключение и нажмите Дополнительные параметры.
Подключение к сети VPN
Если у вас есть профиль VPN, вы можете подключаться к нему.
Выберите значок сети ( или ) в дальнем правом углу панели задач.
Выберите VPN-подключение, которое вы хотите использовать, а затем выполните одно из следующих действий в зависимости от того, что происходит при выборе VPN-подключения:
Если под VPN-подключением отображается кнопка «Подключить», выберите Подключить.
Если в «Параметрах» открывается раздел «VPN», выберите это VPN-подключение, затем выберите Подключить.
При появлении запроса введите имя пользователя и пароль или другие данные для входа.
После подключения имя VPN-подключения будет отображаться под ним. Чтобы проверить наличие подключения к сети VPN во время работы за компьютером, нажмите значок Сеть ( или ) в крайнем правом углу панели задач и убедитесь, что под VPN-подключением есть надпись Подключено.
FIX: Windows 10 PPTP VPN is not connecting

- PPTP (Point-to-Point Tunneling Protocol) is one of the oldest known VPN protocols.
- However, despite it being around for a while, PPTP can be less reliable than other protocols.
- For instance, you may notice that your PPTP VPN may refuse to connect on Windows 10.
- The guide below will teach you what to do when your PPTP VPN just won’t connect.

Are you looking for the right solution for your Windows 10 PPTP VPN not connecting problem? You are in the right spot.
PPTP stands for Point-to-Point Tunneling Protocol. PPTP VPN on the other hand is one of the oldest protocols used on LAN networks. It utilizes 128-bit encryption and it is compatible with Windows OS.
Meanwhile, some Windows 10 users reported the PPTP VPN not connecting problem. Also, this problem is common on computer networks, such as LAN or even WAN.
We have enlisted some solutions for you, so ensure you go through them below. Moreover, any of our compiled solutions can fix the VPN connection problem.
5 Best VPNs we recommend
| 79% Off + 2 free Months |  Check offer! Check offer! | |
| 83% Off (2.25$/Month) + 3 free Months | Check offer! | |
| 68% Off + 1, 12 or 24 free Months (random prize) | Check offer! | |
| 83% Off (2.21$/Month) + 3 free Months | Check offer! | |
| 76% (2.83$) on 2 Years plan | Check offer! |
Fix: Windows 10 PPTP VPN won’t connect
1. Check your internet connection
Firstly, to check your internet connection. This will enable you to determine if you have an active internet connection. For instance, your broadband data subscription might be exhausted resulting in the problem. Hence, you can try other modes of internet connection to see if it works.
Alternatively, you can reset your router or restart your internet connection, and then connect to VPN on your Windows 10 machine.
Meanwhile, if you still get the error after trying out this fix, you may proceed to the next solution.
2. Use an alternative VPN solution
Some VPNs don’t utilize PPTP any longer; this is because PPTP is less secure compared to the latest connection protocols such as SSTP, IKEv2, L2TP, OpenVPN, and many more.
However, some VPN service providers still utilize PPTP connection protocols. Therefore, you may want to try them out so as to bypass the ‘Windows 10 PPTP VPN not connecting’ problem.
One very good example is Private Internet Access, a VPN service owned and continuously developed and supported by Kape Technologies, the same company that created CyberGhost.
PIA features WireGuard®, PPTP, OpenVPN, and L2TP/IPSec technologies, along with SOCKS5 Proxy, and the ability to choose from Different VPN gateways.

Private Internet Access
Get this VPN that features WireGuard®, PPTP, OpenVPN, and L2TP/IPSec technologies, now at a discounted price for a limited time only
3. Change time and location
Windows 10 PPTP VPN , not connecting problem might also be caused by incorrect date and time. Also, if your VPN server location ‘date and time’ is different from your Windows 10 date and time, the VPN connection problem might occur.
Here’s how to set time automatically:
- Press Windows key > Select Settings > Select Time and Language

- Toggle the option Set Time Automatically to ensure it is turned on.
- Close the window and restart your PC.
- After booting up your PC, launch the web browser, and then attempt to launch the website again.
If the Windows 10 PPTP VPN not connecting error prompt persists, proceed to the next solution.
4. Repair your PC Registry
Invalid Windows registry keys, missing DLLs, and even obsolete software leftovers can also cause Windows 10 PPTP VPN not connecting. Hence, you need clean up your Windows registry.
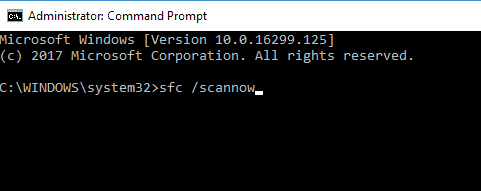
SFC Scan , on the other hand, is a Windows built-in tool that verifies all system files and fixes files with issues. Here’s how to run an SFC scan on all Windows’ versions:
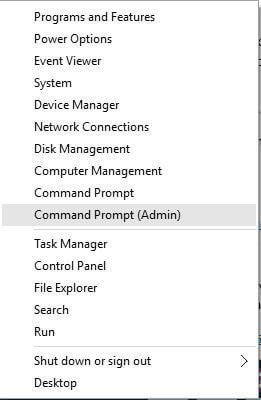
- Go to Start > type cmd > right-click Command Prompt > select Run as Administrator.
- Now, type the sfc /scannow command.
- Wait for the scanning process to complete and then restart your computer. All corrupted files will be replaced on reboot.
5. Reinstall network drivers
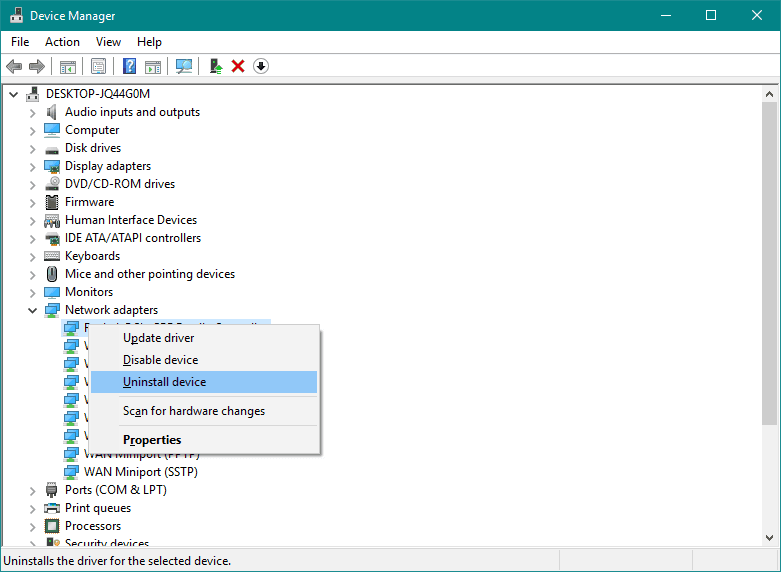
Sometimes, the network drivers might be outdated, corrupted, or even inactive. Hence, you may consider reinstalling the network drivers on your Windows 10 PC. Here’s how to reinstall network drivers:
- Go to Start > Type Device Manager, and then hit Enter key.
- Locate Network Adapters
- Uninstall available network drivers.
- Click Action > Scan for hardware changes
- Wait for the process to be completed. (This will reinstall the drivers)
- Connect to the VPN afterward
In addition, you can also update your network drivers automatically by using automated software.
⇒ Get DriverFix
If you are still getting Windows 10 PPTP VPN not connecting prompt, then you might want to reinstall your VPN client software in the next solution below.
6. Reinstall your VPN
Here’s how to reinstall VPN client on your Windows 10 PC:
- Go to Start >Control Panel
- Select Uninstall a program under Programs menu
- Find your VPN from the list of programs and select Uninstall
- In the Setup Wizard, click you’ll get a notification after a successful uninstall, so click Close to exit the wizard.
- If the VPN is still listed as available after uninstalling it, go to Start >Run
- Type ncpa.cpl and press Enter to open the Network Connections window
- Under Network Connections, right-click on the WAN Miniport labeled your VPN
- Select Delete
- Go to Start > Type Network Connections, and press Enter. Right-click a VPN connection and use the Delete option.
- Select VPN.
- If you see your VPN as available, delete it.

After the complete uninstall, you can then install the VPN client on your Windows 10 PC afterward. Meanwhile, we do recommend that you install the latest VPN client version on your PC.
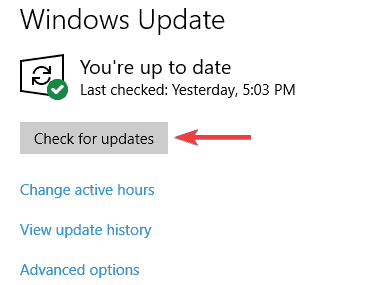
7. Install the latest Windows Updates
Some VPN client software requires the latest Windows .NET Framework and several Windows components. Failure to have some of these components can result in the Windows 10 PPTP VPN not connecting error issue.
Moreover, the latest Windows updates improve your PC’s security, performance, and operations. Hence, we recommend that you install the latest Windows updates.
Here’s how to do this:
- Go to Start>type “update” in the search box and then click on Windows Update to proceed.
- In the Windows Update window, check for updates and install the available updates.
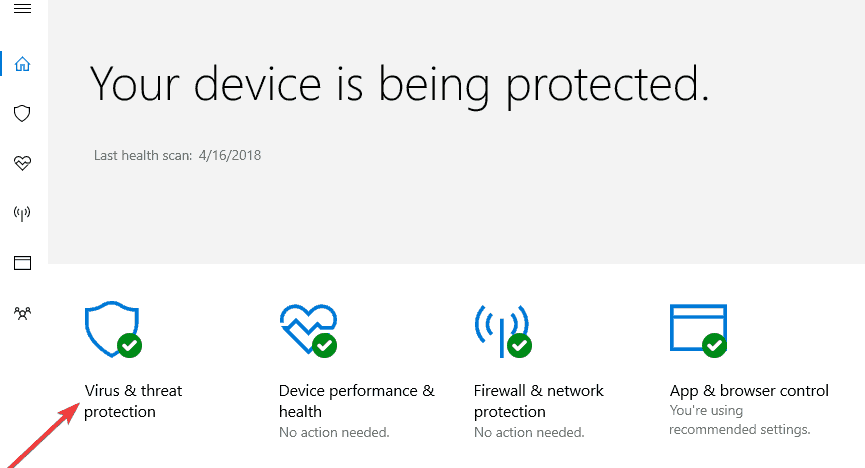
8. Temporarily disable security programs
Some antivirus programs can block VPN software on Windows 10. Hence, you need to exclude your VPN from your antivirus protection settings.
Here’s how to do this in Windows Defender:
- Launch Windows Defender Security Center
- Now, go to Virus & Threat protection settings
- Select Exclusions
- Select Add or remove exclusions
- Select Add an exclusion and add your VPN client software
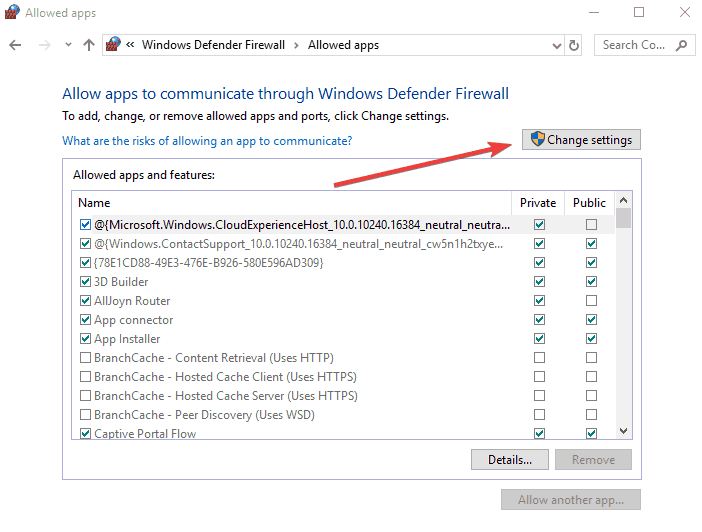
In addition, Windows Firewall as well can also prevent PPTP VPN from connecting; therefore, you need to enable your VPN in Windows Firewall Advanced settings.
Here’s how to do this:
- Go to Start > Type Allow a program through Windows firewall and then hit Enter key
- Click on Change Settings options
- Now, click on Allow another program
- Select the VPN software you want to add, or click Browse to find the VPN software, and then click OK.
- Check if you can connect to your VPN.
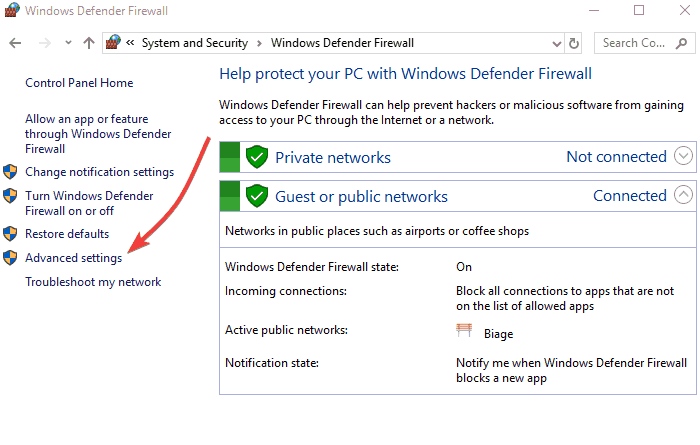
9. Enable rule for PPTP
Here’s how to enable rule for PPTP on Windows 10:
- Go to Start >Control Panel
- Now, go to Windows Firewall > Select Advanced Settings
- Search for the Routing and Remote Access under Inbound Rules and Outbound Rules.
- For Inbound Rules: right-click Routing and Remote Access (PPTP-In), select Enable Rule.
- For Outbound Rules: right-click Routing and Remote Access (PPTP-Out), select Enable Rule.
10. Manually setup PPTP VPN connection
You can also request for PPTP account setup instructions from your VPN service provider and follow the instructions. Alternatively, you can setup PPTP VPN manually on your Windows 10 computer.
However, you need a VPN account and a working internet connection.
Follow these steps to manually set up PPTP VPN:
- Right-click Start >Settings> Click Network and internet > Click VPN.
- Now, Click Add a VPN connection and then click the dropdown menu.
- Check Windows (built-in), and then click the Connection name field.
- Type a name for the VPN connection.
- Click the Server name or address field and enter the server’s address.
- Click the dropdown menu below VPN type and select the PPTP connection protocol.
- Now, click the dropdown menu below Type of sign-in info, tick a sign-in method, and click on Save.
- To connect, click on the VPN you just set up., and click Connect
Also, your VPN service provider will provide you with VPN client software as well. You can install the VPN client software, and then follow the prompts to set up PPTP VPN on your Windows 10 machine.
Have you tried any other solution? Let us know by commenting below or you can ask questions if any. We would gladly respond.
Frequently Asked Questions
Is PPTP VPN safe?
The PPTP VPN protocol is not secure, or at least not as secure as the other alternatives, like SSTP, IKEv2, L2TP, OpenVPN, and many more.
Why are PPTP VPNs not safe?
Compared to the other VPN protocols used nowadays, PPTP protocols are the most vulnerable to malware attacks. That is why a good antivirus tool needs to be coupled with this type of connectivity.
How do I connect to a PPTP VPN in Windows 10?
One of the best PPTP VPNs available is NordVPN.


