- How to install the latest driver for your printer
- What to do if the driver doesn’t install
- Как включить или отключить функцию Печать в PDF (Microsoft Print to PDF) в Windows 10
- Как отключить или включить Печать в PDF (Microsoft Print to PDF) в окне «Компоненты Windows»
- Как включить или отключить функцию Печать в PDF (Microsoft Print to PDF) в Windows PowerShell
- Как включить или отключить функцию Печать в PDF (Microsoft Print to PDF) в командной строке
- Видео-инструкция
- How do I set up «print to file» in windows 10
- Microsoft Print to PDF driver is not listed under Manufactuer or in Windows features.
- Windows 8, Print to PostScript printer to file
- 1 Answer 1
How to install the latest driver for your printer
Most printers require that you install the latest printer driver so that the printer will work well. If you recently upgraded from an earlier version of Windows, your printer driver might work with the previous version but might not work well or at all with Windows 10. Also, if you’ve experienced power outages, computer viruses, or other problems, your printer driver might be damaged. Downloading and installing the latest printer driver can often resolve these problems. Here are several ways to do this.
Windows Update might find an updated version of your printer driver. To use it:
Select the Start button, then select Settings > Update & Security , and select Check for updates.
If Windows Update finds an updated driver, it will download and install it, and your printer will automatically use it.
If your printer came with a disc, it might contain software that can help you install drivers for your printer or check for driver updates.
Check your printer manufacturer’s support site. To find that, search the internet for the name of your printer manufacturer plus the word “support,” such as “HP support.”
Driver updates are often available in the “Drivers” section of a printer manufacturer’s website. Some support sites let you search for your printer model number directly. Locate and download the latest driver for your printer model, then follow the installation instructions on the manufacturer’s website.
Most drivers are self-installing. After you download them, double-click (or double-tap) the file to begin installing it. Then follow these steps to remove and reinstall the printer.
Select the Start button, then select Settings > Devices > Printers & scanners .
Under Printers & scanners, find the printer, select it, and then select Remove device.
After removing your printer, add it back by selecting Add a printer or scanner. Wait for your device to find nearby printers, choose the one you want, and then select Add device.
What to do if the driver doesn’t install
If you double-click the installation file and nothing happens, follow these steps:
Select the Start button, then select Settings > Devices > Printers & scanners .
On the right, under Related Settings, select Print server properties.
On the Drivers tab, see if your printer listed. If it is, you’re all set.
If you don’t see your printer listed, select Add, and in the Welcome to the Add Printer Driver Wizard, select Next.
In the Processor Selection dialog box, select your device’s architecture, and then select Next.
In the Printer Driver Selection dialog box, on the left, select your printer manufacturer, on the right, select your printer driver, select Next, select Finish, and follow the instructions to add your driver.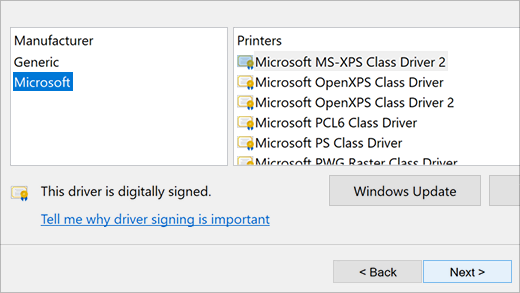
Follow the instructions in the section above to remove and reinstall the printer.
Как включить или отключить функцию Печать в PDF (Microsoft Print to PDF) в Windows 10

В данной статье показаны действия, с помощью которых можно включить или отключить функцию Печать в PDF (Microsoft Print to PDF) в операционной системе Windows 10.
Печать в PDF (Microsoft Print to PDF) — функция представленная в Windows 10, которая позволяет легко конвертировать и сохранять любые документы в формате PDF с помощью операции печати без установки сторонних инструментов PDF.
С помощью этой функции можно забыть обо всех других инструментах, которые вы когда-либо использовали для сохранения PDF-копий документов любого типа, будь то веб-страница или изображение JPEG, PNG на вашем компьютере, документ word и т. д.

Функция Печать в PDF (Microsoft Print to PDF) по умолчанию включена, но если вы не видите её в списке в диалоговом окне печать, скорее всего она была отключена. Также, если по какой-то причине функция печати в PDF работает не корректно или мешает другому инструменту, который вы используете для печати, то можно отключить её.
Как отключить или включить Печать в PDF (Microsoft Print to PDF) в окне «Компоненты Windows»
Чтобы отключить функцию Печать в PDF (Microsoft Print to PDF), нажмите сочетание клавиш  + R, в открывшемся окне Выполнить введите OptionalFeatures и нажмите кнопку OK.

В окне «Компоненты Windows», снимите флажок чтобы отключить параметр Печать в PDF (Майкрософт) и нажмите кнопку OK.

После того как Windows применит требуемые изменения, нажмите кнопку Закрыть, при этом перезагрузка компьютера не требуется.

Как включить или отключить функцию Печать в PDF (Microsoft Print to PDF) в Windows PowerShell
Также отключить или включить функцию Печать в PDF (Microsoft Print to PDF) можно в консоли PowerShell.
Чтобы отключить функцию (компонент) Печать в PDF (Microsoft Print to PDF), откройте консоль Windows PowerShell от имени администратора и выполните следующую команду:
Disable-WindowsOptionalFeature -FeatureName «Printing-PrintToPDFServices-Features» -Online

После выполнения команды, изменения вступают в силу сразу, перезагрузка компьютера не требуется.
Чтобы включить функцию (компонент) Печать в PDF (Microsoft Print to PDF), откройте консоль Windows PowerShell от имени администратора и выполните следующую команду:
Enable-WindowsOptionalFeature -FeatureName «Printing-PrintToPDFServices-Features» -Online

После выполнения команды, изменения вступают в силу сразу, перезагрузка компьютера не требуется.
Как включить или отключить функцию Печать в PDF (Microsoft Print to PDF) в командной строке
Ещё, можно отключить или включить функцию Печать в PDF (Microsoft Print to PDF) используя командную строку.
Чтобы отключить функцию (компонент) Печать в PDF (Microsoft Print to PDF), запустите командную строку от имени администратора и выполните следующую команду:
Dism /online /Disable-Feature /FeatureName:»Printing-PrintToPDFServices-Features»

После выполнения команды, изменения вступают в силу сразу, перезагрузка компьютера не требуется.
Чтобы включить функцию (компонент) Печать в PDF (Microsoft Print to PDF), запустите командную строку от имени администратора и выполните следующую команду:
Dism /online /Enable-Feature /FeatureName:»Printing-PrintToPDFServices-Features»

После выполнения команды, изменения вступают в силу сразу, перезагрузка компьютера не требуется.
Используя различные способы представленные выше, можно включить или отключить функцию Печать в PDF (Microsoft Print to PDF) в операционной системе Windows 10.
Видео-инструкция
Также, можно посмотреть видео ролик в котором показано как включить или отключить функцию Печать в PDF (Microsoft Print to PDF) в операционной системе Windows 10.
.How do I set up «print to file» in windows 10
None of the current answers seem to fit my problem. Here is more information. I have two printers but the drivers for both of them are not compatible with Windows 10, which is the only OS on this computer. So, I would like to print-to-file, send the file to another computer, and print the file from that computer.
Thank you for posting your concern here at the Microsoft Community forum.
Which program are you using for ‘Print to file’?
Did you try installing the printer drivers in compatibility mode and check if it works?
Not all programs support the Print to file option. In most programs, the Print to file option is a check box on the Print dialog box. You may try these steps and check if it helps.
- On the File menu, click Print.
- In the Name box, click the printer you’ll use to print the file.
- Select the Print to file check box, and then click OK.
- In the File name box in the Print to file dialog box, type a file name
You may refer this screenshot:
You may also refer this Microsoft article. This article is for Windows 7 but it is also applicable for Windows 10 Technical Preview 2.
Print to file
Hope this helps. If you need further assistance with Windows, let us know and will be glad to help.
Microsoft Print to PDF driver is not listed under Manufactuer or in Windows features.
In Windows 10, The Microsoft Print to PDF driver is not listed under the «install the printer driver» menu under the Manufacturer: Microsoft heading nor is the feature listed in «turn Windows features on or off. How do I remedy this? I’ve found nothing in the boards.
In regards with your query, kindly follow the steps provided below:
Method 1: Check if it was disabled by mistake
- Click the Start Menu.
- Go to Settings.
- Select Devices.
- Then click Printers & Scanners.
You should see the said feature on the Menu window. But if not, kindly proceed to the next method.
Method 2: Enable/Disable Microsoft Print to PDF
- Press Windows Key + S and enter windows features. Select Turn Windows features on or off from the Start menu.
- Once the Windows Features window opens, locate Microsoft Print to PDF and click on the check box to disable it. Click OK to save changes.
- Restart your PC.
- When your PC restarts, repeat the same steps and enable Microsoft Print to PDF again.
- Click OK to save changes.
After enabling the feature again, Print to PDF should be working again without any issues.
Method 3: Set Print to PDF as default printer
To set Print to PDF as a default printer, you need to do the following:
- Press Windows Key + S and enter printers. Select Devices and Printers from the list of results.
- When Devices and Printers window opens, navigate to Printers section.
- Locate Print to PDF, right click it and choose Set as default printer from the menu. After doing that, you should see a green check mark next to Print to PDF meaning that it’s set as a default printer.
Keep us updated for us to further assist you.
Windows 8, Print to PostScript printer to file
Am I missing something stupid simple?
I have a new Windows 8 machine. 64-bit. From an app on my old machine, I generate report output to a «Generic PostScript Printer» which is configured to be sent out to FILE (not LPT, COM, TCP/IP).
While trying the app, it fails to generate the output to the text file provided.
So, I’m taking my application out of the equation. I just go to control panel, pick this printer and tell the Windows printer dialog to do a test print. It comes up with a dialog to enter the file name and I put it into a folder that I have full permissions to. It fails. I even tried as «Administrator» to remove any possible «permission» issues and it still fails.
What am I missing on something that should otherwise be so simple, that even MS dialog / test print doesn’t work.

1 Answer 1
UPDATE. While digging and struggling, I actually opened a support ticket with Microsoft. They have confirmed that this specific process IS a bug and will be working on a patch (to be delivered with other patches when ready).
Apparently, the machine I bought from DELL only had Windows 8 BASIC version. Through many support calls back and forth, it is a specific issue when trying to use certain printer drivers (such as Microsoft PS Color Printer — for Post-Script output), from the default drivers provided with new machines with Windows installed.
OUR WORK AROUND.
For grins, I ultimately went out to HP’s website (how common are HP printers :), and downloaded the printer driver for a 2500 LaserJet and install THAT version of PostScript printer. After installing that, and trying the output, I can generate the output to a textfile without problem. even when default setting is to LPT1: and being redirected to an output text file for postscript content.
So, ultimately, issue resolved by using ANOTHER Vendor’s printer driver for postscript printing and I’m good to go.


