- Share your network printer
- Share the printer on the primary PC
- Connect the shared printer to another PC
- Set up Sharing settings
- Find your PC name
- Printer Sharing Technical Details
- Types of printer sharing in Windows Server 2012
- Enhanced Point and Print
- Setting up Automatic Printer Driver Downloads for Windows Clients
- Namespaces
- Page actions
- Contents
- Introduction
- Supported Printer Drivers
- General Information
- Supported Windows Printer Drivers
- 32-bit and 64-bit Drivers
- Uploading Only 64-bit Drivers to a Samba Print Server
- Granting the SePrintOperatorPrivilege Privilege
- Setting up the [print$] Share
- Creating a GPO for Trusting the Print Server
- Connecting to the Print Server Using the Print Management Console
- Uploading a Printer Driver to a Samba Print Server
- Assigning a Driver to a Printer
- Using the Print Management Console
- Using the Samba rpcclient Utility
- Preconfiguring a Printer
Share your network printer
In Windows 10, you can share your printer with many PCs on your network. To share a printer from the PC that the printer is connected to (the primary PC) with secondary PCs that the printer is not connected to, you must set up sharing settings for the printer, connect the printer to the primary PC (either wirelessly or by using a USB cable), and then turn on the printer. Also make sure the primary PC is turned on, connected to the printer, and connected to the network.
Note: When sharing a printer, make sure that sharing settings are set up on the primary and secondary PCs. Also, make sure you know the name of the primary PC. For more info, see the Set up Sharing settings and Find your PC name sections at the end of this topic.
Share the printer on the primary PC
There are two ways to share your printer: using Settings or Control Panel.
Share your printer using Settings
Select the Start button, then select Settings > Devices > Printers & scanners.
Choose the printer you want to share, then select Manage.
Select Printer Properties, then choose the Sharing tab.
On the Sharing tab, select Share this printer.
If you want, edit the share name of the printer. You’ll use this name to connect to the printer from a secondary PC.
Share your printer using Control Panel
In the search box on the taskbar, type control panel and then select Control Panel.
Under Hardware and Sound, select View devices and printers.
Select and hold (or right-click) the printer you want to share, select Printer properties, and then choose the Sharing tab.
On the Sharing tab, select Share this printer.
If you want, edit the share name of the printer. You’ll use this name to connect to the printer from a secondary PC.
Select the Start button, then select Settings > Devices > Printers & scanners.
Choose the printer you want to share, then select Manage.
Select Printer Properties, then choose the Sharing tab.
On the Sharing tab, select Share this printer.
If you want, edit the Share name of the printer. You’ll use this name to connect to the printer from a secondary PC.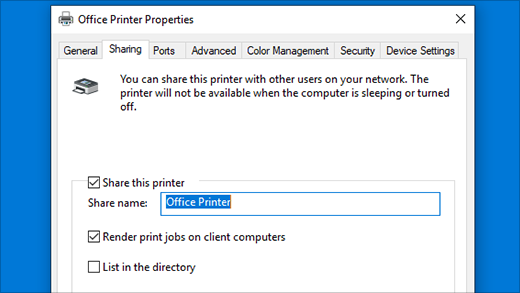
In the search box on the taskbar, type control panel and then select Control Panel.
Under Hardware and Sound, select View devices and printers.
Select and hold (or right-click) the printer you want to share, select Printer properties, and then choose the Sharing tab.
On the Sharing tab, select Share this printer.
If you want, edit the share name of the printer. You’ll use this name to connect to the printer from a secondary PC.
Connect the shared printer to another PC
There are two ways to connect a shared printer to another PC: using Settings or Control Panel.
Select the Start button, then select Settings > Devices > Printers & scanners.
Under Add printers & scanners, select Add a printer or scanner.
Choose the printer you want, and then select Add Device.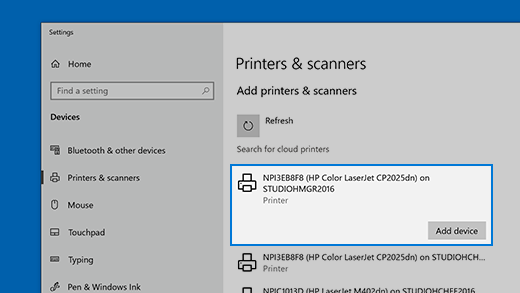
If you don’t see the printer you want, select The printer that I want isn’t listed.
In the Add printer dialog box, select Select a shared printer by name, and then enter the computer or device name of the primary PC and the share name of the printer using one of these formats:
When prompted to install the printer driver, select Next to complete the installation.
For more info about the computer or device name, see the Find your PC name section in this topic. By default, you need the user name and password of the primary PC to access the printer.
In the search box on the taskbar, type control panel and then select Control Panel.
Under Hardware and Sound, select View devices and printers, and then select Add a printer.
Select the printer you want, select Next. When prompted, install the printer driver.
If you don’t see the printer you want, select The printer that I want isn’t listed.
In the Add a device dialog box, select Select a shared printer by name, and then enter the computer or device name of the primary PC and the share name of the printer using one of these formats:
When prompted to install the printer driver, select Next to complete the installation.
For more info about the computer or device name, see the Find your PC name section in this topic. By default, you need the user name and password of the primary PC to access the printer.
Set up Sharing settings
The settings you use to share devices is often turned on by default. If not, follow the steps in this section to turn settings on using settings or Control Panel.
Select the Start button, then select Settings > Network & Internet > Wi-Fi.
Under Related settings, select Change advanced sharing options.
In the Advanced sharing settings dialog box, expand the Private section. Next, under Network discovery, select Turn on network discovery.
Under File and printer sharing, select Turn on file and printer sharing.
In the search box on the taskbar, type control panel and then select Control Panel.
Select Network and Internet > Network and Sharing Center > Change advanced sharing settings.
In the Advanced sharing settings dialog box, expand the Private section. Next, under Network discovery, select Turn on network discovery.
Under File and printer sharing, select Turn on file and printer sharing.
Find your PC name
You’ll need the name of your primary PC, also called the computer name or device name, to connect the secondary PC to the printer.
In the search box on the taskbar, type computer name.
Select View your PC name.
Under Device name, you’ll see the PC (computer) name.
In the search box on the taskbar, type control panel and then select Control Panel.
Select System and Security > System > See the name of this computer.
Under Computer name, you’ll see the PC (computer) name.
Printer Sharing Technical Details
Applies To: Windows Server 2012
This topic focuses on the various printer sharing technologies supported in Windows 8. It provides a quick overview of the various technologies, and why they might be used in certain scenarios.
There are a number of other features in Windows 8 that can be used to help augment or improve the printer sharing features in Windows 8. These features often provide more flexibility to IT administrators, or allow the user experience for printer sharing to be more tailored to a given environment.
Finally, this topic covers deployment scenarios for the various printer sharing features and technologies supported in Windows 8. This section is designed to allow IT administrators to start working with print servers quickly without needing to cross reference a number of other sources for basic print server functions.
Types of printer sharing in Windows Server 2012
Windows Server 2012 supports a number of different sharing mechanisms that enable deployment of print shares to meet various user and business needs. These include Enhanced Point and Print, Package Aware Point and Print, Legacy Point and Print, and Internet Print Protocol (IPP). In most cases, the administrator is not in direct control over the type of sharing that can be used; they are only able to “share” the printer. The drivers installed on the server, the client operating system version, and the connectivity mechanism dictates what type of sharing is available.
The following table shows which printer sharing technology is available based on operating system and driver versions being used from the print server side.
V4 printer driver
V3 Package Aware printer driver
V3 Legacy printer driver
Windows 8/Windows Server 2012
Enhanced Point and Print
Package Aware Point and Print
Legacy Point and Print
Windows 7/Windows Server 2008 R2
Package Aware Point and Print
Legacy Point and Print
Windows Vista/Windows Server 2008
Package Aware Point and Print
Legacy Point and Print
Windows XP/Windows Server 2003
Legacy Point and Print
Legacy Point and Print
The client operating system is also a factor, and can impact the type of connection used beyond what the server makes available. This table shows which mechanism a client attempts to use when connecting to a specific type of print share.
Enhanced Point and Print on server
Package Aware Point and Print on server
Legacy Point and Print on server
Windows 8/Windows Server 2012
Enhanced Point and Print
Package Aware Point and Print
Legacy Point and Print
Windows 7/Windows Server 2008 R2
Enhanced Point and Print
Package Aware Point and Print
Legacy Point and Print
Windows Vista/Windows Server 2008
Enhanced Point and Print
Package Aware Point and Print
Legacy Point and Print
Windows XP/Windows Server 2003
Legacy Point and Print
Legacy Point and Print
When the server has IPP sharing enabled, all print shares will automatically be available through IPP. When a Point and Print connection is possible, all Windows clients will create a Point and Print connection even if the user is attempting to create an IPP connection. Since IPP connections can be manually configured so that clients and servers can communicate even while using different drivers, any client can theoretically connect to any server using any driver capable of being installed on the client. It is important that the drivers are similar enough, so the server driver can accept and route the output of the client driver to the device. There is no programmatic way to test for driver compatibility in IPP scenarios.
Enhanced Point and Print
New to Windows 8/Windows Server 2012, enhanced Point and Print allows a server running Windows 8/Windows Server 2012 to share a printer with any other supported Windows client without the use of additional drivers. This feature is only available when the print server is using a v4 print driver for the print share.
Enhanced Point and Print enables v4 drivers to be used in Point and Print scenarios where client computers may not have any access or ability to use the same driver that is available on the print server. This is accomplished by using an enhanced Point and Print driver on Windows 8 and previous operating systems that can access the configuration of the printer from the print server and mimic the printer’s capabilities without using any device specific code. Only Windows 8 and Windows Server 2012 print servers are capable of creating enhanced Point and Print shares, but any Windows client is capable of connecting to them.
A v4 driver can expose features that require user interface to configure. For standard features supported in the operating system, all of these features should be accessible to all client computers through standard user interface provided as part of that operating system’s basic printer extension. For non-standard features, custom user interface must be provided by the Independent Hardware Vendor (IHV), and installed so the user can access those options. This user interface can be packaged in a Windows Store device app for use in the new Windows user interface print workflows, or as a Printer Extension when the user is printing through a desktop workflow. Printer Extensions can be bundled in a v4 print driver, or installed as a standalone application. All Windows Store device apps must be installed from the Windows App Store, or distributed through enterprise tools designed to deliver Windows Store apps.
The following is a high level diagram of enhanced Point and Print scenarios. The black arrows indicate the required Point and Print data flow to enable connections. The tan arrows show data flow for optional extensions that can extend or improve the printing experience. Since printer extensions are simply Windows applications, they can be installed from media or deployed just like any other application. The print server can also provide an URL that will be shown to users as part of the printer properties. The intension of this link is to provide a simple mechanism for print administrators to direct their users to Printer Extensions for their print share.
.jpeg)
Figure 1: Overview of enhanced Point and Print data flows in Windows 8 printer sharing
Supported Servers
Windows 8/Windows Server 2012 (all versions including x86 and x64 architectures)
Setting up Automatic Printer Driver Downloads for Windows Clients
Namespaces
Page actions
Contents
Introduction
If you are running a Samba print server for Windows clients, you can upload drivers and preconfigure printers. If a user connects to a printer on the Samba server, Windows automatically downloads the driver and installs it locally. The user does not require local administrator permissions for the installation. Additionally, Windows applies preconfigured driver settings, such as paper sizes and the number of trays.
| Before you can set up automatic printer driver download, configure Samba as a print server and share a printer. For details, see Setting up Samba as a Print Server. |
Supported Printer Drivers
General Information
Many driver are provided in a way that enables you to upload them to your Samba print server:
- If the driver is provided in a compressed format, unpack the archive.
- Some drivers are require to start a setup application that installs the driver locally on a Windows host. In certain cases, the installer extracts the individual files into the operating system’s temporary folder during the setup. To use the driver files for uploading them to a Samba print Server, start the installer, copy the files from the temporary folder to a new location, and cancel the installation.
Ask your printer vendor, if the driver supports uploading to a print server for automatic download by Windows operating systems.
Supported Windows Printer Drivers
Samba only supports the printer driver model version 3 that is supported in Windows 2000 to 10 and Windows Server 2000 to 2016.
To use package-aware drivers:
- Run Samba 4.7 and later
- Enable the spoolssd service. For details, see Enabling the spoolssd Service.
The driver model version 4, introduced in Windows 8 and Windows Server 2012, is not supported in Samba. Use version 3 drivers instead.
32-bit and 64-bit Drivers
Printer drivers for the 64-bit Windows architecture, you can only upload from a Windows 64-bit operating system. 32-bit drivers you can upload from both 32-bit and 64-bit Windows operating systems.
To provide driver for both architectures, you must upload 32-bit and 64-bit drivers that uses exactly the same name for both architectures. For example, if you are uploading the 32-bit HP Universal Printing PS driver and the 64-bit HP Universal Printing PS (v5.5.0) driver for Windows, the driver names are different and cannot be used and preconfigured for the same printer.
Uploading Only 64-bit Drivers to a Samba Print Server
Using the default setting, Samba reports itself as Windows NT x86 architecture. Thus, 64-bit drivers stored on this print server can only be assigned to a printer if additionally a 32-bit driver with exactly the same name is uploaded. Otherwise, Windows does not display the driver in the list displayed in the printer’s properties when assigning the driver.
To provide only 64-bit driver on the Samba print server:
- Add the following setting to the [global] section in your smb.conf file:
- Reload Samba:
Granting the SePrintOperatorPrivilege Privilege
Only users and groups having the SePrintOperatorPrivilege privilege granted can upload and preconfigure printer drivers. You can grant this privilege to any user or group.
For example, to grant the privilege to the Domain Admins group, enter:
| It is recommended to grant the privilege to a group instead of individual accounts. This enables you to add and revoke the privilege by updating the group membership. |
To list all users and groups having the SePrintOperatorPrivilege privilege granted, enter:
Setting up the [print$] Share
Windows downloads printer drivers from the print$ share of a print server. This share name is hard-coded in Windows and cannot be changed.
To share the /srv/samba/printer_drivers/ folder using the print$ share name:
- Add the following section to your smb.conf file:
- Reload Samba:
- Create the directory:
- Set the permissions on the share. Users or groups having the SePrintOperatorPrivilege privilege granted must be able to to write to the share. For example, to set write access for the Domain Admins group and read permissions for other users to be able to download the drivers:
- Using POSIX access control lists (ACL):
| When setting up a Samba print server on an Active Directory (AD) domain controller (DC), you cannot use POSIX access control lists (ACL). Use the Windows utilities to set extended ACLs. For details, see Enable Extended ACL Support in the smb.conf File. |
- Using Windows ACLs:
Set the following permissions using the Windows utilities:
| Principal | Access | Apply to |
|---|---|---|
| Creator Owner | Full control | Subfolders and files only |
| Authenticated Users | Read & execute, List folder contents, Read | This folder, subfolders and files |
| Domain Admins | Full control | This folder, subfolders and files |
For details, see Setting Share Permissions and ACLs.
Samba automatically creates the architecture subdirectories on the print$ share when uploading a driver.
Creating a GPO for Trusting the Print Server
 | In July 2016, Microsoft released an update to fix security issues in the Windows print spooler. This update changes the behaviour and limited support for non-package-aware printer drivers. In October 2016, Microsoft published an update to mitigate these problems in an Active Directory (AD). For further details, see MS16-087. This section describes the procedure to work around the problems in an AD. |
To avoid installing malicious drivers from untrusted sources, Windows asks you if you trust the print server when you preconfigure a printer or when a user installs a printer. Create a group policy object (GPO) to trust the Samba print server and work around the known issues introduced by the Windows print spooler security update:
- Log in to a computer using an account that is allowed you to edit group policies, such as the AD domain Administrator account.
- Open the Group Policy Management Console . If you are not having the Remote Server Administration Tools (RSAT) installed on this computer, see Installing RSAT.
- Right-click to your AD domain and select Create a GPO in this domain, and Link it here .
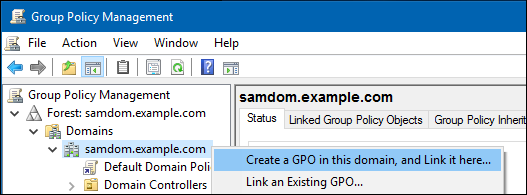
- Enter a name for the GPO, such as Legacy Printer Driver Policy . The new GPO is shown below the domain entry.
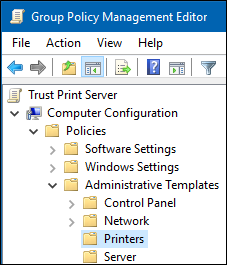
- Right-click to the newly-created GPO and select Edit to open the Group Policy Management Editor .
- Navigate to the Computer Configuration → Policies → Administrative Templates → Printers entry.
- Double-click to the Point and Print Restriction policy to edit the policy:
- Enable the policy and set the following options:
- Enable Users can only point and print to these servers and enter the fully-qualified domain name (FQDN) to the field.
- Select Do not show warning or elevation prompt in both the When installing drivers for a new connection and When updating drivers for an existing connection list.
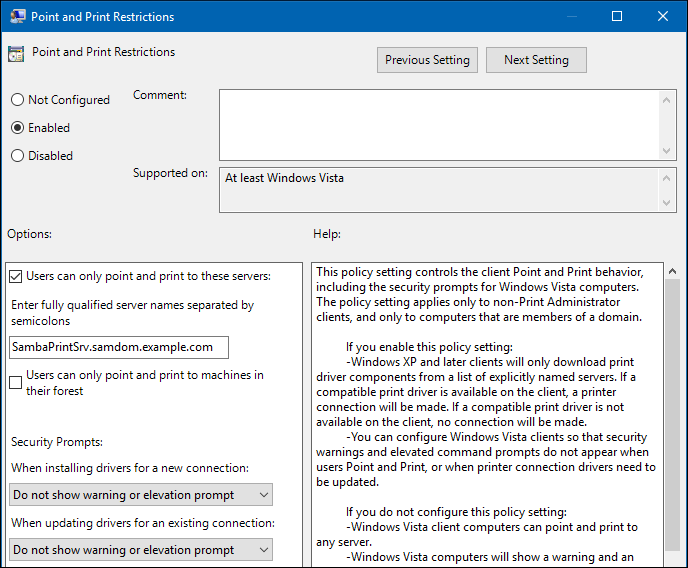
- Click OK .
- Double-click to the Package Point and Print — Approved servers policy to edit the policy:
- Enable the policy and click the Show button.
- Enter the print server’s FQDN. For example:
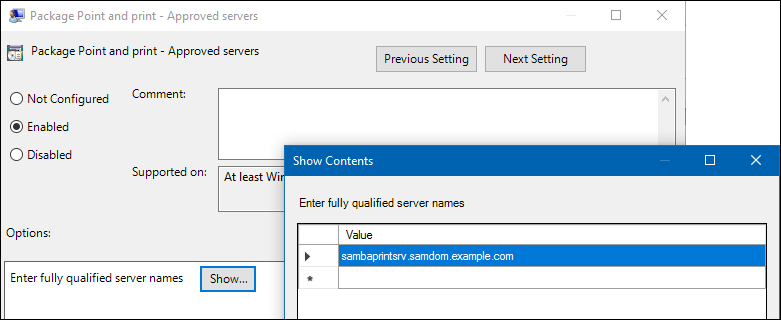
- Close both the content and policy properties by clicking OK .
- Close the Group Policy Management Editor . The GPOs are automatically saved on the Sysvol share on the domain controller (DC).
- Close the Group Policy Management Console .
Wait until the Windows domain members applied the group policy automatically. To apply the policy manually:
- Reboot the domain member.
- Run the following command using an account having local administrator permissions:
Connecting to the Print Server Using the Print Management Console
To connect to the Samba print server:
- Log on to a Windows host using an account that has the SeDiskOperatorPrivilege privilege granted and write permissions on the print$ share.
- Click Start , enter Print Management , and start the application.
- Right-click to the Print Servers entry and select Add/Remove Servers .
- Enter the name of the Samba print server in the Add servers field, and click Add to List .
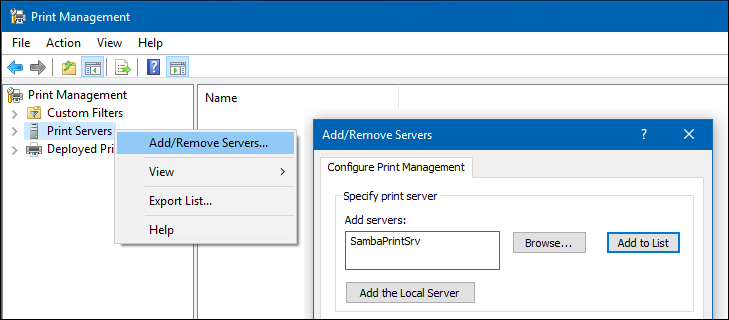
- Click OK .
When you are connected to the print server, you can perform certain tasks, such as uploading drivers and preconfiguring printers.
Uploading a Printer Driver to a Samba Print Server
To upload a printer driver:
- Connect to the print server. See Connecting to the Print Server Using the Print Management Console
- Navigate to the Print Servers entry, double-click your print server, and right-click to the Drivers entry.
- Select Add Driver .
- In upcoming wizard, select the architecture you want to upload a driver for, and select Next .
- Click Have Disk and navigate to the folder containing the printer driver for the selected architecture.
- Select the driver to upload from the list.
| When you upload 32-bit and 64-bit drivers for the same printer, both drivers must have exactly the same driver name. For details, see 32-bit and 64-bit Drivers. |
- Click Finish to start uploading the driver to the print$ share.
- After uploading, the driver is shown in the Drivers menu.
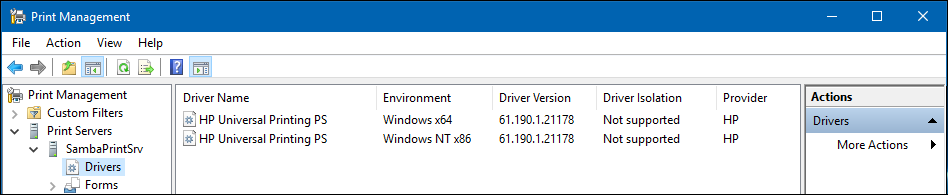
Optionally, upload drivers for additional architectures.
Assigning a Driver to a Printer
Using the Print Management Console
To assign a driver to a printer using the Windows Print Management console:
- Connect to the print server. See Connecting to the Print Server Using the Print Management Console
- Navigate to the Print Servers entry, double-click your print server, and select the Printers entry.
- Right-click to the printer and select Properties .
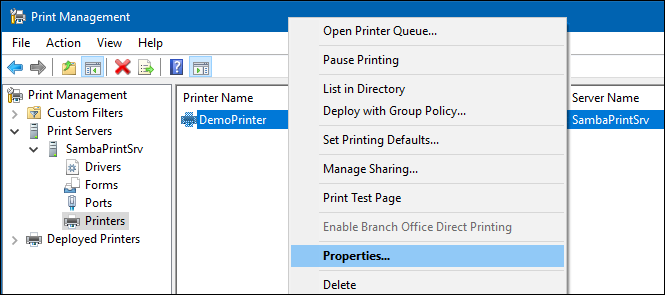
- When no driver is associated with the printer, the following warning is shown:
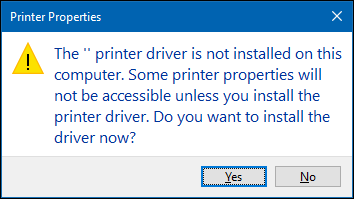 Click No . The driver is selected in a later step from the list of uploaded drivers.
- Navigate to the Advanced tab and select the driver from the list. For example:
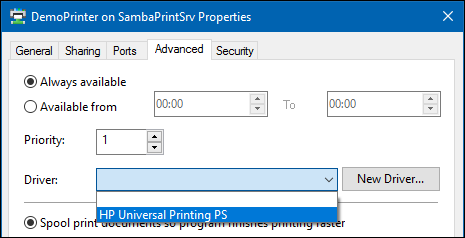 If you uploaded only a 64-bit driver and the driver is not displayed in the list, see Uploading Only 64-bit Drivers to a Samba Print Server.
- Click OK to set the driver for the printer.
If a warning is displayed, cancel the operation and set up a group policy to trust drivers provided by this print server. For details, see Creating a GPO for Trusting the Print Server. 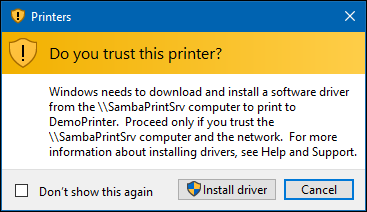
- After the driver is assigned to the printer, Windows automatically renames the printer to the name of the printer driver. It is recommended, to manually reset the name to the printer name set in the smb.conf file:
- Right-click to the printer and select Rename .
- Reset the printer name to the name set in the smb.conf file, and press Enter .
- If the printer list is not refreshed automatically, press the [F5] key.
Using the Samba rpcclient Utility
To assign a driver to a printer locally on a Samba print server using the rpcclient utility:
- List all drivers available on the print$ share:
- Assign the driver to the printer. For example, to assign the HP Universal Printing PS driver to the DemoPrinter printer, enter:
- To verify the result:
Preconfiguring a Printer
If the administrator preconfigured the driver on the print server, users connecting to the printer getting automatically the settings applied as default. Preconfigured settings are applied automatically to all driver platforms for the printer, if drivers for multiple architectures are installed on the server. For details, see 32-bit and 64-bit Drivers.
To preconfigure a printer:
- Connect to the print server. See Connecting to the Print Server Using the Print Management Console.
- Navigate to the Print Servers entry, double-click your print server, and select the Printers entry.
- Right-click to the printer and select Properties .
- Depending on the driver, a tab, such as Device Settings , is provided that enables you to set general settings, such as installed paper trays.
- To preconfigure further settings, navigate to the Advanced tab and click Printing Defaults .
- Update all settings you want to preconfigure. For example, paper sizes and the default paper source.
- Save the advanced settings and the printer properties by clicking OK .


