- Устранение проблем с профилями пользователей с помощью событий Troubleshoot user profiles with events
- Шаг 1. Проверка событий в журнале приложений Step 1: Checking events in the Application log
- Шаг 2. Просмотр операционного журнала для службы профилей пользователей Step 2: View the Operational log for the User Profile Service
- Шаг 3. Включение и просмотр журналов аналитики и отладки Step 3: Enable and view analytic and debug logs
- Шаг 4. Создание и декодирование трассировки Step 4: Creating and decoding a trace
- 3 Ways to Get out of Low Disk Space Warning in Windows 7/8.1/10 [Partition Magic]
- Summary :
- Quick Navigation :
- What Is Low Disk Space Warning
- When Will Low Disk Space Warning Appear
- 3 Ways to Thoroughly Solve Low Disk Space Warning in Windows
- Way 1: Run Disk Cleanup
- Way 2: Extend Partition on the Same Disk
- Way 3: Extend Partition with another Hard Drive
- Bottom Line
- ABOUT THE AUTHOR
Устранение проблем с профилями пользователей с помощью событий Troubleshoot user profiles with events
Применяется к: Windows 10, Windows 8, Windows 8.1, Windows Server 2019, Windows Server 2016, Windows Server 2012 R2, Windows Server 2012 и Windows Server (Semi-annual Channel). Applies to: Windows 10, Windows 8, Windows 8.1, Windows Server 2019, Windows Server 2016, Windows Server 2012 R2, Windows Server 2012, and Windows Server (Semi-annual Channel).
В этой статье рассматривается устранение проблем с загрузкой и выгрузкой профилей пользователей с использованием журналов событий и трассировки. This topic discusses how to troubleshoot problems loading and unloading user profiles by using events and trace logs. В следующих разделах описано, как использовать три журнала событий, в которые записываются сведения о профиле пользователя. The following sections describe how to use the three event logs that record user profile information.
Шаг 1. Проверка событий в журнале приложений Step 1: Checking events in the Application log
Первый шаг в устранении проблем, связанных с загрузкой и выгрузкой профилей пользователей (в том числе перемещаемых профилей пользователей), заключается в использовании компонента «Просмотр событий» для проверки всех событий предупреждений и ошибок, которые записываются службой профилей пользователей в журнал приложений. The first step in troubleshooting issues with loading and unloading user profiles (including roaming user profiles) is to use Event Viewer to examine any Warning and Error events that User Profile Service records in the Application log.
Вот как можно просмотреть события служб профилей пользователей в журнале приложений. Here’s how to view User Profile Services events in the Application log:
- Запустите компонент «Просмотр событий». Start Event Viewer. Для этого откройте Панель управления, выберите раздел Система и безопасность, а затем в разделе Администрирование щелкните ссылку Просмотр журналов событий. To do so, open Control Panel, select System and Security, and then, in the Administrative Tools section, select View event logs. Откроется окно компонента «Просмотр событий». The Event Viewer window opens.
- В дереве консоли сначала перейдите к узлу Журналы Windows, а затем выберите ветку Приложение. In the console tree, first navigate to Windows Logs, then Application.
- В области действий выберите действие Фильтровать текущий журнал. In the Actions pane, select Filter Current Log. Откроется диалоговое окно «Фильтровать текущий журнал». The Filter Current Log dialog box opens.
- В поле Источники событий установите флажок User Profiles Service (Служба профилей пользователей), а затем нажмите кнопку ОК. In the Event sources box, select the User Profiles Service checkbox, and then select OK.
- Ознакомьтесь с перечнем событий, обращая особое внимание на события ошибок. Review the listing of events, paying particular attention to Error events.
- При обнаружении значимых событий выберите ссылку «Справка в Интернете для журнала событий», чтобы просмотреть дополнительные сведения и узнать о процедурах устранения проблем. When you find noteworthy events, select the Event Log Online Help link to display additional information and troubleshooting procedures.
- Прежде чем выполнить дальнейшие действия по устранению проблем, обратите внимание на дату и время значимых событий, а затем изучите операционный журнал (как описано в шаге 2), чтобы узнать сведения о том, что делала служба профилей пользователей во время происшествия событий ошибок или предупреждений. To perform further troubleshooting, note the date and time of noteworthy events and then examine the Operational log (as described in Step 2) to view details about what the User Profile Service was doing around the time of the Error or Warning events.
Можно спокойно проигнорировать событие службы профилей пользователей 1530 «Windows detected your registry file is still in use by other applications or services.» (Система Windows обнаружила, что файл реестра все еще используют другие приложения или службы). You can safely ignore User Profile Service event 1530 «Windows detected your registry file is still in use by other applications or services.»
Шаг 2. Просмотр операционного журнала для службы профилей пользователей Step 2: View the Operational log for the User Profile Service
Если проблему нельзя устранить только с помощью журнала приложений, используйте следующую процедуру для просмотра событий службы профилей пользователей в операционном журнале. If you cannot resolve the issue using the Application log alone, use the following procedure to view User Profile Service events in the Operational log. В этом журнале отображаются некоторые внутренние действия службы, по которых могут помочь точно определить, где в процессе загрузки или выгрузки профиля возникает проблема. This log shows some of the inner workings of the service, and can help pinpoint where in the profile load or unload process the problem is occurring.
Журнал приложений и операционный журнал службы профилей пользователей Windows включены по умолчанию во всех установках Windows. Both the Windows Application log and the User Profile Service Operational log are enabled by default in all Windows installations.
Вот как просмотреть операционный журнал для службы профилей пользователей: Here’s how to view the Operational log for the User Profile Service:
- В дереве консоли «Просмотр событий» перейдите к разделу Журналы приложений и служб, затем выберите Microsoft, Windows, Служба профилей пользователей, Операционный. In the Event Viewer console tree, navigate to Applications and Services Logs, then Microsoft, then Windows, then User Profile Service, and then Operational.
- Изучите события, произошедшие во время происшествия событий ошибок или предупреждений, записанных в журнале приложений. Examine the events that occurred around the time of the Error or Warning events that you noted in the Application log.
Шаг 3. Включение и просмотр журналов аналитики и отладки Step 3: Enable and view analytic and debug logs
Если требуется больше сведений, чем в операционном журнале, можно включить журналы аналитики и отладки на затронутом компьютере. If you require more detail than the Operational log provides, you can enable analytic and debug logs on the affected computer. Эти журналы предоставляют более подробные сведения. Они должны быть отключены, за исключением случаев, когда вы пытаетесь устранить проблему. This level of logging is much more detailed and should be disabled except when trying to troubleshoot an issue.
Вот как включить и просмотреть журналы аналитики и отладки: Here’s how to enable and view analytic and debug logs:
- В компоненте «Просмотр событий» в области Действия выберите Вид, а затем выберите Отобразить аналитический и отладочный журналы. In the Actions pane of Event Viewer, select View, and then select Show Analytic and Debug Logs.
- Перейдите к узлу Журналы приложений и служб, затем выберите Microsoft, Windows, Служба профилей пользователей, Диагностика. Navigate to Applications and Services Logs, then Microsoft, then Windows, then User Profile Service, and then Diagnostic.
- Щелкните Включить журнал, а затем нажмите кнопку Да. Select Enable Log and then select Yes. Это включит журнал диагностики, который начнет запись. This enables the Diagnostic log, which will start logging.
- Если требуется более подробная информация, см. Шаг 4. Создание и декодирование трассировки для получения дополнительных сведений о создании журнала трассировки. If you require even more detailed information, see Step 4: Creating and decoding a trace for more information about how to create a trace log.
- Завершив устранение проблемы, перейдите к журналу Диагностика, щелкните Отключить журнал, выберите Вид, а затем снимите флажок Отобразить аналитический и отладочный журналы, чтобы отменить ведение журнала аналитики и отладки. When you are finished troubleshooting the issue, navigate to the Diagnostic log, select Disable Log, select View and then clear the Show Analytic and Debug Logs checkbox to hide analytic and debug logging.
Шаг 4. Создание и декодирование трассировки Step 4: Creating and decoding a trace
Если не удается устранить проблему с помощью событий, можно создать журнал трассировки (ETL-файл) при воспроизведении проблемы, а затем декодировать его с помощью общедоступных символов с сервера символов (Майкрософт). If you cannot resolve the issue using events, you can create a trace log (an ETL file) while reproducing the issue, and then decode it using public symbols from the Microsoft symbol server. Журналы трассировки предоставляют конкретные сведения о том, что делает служба профилей пользователей, и могут помочь выявить место возникновения сбоя. Trace logs provide very specific information about what the User Profile Service is doing, and can help pinpoint where the failure occurred.
Оптимальная стратегия использования трассировки ETL — сначала записывать наименьшие возможные журналы. The best strategy when using ETL tracing is to first capture the smallest log possible. После декодирования журнала выполните поиск ошибок в нем. Once the log is decoded, search the log for failures.
Вот как создать и декодировать трассировку для службы профилей пользователей: Here’s how to create and decode a trace for the User Profile Service:
Войдите на компьютер, на котором пользователь столкнулся с проблемами, используя учетную запись члена локальной группы администраторов. Sign on to the computer where the user is experiencing problems, using an account that is a member of the local Administrators group.
В командной строке с повышенными привилегиями введите следующие команды, где
is the path to a local folder that you have previously created, for example C:\logs:
На начальном экране выберите имя пользователя, а затем выберите команду Переключить учетную запись, будьте внимательны и не выходите из учетной записи администратора. From the Start screen, select the user name, and then select Switch account, being careful not to log off the administrator. Если вы используете удаленный рабочий стол, закройте сеанс администратора, чтобы установить сеанс пользователя. If you are using Remote Desktop, close the Administrator session to establish the user session.
Воспроизведите проблему. Reproduce the problem. Эта процедура обычно заключается в том, чтобы войти в систему в качестве пользователя, испытывающего проблему, выйти из системы, или и то, и другое. The procedure to reproduce the problem is typically to sign on as the user experiencing the issue, sign the user off, or both.
После воссоздания проблемы войдите в систему опять с правами локального администратора. After reproducing the problem, sign on as the local administrator again.
В командной строке с повышенными привилегиями выполните следующую команду, чтобы сохранить журнал в ETL-файле: From an elevated command prompt run the following command to save the log into an ETL file:
Введите следующую команду, чтобы экспортировать ETL-файл в файл, доступный для чтения, в текущем каталоге (возможно, в домашней папке или папке %WINDIR%\System32): Type the following command to export the ETL file into a human-readable file in the current directory (likely your home folder or the %WINDIR%\System32 folder):
3 Ways to Get out of Low Disk Space Warning in Windows 7/8.1/10 [Partition Magic]
By Rodin | Follow | Last Updated November 22, 2020
Summary :

When your computer has been used for a long time, you may encounter the low disk space warning issue. This post shows you the effects of low disk space and corresponding solutions. Therefore, if the problem occurs to you, don’t worry. Now, please follow the post to see the specific steps.
Quick Navigation :
What Is Low Disk Space Warning
Low disk space warning is a prompt appearing in Windows OS to inform users a specific location of the hard drive is running out of space. When this message appears, users need to take some actions to solve this error message or it will keep popping out frequently. Besides, low disk space warning indicates bad health of the hard drive which needs to be improved in urgent to users.
When Will Low Disk Space Warning Appear
We believe many users have the experience of seeing a red partition bar in Windows Explorer(see the following example). How does this happen? When the free space of a specific partition is lower than 10% of the total storage space, that partition will present itself with a red bar.

And, according to Microsoft’s explanation, users will receive Low Disk Space Warning at the following situations:
- When free disk space reaches 200 MB, users receive the following message for 10 seconds, once per session: «You are running out of disk space on [drive].»
- When free disk space reaches 80 MB, users receive the following message for 30 seconds, every four hours, twice per session: «You are running very low on disk space on [drive].»
- When free disk reaches 50 MB, users receive the following message for 30 seconds, every five minutes, until the free space is above 50 MB: «You are running very low on disk space on [drive].»
How to Disable the Low Disk Space Check
Let’s see a topic posted at Tomshardware:
«I game a lot on my computer, often in windowed mode, and have been getting the ‘Low Disk Space’ warnings popping up during sessions because one of my drives is completely filled with games. My OS is on a separate SSD, so there isn’t any worry there. They are just annoying and detract from game sessions, especially when I am really into a game. Any idea?» Thanks, Andy
Many users are annoyed with this warning message especially when they are focusing on something. They search on the internet wondering how to prevent this low disk space check, because there is no option in the warning message to disable it, and they have scanned over computer settings but find nothing to resolve it. In fact, there is a registry value you can set to disable this feature.
- Click Start, click Run, type “regedit”, and then click OK;
- Click the following key in the registry: HKEY_CURRENT_USER\SOFTWARE\Microsoft\Windows\CurrentVersion\Policies\Explorer;
- On the Edit menu, point to New, and then click DWORD Value;
- Type “NoLowDiskSpaceChecks”, and then press ENTER;
- On the Edit menu, click Modify;
- Type 1, and then click OK;
- Quit Registry Editor.
3 Ways to Thoroughly Solve Low Disk Space Warning in Windows
Users must know disabling low disk space check only disappears the warning message. However, the low disk space issue is not solved. Thorough and effective method should be something that release disk space or increase the free space.
In this post, we list 3 ways to help solve this issue totally.
Way 1: Run Disk Cleanup
Windows includes a built-in tool that enables users to delete temporary files and other unimportant data to free out disk space. Follow the steps below:
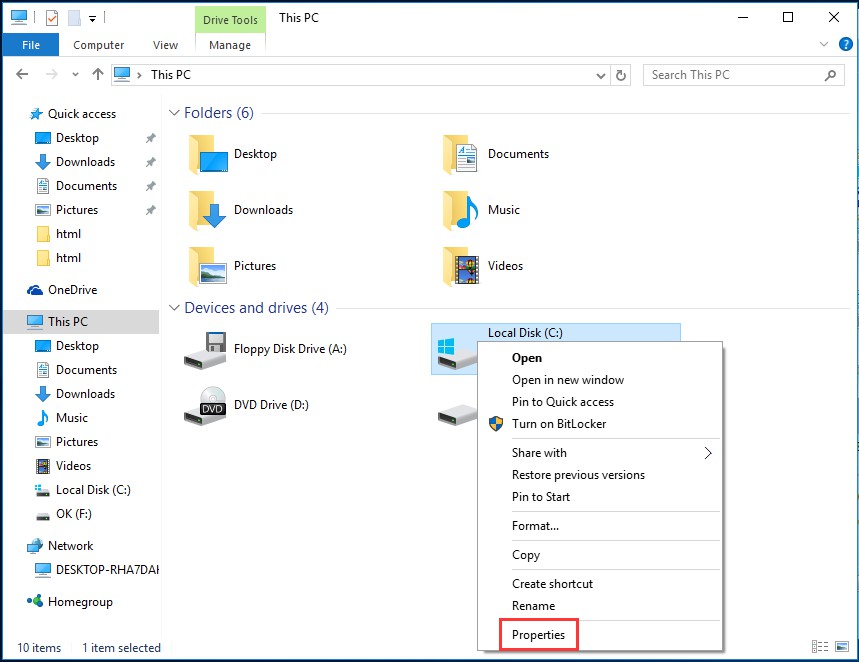
Step 1. Right-click on the low disk space drive in Window Explorer and select «Properties».
Step 2. Click the «Disk Cleanup» button in the disk properties window.
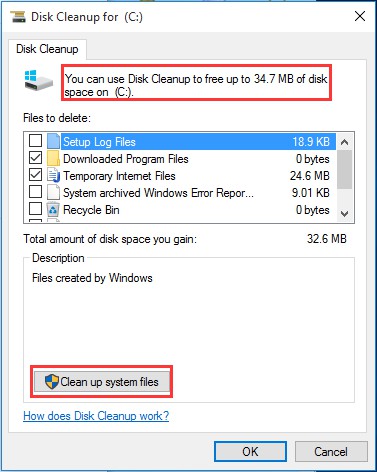
Step 3. A new window comes out. Select the types of files to be deleted and click OK. These files include temporary files, log files, files in your recycle bin, and other unimportant files. Disk Cleanup will show users how much space they can obtain by deleting the selected files.

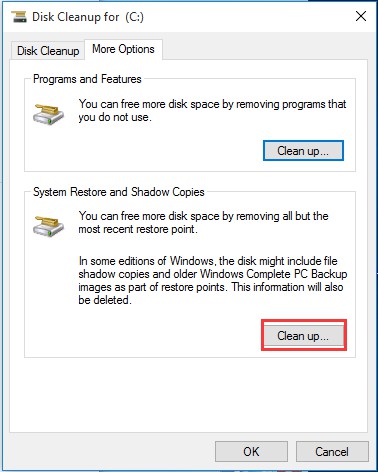
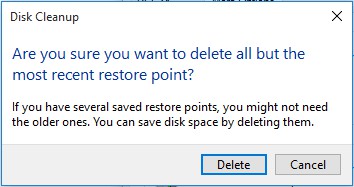
Step 4. By pressing «Clean up system files», users can click the «More Options» button and use the «Clean up» button under «System Restore and Shadow Copies» to delete system restore data. This button deletes all but the most recent restore point, so please ensure your computer is working properly before using it -after that create another system restore point.
Obviously disk cleanup only free limited space — to some extent it is of small significance. A more effective way should be extend partition.
Way 2: Extend Partition on the Same Disk
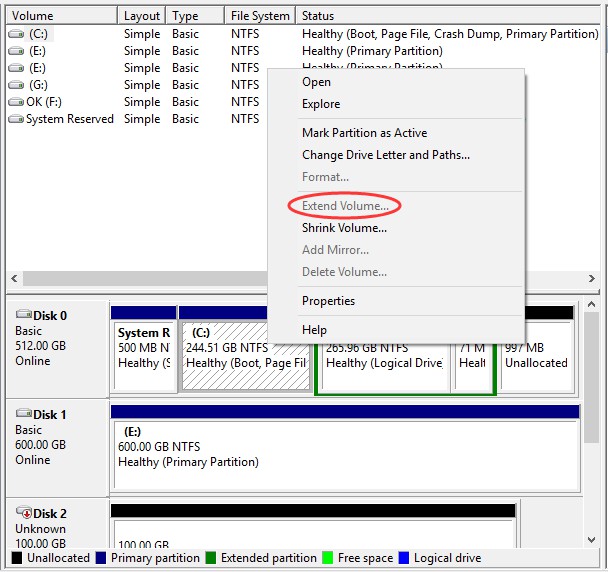
If there are enough free space on the rest partitions of the same disk, extending partition should be straight forward. When it comes to extending partition, Windows Disk Management utility is stereotyped in the way it extends partition, because it always presents users with grey/unavailable options which disable users to use this feature.
Why extend volume greyed out in Windows Disk Management? In other words, extend volume only works when:
- The partition to be extended should be NTFS partition or RAW partition;
- If the partition to be extended is primary partition, there must be unallocated space adjacent and after it;
- If the partition to be extended is logical partition, there must be free space adjacent and after it.
To break these limits, we recommend a more flexible and powerful disk management tool called MiniTool Partition Wizard. What can MiniTool Partition Wizard do? It is professional in disk and partition management which helps users to extend partition, move/resize partition, convert file system, rebuild MBR, recover partition, etc. And free edition is competitive in increasing a low disk space partition.
How to extend partition with MiniTool Partition Wizard:
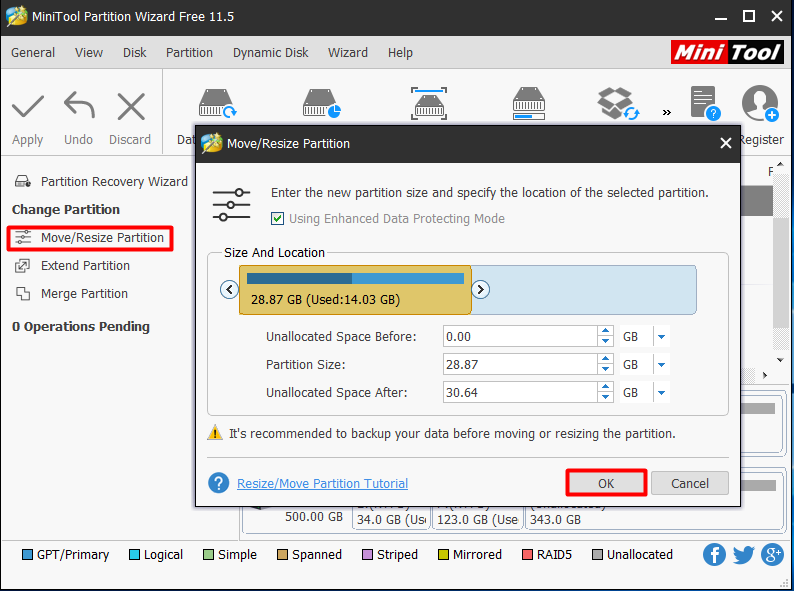
1. Use Move/Resize Partition if there is unallocated space adjacent (both at left and right side) to the target partition.
Step 1: Launch MiniTool Partition Wizard free edition and users will see their disk layout in the middle pane.
Step 2: Click on the partition users want to extend, and choose «Move/Resize Partition» feature in the left pane.
Step 3: In the pop-up window, drag the slide bar to occupy the free space or input the specific volume users want to take from the unallocated space. Then click «OK» to go back to the main interface.
Step 4: Press Apply to execute the changes users have made.
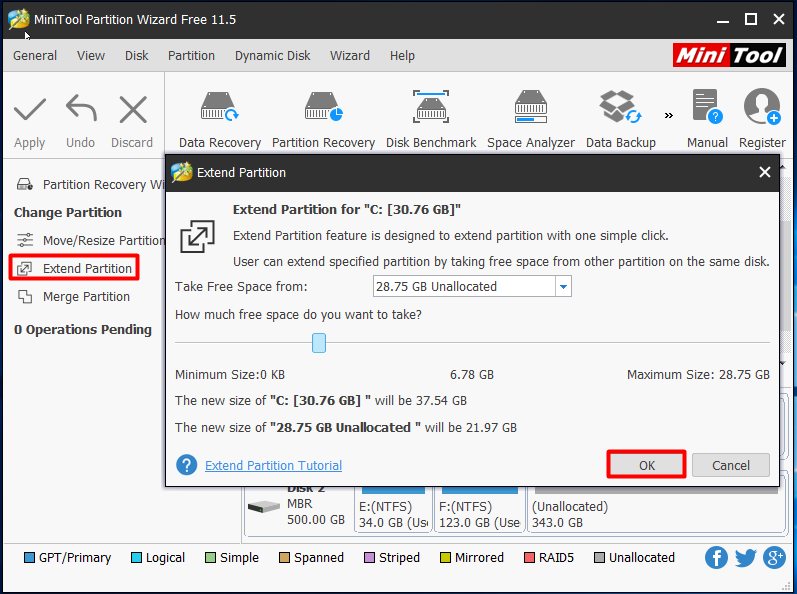
2. Use Extend Partition if there is no unallocated space adjacent (both at left and right side) to the target partition.
Step 1: LaunchMiniTool Partition Wizard free edition, and enter into its main interface.
Step 2: Click on the target partition and choose Extend Partition.
Step 3: In the pop-up window, drop down the partition list and choose which partition or unallocated space to take free space from. Also, it is available to drag the slide bar leftwards or rightwards to decide how much free space users need from that partition. Click OK to continue.
Step 4: Back to the main interface and press Apply on the top left corner.
Way 3: Extend Partition with another Hard Drive
As mentioned in the former part, Disk Management also enables users to extend volume (works for non-system disk) with another hard drive by converting it into dynamic disk. However, dynamic disk brings many restrictions on system installation. Thus, upgrading hard drive should be a more flexible way to solve low disk space warning.
See what does Microsoft say about Basic Disk and Dynamic Disk.
If users have one more hard drive at hand, then there are two more ways to extend partition with MiniTool Partition Wizard free edition.
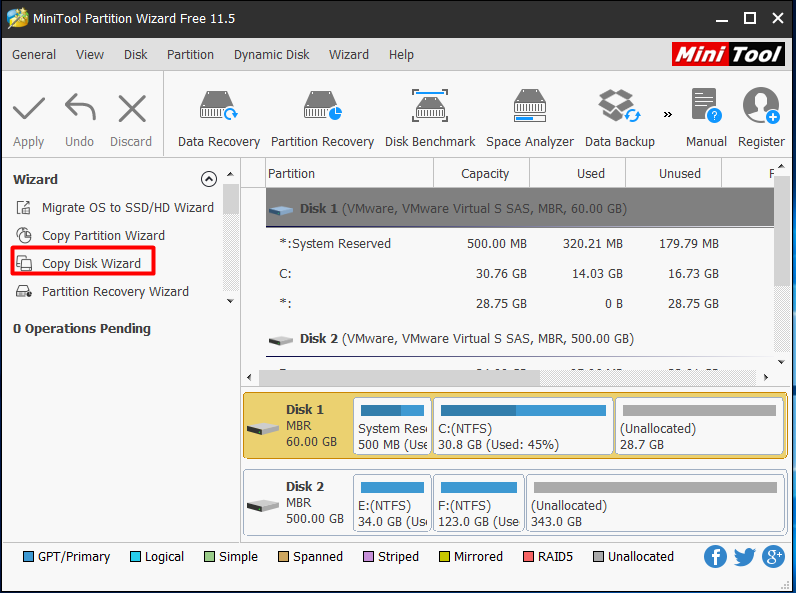
The first one is to Copy Disk to a larger one. This solution is most suitable for users who encounter low disk space on a small hard drive and are going to upgrade the small one to a larger one. In this case, Copy Disk feature of MiniTool Partition Wizard will clone the whole hard drive including the operating system sector-by-sector.
Step 1: Connect the larger drive internally to computer and then launch MiniTool Partition Wizard free edition to the main interface.
Step 2: Select the source disk that is going to be copied and choose Copy Disk.
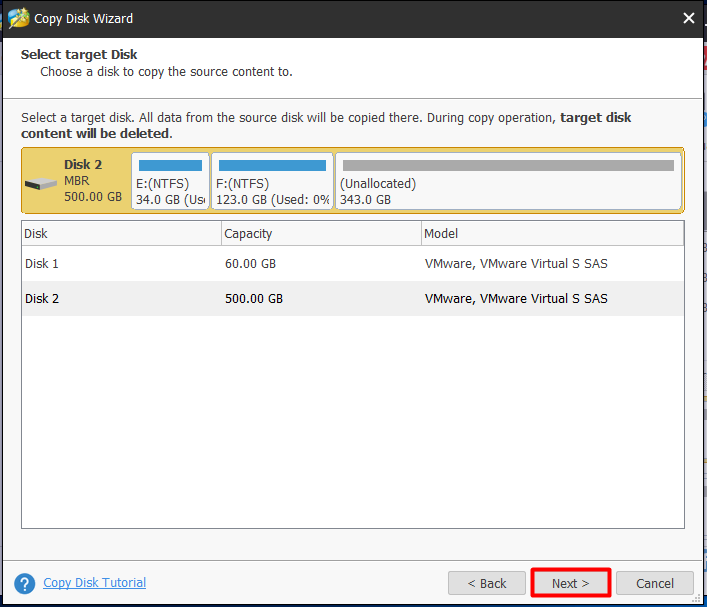
Step 3: Then users will be lead to another window to select a target disk. Please note that the target disk must be able to hold all the data on the source disk and data on the target disk will be erased, so a backup is necessary. Here we click disk 2 to continue.
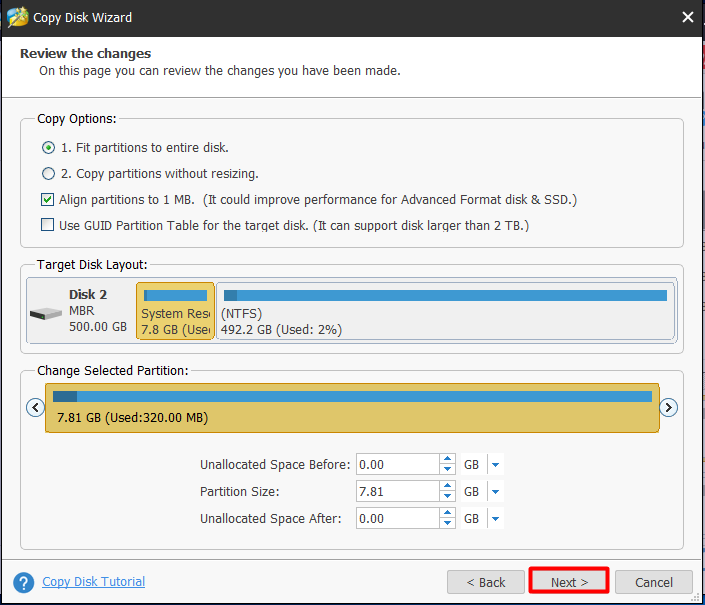
Step 4: On this page there are three options for users. Choose one and click Next to move on.
- «Fit partition to entire disk» allows users to keep the capacity proportion of the partitions on original disk.
- «Copy partition without resize» means to clone an exact same disk with the original one.
- «Align partitions to 1MB» is strongly recommended if the target disk is SSD or has got advanced format.
- «Use GUID Partition Table for the target disk» is very useful if the target disk is larger than 2TB. If users want to make full use of its huge capacity, check this option.
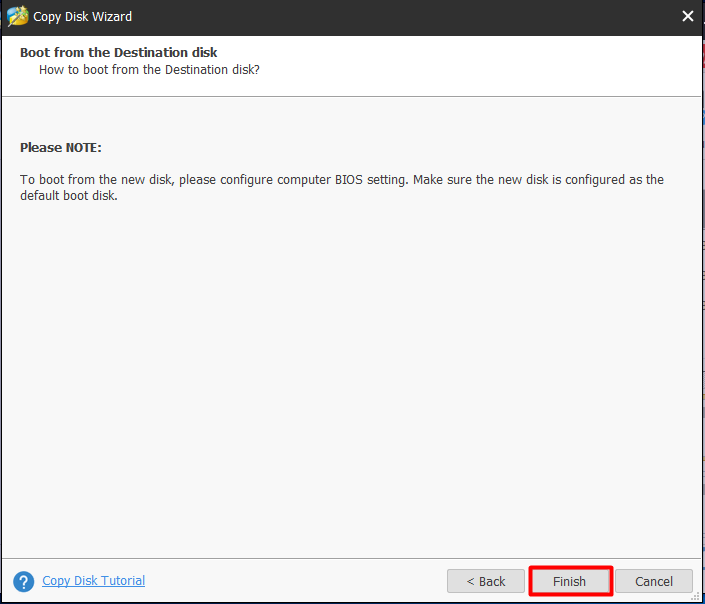
Step 5: In the next page MiniTool Partition Wizard shows users how to boot from the new drive. Please pay attention to this message. Ok now click Finish to go back to the main interface and click Apply to make these changes effective.
The second solution is to Migrate OS to another drive which is useful for system low disk space warning. This solution is suitable for users who only want to enlarge the system partition but there is not enough free space on the rest partitions of the same disk.
Step 1: Connect the second hard drive to computer internally and launch MiniTool Partition Wizard Free Edition. In the main interface choose «Migrate OS to SSD/HD Wizard» from the menu bar.
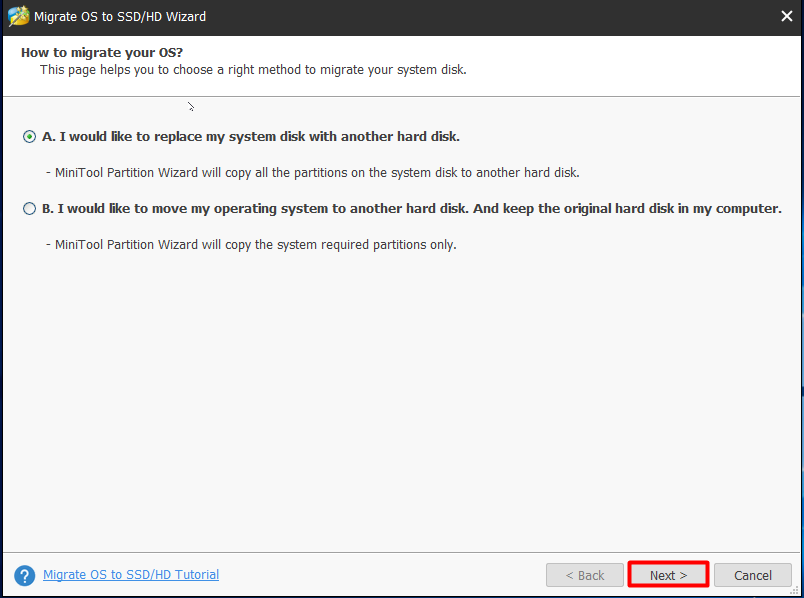
Step 2: Then choose how to migrate the OS. Is that the system required partitions only, or the whole partitions on the drive? Here select the second option and click Next to continue.
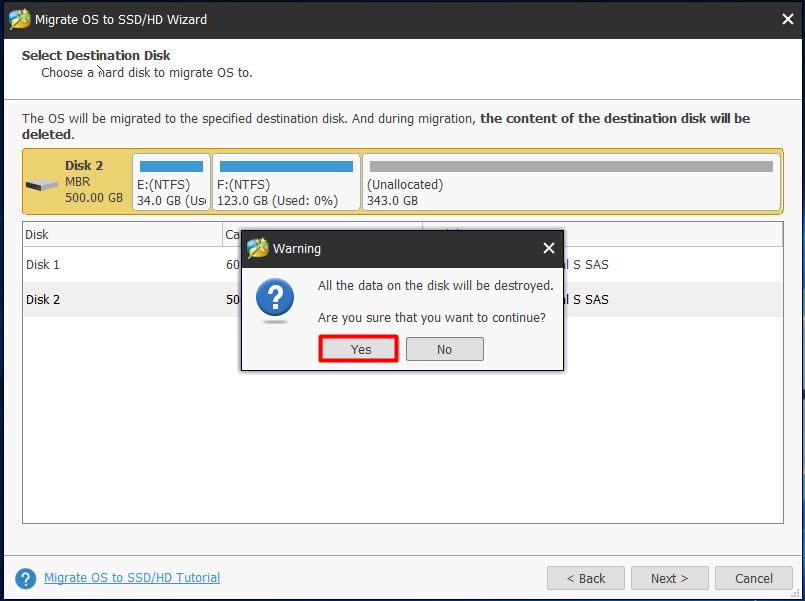
Step 3: In the pop up window select a destination disk and go on. Please pay attention to the warning message that all data on the destination drive will be destroyed so maybe a backup is necessary.
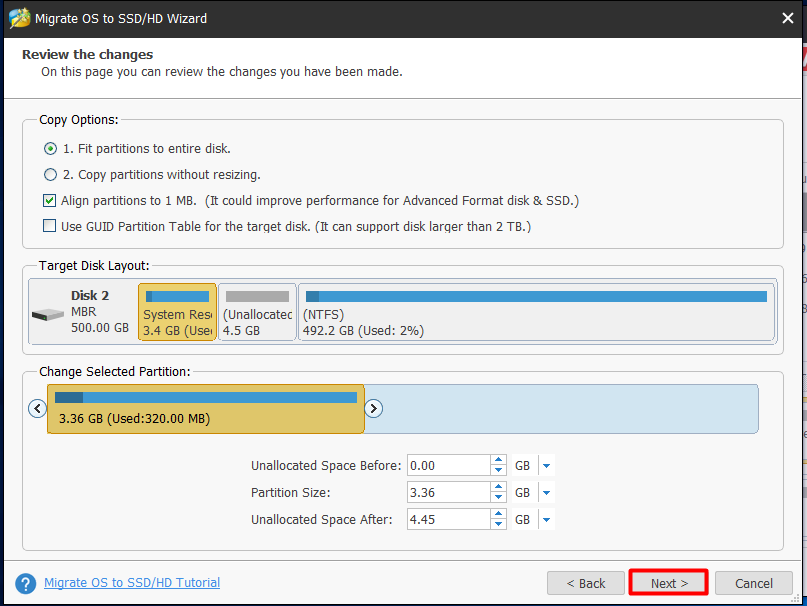
Step 4: Similar with Copy Disk, four options are available for users here. Choose the option you prefer and go ahead.
Step 5: Then Partition Wizard will tell you how to boot from the destination disk. Please make sure the disk is configured as the default boot disk after the migration. Finally press Apply to execute the operations.
MiniTool Partition Wizard is a useful partition tool for Windows low disk space warning right? Press the button to download freeware or buy one for Windows Server.
Bottom Line
In this post we mainly talk about why Windows low disk space warning appears, how to disable low disk space check and how to solve low disk space warning completely. Users can choose any of the three solutions that is most available for them — to do disk cleanup, to extend partition on the same disk, or to upgrade the disk. And, for any questions and suggestions, please leave us comments below. We read every thread.
ABOUT THE AUTHOR

Position: Columnist
Rodin is an enthusiastic IT writer focusing on Windows trends, disk partition management and data recovery. She loves to write and share her idea about the useful tips and tricks on personal computers’ maintenance.
If you are looking for methods to improve your computer performance, manage hard drives and recover data from different devices, Rodin can provide reliable solutions for data management.


