- Get started using Python on Windows for beginners
- Set up your development environment
- Install Python
- Install Visual Studio Code
- Install Git (optional)
- Hello World tutorial for some Python basics
- Hello World tutorial for using Python with VS Code
- Create a simple game with Pygame
- Resources for continued learning
- Online courses for learning Python
- Working with Python in VS Code
- Get started using Python for web development on Windows
- Set up your development environment
- Install Windows Subsystem for Linux
- Set up Visual Studio Code
- Create a new project
- Install Python, pip, and venv
- Create a virtual environment
- Open a WSL — Remote window
- Install the Microsoft Python extension
- Run a simple Python program
- Hello World tutorial for Flask
- Hello World tutorial for Django
Get started using Python on Windows for beginners
The following is a step-by-step guide for beginners interested in learning Python using Windows 10.
Set up your development environment
For beginners who are new to Python, we recommend you install Python from the Microsoft Store. Installing via the Microsoft Store uses the basic Python3 interpreter, but handles set up of your PATH settings for the current user (avoiding the need for admin access), in addition to providing automatic updates. This is especially helpful if you are in an educational environment or a part of an organization that restricts permissions or administrative access on your machine.
If you are using Python on Windows for web development, we recommend a different set up for your development environment. Rather than installing directly on Windows, we recommend installing and using Python via the Windows Subsystem for Linux. For help, see: Get started using Python for web development on Windows. If you’re interested in automating common tasks on your operating system, see our guide: Get started using Python on Windows for scripting and automation. For some advanced scenarios (like needing to access/modify Python’s installed files, make copies of binaries, or use Python DLLs directly), you may want to consider downloading a specific Python release directly from python.org or consider installing an alternative, such as Anaconda, Jython, PyPy, WinPython, IronPython, etc. We only recommend this if you are a more advanced Python programmer with a specific reason for choosing an alternative implementation.
Install Python
To install Python using the Microsoft Store:
Go to your Start menu (lower left Windows icon), type «Microsoft Store», select the link to open the store.
Once the store is open, select Search from the upper-right menu and enter «Python». Open «Python 3.9» from the results under Apps. Select Get.
Once Python has completed the downloading and installation process, open Windows PowerShell using the Start menu (lower left Windows icon). Once PowerShell is open, enter Python —version to confirm that Python3 has installed on your machine.
The Microsoft Store installation of Python includes pip, the standard package manager. Pip allows you to install and manage additional packages that are not part of the Python standard library. To confirm that you also have pip available to install and manage packages, enter pip —version .
Install Visual Studio Code
By using VS Code as your text editor / integrated development environment (IDE), you can take advantage of IntelliSense (a code completion aid), Linting (helps avoid making errors in your code), Debug support (helps you find errors in your code after you run it), Code snippets (templates for small reusable code blocks), and Unit testing (testing your code’s interface with different types of input).
VS Code also contains a built-in terminal that enables you to open a Python command line with Windows Command prompt, PowerShell, or whatever you prefer, establishing a seamless workflow between your code editor and command line.
To install VS Code, download VS Code for Windows: https://code.visualstudio.com.
Once VS Code has been installed, you must also install the Python extension. To install the Python extension, you can select the VS Code Marketplace link or open VS Code and search for Python in the extensions menu (Ctrl+Shift+X).
Python is an interpreted language, and in order to run Python code, you must tell VS Code which interpreter to use. We recommend sticking with Python 3.7 unless you have a specific reason for choosing something different. Once you’ve installed the Python extension, select a Python 3 interpreter by opening the Command Palette (Ctrl+Shift+P), start typing the command Python: Select Interpreter to search, then select the command. You can also use the Select Python Environment option on the bottom Status Bar if available (it may already show a selected interpreter). The command presents a list of available interpreters that VS Code can find automatically, including virtual environments. If you don’t see the desired interpreter, see Configuring Python environments.
To open the terminal in VS Code, select View > Terminal, or alternatively use the shortcut Ctrl+` (using the backtick character). The default terminal is PowerShell.
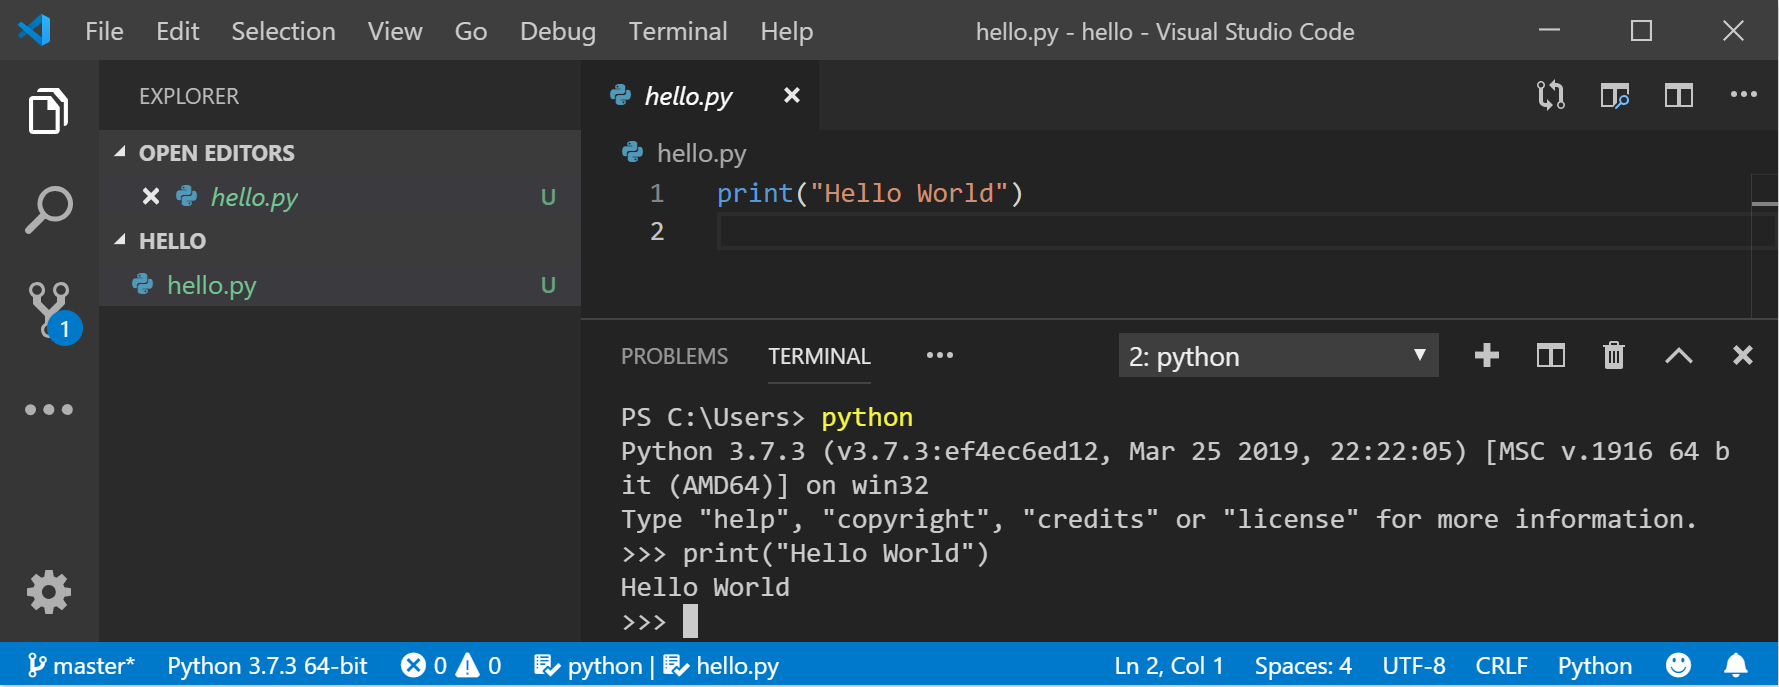
Inside your VS Code terminal, open Python by simply entering the command: python
Try the Python interpreter out by entering: print(«Hello World») . Python will return your statement «Hello World».
Install Git (optional)
If you plan to collaborate with others on your Python code, or host your project on an open-source site (like GitHub), VS Code supports version control with Git. The Source Control tab in VS Code tracks all of your changes and has common Git commands (add, commit, push, pull) built right into the UI. You first need to install Git to power the Source Control panel.
Download and install Git for Windows from the git-scm website.
An Install Wizard is included that will ask you a series of questions about settings for your Git installation. We recommend using all of the default settings, unless you have a specific reason for changing something.
If you’ve never worked with Git before, GitHub Guides can help you get started.
Hello World tutorial for some Python basics
Python, according to its creator Guido van Rossum, is a “high-level programming language, and its core design philosophy is all about code readability and a syntax which allows programmers to express concepts in a few lines of code.”
Python is an interpreted language. In contrast to compiled languages, in which the code you write needs to be translated into machine code in order to be run by your computer’s processor, Python code is passed straight to an interpreter and run directly. You just type in your code and run it. Let’s try it!
With your PowerShell command line open, enter python to run the Python 3 interpreter. (Some instructions prefer to use the command py or python3 , these should also work). You will know that you’re successful because a >>> prompt with three greater-than symbols will display.
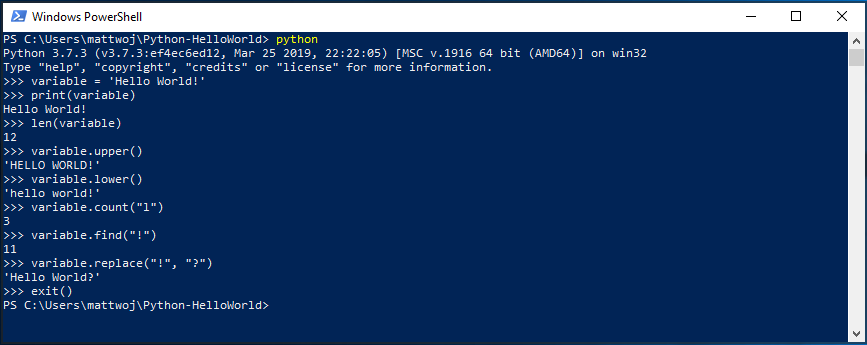
There are several built-in methods that allow you to make modifications to strings in Python. Create a variable, with: variable = ‘Hello World!’ . Press Enter for a new line.
Print your variable with: print(variable) . This will display the text «Hello World!».
Find out the length, how many characters are used, of your string variable with: len(variable) . This will display that there are 12 characters used. (Note that the blank space it counted as a character in the total length.)
Convert your string variable to upper-case letters: variable.upper() . Now convert your string variable to lower-case letters: variable.lower() .
Count how many times the letter «l» is used in your string variable: variable.count(«l») .
Search for a specific character in your string variable, let’s find the exclamation point, with: variable.find(«!») . This will display that the exclamation point is found in the 11th position character of the string.
Replace the exclamation point with a question mark: variable.replace(«!», «?») .
To exit Python, you can enter exit() , quit() , or select Ctrl-Z.
Hope you had fun using some of Python’s built-in string modification methods. Now try creating a Python program file and running it with VS Code.
Hello World tutorial for using Python with VS Code
The VS Code team has put together a great Getting Started with Python tutorial walking through how to create a Hello World program with Python, run the program file, configure and run the debugger, and install packages like matplotlib and numpy to create a graphical plot inside a virtual environment.
Open PowerShell and create an empty folder called «hello», navigate into this folder, and open it in VS Code:
Once VS Code opens, displaying your new hello folder in the left-side Explorer window, open a command line window in the bottom panel of VS Code by pressing Ctrl+` (using the backtick character) or selecting View > Terminal. By starting VS Code in a folder, that folder becomes your «workspace». VS Code stores settings that are specific to that workspace in .vscode/settings.json, which are separate from user settings that are stored globally.
Continue the tutorial in the VS Code docs: Create a Python Hello World source code file.
Create a simple game with Pygame
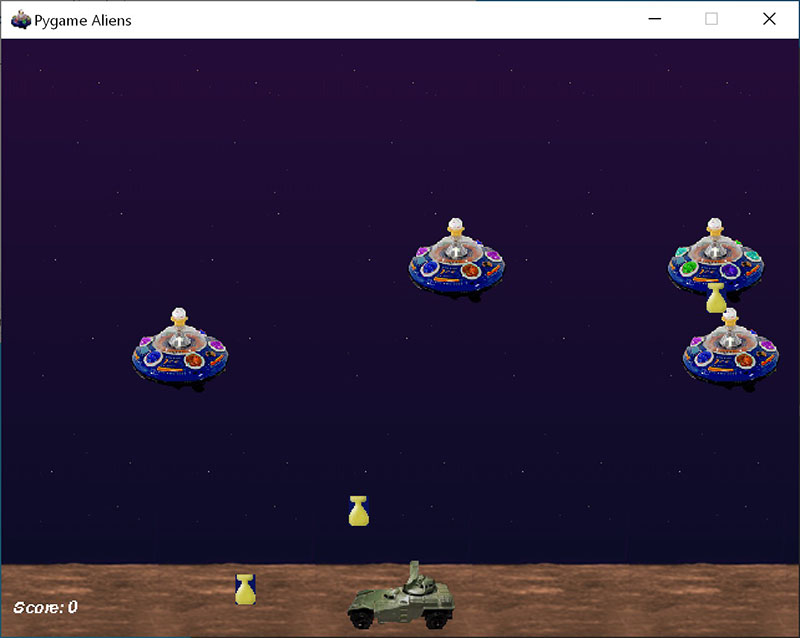
Pygame is a popular Python package for writing games — encouraging students to learn programming while creating something fun. Pygame displays graphics in a new window, and so it will not work under the command-line-only approach of WSL. However, if you installed Python via the Microsoft Store as detailed in this tutorial, it will work fine.
Once you have Python installed, install pygame from the command line (or the terminal from within VS Code) by typing python -m pip install -U pygame —user .
Test the installation by running a sample game : python -m pygame.examples.aliens
All being well, the game will open a window. Close the window when you are done playing.
Here’s how to start writing your own game.
Open PowerShell (or Windows Command Prompt) and create an empty folder called «bounce». Navigate to this folder and create a file named «bounce.py». Open the folder in VS Code:
Using VS Code, enter the following Python code (or copy and paste it):
Save it as: bounce.py .
From the PowerShell terminal, run it by entering: python bounce.py .
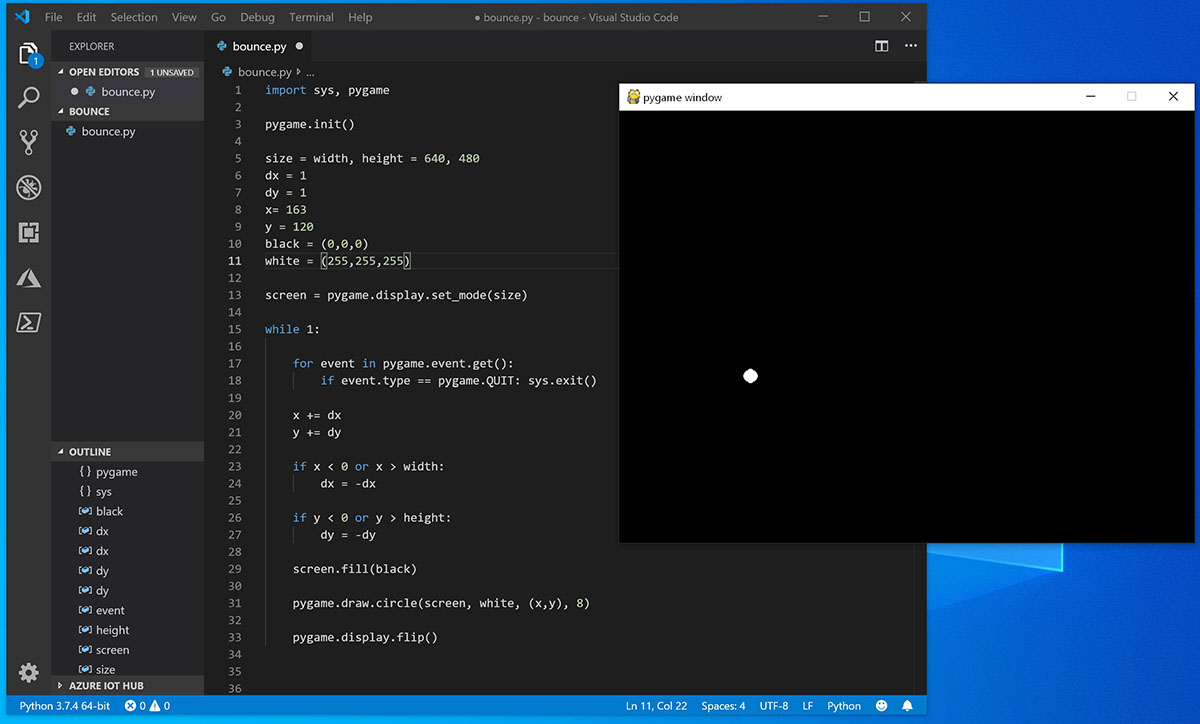
Try adjusting some of the numbers to see what effect they have on your bouncing ball.
Read more about writing games with pygame at pygame.org.
Resources for continued learning
We recommend the following resources to support you in continuing to learn about Python development on Windows.
Online courses for learning Python
Introduction to Python on Microsoft Learn: Try the interactive Microsoft Learn platform and earn experience points for completing this module covering the basics on how to write basic Python code, declare variables, and work with console input and output. The interactive sandbox environment makes this a great place to start for folks who don’t have their Python development environment set up yet.
Python on Pluralsight: 8 Courses, 29 Hours: The Python learning path on Pluralsight offers online courses covering a variety of topics related to Python, including a tool to measure your skill and find your gaps.
LearnPython.org Tutorials: Get started on learning Python without needing to install or set anything up with these free interactive Python tutorials from the folks at DataCamp.
The Python.org Tutorials: Introduces the reader informally to the basic concepts and features of the Python language and system.
Learning Python on Lynda.com: A basic introduction to Python.
Working with Python in VS Code
Editing Python in VS Code: Learn more about how to take advantage of VS Code’s autocomplete and IntelliSense support for Python, including how to customize their behavior. or just turn them off.
Linting Python: Linting is the process of running a program that will analyse code for potential errors. Learn about the different forms of linting support VS Code provides for Python and how to set it up.
Debugging Python: Debugging is the process of identifying and removing errors from a computer program. This article covers how to initialize and configure debugging for Python with VS Code, how to set and validate breakpoints, attach a local script, perform debugging for different app types or on a remote computer, and some basic troubleshooting.
Unit testing Python: Covers some background explaining what unit testing means, an example walkthrough, enabling a test framework, creating and running your tests, debugging tests, and test configuration settings.
Get started using Python for web development on Windows
The following is a step-by-step guide to get you started using Python for web development on Windows, using the Windows Subsystem for Linux (WSL).
Set up your development environment
We recommend installing Python on WSL when building web applications. Many of the tutorials and instructions for Python web development are written for Linux users and use Linux-based packaging and installation tools. Most web apps are also deployed on Linux, so this will ensure you have consistency between your development and production environments.
If you are using Python for something other than web development, we recommend you install Python directly on Windows 10 using the Microsoft Store. WSL does not support GUI desktops or applications (like PyGame, Gnome, KDE, etc). Install and use Python directly on Windows for these cases. If you’re new to Python, see our guide: Get started using Python on Windows for beginners. If you’re interested in automating common tasks on your operating system, see our guide: Get started using Python on Windows for scripting and automation. For some advanced scenarios, you may want to consider downloading a specific Python release directly from python.org or consider installing an alternative, such as Anaconda, Jython, PyPy, WinPython, IronPython, etc. We only recommend this if you are a more advanced Python programmer with a specific reason for choosing an alternative implementation.
Install Windows Subsystem for Linux
WSL lets you run a GNU/Linux command line environment integrated directly with Windows and your favorite tools, like Visual Studio Code, Outlook, etc.
To enable and install WSL (or WSL 2 depending on your needs), follow the steps in the WSL install documentation. These steps will include choosing a Linux distribution (for example, Ubuntu).
Once you have installed WSL and a Linux distribution, open the Linux distribution (it can be found in your Windows start menu) and check the version and codename using the command: lsb_release -dc .
We recommend updating your Linux distribution regularly, including immediately after you install, to ensure you have the most recent packages. Windows doesn’t automatically handle this update. To update your distribution, use the command: sudo apt update && sudo apt upgrade .
Consider installing the new Windows Terminal from the Microsoft Store to enable multiple tabs (quickly switch between multiple Linux command lines, Windows Command Prompt, PowerShell, Azure CLI, etc), create custom key bindings (shortcut keys for opening or closing tabs, copy+paste, etc.), use the search feature, and set up custom themes (color schemes, font styles and sizes, background image/blur/transparency). Learn more.
Set up Visual Studio Code
Take advantage of IntelliSense, Linting, Debug support, Code snippets, and Unit testing by using VS Code. VS Code integrates nicely with the Windows Subsystem for Linux, providing a built-in terminal to establish a seamless workflow between your code editor and your command line, in addition to supporting Git for version control with common Git commands (add, commit, push, pull) built right into the UI.
Download and install VS Code for Windows. VS Code is also available for Linux, but Windows Subsystem for Linux does not support GUI apps, so we need to install it on Windows. Not to worry, you’ll still be able to integrate with your Linux command line and tools using the Remote — WSL Extension.
Install the Remote — WSL Extension on VS Code. This allows you to use WSL as your integrated development environment and will handle compatibility and pathing for you. Learn more.
If you already have VS Code installed, you need to ensure that you have the 1.35 May release or later in order to install the Remote — WSL Extension. We do not recommend using WSL in VS Code without the Remote-WSL extension as you will lose support for auto-complete, debugging, linting, etc. Fun fact: This WSL extension is installed in $HOME/.vscode-server/extensions.
Create a new project
Let’s create a new project directory on our Linux (Ubuntu) file system that we will then work on with Linux apps and tools using VS Code.
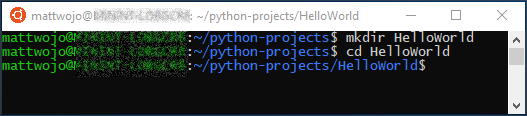
Close VS Code and open Ubuntu 18.04 (your WSL command line) by going to your Start menu (lower left Windows icon) and typing: «Ubuntu 18.04».
In your Ubuntu command line, navigate to where you want to put your project, and create a directory for it: mkdir HelloWorld .
An important thing to remember when using Windows Subsystem for Linux (WSL) is that you are now working between two different file systems: 1) your Windows file system, and 2) your Linux file system (WSL), which is Ubuntu for our example. You will need to pay attention to where you install packages and store files. You can install one version of a tool or package in the Windows file system and a completely different version in the Linux file system. Updating the tool in the Windows file system will have no effect on the tool in the Linux file system, and vice-versa. WSL mounts the fixed drives on your computer under the /mnt/ folder in your Linux distribution. For example, your Windows C: drive is mounted under /mnt/c/ . You can access your Windows files from the Ubuntu terminal and use Linux apps and tools on those files and vice-versa. We recommend working in the Linux file system for Python web development given that much of the web tooling is originally written for Linux and deployed in a Linux production environment. It also avoids mixing file system semantics (like Windows being case-insensitive regarding file names). That said, WSL now supports jumping between the Linux and Windows files systems, so you can host your files on either one. Learn more.
Install Python, pip, and venv
Ubuntu 18.04 LTS comes with Python 3.6 already installed, but it does not come with some of the modules that you may expect to get with other Python installations. We will still need to install pip, the standard package manager for Python, and venv, the standard module used to create and manage lightweight virtual environments.
Confirm that Python3 is already installed by opening your Ubuntu terminal and entering: python3 —version . This should return your Python version number. If you need to update your version of Python, first update your Ubuntu version by entering: sudo apt update && sudo apt upgrade , then update Python using sudo apt upgrade python3 .
Install pip by entering: sudo apt install python3-pip . Pip allows you to install and manage additional packages that are not part of the Python standard library.
Install venv by entering: sudo apt install python3-venv .
Create a virtual environment
Using virtual environments is a recommended best practice for Python development projects. By creating a virtual environment, you can isolate your project tools and avoid versioning conflicts with tools for your other projects. For example, you may be maintaining an an older web project that requires the Django 1.2 web framework, but then an exciting new project comes along using Django 2.2. If you update Django globally, outside of a virtual environment, you could run into some versioning issues later on. In addition to preventing accidental versioning conflicts, virtual environments let you install and manage packages without administrative privileges.
Open your terminal and, inside your HelloWorld project folder, use the following command to create a virtual environment named .venv: python3 -m venv .venv .
To activate the virtual environment, enter: source .venv/bin/activate . If it worked, you should see (.venv) before the command prompt. You now have a self-contained environment ready for writing code and installing packages. When you’re finished with your virtual environment, enter the following command to deactivate it: deactivate .

We recommend creating the virtual environment inside the directory in which you plan to have your project. Since each project should have its own separate directory, each will have its own virtual environment, so there is not a need for unique naming. Our suggestion is to use the name .venv to follow the Python convention. Some tools (like pipenv) also default to this name if you install into your project directory. You don’t want to use .env as that conflicts with environment variable definition files. We generally do not recommend non-dot-leading names, as you don’t need ls constantly reminding you that the directory exists. We also recommend adding .venv to your .gitignore file. (Here is GitHub’s default gitignore template for Python for reference.) For more information about working with virtual environments in VS Code, see Using Python environments in VS Code.
Open a WSL — Remote window
VS Code uses the Remote — WSL Extension (installed previously) to treat your Linux subsystem as a remote server. This allows you to use WSL as your integrated development environment. Learn more.
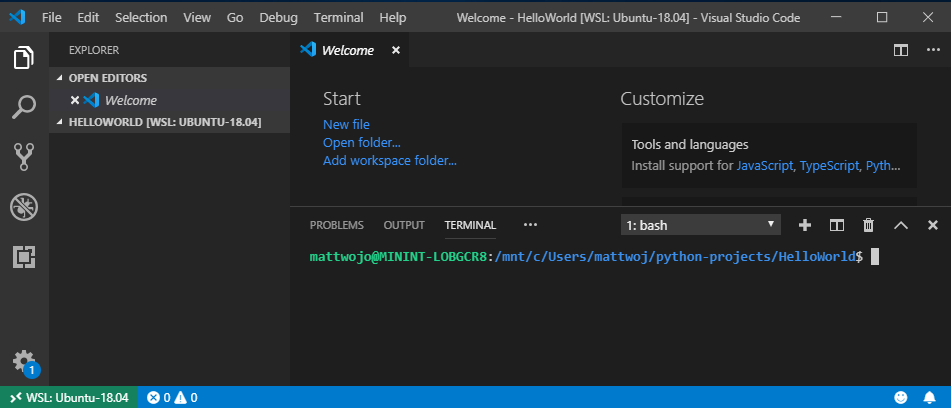
Open your project folder in VS Code from your Ubuntu terminal by entering: code . (the «.» tells VS Code to open the current folder).
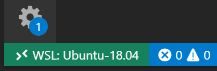
A Security Alert will pop-up from Windows Defender, select «Allow access». Once VS Code opens, you should see the Remote Connection Host indicator, in the bottom-left corner, letting you know that you are editing on WSL: Ubuntu-18.04.
Close your Ubuntu terminal. Moving forward we will use the WSL terminal integrated into VS Code.
Open the WSL terminal in VS Code by pressing Ctrl+` (using the backtick character) or selecting View > Terminal. This will open a bash (WSL) command-line opened to the project folder path that you created in your Ubuntu terminal.
Install the Microsoft Python extension
You will need to install any VS Code extensions for your Remote — WSL. Extensions already installed locally on VS Code will not automatically be available. Learn more.
Open the VS Code Extensions window by entering Ctrl+Shift+X (or use the menu to navigate to View > Extensions).
In the top Search Extensions in Marketplace box, enter: Python.
Find the Python (ms-python.python) by Microsoft extension and select the green Install button.
Once the extension is finished installing, you will need to select the blue Reload Required button. This will reload VS Code and display a WSL: UBUNTU-18.04 — Installed section in your VS Code Extensions window showing that you’ve installed the Python extension.
Run a simple Python program
Python is an interpreted language and supports different types of interpretors (Python2, Anaconda, PyPy, etc). VS Code should default to the interpreter associated with your project. If you have a reason to change it, select the interpreter currently displayed in blue bar on the bottom of your VS Code window or open the Command Palette (Ctrl+Shift+P) and enter the command Python: Select Interpreter. This will display a list of the Python interpreters that you currently have installed. Learn more about configuring Python environments.
Let’s create and run a simple Python program as a test and ensure that we have the correct Python interpreter selected.
Open the VS Code File Explorer window by entering Ctrl+Shift+E (or use the menu to navigate to View > Explorer).
If it’s not already open, open your integrated WSL terminal by entering Ctrl+Shift+` and ensure that your HelloWorld python project folder is selected.
Create a python file by entering: touch test.py . You should see the file you just created appear in your Explorer window under the .venv and .vscode folders already in your project directory.
Select the test.py file that you just created in your Explorer window to open it in VS Code. Because the .py in our file name tells VS Code that this is a Python file, the Python extension you loaded previously will automatically choose and load a Python interpreter that you will see displayed on the bottom of your VS Code window.
Paste this Python code into your test.py file and then save the file (Ctrl+S):
To run the Python «Hello World» program that we just created, select the test.py file in the VS Code Explorer window, then right-click the file to display a menu of options. Select Run Python File in Terminal. Alternatively, in your integrated WSL terminal window, enter: python test.py to run your «Hello World» program. The Python interpreter will print «Hello World» in your terminal window.
Congratulations. You’re all set up to create and run Python programs! Now let’s try creating a Hello World app with two of the most popular Python web frameworks: Flask and Django.
Hello World tutorial for Flask
Flask is a web application framework for Python. In this brief tutorial, you’ll create a small «Hello World» Flask app using VS Code and WSL.
Open Ubuntu 18.04 (your WSL command line) by going to your Start menu (lower left Windows icon) and typing: «Ubuntu 18.04».
Create a directory for your project: mkdir HelloWorld-Flask , then cd HelloWorld-Flask to enter the directory.
Create a virtual environment to install your project tools: python3 -m venv .venv
Open your HelloWorld-Flask project in VS Code by entering the command: code .
Inside VS Code, open your integrated WSL terminal (aka Bash) by entering Ctrl+Shift+` (your HelloWorld-Flask project folder should already be selected). Close your Ubuntu command line as we will be working in the WSL terminal integrated with VS Code moving forward.
Activate the virtual environment that you created in step #3 using your Bash terminal in VS Code: source .venv/bin/activate . If it worked, you should see (.venv) before the command prompt.
Install Flask in the virtual environment by entering: python3 -m pip install flask . Verify that it’s installed by entering: python3 -m flask —version .
Create a new file for your Python code: touch app.py
Open your app.py file in VS Code’s File Explorer ( Ctrl+Shift+E , then select your app.py file). This will activate the Python Extension to choose an interpreter. It should default to Python 3.6.8 64-bit (‘.venv’: venv). Notice that it also detected your virtual environment.

In app.py, add code to import Flask and create an instance of the Flask object:
Also in app.py, add a function that returns content, in this case a simple string. Use Flask’s app.route decorator to map the URL route «/» to that function:
You can use multiple decorators on the same function, one per line, depending on how many different routes you want to map to the same function.
Save the app.py file (Ctrl+S).
In the terminal, run the app by entering the following command:
This runs the Flask development server. The development server looks for app.py by default. When you run Flask, you should see output similar to the following:
Open your default web browser to the rendered page, Ctrl+Click the http://127.0.0.1:5000/ URL in the terminal. You should see the following message in your browser:

Observe that when you visit a URL like «/», a message appears in the debug terminal showing the HTTP request:
Stop the app by using Ctrl+C in the terminal.
If you want to use a different filename than app.py, such as program.py, define an environment variable named FLASK_APP and set its value to your chosen file. Flask’s development server then uses the value of FLASK_APP instead of the default file app.py. For more information, see Flask’s Command Line Interface documentation.
Congratulations, you’ve created a Flask web application using Visual Studio Code and Windows Subsystem for Linux! For a more in-depth tutorial using VS Code and Flask, see Flask Tutorial in Visual Studio Code.
Hello World tutorial for Django
Django is a web application framework for Python. In this brief tutorial, you’ll create a small «Hello World» Django app using VS Code and WSL.
Open Ubuntu 18.04 (your WSL command line) by going to your Start menu (lower left Windows icon) and typing: «Ubuntu 18.04».
Create a directory for your project: mkdir HelloWorld-Django , then cd HelloWorld-Django to enter the directory.
Create a virtual environment to install your project tools: python3 -m venv .venv
Open your HelloWorld-DJango project in VS Code by entering the command: code .
Inside VS Code, open your integrated WSL terminal (aka Bash) by entering Ctrl+Shift+` (your HelloWorld-Django project folder should already be selected). Close your Ubuntu command line as we will be working in the WSL terminal integrated with VS Code moving forward.
Activate the virtual environment that you created in step #3 using your Bash terminal in VS Code: source .venv/bin/activate . If it worked, you should see (.venv) before the command prompt.
Install Django in the virtual environment with the command: python3 -m pip install django . Verify that it’s installed by entering: python3 -m django —version .
Next, run the following command to create the Django project:
The startproject command assumes (by use of . at the end) that the current folder is your project folder, and creates the following within it:
manage.py : The Django command-line administrative utility for the project. You run administrative commands for the project using python manage.py [options] .
A subfolder named web_project , which contains the following files:
- __init__.py : an empty file that tells Python that this folder is a Python package.
- wsgi.py : an entry point for WSGI-compatible web servers to serve your project. You typically leave this file as-is as it provides the hooks for production web servers.
- settings.py : contains settings for Django project, which you modify in the course of developing a web app.
- urls.py : contains a table of contents for the Django project, which you also modify in the course of development.
To verify the Django project, start Django’s development server using the command python3 manage.py runserver . The server runs on the default port 8000, and you should see output like the following output in the terminal window:
When you run the server the first time, it creates a default SQLite database in the file db.sqlite3 , which is intended for development purposes, but can be used in production for low-volume web apps. Also, Django’s built-in web server is intended only for local development purposes. When you deploy to a web host, however, Django uses the host’s web server instead. The wsgi.py module in the Django project takes care of hooking into the production servers.
If you want to use a different port than the default 8000, specify the port number on the command line, such as python3 manage.py runserver 5000 .
Ctrl+click the http://127.0.0.1:8000/ URL in the terminal output window to open your default browser to that address. If Django is installed correctly and the project is valid, you’ll see a default page. The VS Code terminal output window also shows the server log.
When you’re done, close the browser window and stop the server in VS Code using Ctrl+C as indicated in the terminal output window.
Now, to create a Django app, run the administrative utility’s startapp command in your project folder (where manage.py resides):
The command creates a folder called hello that contains a number of code files and one subfolder. Of these, you frequently work with views.py (that contains the functions that define pages in your web app) and models.py (that contains classes defining your data objects). The migrations folder is used by Django’s administrative utility to manage database versions as discussed later in this tutorial. There are also the files apps.py (app configuration), admin.py (for creating an administrative interface), and tests.py (for tests), which are not covered here.
Modify hello/views.py to match the following code, which creates a single view for the app’s home page:
Create a file, hello/urls.py , with the contents below. The urls.py file is where you specify patterns to route different URLs to their appropriate views. The code below contains one route to map root URL of the app ( «» ) to the views.home function that you just added to hello/views.py :
The web_project folder also contains a urls.py file, which is where URL routing is actually handled. Open web_project/urls.py and modify it to match the following code (you can retain the instructive comments if you like). This code pulls in the app’s hello/urls.py using django.urls.include , which keeps the app’s routes contained within the app. This separation is helpful when a project contains multiple apps.
Save all modified files.
In the VS Code Terminal, run the development server with python3 manage.py runserver and open a browser to http://127.0.0.1:8000/ to see a page that renders «Hello, Django».
Congratulations, you’ve created a Django web application using VS Code and Windows Subsystem for Linux! For a more in-depth tutorial using VS Code and Django, see Django Tutorial in Visual Studio Code.


