- How to prevent Windows startup programs from loading
- Windows 8 and 10
- Windows XP, Vista, and 7
- Windows Startup
- Windows registry
- Windows Services
- How To Disable Startup Programs In Windows 7 and Vista
- “What is the MSConfig Utility?”
- How To Disable Startup Applications In Windows
- Step 1
- Step 2
- Step 3
- How to disable startup programs with CCleaner
- How to Add Programs to Startup in Windows 10
- Launch your favorite apps every time you boot up
- What to Know
- How to Add Programs to Startup in Windows 10
- What Is the Windows Startup Folder?
- Drawbacks to Adding Programs to the Startup Folder in Windows 10
- What to Do If You Have Too Many Windows 10 Startup Programs
- Easily Add Programs to Windows 7 Startup Folders
- The Startup Folder for the Current User
- The Startup Folder for All Users
How to prevent Windows startup programs from loading

There are different ways a program can automatically load when Windows first starts. Below is a full list of where to find startup programs and how they can be disabled.
Windows 8 and 10
Users of Windows 8 and 10 can disable startup programs via the Windows Task Manager.
- Press the Ctrl + Alt + Del keys at the same time.
- Click Task Manager.
- In the Task Manager window, click the Startup tab.
- Right-click any startup program you want to disable and click Disable.
Windows XP, Vista, and 7
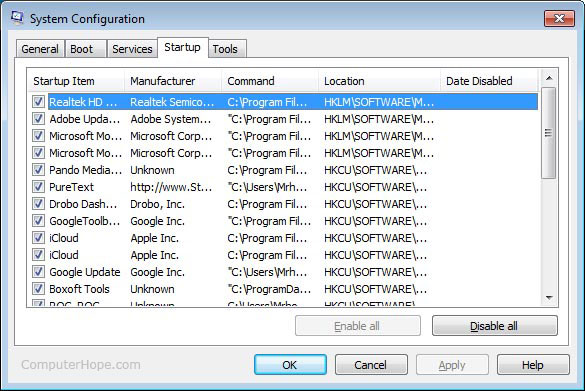
Most Windows users can use the msconfig utility to disable startup programs by following the steps below.
- Click Start, and then Run.
- Type msconfig into the text box, and then press the Enter .
- In the System Configuration window that appears (shown below), click the Startuptab.
- Uncheck each of the programs you don’t want to load upon startup.
Windows Startup
Another location startup programs are placed is the Windows Startup folder. To view this folder, follow the steps below.
- Click Start, Programs, Startup, then locate the program you want to remove. You can then right-click the program and select delete from the drop-down menu that appears. This action prevents the program from loading automatically upon startup.
- If you see the program you want to remove, but have Windows 95, click Start, Settings, and then Taskbar & Startup Menu. Click the Start menu programs tab, click the Advanced button, click the Programs folder, and then click the Startup folder. Highlight the program you do not want to startup automatically and press Del on your keyboard.
Windows registry
The Windows registry is another common location to locate programs loading up automatically. If you are unfamiliar with the registry and its potential dangers, see the registry help page. Once you have familiarized yourself with the registry, follow the steps below.
- Click Start, Run, type Regedit, and then press Enter .
- Click HKEY_LOCAL_MACHINE.
- Click Software.
- Click Microsoft.
- Click Windows.
- Click Current Version.
- Click Run.
- In the Run folder, locate the program(s) you don’t want to boot upon startup.
- Once located, highlight the file and press Del .
- Exit out of the registry and reboot the computer.
Windows Services
Microsoft Windows can also automatically load a program through Windows services. Follow the steps below to check the services currently setup on your computer.
User must have administrative rights to perform the steps below.
How To Disable Startup Programs In Windows 7 and Vista


 Over time as you install more and more software you may start to notice that it takes longer and longer for your computer to startup. More likely than not, this is probably because many applications these days hook into your Windows Startup process and automatically load up each time you start your computer. For some applications, that’s a good thing (Anti-Virus, Firewall, etc.) and I’m OK with that. However, for the majority of apps out there, it’s just a resource suck which is doing nothing more than taking up memory, CPU, and extending my startup times.
By using the Microsoft Configuration tool (msconfig.exe), we can quickly and easily audit what’s running at startup and disable the things we would prefer just to start manually after boot.
Editor’s Note: See Disabling Startup Programs for Windows 10 and Windows 8.1. Those articles contain more detailed information for the latest Microsoft operating systems.
“What is the MSConfig Utility?”
MsConfig.exe has been around for a while. It’s a Microsoft-built utility so you can trust it as well. Essentially it’s used to reconfigure your startup items within all Windows 7, Vista, or XP as well as several other things, so you need to be careful (I thought of the Spiderman reference here “With great power comes great responsibility”) as you play around with it. If you stick to the Step-by-Step How-To below, you should be okay.
How To Disable Startup Applications In Windows
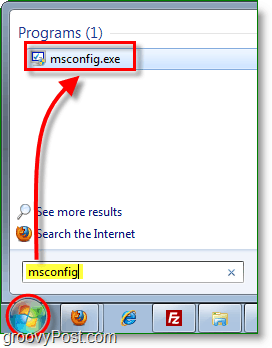
Step 1
Click the Start Menu Orb then in the search box Type MSConfig and Press Enter or Click the msconfig.exe program link.
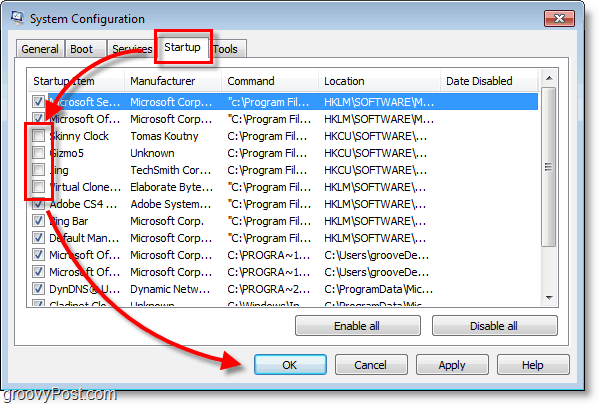
Step 2
From within the System Configuration tool, Click Startup tab and then Uncheck the program boxes that you would like to prevent from starting when Windows starts. Click OK to save changes when finished.
Step 3
Now that you’ve saved changes Restart Windows and the selected programs should no longer automatically start up.

How to disable startup programs with CCleaner
CCleaner is another free app for Windows or Mac you can use to disable startup programs.
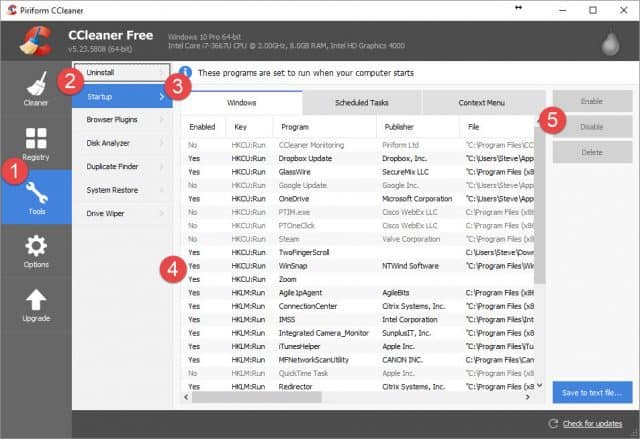
Take a look at our full tutorial which outlines how to disable apps using CCleaner.
How to Add Programs to Startup in Windows 10
Launch your favorite apps every time you boot up
:max_bytes(150000):strip_icc()/JeremyLaukkonen-1bb154ef56254c2896eae37b5f535144.jpg)
What to Know
- Open the Run dialog box, enter shell:startup, then right-click inside the Startup folder and select New >Shortcut to add a program.
- If you can’t find the app, enter shell:appsfolder in the Run dialog box, then drag apps from that folder into the Startup folder.
- Some apps offer a ‘run at startup’ option, which is an easier way to add a program to startup in Windows 10.
This article explains how to add a program to startup in Windows 10. Applications that are designated as startup programs are launched as Windows 10 boots.
How to Add Programs to Startup in Windows 10
You can enable or disable apps from running on startup in the App Startup Control Panel and the taskbar, but the only place you can add new startup programs is through the startup folder.
Some modern apps have a ‘run at startup’ capability built into their options. If your app has that option, then turning it on is a lot easier than the following method, which is designed to work with all programs.
Press the Windows key + R to open the run dialog box.
:max_bytes(150000):strip_icc()/1-97df062fcf8c4cd890559771065d3ce8.PNG)
Type shell:startup in the run dialog box and press Enter on your keyboard.
:max_bytes(150000):strip_icc()/001-how-to-add-programs-to-startup-in-windows-10-2ae393c398b14b1aa8d2c117b8b47820.jpg)
Right click in the startup folder and click New.
:max_bytes(150000):strip_icc()/002-how-to-add-programs-to-startup-in-windows-10-4520ceeb6e4843a3bd0ffb781051f272.jpg)
Click Shortcut.
:max_bytes(150000):strip_icc()/003-how-to-add-programs-to-startup-in-windows-10-a52d09846e79401fbf0c9d8d27ced13e.jpg)
Type the location of the program if you know it, or click Browse to locate the program on your computer.
:max_bytes(150000):strip_icc()/004-how-to-add-programs-to-startup-in-windows-10-2640d8ace05e40ca93f5317b0138bc4a.jpg)
If you can’t find your app, try opening the run dialog box back up and typing shell:appsfolder. You can drag any app from that folder into the startup folder to instantly create a shortcut.
Click Next.
:max_bytes(150000):strip_icc()/005-how-to-add-programs-to-startup-in-windows-10-ab1ec77de0d743a18997f27d6b493a97.jpg)
Type a name for the shortcut, and click Finish.
:max_bytes(150000):strip_icc()/006-how-to-add-programs-to-startup-in-windows-10-079ec1dd9b1c4ab8b4c8932fc13e0f11.jpg)
Create additional links for any other programs you want to run automatically when Windows starts.
Restart your computer, and the new programs will launch automatically.
What Is the Windows Startup Folder?
The Windows startup folder is a folder that Windows looks in for programs to run every time it starts. This was the only way to manage startup programs in older versions of Windows. Adding a program shortcut causes that program to launch when Windows starts, and removing a program shortcut stops it from launching when Windows starts.
While Windows 10 has moved to the newer app startup control panel as the primary way to manage which apps, the startup folder remains the best way for users to add their own startup programs.
Drawbacks to Adding Programs to the Startup Folder in Windows 10
The benefits of adding programs you use every day to the Windows 10 startup folder are obvious. Instead of waiting for Windows to start up and then manually clicking on everything you launch every day, all you have to do is turn your computer on and wait for everything to load.
The issue is that it takes time for programs to load along with Windows, and every program you load takes up resources like memory and processor power. Load too many unnecessary programs, and you’ll find that Windows 10 starts slow and may even remain sluggish after loading everything.
If you change your mind about programs you’ve added to the startup folder, you can simply delete the shortcuts to prevent those programs from launching whenever you turn on your computer. You can also change startup programs in Windows 10 using the task manager or the startup app control panel.
What to Do If You Have Too Many Windows 10 Startup Programs
If you have some essential programs that you use for work every day, or you mainly use your computer to play a specific game, try adding the programs that are important to you and then removing programs you don’t ever use.
Your computer probably came with bloatware you never actually use, and applications are often set to run when Windows starts up even if you don’t want them to. Disable those startup programs, add the ones you want, and you’ll enjoy both convenience and faster startup times.
Easily Add Programs to Windows 7 Startup Folders
Load up programs you use most
Starting with Windows 95, Microsoft made adding programs to the startup folder as easy as navigating to the folder in Windows Explorer and dragging shortcuts or programs directly into it.
The startup folder, conveniently shown on the Start Menu, made it easy to see which programs would launch when Windows booted up. However, in Windows 7, the startup folder is a hidden system folder that is not located in the same place as the startup folders in Windows XP.
This article shows you an easy way to add programs to the Windows 7 startup folder for both the current user and all users of the computer.
Suppose that you have Microsoft Word pinned to your Start Menu and you want Word to open up each time Windows 7 loads. The easiest way to do this is to add a shortcut to Word into the startup folder.
However, you can add Word to the startup folder for just the current user or for anyone who uses your computer. Below are instructions for both using Word as an example.
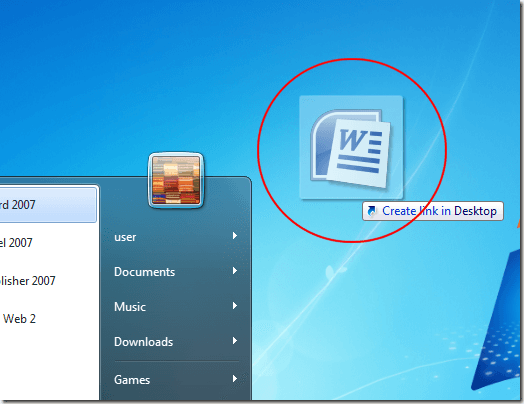
Whether you are adding Word to the startup folder for the current user or for all users, it is best to begin by putting a shortcut to Word on the desktop. Before you begin, make sure you are using an account with administrative privileges in Windows 7.
To create a shortcut on the desktop, right-click drag the program icon from the Start Menu onto the desktop and select Create Shortcut Here from the menu that pops up when you let go of the right mouse button.
The Startup Folder for the Current User
Now you simply need to add the new shortcut you just placed on the desktop into the current user’s startup folder. However, remember that in Windows 7, the startup folder is a hidden system folder. Rather than unhide the folder and fumble around the Windows folder structure to find it, Microsoft made it simple to locate the startup folder.
To locate the current user’s startup folder, click on Start>All Programs and then right click on the Startup folder. Then, choose open from the menu.

This will instantly open Windows Explorer directly to the current user’s startup folder. Notice that the startup folder for the current user resides at:
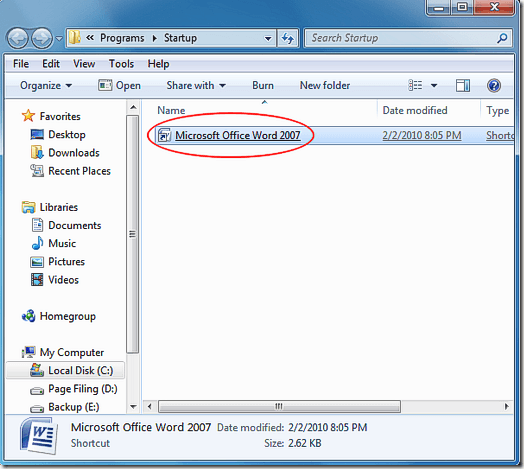
Simply drop the new shortcut from the desktop into this folder and restart your computer. Word should now load at Windows boot up.
The Startup Folder for All Users
If you want Word to load for everyone when Windows boots up, you need to follow a similar set of instructions with one minor change. Begin by clicking on Start>All Programs and right-click on the Startup folder just as before. However, this time instead of choosing Open, choose Open all users.
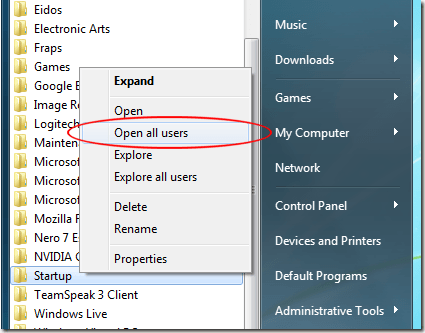
Windows Explorer once again opens, but this time the location is:
You can now simply drag the new Word shortcut into this folder and Word will load on boot up for all users of your computer.
Unlike Windows XP, Windows 7 makes the startup folder for all users of the computer a hidden system folder. Rather than go through the trouble of locating and un-hiding the startup folder, use the tricks in this article to add any program to the startup menu for the current user or all users of a Windows 7 computer. Enjoy!
Founder of Help Desk Geek and managing editor. He began blogging in 2007 and quit his job in 2010 to blog full-time. He has over 15 years of industry experience in IT and holds several technical certifications. Read Aseem’s Full Bio


