- Windows 10: PC Won’t Go to Sleep Mode
- Fix 1 – Power Options
- Fix 2 – Sensitive Mouse
- Fix 3 – Network Adapters
- You Might Also Like
- How to Put Programs to Sleep on Windows 10
- How To Enable Or Disable Sleep Mode In Windows 10
- What’s the sleep mode in Windows 10?
- Enable or disable sleep mode
- Another way to make your Windows 10 PC never sleep
- Windows 10 doesn’t go to sleep
- Replies (11)
- How can I put the computer to sleep from Command Prompt/Run menu?
- 12 Answers 12
Windows 10: PC Won’t Go to Sleep Mode
By Mitch Bartlett 73 Comments
Having problems where Microsoft Windows 10 won’t go into sleep mode? This tutorial will help you figure out the problem.
Fix 1 – Power Options
- Select the “Start” button, then select “Settings” (gear icon).
- Select “System“.
- Select “Power & sleep“.
- Ensure the “Sleep” setting is set to a desired value.
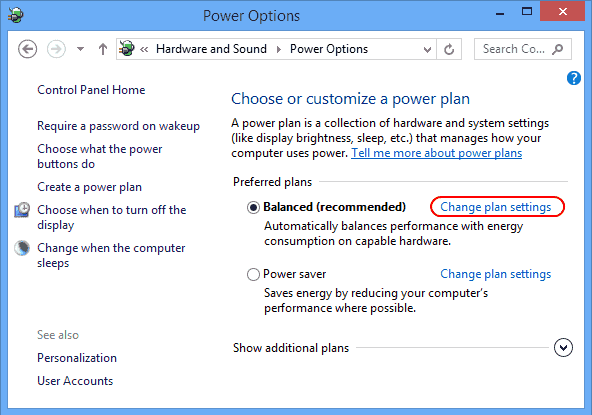
- Select “Additional power settings” in the right pane.
- Select “Change Plan Settings” next to the option that you have selected.

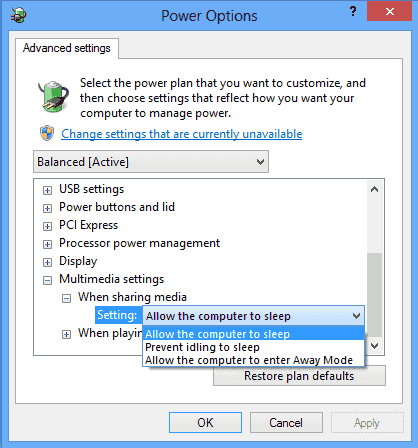
- Select “Change advanced power settings“.
- On the “Power Options” screen, you want to expand each setting and ensure that they allow the computer to go to sleep mode. In my case, the setting under “Multimedia settings” > “When sharing media” was set to “Prevent idling to sleep“. I had to set this to “Allow the computer to sleep“. If you’re feeling lazy, just hit the “Restore plan defaults” button and that should toggle all items to where sleeping is allowed in Windows 10.

Fix 2 – Sensitive Mouse
If you have a sensitive mouse, any vibration near your PC could be keeping your machine awake. Try these steps to prevent the mouse from waking your machine.
- Select the “Start” button, then type “device“.
- Open “Device Manager“.
- Expand the “Mice and other pointing devices” section.
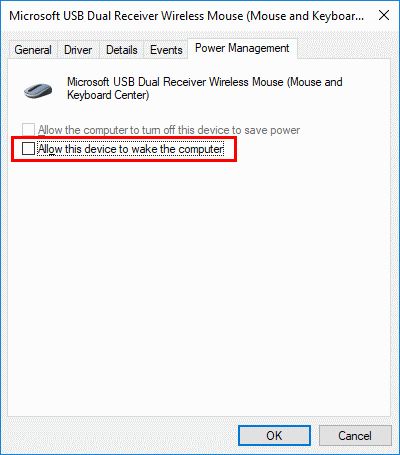
- Right-click on the mouse you are using, then choose “Properties“.
- Select the “Power Management” tab.
- Uncheck the “Allow this device to wake the computer” box, then select “OK“.
Fix 3 – Network Adapters
These steps are the same as Fix 2, only you’re checking under “Network adapters”.
- Select the “Start” button, then type “device“.
- Open “Device Manager“.
- Expand the “Network adapters” section.
- Check under each of the options by right-clicking and selecting “Properties“.
- Uncheck the “Allow this device to wake the computer” box, then select “OK” for each network card.
If you still have problems with your Windows 10 computer sleeping, there may be a program that is constantly running on your PC that keeps it awake, or even worse, a virus. Use my Bible For Making Your Windows Computer Run Faster to gain control over what’s running on your PC.
You Might Also Like
Filed Under: Windows Tagged With: Windows 10
How to Put Programs to Sleep on Windows 10

This Itechguide teaches you how to put programs to sleep on Windows 10. The guide covers 5 steps to put programs to sleep on Windows 10.
- Right-click the Windows 10 Start menu and click Settings.

- Then, on the Windows Settings screen, click the Privacy category.

- On the left pane of the Privacy settings screen, scroll down and click Background apps.

- Finally, on the Background apps settings screen, if you want to put all programs to sleep on Windows 10 (stop them running on the background), toggle the Let apps run in thebackground switch from On to Off. All the apps will be turned off – see the second image below.


- However, to put a specific app to sleep, leave the Let apps run in thebackground switch On. Then, toggle the switch beside the app you want to put to sleep from On to Off.

You can use the 5 steps covered in this Itechguide to put programs to sleep on Windows 10! I hope you found this Itechguide helpful. If you found it helpful, kindly vote Yes to the “Was this post Helpful” question below.
Alternatively, you could ask a question, leave a comment or provide feedback with the “Leave a Reply” form found towards the end of this page.
Finally, for more Windows 10 Itechguides, visit our WINDOWS 10 HOW-TO page. You may also find our Work from Home page very helpful.
How To Enable Or Disable Sleep Mode In Windows 10
Last Updated on March 26, 2021 by admin 23 Comments
The sleep mode or sleep state is a low-power state available in the Windows operating system, including Windows 10. This low-power sleep mode comes in handy, especially for notebook and tablet users to extend the battery life.
What’s the sleep mode in Windows 10?
Unlike Hibernation, when a device is put into sleep mode or state, it will draw a very small amount of power, but you will be able to resume your work very quickly (almost instantly) by pressing any key on the keyboard, moving the mouse/touchpad, or pressing the power button.
Since the sleep state draws a small amount of power, on a battery-powered device, if the battery level falls below the critical level, Windows automatically puts the device into hibernation mode (if enabled) to prevent any data loss.
With default settings, your PC might go to the sleep mode after 15 (when on battery) or 30 (when plugged in) minutes of inactivity. This also means that, at times, your Windows 10 PC might go to sleep mode when a program is running in the background, resulting in loss of data.
For instance, your Windows 10 PC might go to sleep mode when a file is being downloaded via a web browser, forcing you to start the download all over again if the server from where you are downloading the file doesn’t offer resume support.
If you find that the sleep mode is not so useful, you can either configure your PC to enter the sleep mode after a long period of user inactivity or make your Windows 10 PC never sleep.
Follow the given below instructions to enable or disable sleep mode in Windows 10.
Method 1
Enable or disable sleep mode
Step 1: Open the Settings app. To do so, click on the Settings app icon on the Start menu or simultaneously press Windows and I keys.
Step 2: Click the first option titled System.

Step 3: On the resulting page, click Power & Sleep. Now, under the Sleep section, you will see two options:
# On battery power, PC goes to sleep after
# When plugged in, PC goes to sleep after

For both options, expand the drop-down menu and select Never. That’s it! Your PC will never go to sleep mode again. Here, as you can see in the above picture, you can configure how long should Windows 10 wait before putting the computer to sleep mode.
Note that changes made to the sleep mode will apply to the current power plan only. To make changes to other power plans, switch to the different power plans by right-clicking the battery icon in the system tray, clicking Power Options, and then selecting a power plan from the list.
Once a different power plan is selected, repeat above mentioned steps to configure or disable sleep mode for that plan.
Method 2
Another way to make your Windows 10 PC never sleep
Step 1: Type Power Options in the Start menu or taskbar search box and then press Enter to open the classic Power Options window. Alternatively, open the Control Panel, change the View by to Small icons, and then click Power Options.

Step 2: On the left pane, click Change when the computer sleeps link to open Edit plan settings window.

Step 3: Here, in the drop-down menus next to Put the computer to sleep, select Never for On battery and Plugged in. Click the Save changes button. That’s it!

Note that, instead of selecting Never, selecting any other number will enable the sleep mode in Windows 10.
IMPORTANT: You need to repeat the steps mentioned above for all power plans. That is, if you have disabled sleep mode for Power Saver plan, you will need to do the same for Balanced and other plans (if you have created) to avoid Windows 10 putting your PC into the sleep mode while on these power plans.
Windows 10 doesn’t go to sleep
My computer won’t automatically go to sleep, after a recent update. When I manually put it to sleep, it awakens less than 10 seconds later. When it wakes, I can’t click on anything, but I can move the mouse. I have to press CTRL + ALT + DELETE in order to regain control of the computer. I undid the last update, and the problem remains. How do I fix this?
Replies (11)
* Please try a lower page number.
* Please enter only numbers.
* Please try a lower page number.
* Please enter only numbers.
There can be several causes but to start with, you can try following. Please try these options one by one and check after each option.
1. Troubleshoot Power
Type troubleshoot in Cortana Search > Click Troubleshoot > Scroll down > Click Power > Run the troubleshooter > Follow on-screen direction.
2. Restore Default for Power Settings
Windows Key+I > System > Power & sleep > Click Additional power settings to open Power options > Click Change Plan Settings > Click Restore default settings for this plan
3. Disable Fast Startup
Reach to Power options as in previous step > Click Choose what the power buttons do > Click Change settings that are currently unavailable > Scroll down to Shutdown settings and uncheck Turn on fast startup > Click Save changes
4. Uninstall / Install Battery Driver (Only for laptops)
Shut down your computer > Detach power chord > Remove battery > Attach power chord > Reboot your computer
Windows Key+X > Device Manager > Expand Batteries > Right-click Microsoft ACPI-Compliant System > Uninstall > Shutdown the computer > Remove the power chord > Attach your battery > Attach your power chord > Reboot the computer to automatically install the driver
Best regards
Vijay A. Verma @ http://www.eforexcel.com/
Timezone: UTC+05:30, PST+12:30
Availability Hours (UTC) : 05:00 AM — 05:00 PM
How can I put the computer to sleep from Command Prompt/Run menu?
I know that almost everything on Windows, like opening any sort of application, can be done from the command prompt or from the Run menu.
How can I put my computer to sleep or shut it down? What is the command for that?
12 Answers 12
You will find shutdown.exe to be your friend.
Other handy commands see this post:
Hibernate Computer — see answers by Scott Chamberlain and Eric L.
It seems that sleeping a computer is problematic if hibernate is turned on.
Copying from other answers:
You can either try PsShutdown or:
The command rundll32.exe powrprof.dll,SetSuspendState 0,1,0 for sleep is correct — however, it will hibernate instead of sleep if you don’t turn the hibernation off.
Here’s how to do that:
Go to the Start Menu and open an elevated Command Prompt by typing cmd.exe, right clicking and choosing Run as administrator. Type the following command:
The methods posted by other people do not work correctly if a computer has hibernation enabled, the computer will not wake on Keyboard or, more importantly, not wake on scheduled task.
One of Microsoft’s Sysinternals tool is PsShutdown using the command psshutdown -d -t 0 it will correctly sleep, not hibernate, a computer
The command rundll32.exe powrprof.dll,SetSuspendState 0,1,0 for sleep is correct — however, it will hibernate instead of sleep if you don’t turn the hibernation off.
Here’s how to do that:
Go to the Start Menu and open an elevated Command Prompt by typing cmd.exe , right clicking and choosing Run as administrator. Type the following command:

NirCmd workes on Windows 8 (I assume it also works with Windows 7) → http://www.nirsoft.net/utils/nircmd.html
The command is standby , but it puts the computer to sleep.
If you have hybrid sleep enabled, it will work; i.e., it puts the computer to sleep and copies the memory to disk in case of power loss.
See the free utility of Wizmo, which can do very many things.
The command you’re looking for is probably:

You can initiate the suspend or hibernate options from the command line as specified below and referenced in this article.
If your computer is set to allow hibernation then the above command will initiate hibernation. If the hibernation feature is disabled, then it will enter the standby state. As other users have answered previously, shutdown.exe /? will provide many shutdown options.
If you have Python (with pywin32) available you can also call that SetSuspendState function directly with:
This can easily be put into a batch file or a shortcut sorta like:
So then if you don’t have your .py files associated to the interpreter you can just double click the link.


