- Панель быстрого доступа Windows 10
- Отключаем и настраиваем список последних файлов и популярных каталогов в Панели быстрого доступа
- Добавление файлов и папок в Панель быстрого доступа
- Отключение Панели быстрого доступа
- Quick Access Toolbar
- Introduction
- Implement the Quick Access Toolbar
- Markup
- QAT Persistence
- Quick Access Toolbar Properties
- The Quick Access Toolbar in Windows 10: All you need to know
- Where is the Quick Access Toolbar in Windows 10?
- Customize the Quick Access Toolbar with the buttons you need
- Change the position of the Quick Access Toolbar
- Use the Quick Access Toolbar menu to minimize File Explorer’s ribbon
- Did the Quick Access Toolbar catch your eye? Why?
Панель быстрого доступа Windows 10
Автор: admin · Опубликовано 22.12.2015 · Обновлено 02.06.2016
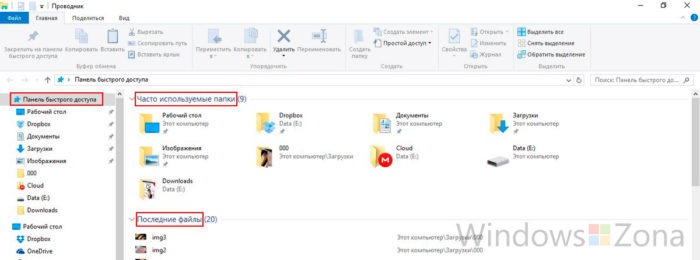
Одно из самых заметных нововведений в программе Проводник (File Explorer) появившееся в операционной системе Windows 10 — это «Панель быстрого доступа». Быстрый доступ (Quick Access) содержит ссылки на часто используемые папки и последние используемые файлы, так же пользователь может сам добавить «избранные» папки в эту панель. Если вам не хочется видеть эту панель или вы хотите скрыть информацию о последних открываемых вами файлов от других пользователей, эта статья для вас.
Отключаем и настраиваем список последних файлов и популярных каталогов в Панели быстрого доступа
По умолчанию в Панели быстрого доступа отображаются последние открытые вами файлы и каталоги. Любой пользователь компьютера запустивший Проводник может их увидеть. Если вы хотите скрыть список этих фалов от посторонних или вам просто доставляет неудобство это нововведение, ниже написана инструкция, которая поможет вам отключить частые папки и недавние файлы в разделе «Панель быстрого доступа».
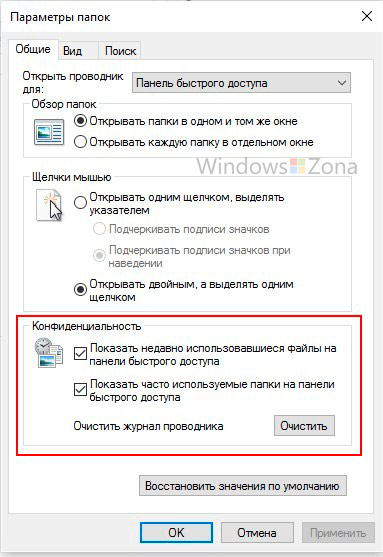
В Проводнике откройте вкладку «Вид» и нажмите кнопку «Параметры», далее выберите «Изменить параметры папок и поиска».

Параметры Панель быстрого доступа Windows 10
Внизу открывшегося окна вы удите раздел «Конфиденциальность», он содержит два параметра. Один из параметров отключает или включает отображение последних используемых фалов, а второй включает или отключает отображение часто используемых папок. Галочками отметьте нужные вам настройки и нажмите ОК.
Конфиденциальность Панель быстрого доступа Windows 10
Вы так же можете очистить историю (журнал) просмотров. Для этого в том же разделе нужно нажать кнопку «Очистить». Правда в этом случае последние файлы и папки будут отображаться, просто Windows начнет их отслеживать с нуля.
Если вы ходите чтобы Панель быстрого доступа отображала часто используемые папки, но хотите удалить из этого списка определенную папку или файл, нажмите по нужному объекту правой кнопкой мыши и в контекстном меню выберите «Удалить из панели быстрого доступа» (Remove from Quick access).
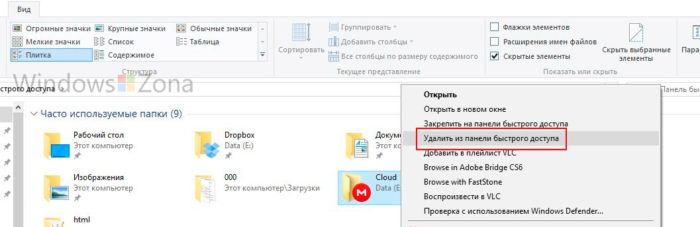
Удалить из панели быстрого доступа
Добавление файлов и папок в Панель быстрого доступа
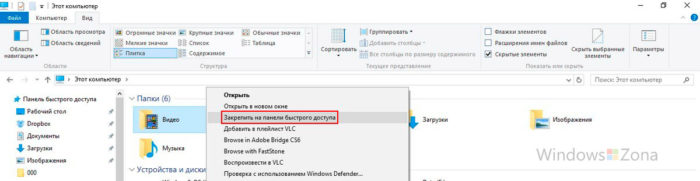
Кроме отображение последних файлов и часто используемых папок, для вашего удобства в Quick Access можно добавить нужные вам папки и файлы, получится своеобразная панель «избранное» для Проводника.
Добавить папку очень легко, просто кликните по ней правой кнопкой мыши и в контекстном меню выберите пункт «Закрепить в панели быстрого доступа». С файлами аналогично.
Добавление файлов и папок в Панель быстрого доступа Windows 10
Отключение Панели быстрого доступа
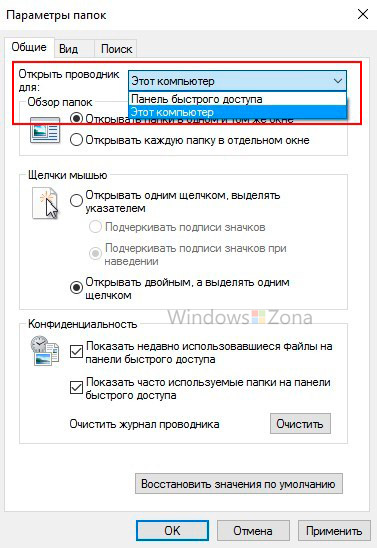
Если вам совсем не нравится Панель быстрого доступа, ее можно полностью отключить и заменить, например, на Мой компьютер.
Для этого откройте вкладку «Вид» и нажмите кнопку «Параметры», далее выберите «Изменить параметры папок и поиска». В открывшемся окне наверху будет пункт «Открывать проводник для», в выпадающем меню выберите необходимый пункт.
Не забывайте, что любые изменения можно вернуть назад, проделав все вышеуказанные инструкции в обратном порядке.
Quick Access Toolbar
The Quick Access Toolbar (QAT) is a small, customizable toolbar that exposes a set of Commands that are specified by the application or selected by the user.
Introduction
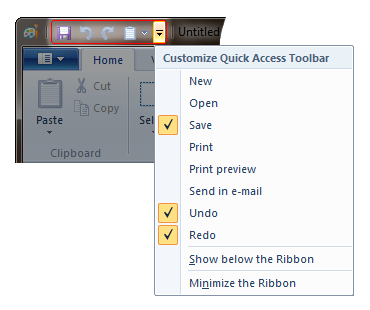
By default, the Quick Access Toolbar (QAT) is located in the title bar of the application window but can be configured to display below the ribbon. In addition to exposing Commands, the Quick Access Toolbar (QAT) also includes a customizable drop-down menu that contains the complete set of default Quick Access Toolbar (QAT) Commands (whether hidden or displayed in the Quick Access Toolbar (QAT)) and a set of Quick Access Toolbar (QAT) and ribbon options.
The following screen shot shows an example of the Ribbon Quick Access Toolbar (QAT).
The Quick Access Toolbar (QAT) consists of a combination of up to 20 Commands either specified by the application (known as the application defaults list) or selected by the user. The Quick Access Toolbar (QAT) can contain unique Commands that are not available elsewhere in the ribbon UI.
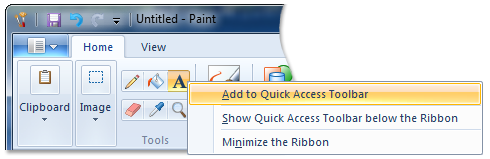
While almost all ribbon controls allow their associated Command to be added to the Quick Access Toolbar (QAT) through the context menu shown in the following screen shot, Commands exposed in a Context Popup do not provide this context menu.
Implement the Quick Access Toolbar
As with all Windows Ribbon framework controls, taking full advantage of the Quick Access Toolbar (QAT) requires both a markup component that controls its presentation within the ribbon and a code component that governs its functionality.
Markup
The Quick Access Toolbar (QAT) control is declared, and associated with a Command ID, in markup through the QuickAccessToolbar element. The Command ID is used to identify and bind the Quick Access Toolbar (QAT) to a Command handler defined by the application.
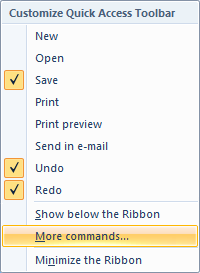
In addition to the basic Command handler for primary Quick Access Toolbar (QAT) functionality, declaring the optional CustomizeCommandName QuickAccessToolbar element attribute causes the framework to add a More Commands item to the Command list of the Quick Access Toolbar (QAT) drop-down menu that requires a secondary Command handler be defined.
For consistency across Ribbon applications, it is recommended that the CustomizeCommandName Command handler launch a Quick Access Toolbar (QAT) customization dialog. Because the Ribbon framework only provides the launching point in the UI, the application is solely responsible for providing the customization dialog implementation when the callback notification for this Command is received.
The following screen shot shows a Quick Access Toolbar (QAT) drop-down menu with the More Commands Command item.
The application defaults list for the Quick Access Toolbar (QAT) is specified through the QuickAccessToolbar.ApplicationDefaults property which identifies a default list of recommended Commands, all of which are listed in the Quick Access Toolbar (QAT) drop-down menu.
To display Commands from the application defaults list in the Quick Access Toolbar (QAT) toolbar, the ApplicationDefaults.IsChecked attribute of each control element must have a value of true . The preceding images show the results of setting this attribute to true for the Save, Undo, and Redo Commands.
Windows 8 and newer: All gallery-based controls are supported (ComboBox, InRibbonGallery, SplitButtonGallery, and DropDownGallery).
Items in a gallery control can support highlighting on hover. To support hover highlighting, the gallery must be an items gallery and use a FlowMenuLayout of type VerticalMenuLayout.
The following example demonstrates the basic markup for a QuickAccessToolbar element.
This section of code shows the Command declarations for a Quick Access Toolbar (QAT) element.
This section of code shows the control declarations for a Quick Access Toolbar (QAT) element.
The Ribbon framework application must provide a Command handler callback method to manipulate the Quick Access Toolbar (QAT). This handler works in a similar fashion to Command gallery handlers, except that the Quick Access Toolbar (QAT) does not support categories. For more information, see Working with Galleries.
The Quick Access Toolbar (QAT) Command collection is retrieved as an IUICollection object through the UI_PKEY_ItemsSource property key. Adding Commands to the Quick Access Toolbar (QAT) at run time is accomplished by adding an IUISimplePropertySet object to the IUICollection.
Unlike Command galleries, a command type property (UI_PKEY_CommandType) is not required for the Quick Access Toolbar (QAT) IUISimplePropertySet object. However, the Command must exist in the ribbon or Quick Access Toolbar (QAT) application defaults list; a new Command cannot be created at run time and added to the Quick Access Toolbar (QAT).
The Ribbon application cannot replace the Quick Access Toolbar (QAT) IUICollection with a custom collection object derived from IEnumUnknown.
The following example demonstrates a basic Quick Access Toolbar (QAT) Command handler implementation.
QAT Persistence
Quick Access Toolbar (QAT) Command items and settings can be persisted across application sessions using the IUIRibbon::SaveSettingsToStream and IUIRibbon::LoadSettingsFromStream functions. For more information, see Persisting Ribbon State.
Quick Access Toolbar Properties
The Ribbon framework defines a collection of property keys for the Quick Access Toolbar (QAT) control.
Typically, a Quick Access Toolbar (QAT) property is updated in the ribbon UI by invalidating the Command associated with the control through a call to the IUIFramework::InvalidateUICommand method. The invalidation event is handled, and the property updates defined, by the IUICommandHandler::UpdateProperty callback method.
The IUICommandHandler::UpdateProperty callback method is not executed, and the application queried for an updated property value, until the property is required by the framework. For example, when a tab is activated and a control revealed in the ribbon UI, or when a tooltip is displayed.
In some cases, a property can be retrieved through the IUIFramework::GetUICommandProperty method and set with the IUIFramework::SetUICommandProperty method.
The following table lists the property keys that are associated with the Quick Access Toolbar (QAT) control.
| Property Key | Notes |
|---|---|
| UI_PKEY_ItemsSource | Supports IUIFramework::GetUICommandProperty (does not support IUIFramework::SetUICommandProperty).IUIFramework::GetUICommandProperty returns a pointer to an IUICollection object that represents the commands in the QAT. Each Command is identified by its Command ID, which is obtained by calling the IUISimplePropertySet::GetValue method and passing in the property key UI_PKEY_CommandId. |
There are no property keys associated with the More Commands Command item of the Quick Access Toolbar (QAT) drop-down menu
The Quick Access Toolbar in Windows 10: All you need to know
With all the tabs and buttons available in File Explorer, the Quick Access Toolbar in Windows 10 is surely overlooked by many users. That is a shame because the feature is subtle, practical, and easy-to-use, which are not words I often use when it comes to Windows 10. Brilliant in its simplicity, the Quick Access Toolbar can be customized to include buttons and options that access your favorite tools, letting you swiftly manage File Explorer items. Read this tutorial to learn all there is to know about the Quick Access Toolbar in Windows 10 and how you can use it to be more efficient when working with File Explorer:
Where is the Quick Access Toolbar in Windows 10?
By default, the Quick Access Toolbar is present on the extreme left of the File Explorer title bar. Open a File Explorer window in Windows 10 and look at the top. You can see the Quick Access Toolbar in all of its minimalistic glory in the upper-left corner.
NOTE: The Quick Access Toolbar should not be confused with the Quick access location from File Explorer’s Navigation pane, seen below. To add a folder you often use to the Quick access list, read 4 ways to pin items to Quick access in File Explorer.
Customize the Quick Access Toolbar with the buttons you need
The Quick Access Toolbar is highly customizable, and you can configure it to include any commands and options you want from File Explorer’s tabs. Anything you add is shown at all times, no matter what tab is displayed on the ribbon, and you can simply click or tap a button to use the corresponding action directly from the toolbar. By default, the Quick Access Toolbar contains only two buttons and an arrow that opens a drop-down menu.
The “Customize Quick Access Toolbar” menu reveals the complete set of default commands. The checked commands are shown, while the rest are hidden. Clicking or tapping on a command from the list checks or unchecks it, and only the selected options are displayed in the Quick Access Toolbar. There are six default commands available:
- Undo – Rolls back the last change you made to the active window.
- Redo – Redoes the previously undone action.
- Delete – Sends the selected items(s) to the Recycle Bin.
- Properties – Opens the selected file or folder’s Properties window. This button is enabled by default and is displayed first on the Quick Access Toolbar.
- New Folder – Creates a new folder in the active File Explorer window. This button is the second option available by default on the Quick Access Toolbar.
- Rename – Highlights the name of the selected item(s), allowing you to replace it.
While these options are helpful, what we love about the Quick Access Toolbar is that you can easily add any item(s) from File Explorer’s tabs to it, thus getting faster access to specific commands you use regularly. Since users often need to select multiple files on Windows, let’s use the Select all option to show how this works. Right-click or press-and-hold the Select all button from File Explorer’s ribbon to open a contextual menu. Then, click or tap on “Add to Quick Access Toolbar.“
The button is added last to the Quick Access Toolbar, as seen below. You can click or tap on it at any time to immediately select the contents of your active File Explorer window.
This method can be used to add anything you want, including special buttons from specific tabs, like the Open Settings button from the Computer tab, available when you access This PC.
You can even open the Recycle Bin and right-click or press-and-hold the “Empty Recycle Bin” button. Click or tap “Add to Quick Access Toolbar,“ and the button is immediately attached to the bar.
Do you often need to switch between different views for your folders in File Explorer? No worries, go ahead and add the whole Views gallery by right-clicking or pressing-and-holding on it and then pressing “Add gallery to Quick Access Toolbar.“
The entire gallery is now displayed as an icon in the Quick Access Toolbar.
The customization options are endless, and you can even add whole sections of a tab the same way. However, that means more clicking or tapping to reach the button you want. To really boost your productivity with the Quick Access Toolbar, we recommend adding the specific commands you need.
If the option to add a command is greyed out, the corresponding button is already added to the toolbar – below, we tried to attach the New folder button, which is there by default.
Removing buttons is done in two different ways. When it comes to the default set of commands described earlier, access the “Customize Quick Access Toolbar” menu and uncheck the options you want to eliminate. Additionally, you can remove any command by right-clicking or pressing-and-holding on its icon in the Quick Access Toolbar and then clicking or tapping “Remove from Quick Access Toolbar.“
Take your time and experiment on the Quick Access Toolbar. Add and remove buttons until the commands you use are shown in an order that makes sense to you. While you can add as many buttons as you want, keep in mind that the Quick Access Toolbar can not be displayed on multiple lines. If there’s no more room on the title bar, the toolbar shows a double arrow. Click or tap on it to access the last buttons – in the screenshot below, you can see the “Open Windows PowerShell” button and the menu arrow are shown in a secondary bar.
You can maximize the File Explorer window to get more room on its title bar if you want to fit more icons. However, a better solution is to move the Quick Access Toolbar, as you can see in the next chapter.
Change the position of the Quick Access Toolbar
There is not a tremendous amount of flexibility as to the position of this toolbar, and you can only choose one of two possible locations. While the Quick Access Toolbar defaults to the top-left corner of the File Explorer window, you can move it below the ribbon, if you prefer. Use the down menu arrow on the toolbar and click or tap “Show below the Ribbon.“
Alternatively, you can right-click or press-and-hold any button on the ribbon or the toolbar to access the “Show Quick Access Toolbar below the Ribbon” option.
The new position places the Quick Access Toolbar just under the ribbon, on the left side of the window, which also provides more room for your buttons. This lower position makes sense if you’re using your mouse and want the bar close to the files to minimize the amount of movement required between clicks.
If you change your mind and decide to place it above the ribbon rather than under it, you can configure it to display in its original position the same way. One way is to open the “Customize Quick Access Toolbar” menu and click or tap “Show above the Ribbon.“ Alternatively, right-click or press-and-hold any button from the toolbar or the ribbon to “Show the Quick Access Toolbar above the Ribbon.“
Use the Quick Access Toolbar menu to minimize File Explorer’s ribbon
Using the Quick Access Toolbar might make File Explorer’s ribbon obsolete, so you might want to get rid of it altogether, since it takes up an awful lot of room. While there are other ways to remove or hide the ribbon from File Explorer in Windows 10, you can also do it from the “Customize Quick Access Toolbar” menu. Click or tap the arrow on the toolbar, followed by “Minimize the Ribbon.“
Alternatively, in the previous chapters, you might have noticed that this option is also present in the right-click menu of buttons on both the ribbon and the Quick Access Toolbar.
The ribbon recedes into itself, freeing up screen space, which comes in handy if you’re working on a laptop or tablet instead of a big screen.
Don’t worry about losing the ribbon completely while it’s minimized because you can still access it. Clicking or tapping a tab name extends the ribbon, showing its options in File Explorer. However, after you click or tap on the option you want to use, the tab is minimized once more. If you don’t like this behavior and want to keep the ribbon interface open, you can follow the steps in this chapter to access either menu. Then, click or tap the “Minimize the Ribbon” option to uncheck it and maximize the ribbon.
The Quick Access Toolbar is just one of the many features that make File Explorer great in Windows 10, and you can learn about others by reading 15 ways to improve File Explorer.
Did the Quick Access Toolbar catch your eye? Why?
If you don’t like keyboard shortcuts or you rely mostly on your mouse, the Quick Access Toolbar is an impressive tool in Windows 10. It can successfully replace the ribbon, giving you more space on your screen, while also saving you the time typically spent going through tabs and menus to access commands. That is a lot of value for users who spend a significant amount of time in File Explorer. Before you close this guide, let us know what you like about the Quick Access Toolbar. What would you add? Share your thoughts and opinions in a comment below.


